External-Attention-pytorch
External-Attention-pytorch 是一个基于 PyTorch 构建的开源代码库,旨在汇集并复现各类主流的注意力机制(Attention)、多层感知机(MLP)、重参数化(Re-parameter)及卷积模块。它的核心目标是帮助开发者和研究人员从代码层面深入理解前沿论文的核心思想。
在阅读学术论文时,许多研究者常面临一个痛点:论文理论看似简洁,但官方源码往往将核心模块深度耦合在复杂的分类、检测或分割框架中,导致难以剥离出关键代码进行学习和复用。External-Attention-pytorch 有效解决了这一难题,它将各种算法模块封装为独立、语义清晰且即插即用的“乐高积木”。用户无需反复造轮子或深陷冗余的工程代码,只需几行调用即可在实验中验证不同机制的效果。
该工具特别适合深度学习初学者、高校科研人员以及算法工程师使用。对于新手,它是拆解论文原理、掌握核心代码实现的绝佳教程;对于进阶研究者,它提供了丰富的基础组件,便于快速搭建和迭代创新模型。项目不仅涵盖了 SE、CBAM、SK 等经典注意力机制,还持续更新如 MobileViTv2 等最新架构,支持通过 pip 直接安装或源码引用,极大地降低了科研门槛并提升了实验效率。
使用场景
某计算机视觉算法工程师正在复现一篇最新的图像分割论文,试图将其中提出的新型注意力机制集成到现有的 PyTorch 训练框架中以提升模型精度。
没有 External-Attention-pytorch 时
- 代码定位困难:论文核心思想虽简单,但作者开源的源码往往与特定的检测或分割框架深度耦合,导致难以从冗余的工程代码中剥离出仅含十几行的核心注意力模块。
- 重复造轮子耗时:开发者需要手动重写 CBAM、SE 或 External Attention 等常见模块,不仅耗费大量时间调试维度匹配问题,还容易引入难以察觉的 Bug。
- 理解门槛高:对于刚入门的研究者,缺乏标准化、语义清晰的独立组件,导致在阅读论文和对照代码时产生认知断层,难以快速验证想法。
- 实验迭代缓慢:每次尝试不同的注意力机制(如从 SE 切换到 SK Attention)都需要重新查找资料并编写新类,严重拖慢了消融实验的进度。
使用 External-Attention-pytorch 后
- 即插即用高效集成:通过
pip install fightingcv-attention即可直接导入如MobileViTv2Attention等模块,无需关心底层实现细节,像搭乐高一样轻松嵌入现有网络。 - 统一接口降低出错率:库内所有注意力机制、MLP 及卷积模块均提供标准化的 PyTorch 接口,消除了手动重写时的维度对齐烦恼,确保代码健壮性。
- 加速论文复现与理解:提供了纯净的核心代码实现,帮助开发者直观对照论文公式与代码逻辑,真正实现了“让世界上没有难读的论文”。
- 快速开展消融实验:只需修改一行导入代码即可在 Self-Attention、ECA、DANet 等多种机制间自由切换,极大提升了模型优化和对比实验的效率。
External-Attention-pytorch 通过将复杂的论文核心代码转化为标准化的“乐高组件”,让科研人员从繁琐的代码工程中解放出来,专注于算法创新本身。
运行环境要求
- 未说明
未说明
未说明

快速开始

简体中文 | English
FightingCV 代码库, 包含 注意力,骨干网络, MLP, 重参数化, 卷积
🌟 星级历史

使用
安装
直接通过 pip 安装
pip install fightingcv-attention
或克隆该仓库
git clone https://github.com/xmu-xiaoma666/External-Attention-pytorch.git

cd External-Attention-pytorch
演示
使用 pip 方式
import torch
from torch import nn
from torch.nn import functional as F

# 使用 pip 方式

from fightingcv_attention.attention.MobileViTv2Attention import *

if __name__ == '__main__':
    input=torch.randn(50,49,512)
    sa = MobileViTv2Attention(d_model=512)
    output=sa(input)
    print(output.shape)
- pip包 内置模块使用参考: fightingcv-attention 说明文档
使用 git 方式
import torch
from torch import nn
from torch.nn import functional as F

# 与 pip方式 区别在于 将 `fightingcv_attention` 替换 `model`

from model.attention.MobileViTv2Attention import *

if __name__ == '__main__':
    input=torch.randn(50,49,512)
    sa = MobileViTv2Attention(d_model=512)
    output=sa(input)
    print(output.shape)
目录
注意力系列
"超越自注意力:用于视觉任务的双线性层外部注意力---arXiv 2021.05.05" 的 PyTorch 实现
"Attention Is All You Need---NIPS2017" 的 PyTorch 实现
"Squeeze-and-Excitation Networks---CVPR2018" 的 PyTorch 实现
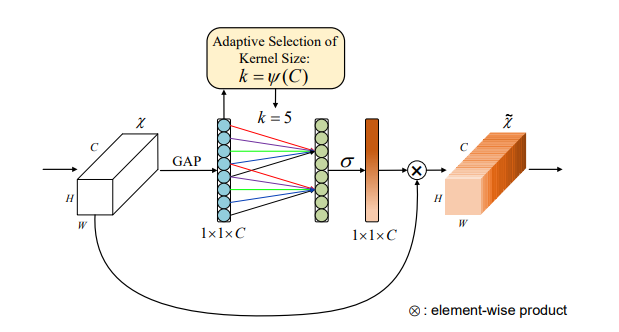
"Selective Kernel Networks---CVPR2019" 的 PyTorch 实现
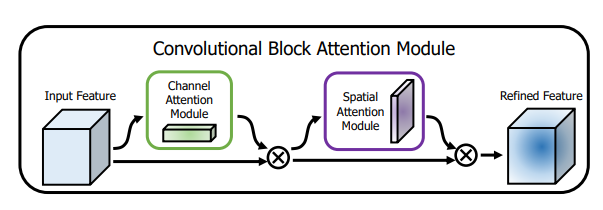
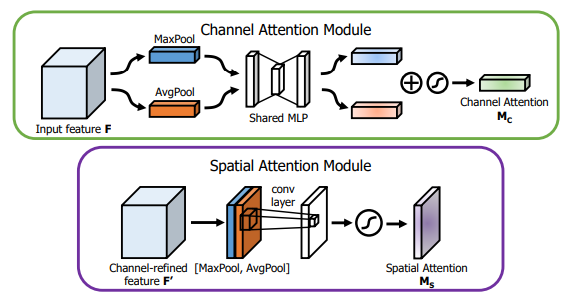
"CBAM: 卷积块注意力模块---ECCV2018" 的 PyTorch 实现
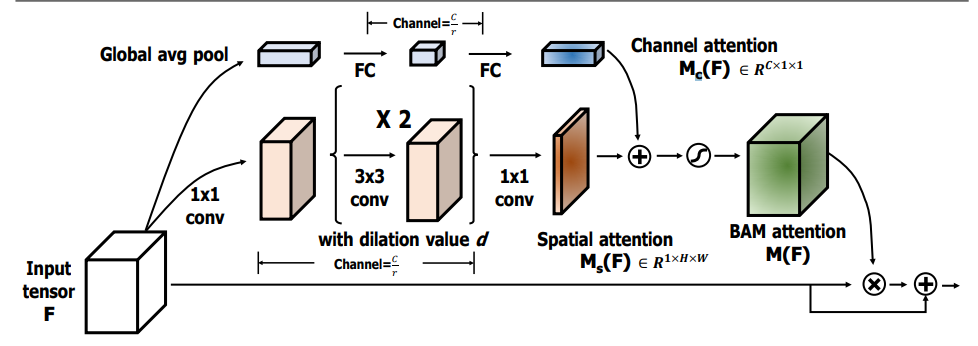
"BAM: 瓶颈注意力模块---BMCV2018" 的 PyTorch 实现
"ECA-Net: 针对深度卷积神经网络的高效通道注意力---CVPR2020" 的 PyTorch 实现
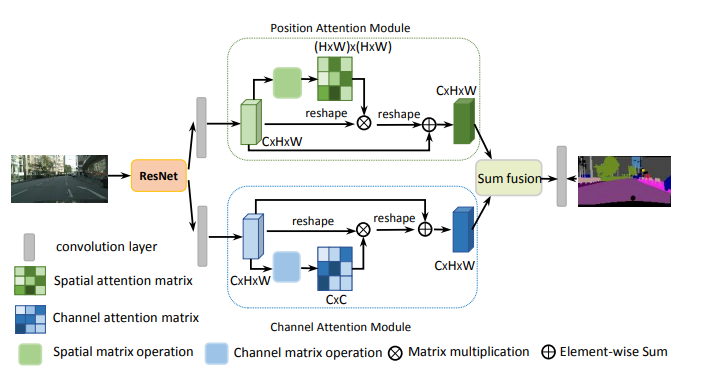
"场景分割的双注意力网络---CVPR2019" 的 PyTorch 实现
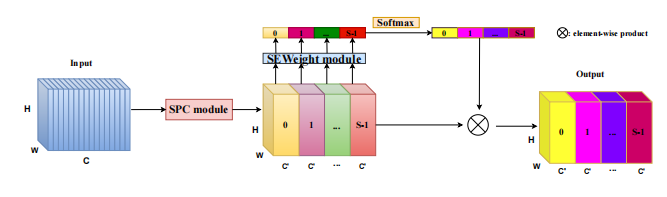
"EPSANet: 卷积神经网络上的高效金字塔分裂注意力模块---arXiv 2021.05.30" 的 PyTorch 实现
"ResT: 用于视觉识别的高效Transformer---arXiv 2021.05.28" 的 PyTorch 实现
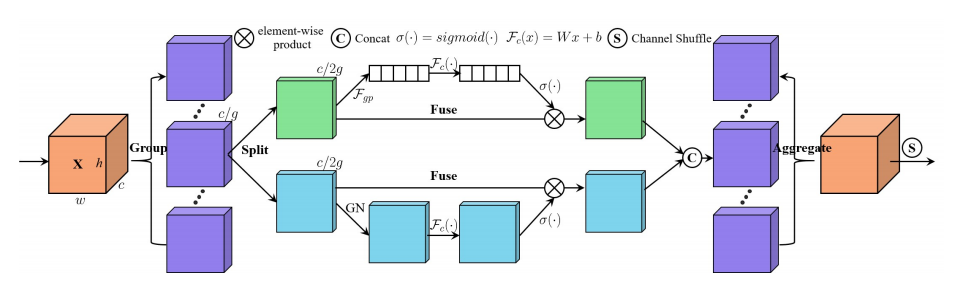
"SA-NET: 用于深度卷积神经网络的SHUFFLE注意力---ICASSP 2021" 的 PyTorch 实现
"MUSE: 用于序列到序列学习的并行多尺度注意力---arXiv 2019.11.17" 的 PyTorch 实现
"空间分组增强:改进卷积网络中的语义特征学习---arXiv 2019.05.23" 的 PyTorch 实现
"A2-Nets: 双重注意力网络---NIPS2018" 的 PyTorch 实现
"无注意力Transformer---ICLR2021 (Apple 新作)" 的 PyTorch 实现
"VOLO: 视觉观察者用于视觉识别---arXiv 2021.06.24" 的 PyTorch 实现 【论文解析】
"Vision Permutator: 一种可置换的类MLP架构用于视觉识别---arXiv 2021.06.23" 的 PyTorch 实现 【论文解析】
"CoAtNet: 将卷积与注意力结合以适应所有数据规模---arXiv 2021.06.09" 的 PyTorch 实现 【论文解析】
"用于参数高效的视觉骨干网络的局部自注意力缩放---CVPR2021 口头报告" 的 PyTorch 实现 【论文解析】
"极化自注意力:迈向高质量像素级回归---arXiv 2021.07.02" 的 PyTorch 实现 【论文解析】
"用于视觉识别的上下文Transformer网络---arXiv 2021.07.26" 的 PyTorch 实现 【论文解析】
"残差注意力:一种简单但有效的多标签识别方法---ICCV2021" 的 PyTorch 实现
"S²-MLPv2: 改进的空间移位MLP架构用于视觉---arXiv 2021.08.02" 的 PyTorch 实现 【论文解析】
"用于图像分类的全局滤波网络---arXiv 2021.07.01" 的 PyTorch 实现
"旋转以关注:卷积三元注意力模块---WACV 2021" 的 PyTorch 实现
"用于高效移动网络设计的坐标注意力---CVPR 2021" 的 PyTorch 实现
"MobileViT: 轻量级、通用且适合移动端的视觉Transformer---ArXiv 2021.10.05" 的 PyTorch 实现
"非深度网络---ArXiv 2021.10.20" 的 PyTorch 实现
"UFO-ViT: 不使用Softmax的高性能线性视觉Transformer---ArXiv 2021.09.29" 的 PyTorch 实现
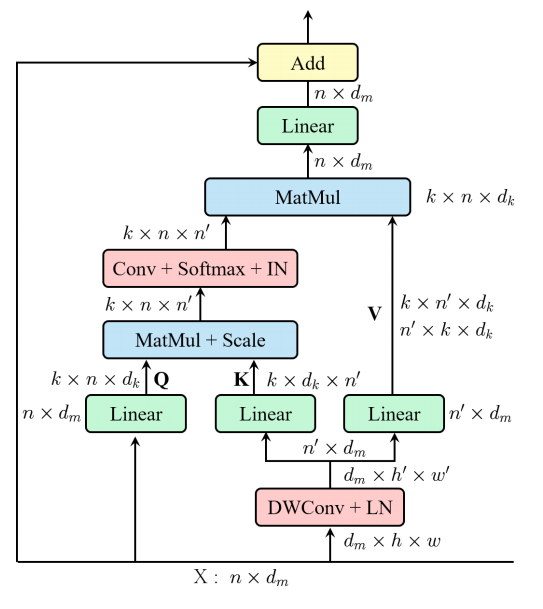
"适用于移动视觉Transformer的可分离自注意力---ArXiv 2022.06.06" 的 PyTorch 实现
"关于自注意力与卷积融合的研究---ArXiv 2022.03.14" 的 PyTorch 实现
"CROSSFORMER: 一种基于跨尺度注意力的多功能视觉Transformer---ICLR 2022" 的 PyTorch 实现
"将全局特征聚合到局部视觉Transformer中" 的 PyTorch 实现
"CCNet: 用于语义分割的十字交叉注意力" 的 PyTorch 实现
"多维Transformer中的轴向注意力" 的 PyTorch 实现
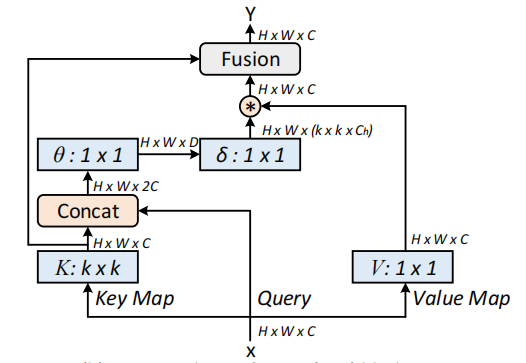
1. 外部注意力使用
1.1. 论文
1.2. 概述
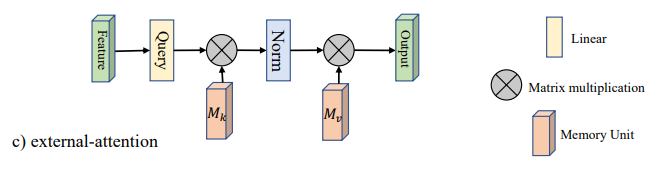
1.3. 使用代码
from model.attention.ExternalAttention import ExternalAttention
import torch

input=torch.randn(50,49,512)
ea = ExternalAttention(d_model=512,S=8)
output=ea(input)
print(output.shape)
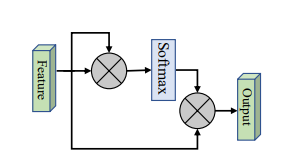
2. 自注意力使用
2.1. 论文
1.2. 概述

1.3. 使用代码
from model.attention.SelfAttention import ScaledDotProductAttention
import torch

input=torch.randn(50,49,512)
sa = ScaledDotProductAttention(d_model=512, d_k=512, d_v=512, h=8)
output=sa(input,input,input)
print(output.shape)
3. 简化自注意力使用
3.1. 论文
3.2. 概述
3.3. 使用代码
from model.attention.SimplifiedSelfAttention import SimplifiedScaledDotProductAttention
import torch

input=torch.randn(50,49,512)
ssa = SimplifiedScaledDotProductAttention(d_model=512, h=8)
output=ssa(input,input,input)
print(output.shape)
4. 挤压与激励注意力使用方法
4.1. 论文
4.2. 概述
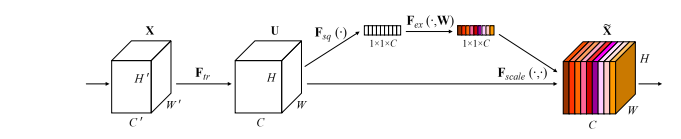
4.3. 使用代码
from model.attention.SEAttention import SEAttention
import torch

input=torch.randn(50,512,7,7)
se = SEAttention(channel=512,reduction=8)
output=se(input)
print(output.shape)
5. SK注意力使用方法
5.1. 论文
5.2. 概述
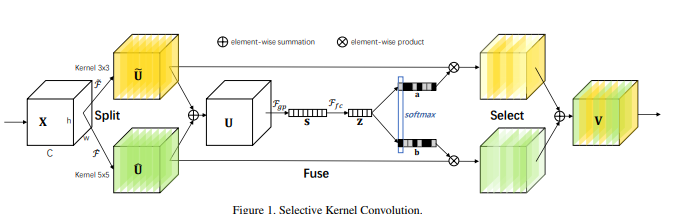
5.3. 使用代码
from model.attention.SKAttention import SKAttention
import torch

input=torch.randn(50,512,7,7)
se = SKAttention(channel=512,reduction=8)
output=se(input)
print(output.shape)
6. CBAM注意力使用方法
6.1. 论文
6.2. 概述
6.3. 使用代码
from model.attention.CBAM import CBAMBlock
import torch

input=torch.randn(50,512,7,7)
kernel_size=input.shape[2]
cbam = CBAMBlock(channel=512,reduction=16,kernel_size=kernel_size)
output=cbam(input)
print(output.shape)
7. BAM注意力使用方法
7.1. 论文
7.2. 概述
7.3. 使用代码
from model.attention.BAM import BAMBlock
import torch

input=torch.randn(50,512,7,7)
bam = BAMBlock(channel=512,reduction=16,dia_val=2)
output=bam(input)
print(output.shape)
8. ECA注意力使用方法
8.1. 论文
8.2. 概述
8.3. 使用代码
from model.attention.ECAAttention import ECAAttention
import torch

input=torch.randn(50,512,7,7)
eca = ECAAttention(kernel_size=3)
output=eca(input)
print(output.shape)
9. DANet注意力使用方法
9.1. 论文
9.2. 概述
9.3. 使用代码
from model.attention.DANet import DAModule
import torch

input=torch.randn(50,512,7,7)
danet=DAModule(d_model=512,kernel_size=3,H=7,W=7)
print(danet(input).shape)
10. 金字塔分割注意力使用方法
10.1. 论文
"EPSANet:卷积神经网络上的高效金字塔分割注意力模块"
10.2. 概述
10.3. 使用代码
from model.attention.PSA import PSA
import torch

input=torch.randn(50,512,7,7)
psa = PSA(channel=512,reduction=8)
output=psa(input)
print(output.shape)
11. 高效多头自注意力使用方法
11.1. 论文
11.2. 概述
11.3. 使用代码
from model.attention.EMSA import EMSA
import torch
from torch import nn
from torch.nn import functional as F

input=torch.randn(50,64,512)
emsa = EMSA(d_model=512, d_k=512, d_v=512, h=8,H=8,W=8,ratio=2,apply_transform=True)
output=emsa(input,input,input)
print(output.shape)
12. 洗牌注意力使用方法
12.1. 论文
12.2. 概述
12.3. 使用代码
from model.attention.ShuffleAttention import ShuffleAttention
import torch
from torch import nn
from torch.nn import functional as F


input=torch.randn(50,512,7,7)
se = ShuffleAttention(channel=512,G=8)
output=se(input)
print(output.shape)
13. MUSE注意力使用方法
13.1. 论文
13.2. 概述
13.3. 使用代码
from model.attention.MUSEAttention import MUSEAttention
import torch
from torch import nn
from torch.nn import functional as F


input=torch.randn(50,49,512)
sa = MUSEAttention(d_model=512, d_k=512, d_v=512, h=8)
output=sa(input,input,input)
print(output.shape)
14. SGE注意力使用方法
14.1. 论文
14.2. 概述
14.3. 使用代码
from model.attention.SGE import SpatialGroupEnhance
import torch
from torch import nn
from torch.nn import functional as F

input=torch.randn(50,512,7,7)
sge = SpatialGroupEnhance(groups=8)
output=sge(input)
print(output.shape)
15. A2注意力使用方法
15.1. 论文
15.2. 概述
15.3. 使用代码
from model.attention.A2Atttention import DoubleAttention
import torch
from torch import nn
from torch.nn import functional as F

input=torch.randn(50,512,7,7)
a2 = DoubleAttention(512,128,128,True)
output=a2(input)
print(output.shape)
16. AFT注意力使用方法
16.1. 论文
16.2. 概述
16.3. 使用代码
from model.attention.AFT import AFT_FULL
import torch
from torch import nn
from torch.nn import functional as F

input=torch.randn(50,49,512)
aft_full = AFT_FULL(d_model=512, n=49)
output=aft_full(input)
print(output.shape)
17. Outlook注意力使用方法
17.1. 论文
17.2. 概述
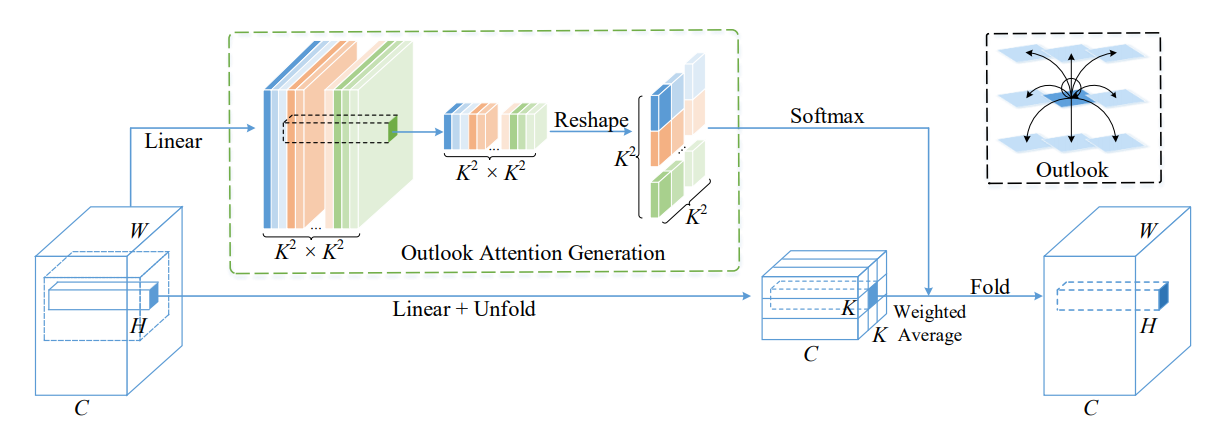
17.3. 使用代码
from model.attention.OutlookAttention import OutlookAttention
import torch
from torch import nn
from torch.nn import functional as F

input=torch.randn(50,28,28,512)
outlook = OutlookAttention(dim=512)
output=outlook(input)
print(output.shape)
18. ViP注意力使用方法
18.1. 论文
Vision Permutator:一种用于视觉识别的可置换MLP-like架构"
18.2. 概述
18.3. 使用代码
from model.attention.ViP import WeightedPermuteMLP
import torch
from torch import nn
from torch.nn import functional as F

input=torch.randn(64,8,8,512)
seg_dim=8
vip=WeightedPermuteMLP(512,seg_dim)
out=vip(input)
print(out.shape)
19. CoAtNet 注意力使用
19.1. 论文
19.2. 概述
无
19.3. 使用代码
from model.attention.CoAtNet import CoAtNet
import torch
from torch import nn
from torch.nn import functional as F

input=torch.randn(1,3,224,224)
mbconv=CoAtNet(in_ch=3,image_size=224)
out=mbconv(input)
print(out.shape)
20. HaloNet 注意力使用
20.1. 论文
20.2. 概述
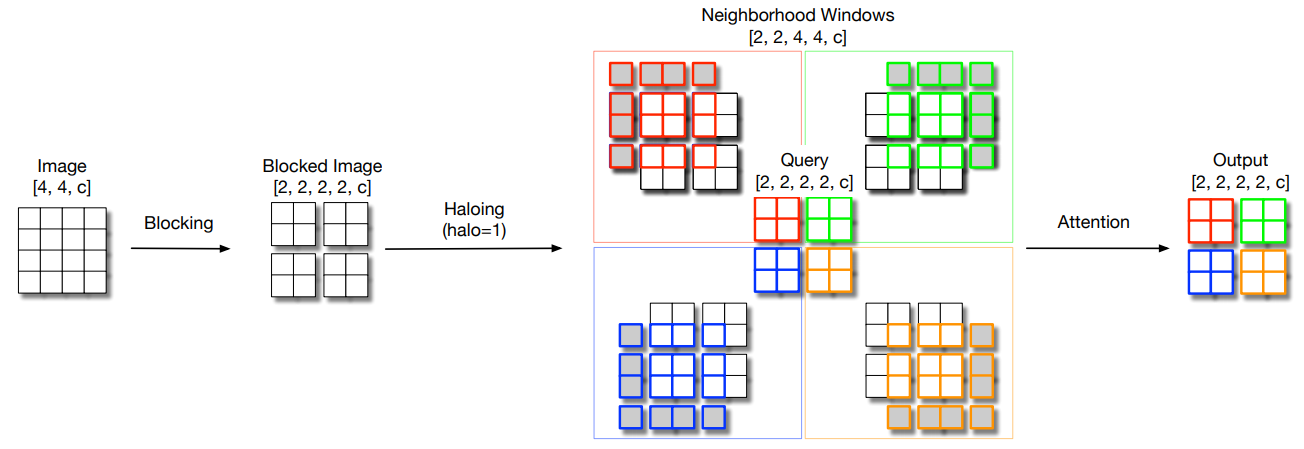
20.3. 使用代码
from model.attention.HaloAttention import HaloAttention
import torch
from torch import nn
from torch.nn import functional as F

input=torch.randn(1,512,8,8)
halo = HaloAttention(dim=512,
    block_size=2,
    halo_size=1,)
output=halo(input)
print(output.shape)
21. 极化自注意力使用
21.1. 论文
21.2. 概述
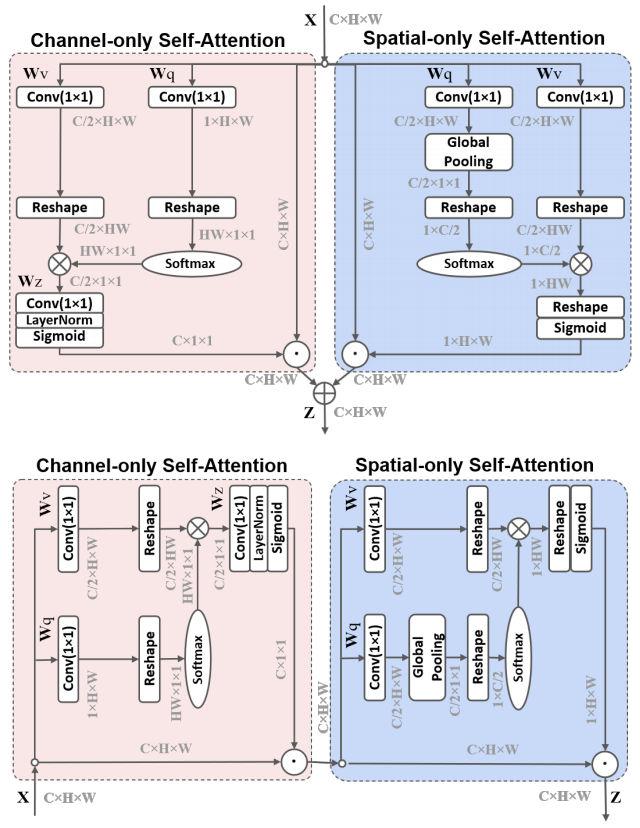
21.3. 使用代码
from model.attention.PolarizedSelfAttention import ParallelPolarizedSelfAttention,SequentialPolarizedSelfAttention
import torch
from torch import nn
from torch.nn import functional as F

input=torch.randn(1,512,7,7)
psa = SequentialPolarizedSelfAttention(channel=512)
output=psa(input)
print(output.shape)
22. CoT注意力使用
22.1. 论文
用于视觉识别的上下文Transformer网络---arXiv 2021年7月26日
22.2. 概述
22.3. 使用代码
from model.attention.CoTAttention import CoTAttention
import torch
from torch import nn
from torch.nn import functional as F

input=torch.randn(50,512,7,7)
cot = CoTAttention(dim=512,kernel_size=3)
output=cot(input)
print(output.shape)
23. 残差注意力使用
23.1. 论文
残差注意力:一种简单但有效的多标签识别方法---ICCV2021
23.2. 概述
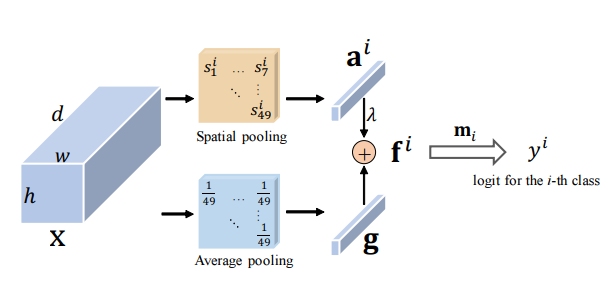
23.3. 使用代码
from model.attention.ResidualAttention import ResidualAttention
import torch
from torch import nn
from torch.nn import functional as F

input=torch.randn(50,512,7,7)
resatt = ResidualAttention(channel=512,num_class=1000,la=0.2)
output=resatt(input)
print(output.shape)
24. S2注意力使用
24.1. 论文
S²-MLPv2:改进的空间移位MLP视觉架构---arXiv 2021年8月2日
24.2. 概述
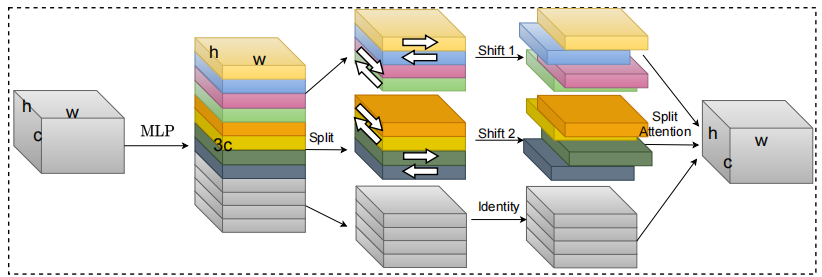
24.3. 使用代码
from model.attention.S2Attention import S2Attention
import torch
from torch import nn
from torch.nn import functional as F

input=torch.randn(50,512,7,7)
s2att = S2Attention(channels=512)
output=s2att(input)
print(output.shape)
25. GFNet 注意力使用
25.1. 论文
用于图像分类的全局滤波器网络---arXiv 2021年7月1日
25.2. 概述
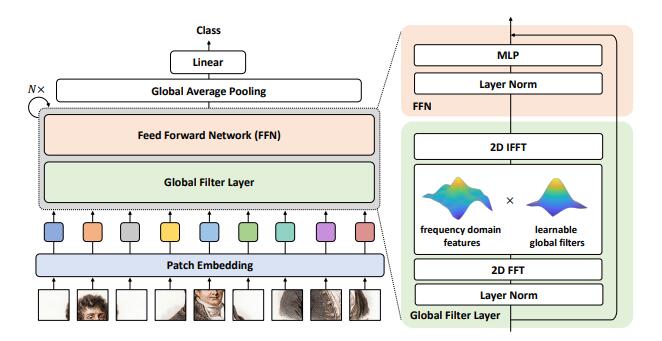
25.3. 使用代码 - 由 Wenliang Zhao (作者) 实现
from model.attention.gfnet import GFNet
import torch
from torch import nn
from torch.nn import functional as F

x = torch.randn(1, 3, 224, 224)
gfnet = GFNet(embed_dim=384, img_size=224, patch_size=16, num_classes=1000)
out = gfnet(x)
print(out.shape)
26. 三元组注意力使用
26.1. 论文
26.2. 概述
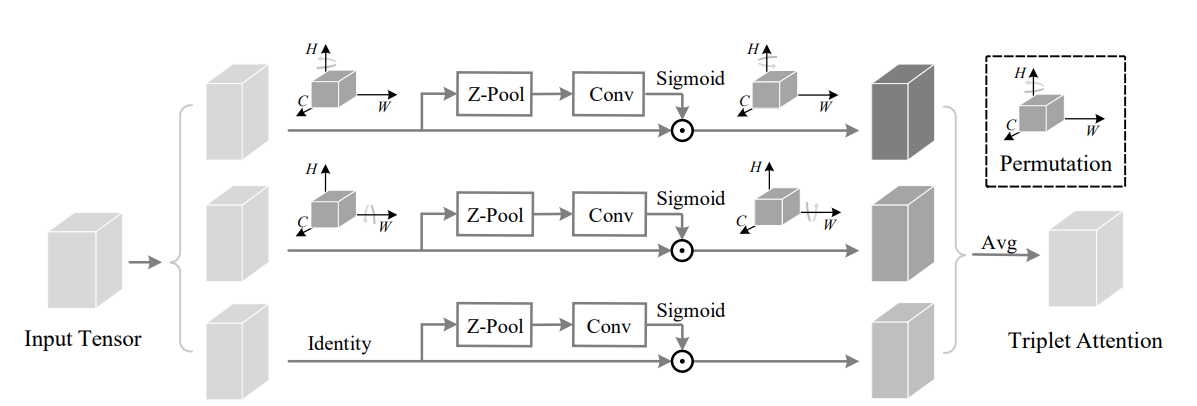
26.3. 使用代码 - 由 digantamisra98 实现
from model.attention.TripletAttention import TripletAttention
import torch
from torch import nn
from torch.nn import functional as F
input=torch.randn(50,512,7,7)
triplet = TripletAttention()
output=triplet(input)
print(output.shape)
27. 坐标注意力使用
27.1. 论文
27.2. 概述
27.3. 使用代码 - 由 Andrew-Qibin 实现
from model.attention.CoordAttention import CoordAtt
import torch
from torch import nn
from torch.nn import functional as F

inp=torch.rand([2, 96, 56, 56])
inp_dim, oup_dim = 96, 96
reduction=32

coord_attention = CoordAtt(inp_dim, oup_dim, reduction=reduction)
output=coord_attention(inp)
print(output.shape)
28. MobileViT 注意力使用
28.1. 论文
MobileViT:轻量级、通用且适合移动端的视觉Transformer---ArXiv 2021年10月5日
28.2. 概述
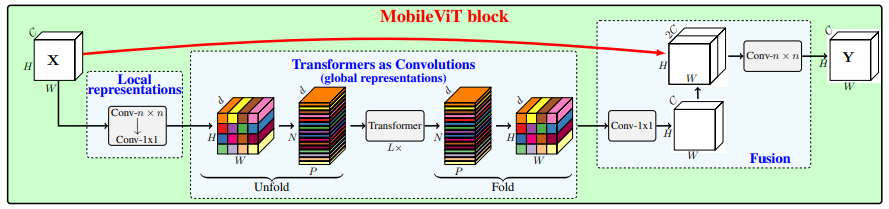
28.3. 使用代码
from model.attention.MobileViTAttention import MobileViTAttention
import torch
from torch import nn
from torch.nn import functional as F

if __name__ == '__main__':
    m=MobileViTAttention()
    input=torch.randn(1,3,49,49)
    output=m(input)
    print(output.shape)  #输出:(1,3,49,49)
29. ParNet 注意力使用
29.1. 论文
29.2. 概述
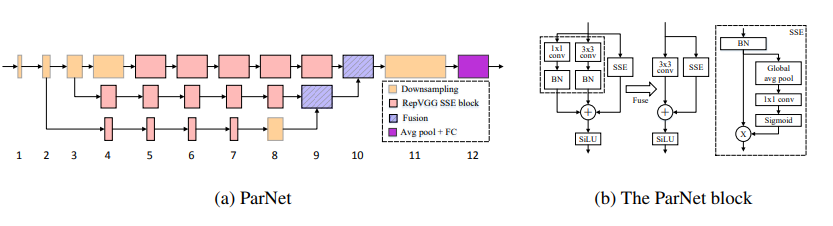
29.3. 使用代码
from model.attention.ParNetAttention import *
import torch
from torch import nn
from torch.nn import functional as F

if __name__ == '__main__':
    input=torch.randn(50,512,7,7)
    pna = ParNetAttention(channel=512)
    output=pna(input)
    print(output.shape) #50,512,7,7
30. UFO 注意力使用
30.1. 论文
UFO-ViT:高性能线性视觉Transformer,无需Softmax---ArXiv 2021年9月29日
30.2. 概述
30.3. 使用代码
from model.attention.UFOAttention import *
import torch
from torch import nn
from torch.nn import functional as F

if __name__ == '__main__':
    input=torch.randn(50,49,512)
    ufo = UFOAttention(d_model=512, d_k=512, d_v=512, h=8)
    output=ufo(input,input,input)
    print(output.shape) #[50, 49, 512]
31. ACmix 注意力使用
31.1. 论文
31.2. 使用代码
from model.attention.ACmix import ACmix
import torch

if __name__ == '__main__':
    input=torch.randn(50,256,7,7)
    acmix = ACmix(in_planes=256, out_planes=256)
    output=acmix(input)
    print(output.shape)
32. MobileViTv2 注意力使用方法
32.1. 论文
用于移动端视觉Transformer的可分离自注意力---ArXiv 2022年6月6日
32.2. 概述
32.3. 使用代码
from model.attention.MobileViTv2Attention import MobileViTv2Attention
import torch
from torch import nn
from torch.nn import functional as F

if __name__ == '__main__':
    input=torch.randn(50,49,512)
    sa = MobileViTv2Attention(d_model=512)
    output=sa(input)
    print(output.shape)
33. DAT 注意力使用方法
33.1. 论文
带有可变形注意力的视觉Transformer---CVPR2022
33.2. 使用代码
from model.attention.DAT import DAT
import torch

if __name__ == '__main__':
    input=torch.randn(1,3,224,224)
    model = DAT(
        img_size=224,
        patch_size=4,
        num_classes=1000,
        expansion=4,
        dim_stem=96,
        dims=[96, 192, 384, 768],
        depths=[2, 2, 6, 2],
        stage_spec=[['L', 'S'], ['L', 'S'], ['L', 'D', 'L', 'D', 'L', 'D'], ['L', 'D']],
        heads=[3, 6, 12, 24],
        window_sizes=[7, 7, 7, 7] ,
        groups=[-1, -1, 3, 6],
        use_pes=[False, False, True, True],
        dwc_pes=[False, False, False, False],
        strides=[-1, -1, 1, 1],
        sr_ratios=[-1, -1, -1, -1],
        offset_range_factor=[-1, -1, 2, 2],
        no_offs=[False, False, False, False],
        fixed_pes=[False, False, False, False],
        use_dwc_mlps=[False, False, False, False],
        use_conv_patches=False,
        drop_rate=0.0,
        attn_drop_rate=0.0,
        drop_path_rate=0.2,
    )
    output=model(input)
    print(output[0].shape)
34. CrossFormer 注意力使用方法
34.1. 论文
CROSSFORMER:一种基于跨尺度注意力的多功能视觉Transformer---ICLR 2022
34.2. 使用代码
from model.attention.Crossformer import CrossFormer
import torch

if __name__ == '__main__':
    input=torch.randn(1,3,224,224)
    model = CrossFormer(img_size=224,
        patch_size=[4, 8, 16, 32],
        in_chans= 3,
        num_classes=1000,
        embed_dim=48,
        depths=[2, 2, 6, 2],
        num_heads=[3, 6, 12, 24],
        group_size=[7, 7, 7, 7],
        mlp_ratio=4.,
        qkv_bias=True,
        qk_scale=None,
        drop_rate=0.0,
        drop_path_rate=0.1,
        ape=False,
        patch_norm=True,
        use_checkpoint=False,
        merge_size=[[2, 4], [2,4], [2, 4]]
    )
    output=model(input)
    print(output.shape)
35. MOATransformer 注意力使用方法
35.1. 论文
35.2. 使用代码
from model.attention.MOATransformer import MOATransformer
import torch

if __name__ == '__main__':
    input=torch.randn(1,3,224,224)
    model = MOATransformer(
        img_size=224,
        patch_size=4,
        in_chans=3,
        num_classes=1000,
        embed_dim=96,
        depths=[2, 2, 6],
        num_heads=[3, 6, 12],
        window_size=14,
        mlp_ratio=4.,
        qkv_bias=True,
        qk_scale=None,
        drop_rate=0.0,
        drop_path_rate=0.1,
        ape=False,
        patch_norm=True,
        use_checkpoint=False
    )
    output=model(input)
    print(output.shape)
36. CrissCrossAttention 注意力使用方法
36.1. 论文
36.2. 使用代码
from model.attention.CrissCrossAttention import CrissCrossAttention
import torch

if __name__ == '__main__':
    input=torch.randn(3, 64, 7, 7)
    model = CrissCrossAttention(64)
    outputs = model(input)
    print(outputs.shape)
37. Axial_attention 注意力使用方法
37.1. 论文
37.2. 使用代码
from model.attention.Axial_attention import AxialImageTransformer
import torch

if __name__ == '__main__':
    input=torch.randn(3, 128, 7, 7)
    model = AxialImageTransformer(
        dim = 128,
        depth = 12,
        reversible = True
    )
    outputs = model(input)
    print(outputs.shape)
骨干网络系列
PyTorch 实现的 "Deep Residual Learning for Image Recognition---CVPR2016 最佳论文"
PyTorch 实现的 "Aggregated Residual Transformations for Deep Neural Networks---CVPR2017"
PyTorch 实现的 MobileViT: 轻量级、通用且移动端友好的视觉 Transformer---ArXiv 2020.10.05
PyTorch 实现的 Patches Are All You Need?---ICLR2022 (审稿中)
PyTorch 实现的 Shuffle Transformer: 重新思考视觉 Transformer 的空间洗牌操作---ArXiv 2021.06.07
PyTorch 实现的 ConTNet: 为什么不在同一模型中同时使用卷积和 Transformer?---ArXiv 2021.04.27
PyTorch 实现的 具有层次化注意力的视觉 Transformer---ArXiv 2022.06.15
PyTorch 实现的 Co-Scale Conv-Attentional Image Transformers---ArXiv 2021.08.26
PyTorch 实现的 用于视觉 Transformer 的条件位置编码
PyTorch 实现的 重新思考视觉 Transformer 的空间维度---ICCV 2021
PyTorch 实现的 CrossViT: 用于图像分类的跨注意力多尺度视觉 Transformer---ICCV 2021
PyTorch 实现的 Transformer in Transformer---NeurIPS 2021
PyTorch 实现的 DeepViT: 向更深层的视觉 Transformer 发展
PyTorch 实现的 将卷积设计融入视觉 Transformer
PyTorch 实现的 ConViT: 通过软卷积归纳偏置改进视觉 Transformer
PyTorch 实现的 基于注意力聚合增强卷积网络
PyTorch 实现的 让图像 Transformer 更深——ICCV 2021 (口头报告)
PyTorch 实现的 数据高效训练的图像 Transformer 及通过注意力进行蒸馏---ICML 2021
PyTorch 实现的 LeViT: 以卷积网络之形实现更快推理的视觉 Transformer
PyTorch 实现的 VOLO: 用于视觉识别的 Vision Outlooker
PyTorch 实现的 Container: 上下文聚合网络---NeuIPS 2021
PyTorch 实现的 CMT: 卷积神经网络与视觉 Transformer 的结合---CVPR 2022
PyTorch 实现的 具有可变形注意力的视觉 Transformer---CVPR 2022
PyTorch 实现的 EfficientFormer: 以 MobileNet 速度运行的视觉 Transformer
PyTorch 实现的 ConvNeXtV2: 将卷积网络与掩码自编码器协同设计并扩展
1. ResNet 使用
1.1. 论文
"Deep Residual Learning for Image Recognition---CVPR2016 最佳论文"
1.2. 概述
1.3. 使用代码
from model.backbone.resnet import ResNet50,ResNet101,ResNet152
import torch
if __name__ == '__main__':
    input=torch.randn(50,3,224,224)
    resnet50=ResNet50(1000)
    # resnet101=ResNet101(1000)
    # resnet152=ResNet152(1000)
    out=resnet50(input)
    print(out.shape)
2. ResNeXt 使用
2.1. 论文
"Aggregated Residual Transformations for Deep Neural Networks---CVPR2017"
2.2. 概述

2.3. 使用代码
from model.backbone.resnext import ResNeXt50,ResNeXt101,ResNeXt152
import torch

if __name__ == '__main__':
    input=torch.randn(50,3,224,224)
    resnext50=ResNeXt50(1000)
    # resnext101=ResNeXt101(1000)
    # resnext152=ResNeXt152(1000)
    out=resnext50(input)
    print(out.shape)
3. MobileViT 使用
3.1. 论文
MobileViT: 轻量级、通用且移动端友好的视觉 Transformer---ArXiv 2020.10.05
3.2. 概述
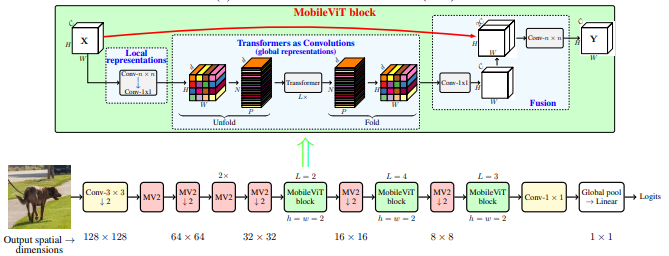
3.3. 使用代码
from model.backbone.MobileViT import *
import torch
from torch import nn
from torch.nn import functional as F

if __name__ == '__main__':
    input=torch.randn(1,3,224,224)

    ### mobilevit_xxs
    mvit_xxs=mobilevit_xxs()
    out=mvit_xxs(input)
    print(out.shape)

    ### mobilevit_xs
    mvit_xs=mobilevit_xs()
    out=mvit_xs(input)
    print(out.shape)


    ### mobilevit_s
    mvit_s=mobilevit_s()
    out=mvit_s(input)
    print(out.shape)
4. ConvMixer 使用
4.1. 论文
Patches Are All You Need?---ICLR2022 (审稿中)
4.2. 概述
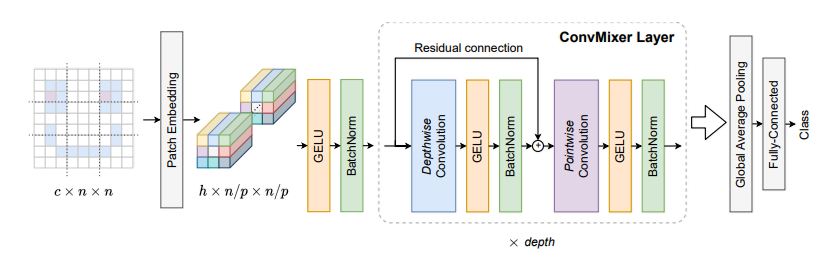
4.3. 使用代码
from model.backbone.ConvMixer import *
import torch
from torch import nn
from torch.nn import functional as F

if __name__ == '__main__':
    x=torch.randn(1,3,224,224)
    convmixer=ConvMixer(dim=512,depth=12)
    out=convmixer(x)
    print(out.shape)  #[1, 1000]
5. ShuffleTransformer 使用
5.1. 论文
Shuffle Transformer: 重新思考视觉 Transformer 的空间洗牌操作
5.2. 使用代码
from model.backbone.ShuffleTransformer import ShuffleTransformer
import torch
from torch import nn
from torch.nn import functional as F

if __name__ == '__main__':
    input=torch.randn(1,3,224,224)
    sft = ShuffleTransformer()
    output=sft(input)
    print(output.shape)
6. ConTNet 使用
6.1. 论文
ConTNet: 为什么不在同一模型中同时使用卷积和 Transformer?
6.2. 使用代码
from model.backbone.ConTNet import ConTNet
import torch
from torch import nn
from torch.nn import functional as F

if __name__ == "__main__":
    model = build_model(use_avgdown=True, relative=True, qkv_bias=True, pre_norm=True)
    input = torch.randn(1, 3, 224, 224)
    out = model(input)
    print(out.shape)
7 HATNet 使用方法
7.1. 论文
7.2. 使用代码
from model.backbone.HATNet import HATNet
import torch
from torch import nn
from torch.nn import functional as F

if __name__ == '__main__':
    input=torch.randn(1,3,224,224)
    hat = HATNet(dims=[48, 96, 240, 384], head_dim=48, expansions=[8, 8, 4, 4],
        grid_sizes=[8, 7, 7, 1], ds_ratios=[8, 4, 2, 1], depths=[2, 2, 6, 3])
    output=hat(input)
    print(output.shape)
8 CoaT 使用方法
8.1. 论文
8.2. 使用代码
from model.backbone.CoaT import CoaT
import torch
from torch import nn

if __name__ == '__main__':
    input=torch.randn(1,3,224,224)
    model = CoaT(patch_size=4, embed_dims=[152, 152, 152, 152], serial_depths=[2, 2, 2, 2], parallel_depth=6, num_heads=8, mlp_ratios=[4, 4, 4, 4])
    output=model(input)
    print(output.shape) # torch.Size([1, 1000])
9 PVT 使用方法
9.1. 论文
PVT v2:基于金字塔视觉Transformer的改进基线
9.2. 使用代码
from model.backbone.PVT import PyramidVisionTransformer
import torch
from torch import nn

if __name__ == '__main__':
    input=torch.randn(1,3,224,224)
    model = PyramidVisionTransformer(
        patch_size=4, embed_dims=[64, 128, 320, 512], num_heads=[1, 2, 5, 8], mlp_ratios=[8, 8, 4, 4], qkv_bias=True,
        norm_layer=partial(nn.LayerNorm, eps=1e-6), depths=[2, 2, 2, 2], sr_ratios=[8, 4, 2, 1])
    output=model(input)
    print(output.shape)
10 CPVT 使用方法
10.1. 论文
10.2. 使用代码
from model.backbone.CPVT import CPVTV2
import torch
from torch import nn

if __name__ == '__main__':
    input=torch.randn(1,3,224,224)
    model = CPVTV2(
        patch_size=4, embed_dims=[64, 128, 320, 512], num_heads=[1, 2, 5, 8], mlp_ratios=[8, 8, 4, 4], qkv_bias=True,
        norm_layer=partial(nn.LayerNorm, eps=1e-6), depths=[3, 4, 6, 3], sr_ratios=[8, 4, 2, 1])
    output=model(input)
    print(output.shape)
11 PIT 使用方法
11.1. 论文
11.2. 使用代码
from model.backbone.PIT import PoolingTransformer
import torch
from torch import nn

if __name__ == '__main__':
    input=torch.randn(1,3,224,224)
    model = PoolingTransformer(
        image_size=224,
        patch_size=14,
        stride=7,
        base_dims=[64, 64, 64],
        depth=[3, 6, 4],
        heads=[4, 8, 16],
        mlp_ratio=4
    )
    output=model(input)
    print(output.shape)
12 CrossViT 使用方法
12.1. 论文
CrossViT:用于图像分类的交叉注意力多尺度视觉Transformer
12.2. 使用代码
from model.backbone.CrossViT import VisionTransformer
import torch
from torch import nn

if __name__ == "__main__":
    input=torch.randn(1,3,224,224)
    model = VisionTransformer(
        img_size=[240, 224],
        patch_size=[12, 16],
        embed_dim=[192, 384],
        depth=[[1, 4, 0], [1, 4, 0], [1, 4, 0]],
        num_heads=[6, 6],
        mlp_ratio=[4, 4, 1],
        qkv_bias=True,
        norm_layer=partial(nn.LayerNorm, eps=1e-6)
    )
    output=model(input)
    print(output.shape)
13 TnT 使用方法
13.1. 论文
13.2. 使用代码
from model.backbone.TnT import TNT
import torch
from torch import nn

if __name__ == '__main__':
    input=torch.randn(1,3,224,224)
    model = TNT(
        img_size=224,
        patch_size=16,
        outer_dim=384,
        inner_dim=24,
        depth=12,
        outer_num_heads=6,
        inner_num_heads=4,
        qkv_bias=False,
        inner_stride=4)
    output=model(input)
    print(output.shape)
14 DViT 使用方法
14.1. 论文
14.2. 使用代码
from model.backbone.DViT import DeepVisionTransformer
import torch
from torch import nn

if __name__ == '__main__':
    input=torch.randn(1,3,224,224)
    model = DeepVisionTransformer(
        patch_size=16, embed_dim=384,
        depth=[False] * 16,
        apply_transform=[False] * 0 + [True] * 32,
        num_heads=12,
        mlp_ratio=3,
        qkv_bias=True,
        norm_layer=partial(nn.LayerNorm, eps=1e-6),
        )
    output=model(input)
    print(output.shape)
15 CeiT 使用方法
15.1. 论文
15.2. 使用代码
from model.backbone.CeiT import CeIT
import torch
from torch import nn

if __name__ == '__main__':
    input=torch.randn(1,3,224,224)
    model = CeIT(
        hybrid_backbone=Image2Tokens(),
        patch_size=4,
        embed_dim=192,
        depth=12,
        num_heads=3,
        mlp_ratio=4,
        qkv_bias=True,
        norm layer=partial(nn.LayerNorm, eps=1e-6)
        )
    output=model(input)
    print(output.shape)
16 ConViT 使用方法
16.1. 论文
ConViT:通过软卷积归纳偏置改进视觉Transformer
16.2. 使用代码
from model.backbone.ConViT import VisionTransformer
import torch
from torch import nn

if __name__ == '__main__':
    input=torch.randn(1,3,224,224)
    model = VisionTransformer(
        num_heads=16,
        norm layer=partial(nn.LayerNorm, eps=1e-6)
        )
    output=model(input)
    print(output.shape)
17 CaiT 使用方法
17.1. 论文
17.2. 使用代码
from model.backbone.CaiT import CaiT
import torch
from torch import nn

if __name__ == '__main__':
    input=torch.randn(1,3,224,224)
    model = CaiT(
        img_size= 224,
        patch_size=16,
        embed_dim=192,
        depth=24,
        num_heads=4,
        mlp ratio=4,
        qkv bias=True,
        norm layer=partial(nn.LayerNorm, eps=1e-6),
        init scale=1e-5,
        depth token only=2
        )
    output=model(input)
    print(output.shape)
18 PatchConvnet 使用方法
18.1. 论文
18.2. 使用代码
from model.backbone.PatchConvnet import PatchConvnet
import torch
from torch import nn

if __name__ == '__main__':
    input=torch.randn(1,3,224,224)
    model = PatchConvnet(
        patch_size=16,
        embed_dim=384,
        depth=60,
        num_heads=1,
        qkv_bias=True,
        norm_layer=partial(nn.LayerNorm, eps=1e-6),
        Patch_layer=ConvStem,
        Attention_block=Conv_blocks_se,
        depth_token_only=1,
        mlp_ratio_clstk=3.0,
    )
    output=model(input)
    print(output.shape)
19 DeiT 使用方法
19.1. 论文
19.2. 使用代码
from model.backbone.DeiT import DistilledVisionTransformer
import torch
from torch import nn

if __name__ == '__main__':
    input=torch.randn(1,3,224,224)
    model = DistilledVisionTransformer(
        patch_size=16,
        embed_dim=384,
        depth=12,
        num_heads=6,
        mlp_ratio=4,
        qkv_bias=True,
        norm_layer=partial(nn.LayerNorm, eps=1e-6)
        )
    output=model(input)
    print(output[0].shape)
20 LeViT 使用方法
20.1. 论文
LeViT:以卷积神经网络形式实现的视觉Transformer,用于更快速的推理
20.2. 使用代码
from model.backbone.LeViT import *
import torch
from torch import nn

if __name__ == '__main__':
    for name in specification:
        input=torch.randn(1,3,224,224)
        model = globals()[name](fuse=True, pretrained=False)
        model.eval()
        output = model(input)
        print(output.shape)
21 VOLO 使用方法
21.1. 论文
21.2. 使用代码
from model.backbone.VOLO import VOLO
import torch
from torch import nn

if __name__ == '__main__':
    input=torch.randn(1,3,224,224)
    model = VOLO([4, 4, 8, 2],
                 embed_dims=[192, 384, 384, 384],
                 num_heads=[6, 12, 12, 12],
                 mlp_ratios=[3, 3, 3, 3],
                 downsamples=[True, False, False, False],
                 outlook_attention=[True, False, False, False ],
                 post_layers=['ca', 'ca'],
                 )
    output=model(input)
    print(output[0].shape)
22 Container 使用方法
22.1. 论文
22.2. 使用代码
from model.backbone.Container import VisionTransformer
import torch
from torch import nn

if __name__ == '__main__':
    input=torch.randn(1,3,224,224)
    model = VisionTransformer(
        img_size=[224, 56, 28, 14],
        patch_size=[4, 2, 2, 2],
        embed_dim=[64, 128, 320, 512],
        depth=[3, 4, 8, 3],
        num_heads=16,
        mlp_ratio=[8, 8, 4, 4],
        qkv_bias=True,
        norm_layer=partial(nn.LayerNorm, eps=1e-6))
    output=model(input)
    print(output.shape)
23 CMT 使用方法
23.1. 论文
23.2. 使用代码
from model.backbone.CMT import CMT_Tiny
import torch
from torch import nn

if __name__ == '__main__':
    input=torch.randn(1,3,224,224)
    model = CMT_Tiny()
    output=model(input)
    print(output[0].shape)
24 EfficientFormer 使用方法
24.1. 论文
EfficientFormer:以MobileNet速度运行的视觉Transformer
24.2. 使用代码
from model.backbone.EfficientFormer import EfficientFormer
import torch
from torch import nn

if __name__ == '__main__':
    input=torch.randn(1,3,224,224)
    model = EfficientFormer(
        layers=EfficientFormer_depth['l1'],
        embed_dims=EfficientFormer_width['l1'],
        downsamples=[True, True, True, True],
        vit_num=1,
    )
    output=model(input)
    print(output[0].shape)
25 ConvNeXtV2 使用方法
25.1. 论文
25.2. 使用代码
from model.backbone.convnextv2 import convnextv2_atto
import torch
from torch import nn

if __name__ == "__main__":
    model = convnextv2_atto()
    input = torch.randn(1, 3, 224, 224)
    out = model(input)
    print(out.shape)
MLP系列
Pytorch实现的"关注MLP---arXiv 2021.05.17"
1. RepMLP 使用方法
1.1. 论文
1.2. 概述
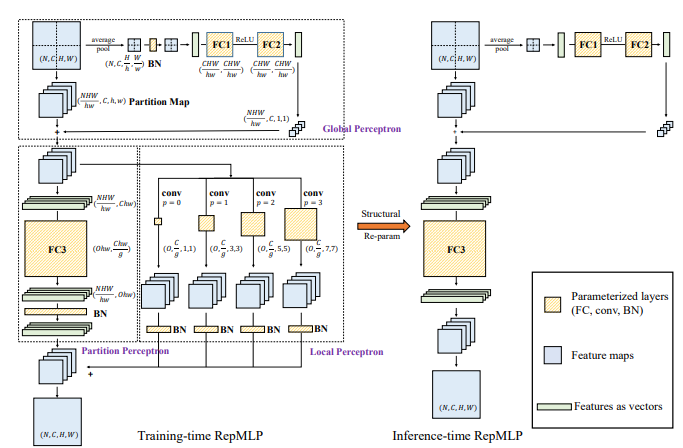
1.3. 使用代码
from model.mlp.repmlp import RepMLP
import torch
from torch import nn

N=4 #batch size
C=512 #input dim
O=1024 #output dim
H=14 #image height
W=14 #image width
h=7 #patch height
w=7 #patch width
fc1_fc2_reduction=1 #reduction ratio
fc3_groups=8 # groups
repconv_kernels=[1,3,5,7] #kernel list
repmlp=RepMLP(C,O,H,W,h,w,fc1_fc2_reduction,fc3_groups,repconv_kernels=repconv_kernels)
x=torch.randn(N,C,H,W)
repmlp.eval()
for module in repmlp.modules():
    if isinstance(module, nn.BatchNorm2d) or isinstance(module, nn.BatchNorm1d):
        nn.init.uniform_(module.running_mean, 0, 0.1)
        nn.init.uniform_(module.running_var, 0, 0.1)
        nn.init.uniform_(module.weight, 0, 0.1)
        nn.init.uniform_(module.bias, 0, 0.1)

#training result
out=repmlp(x)
#inference result
repmlp.switch_to_deploy()
deployout = repmlp(x)

print(((deployout-out)**2).sum())
2. MLP-Mixer 使用方法
2.1. 论文
2.2. 概述
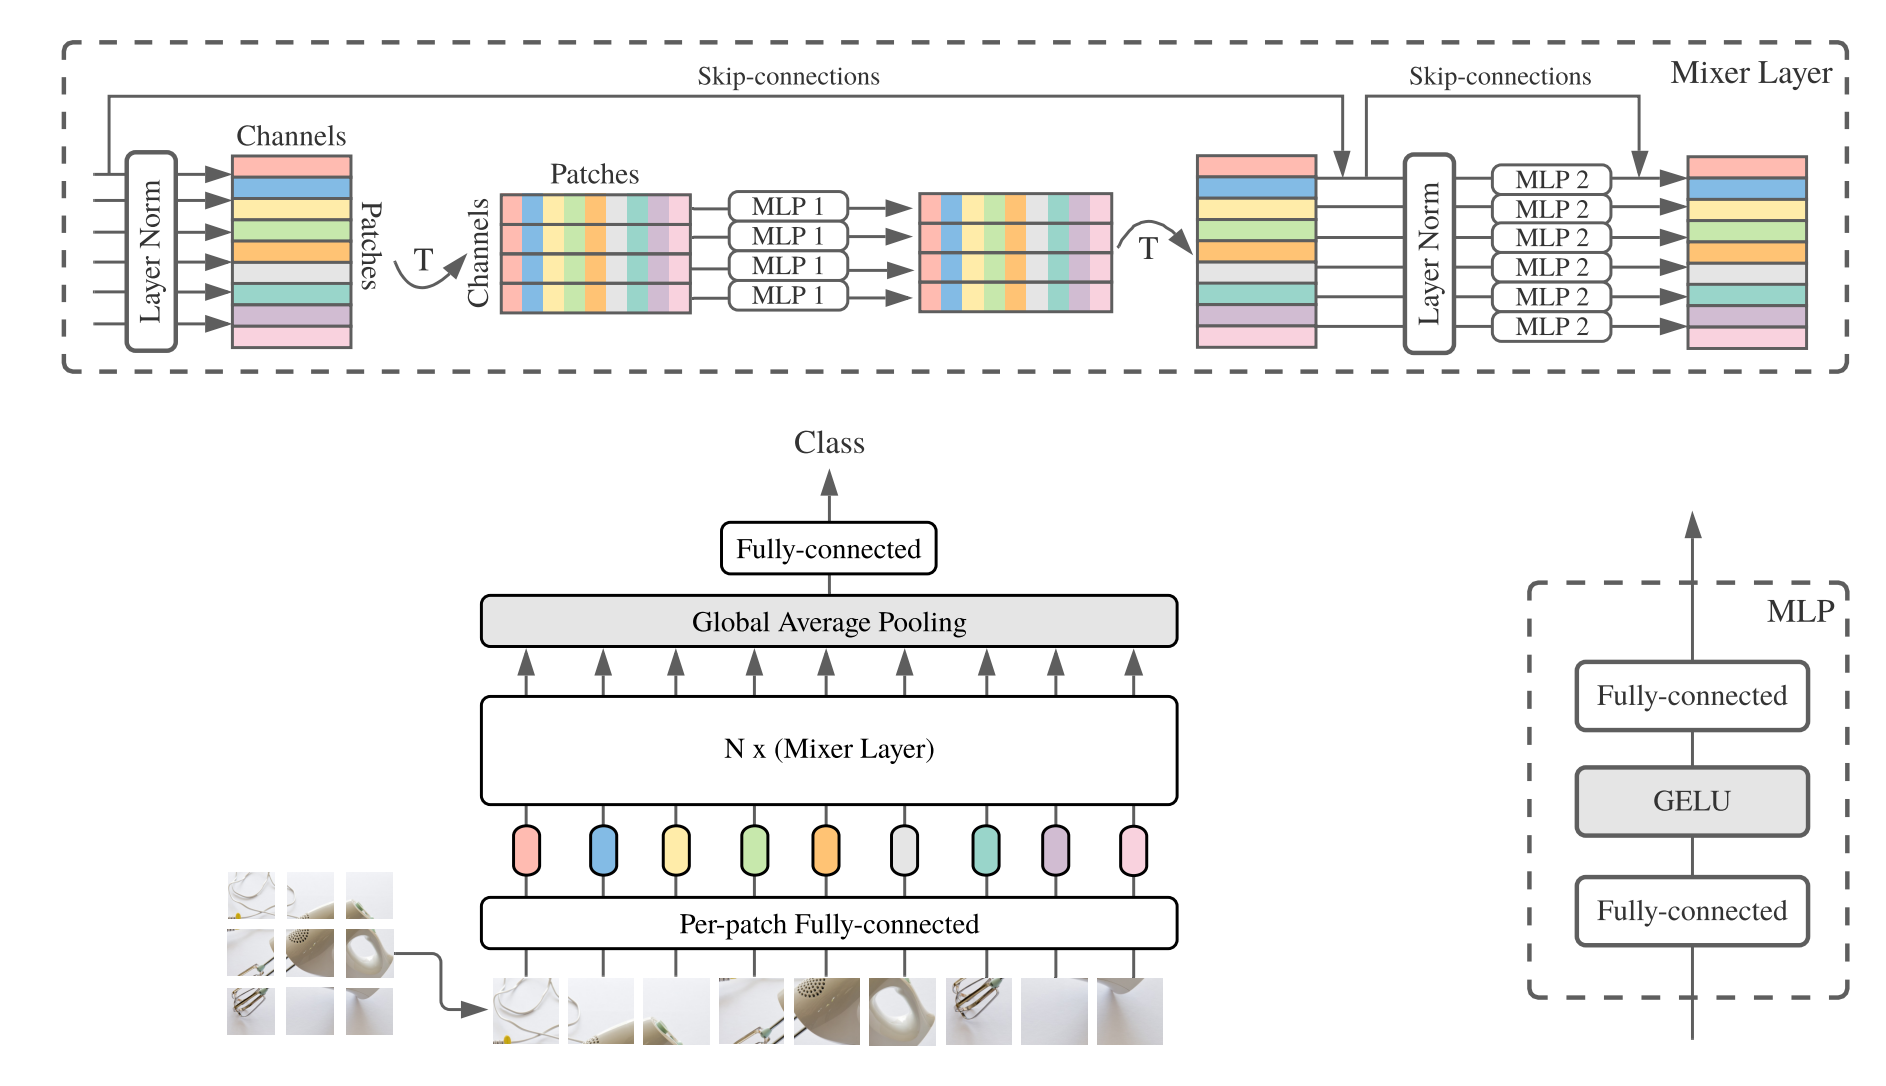
2.3. 使用代码
from model.mlp.mlp_mixer import MlpMixer
import torch
mlp_mixer=MlpMixer(num_classes=1000,num_blocks=10,patch_size=10,tokens_hidden_dim=32,channels_hidden_dim=1024,tokens_mlp_dim=16,channels_mlp_dim=1024)
input=torch.randn(50,3,40,40)
output=mlp_mixer(input)
print(output.shape)
3. ResMLP 使用方法
3.1. 论文
3.2. 概述

3.3. 使用代码
from model.mlp.resmlp import ResMLP
import torch

input=torch.randn(50,3,14,14)
resmlp=ResMLP(dim=128,image_size=14,patch_size=7,class_num=1000)
out=resmlp(input)
print(out.shape) #最后一维是类别数
4. gMLP 使用方法
4.1. 论文
4.2. 概述
4.3. 使用代码
from model.mlp.g_mlp import gMLP
import torch

num_tokens=10000
bs=50
len_sen=49
num_layers=6
input=torch.randint(num_tokens,(bs,len_sen)) #batch size,序列长度
gmlp = gMLP(num_tokens=num_tokens,len_sen=len_sen,dim=512,d_ff=1024)
output=gmlp(input)
print(output.shape)
5. sMLP 使用方法
5.1. 论文
5.2. 概述

5.3. 使用代码
from model.mlp.sMLP_block import sMLPBlock
import torch
from torch import nn
from torch.nn import functional as F

if __name__ == '__main__':
    input=torch.randn(50,3,224,224)
    smlp=sMLPBlock(h=224,w=224)
    out=smlp(input)
    print(out.shape)
6. vip-mlp 使用方法
6.1. 论文
6.2. 使用代码
from model.mlp.vip-mlp import VisionPermutator
import torch
from torch import nn
from torch.nn import functional as F

if __name__ == '__main__':
    input=torch.randn(1,3,224,224)
    model = VisionPermutator(
        layers=[4, 3, 8, 3],
        embed_dims=[384, 384, 384, 384],
        patch_size=14,
        transitions=[False, False, False, False],
        segment_dim=[16, 16, 16, 16],
        mlp_ratios=[3, 3, 3, 3],
        mlp_fn=WeightedPermuteMLP
    )
    output=model(input)
    print(output.shape)
重参数化系列
"RepVGG:让VGG风格的卷积神经网络再次伟大——CVPR2021" 的 PyTorch 实现
"ACNet:通过非对称卷积块强化内核骨架,打造强大的CNN——ICCV2019" 的 PyTorch 实现
"多样分支模块:将卷积构建为类似Inception的单元——CVPR2021" 的 PyTorch 实现
1. RepVGG 使用方法
1.1. 论文
1.2. 概述
1.3. 使用代码
from model.rep.repvgg import RepBlock
import torch


input=torch.randn(50,512,49,49)
repblock=RepBlock(512,512)
repblock.eval()
out=repblock(input)
repblock._switch_to_deploy()
out2=repblock(input)
print('VGG与RepVGG之间的差异')
print(((out2-out)**2).sum())
2. ACNet 使用方法
2.1. 论文
"ACNet:通过非对称卷积块强化内核骨架,打造强大的CNN"
2.2. 概述
2.3. 使用代码
from model.rep.acnet import ACNet
import torch
from torch import nn

input=torch.randn(50,512,49,49)
acnet=ACNet(512,512)
acnet.eval()
out=acnet(input)
acnet._switch_to_deploy()
out2=acnet(input)
print('差异:')
print(((out2-out)**2).sum())
2. 多样分支模块使用方法
2.1. 论文
2.2. 概述
2.3. 使用代码
2.3.1 变换I
from model.rep.ddb import transI_conv_bn
import torch
from torch import nn
from torch.nn import functional as F

input=torch.randn(1,64,7,7)
#卷积+批归一化
conv1=nn.Conv2d(64,64,3,padding=1)
bn1=nn.BatchNorm2d(64)
bn1.eval()
out1=bn1(conv1(input))

#融合卷积
conv_fuse=nn.Conv2d(64,64,3,padding=1)
conv_fuse.weight.data,conv_fuse.bias.data=transI_conv_bn(conv1,bn1)
out2=conv_fuse(input)

print("差异:",((out2-out1)**2).sum().item())
2.3.2 变换II
from model.rep.ddb import transII_conv_branch
import torch
from torch import nn
from torch.nn import functional as F

input=torch.randn(1,64,7,7)

#两个卷积相加
conv1=nn.Conv2d(64,64,3,padding=1)
conv2=nn.Conv2d(64,64,3,padding=1)
out1=conv1(input)+conv2(input)

#融合卷积
conv_fuse=nn.Conv2d(64,64,3,padding=1)
conv_fuse.weight.data,conv_fuse.bias.data=transII_conv_branch(conv1,conv2)
out2=conv_fuse(input)

print("差异:",((out2-out1)**2).sum().item())
2.3.3 变换III
from model.rep.ddb import transIII_conv_sequential
import torch
from torch import nn
from torch.nn import functional as F

input=torch.randn(1,64,7,7)

#两个卷积相加
conv1=nn.Conv2d(64,64,1,padding=0,bias=False)
conv2=nn.Conv2d(64,64,3,padding=1,bias=False)
out1=conv2(conv1(input))


#融合卷积
conv_fuse=nn.Conv2d(64,64,3,padding=1,bias=False)
conv_fuse.weight.data=transIII_conv_sequential(conv1,conv2)
out2=conv_fuse(input)

print("差异:",((out2-out1)**2).sum().item())
2.3.4 变换IV
from model.rep.ddb import transIV_conv_concat
import torch
from torch import nn
from torch.nn import functional as F

input=torch.randn(1,64,7,7)

#两个卷积相加
conv1=nn.Conv2d(64,32,3,padding=1)
conv2=nn.Conv2d(64,32,3,padding=1)
out1=torch.cat([conv1(input),conv2(input)],dim=1)

#融合卷积
conv_fuse=nn.Conv2d(64,64,3,padding=1)
conv_fuse.weight.data,conv_fuse.bias.data=transIV_conv_concat(conv1,conv2)
out2=conv_fuse(input。

print("差异:",((out2-out1)**2).sum().item())
2.3.5 变换V
from model.rep.ddb import transV_avg
import torch
from torch import nn
from torch.nn import functional as F

输入=torch.randn(1,64,7,7)

avg=nn.AvgPool2d(kernel_size=3,stride=1)
out1=avg(input)

conv=transV_avg(64,3)
out2=conv(input。

print("差异:",((out2-out1)**2).sum().item())
2.3.6 变换VI
from model.rep.ddb import transVI_conv_scale
import torch
from torch import nn
从torch.nn中导入functional as F

输入=torch.randn(1,64,7,7)

#两个卷积相加
conv1x1=nn.Conv2d(64,64,1)
conv1x3=nn.Conv2d(64,64,(1,3),padding=(0,1))
conv3x1=nn.Conv2d(64,64,(3,1),padding=(1,0))
out1=conv1x1(input)+conv1x3(input)+conv3x1(input。

#融合卷积
conv_fuse=nn.Conv2d(64,64,3,padding=1)
conv_fuse.weight.data,conv_fuse.bias.data=transVI_conv_scale(conv1x1,conv1x3,conv3x1)
out2=conv_fuse(input。

print("差异:",((out2-out1)**2).sum().item())。
卷积系列
PyTorch 实现的 "MobileNets: 面向移动视觉应用的高效卷积神经网络---CVPR2017"
PyTorch 实现的 "EfficientNet: 重新思考卷积神经网络的模型缩放---PMLR2019"
PyTorch 实现的 "Involution: 针对视觉识别任务反转卷积的固有特性---CVPR2021"
PyTorch 实现的 "动态卷积:卷积核上的注意力机制---CVPR2020 口头报告"
PyTorch 实现的 "CondConv: 用于高效推理的条件参数化卷积---NeurIPS2019"
1. 深度可分离卷积的使用
1.1. 论文
"MobileNets: 面向移动视觉应用的高效卷积神经网络"
1.2. 概述
1.3. 使用代码
from model.conv.DepthwiseSeparableConvolution import DepthwiseSeparableConvolution
import torch
from torch import nn
from torch.nn import functional as F

input=torch.randn(1,3,224,224)
dsconv=DepthwiseSeparableConvolution(3,64)
out=dsconv(input)
print(out.shape)
2. MBConv 的使用
2.1. 论文
"EfficientNet: 重新思考卷积神经网络的模型缩放"
2.2. 概述
2.3. 使用代码
from model.conv.MBConv import MBConvBlock
import torch
from torch import nn
from torch.nn import functional as F

input=torch.randn(1,3,224,224)
mbconv=MBConvBlock(ksize=3,input_filters=3,output_filters=512,image_size=224)
out=mbconv(input)
print(out.shape)
3. Involution 的使用
3.1. 论文
"Involution: 针对视觉识别任务反转卷积的固有特性"
3.2. 概述
3.3. 使用代码
from model.conv.Involution import Involution
import torch
from torch import nn
from torch.nn import functional as F

input=torch.randn(1,4,64,64)
involution=Involution(kernel_size=3,in_channel=4,stride=2)
out=involution(input)
print(out.shape)
4. DynamicConv 的使用
4.1. 论文
4.2. 概述
4.3. 使用代码
from model.conv.DynamicConv import *
import torch
from torch import nn
from torch.nn import functional as F

if __name__ == '__main__':
    input=torch.randn(2,32,64,64)
    m=DynamicConv(in_planes=32,out_planes=64,kernel_size=3,stride=1,padding=1,bias=False)
    out=m(input)
    print(out.shape) # 2,32,64,64
5. CondConv 的使用
5.1. 论文
5.2. 概述
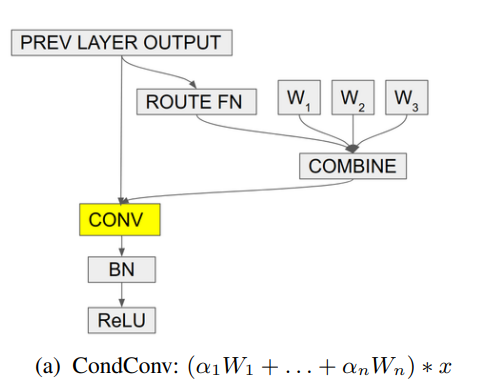
5.3. 使用代码
from model.conv.CondConv import *
import torch
from torch import nn
from torch.nn import functional as F


if __name__ == '__main__':
    input=torch.randn(2,32,64,64)
    m=CondConv(in_planes=32,out_planes=64,kernel_size=3,stride=1,padding=1,bias=False)
    out=m(input)
    print(out.shape)
其他项目推荐
🔥🔥🔥 重磅!!!作为项目补充,更多论文层面的解析,可以关注新开源的项目 FightingCV-Paper-Reading ,里面汇集和整理了各大顶会顶刊的论文解析
🔥🔥🔥重磅!!! 最近为大家整理了网上的各种AI相关的视频教程和必读论文 FightingCV-Course
🔥🔥🔥 重磅!!!最近全新开源了一个 YOLOAir 目标检测代码库 ,里面集成了多种YOLO模型,包括YOLOv5, YOLOv7,YOLOR, YOLOX,YOLOv4, YOLOv3以及其他YOLO模型,还包括多种现有Attention机制。
🔥🔥🔥 ECCV2022论文汇总:ECCV2022-Paper-List
常见问题
相似工具推荐
openclaw
OpenClaw 是一款专为个人打造的本地化 AI 助手,旨在让你在自己的设备上拥有完全可控的智能伙伴。它打破了传统 AI 助手局限于特定网页或应用的束缚,能够直接接入你日常使用的各类通讯渠道,包括微信、WhatsApp、Telegram、Discord、iMessage 等数十种平台。无论你在哪个聊天软件中发送消息,OpenClaw 都能即时响应,甚至支持在 macOS、iOS 和 Android 设备上进行语音交互,并提供实时的画布渲染功能供你操控。 这款工具主要解决了用户对数据隐私、响应速度以及“始终在线”体验的需求。通过将 AI 部署在本地,用户无需依赖云端服务即可享受快速、私密的智能辅助,真正实现了“你的数据,你做主”。其独特的技术亮点在于强大的网关架构,将控制平面与核心助手分离,确保跨平台通信的流畅性与扩展性。 OpenClaw 非常适合希望构建个性化工作流的技术爱好者、开发者,以及注重隐私保护且不愿被单一生态绑定的普通用户。只要具备基础的终端操作能力(支持 macOS、Linux 及 Windows WSL2),即可通过简单的命令行引导完成部署。如果你渴望拥有一个懂你
stable-diffusion-webui
stable-diffusion-webui 是一个基于 Gradio 构建的网页版操作界面,旨在让用户能够轻松地在本地运行和使用强大的 Stable Diffusion 图像生成模型。它解决了原始模型依赖命令行、操作门槛高且功能分散的痛点,将复杂的 AI 绘图流程整合进一个直观易用的图形化平台。 无论是希望快速上手的普通创作者、需要精细控制画面细节的设计师,还是想要深入探索模型潜力的开发者与研究人员,都能从中获益。其核心亮点在于极高的功能丰富度:不仅支持文生图、图生图、局部重绘(Inpainting)和外绘(Outpainting)等基础模式,还独创了注意力机制调整、提示词矩阵、负向提示词以及“高清修复”等高级功能。此外,它内置了 GFPGAN 和 CodeFormer 等人脸修复工具,支持多种神经网络放大算法,并允许用户通过插件系统无限扩展能力。即使是显存有限的设备,stable-diffusion-webui 也提供了相应的优化选项,让高质量的 AI 艺术创作变得触手可及。
everything-claude-code
everything-claude-code 是一套专为 AI 编程助手(如 Claude Code、Codex、Cursor 等)打造的高性能优化系统。它不仅仅是一组配置文件,而是一个经过长期实战打磨的完整框架,旨在解决 AI 代理在实际开发中面临的效率低下、记忆丢失、安全隐患及缺乏持续学习能力等核心痛点。 通过引入技能模块化、直觉增强、记忆持久化机制以及内置的安全扫描功能,everything-claude-code 能显著提升 AI 在复杂任务中的表现,帮助开发者构建更稳定、更智能的生产级 AI 代理。其独特的“研究优先”开发理念和针对 Token 消耗的优化策略,使得模型响应更快、成本更低,同时有效防御潜在的攻击向量。 这套工具特别适合软件开发者、AI 研究人员以及希望深度定制 AI 工作流的技术团队使用。无论您是在构建大型代码库,还是需要 AI 协助进行安全审计与自动化测试,everything-claude-code 都能提供强大的底层支持。作为一个曾荣获 Anthropic 黑客大奖的开源项目,它融合了多语言支持与丰富的实战钩子(hooks),让 AI 真正成长为懂上
ComfyUI
ComfyUI 是一款功能强大且高度模块化的视觉 AI 引擎,专为设计和执行复杂的 Stable Diffusion 图像生成流程而打造。它摒弃了传统的代码编写模式,采用直观的节点式流程图界面,让用户通过连接不同的功能模块即可构建个性化的生成管线。 这一设计巧妙解决了高级 AI 绘图工作流配置复杂、灵活性不足的痛点。用户无需具备编程背景,也能自由组合模型、调整参数并实时预览效果,轻松实现从基础文生图到多步骤高清修复等各类复杂任务。ComfyUI 拥有极佳的兼容性,不仅支持 Windows、macOS 和 Linux 全平台,还广泛适配 NVIDIA、AMD、Intel 及苹果 Silicon 等多种硬件架构,并率先支持 SDXL、Flux、SD3 等前沿模型。 无论是希望深入探索算法潜力的研究人员和开发者,还是追求极致创作自由度的设计师与资深 AI 绘画爱好者,ComfyUI 都能提供强大的支持。其独特的模块化架构允许社区不断扩展新功能,使其成为当前最灵活、生态最丰富的开源扩散模型工具之一,帮助用户将创意高效转化为现实。
gemini-cli
gemini-cli 是一款由谷歌推出的开源 AI 命令行工具,它将强大的 Gemini 大模型能力直接集成到用户的终端环境中。对于习惯在命令行工作的开发者而言,它提供了一条从输入提示词到获取模型响应的最短路径,无需切换窗口即可享受智能辅助。 这款工具主要解决了开发过程中频繁上下文切换的痛点,让用户能在熟悉的终端界面内直接完成代码理解、生成、调试以及自动化运维任务。无论是查询大型代码库、根据草图生成应用,还是执行复杂的 Git 操作,gemini-cli 都能通过自然语言指令高效处理。 它特别适合广大软件工程师、DevOps 人员及技术研究人员使用。其核心亮点包括支持高达 100 万 token 的超长上下文窗口,具备出色的逻辑推理能力;内置 Google 搜索、文件操作及 Shell 命令执行等实用工具;更独特的是,它支持 MCP(模型上下文协议),允许用户灵活扩展自定义集成,连接如图像生成等外部能力。此外,个人谷歌账号即可享受免费的额度支持,且项目基于 Apache 2.0 协议完全开源,是提升终端工作效率的理想助手。
markitdown
MarkItDown 是一款由微软 AutoGen 团队打造的轻量级 Python 工具,专为将各类文件高效转换为 Markdown 格式而设计。它支持 PDF、Word、Excel、PPT、图片(含 OCR)、音频(含语音转录)、HTML 乃至 YouTube 链接等多种格式的解析,能够精准提取文档中的标题、列表、表格和链接等关键结构信息。 在人工智能应用日益普及的今天,大语言模型(LLM)虽擅长处理文本,却难以直接读取复杂的二进制办公文档。MarkItDown 恰好解决了这一痛点,它将非结构化或半结构化的文件转化为模型“原生理解”且 Token 效率极高的 Markdown 格式,成为连接本地文件与 AI 分析 pipeline 的理想桥梁。此外,它还提供了 MCP(模型上下文协议)服务器,可无缝集成到 Claude Desktop 等 LLM 应用中。 这款工具特别适合开发者、数据科学家及 AI 研究人员使用,尤其是那些需要构建文档检索增强生成(RAG)系统、进行批量文本分析或希望让 AI 助手直接“阅读”本地文件的用户。虽然生成的内容也具备一定可读性,但其核心优势在于为机器