ComfyUI_LayerStyle
ComfyUI_LayerStyle 是一套专为 ComfyUI 设计的节点插件,旨在将 Photoshop 中经典的图层合成与蒙版处理功能引入 AI 工作流。它解决了用户在生成式 AI 创作过程中频繁切换软件进行后期处理的痛点,让用户无需离开 ComfyUI 环境,即可在一个集中的工作流中完成复杂的图像合成、遮罩编辑及细节调整,显著提升了从生成到成图的效率。
这款工具特别适合希望深化工作流整合的 AI 艺术家、数字设计师以及进阶创作者使用。对于习惯传统图像处理逻辑但想拥抱 AI 生成的用户而言,它提供了极佳的上手体验。其核心亮点在于成功迁移了多项 Photoshop 基础功能至节点系统,支持灵活的图层混合模式与精细的蒙版控制。值得注意的是,为了保持核心功能的稳定与轻量,开发者已将部分依赖复杂模型的高级功能(如各类超精度分割、智能抠图及二维码工具等)剥离至独立的 ComfyUI_LayerStyle_Advance 仓库,用户可根据实际需求灵活选配,确保工作流的流畅运行。
使用场景
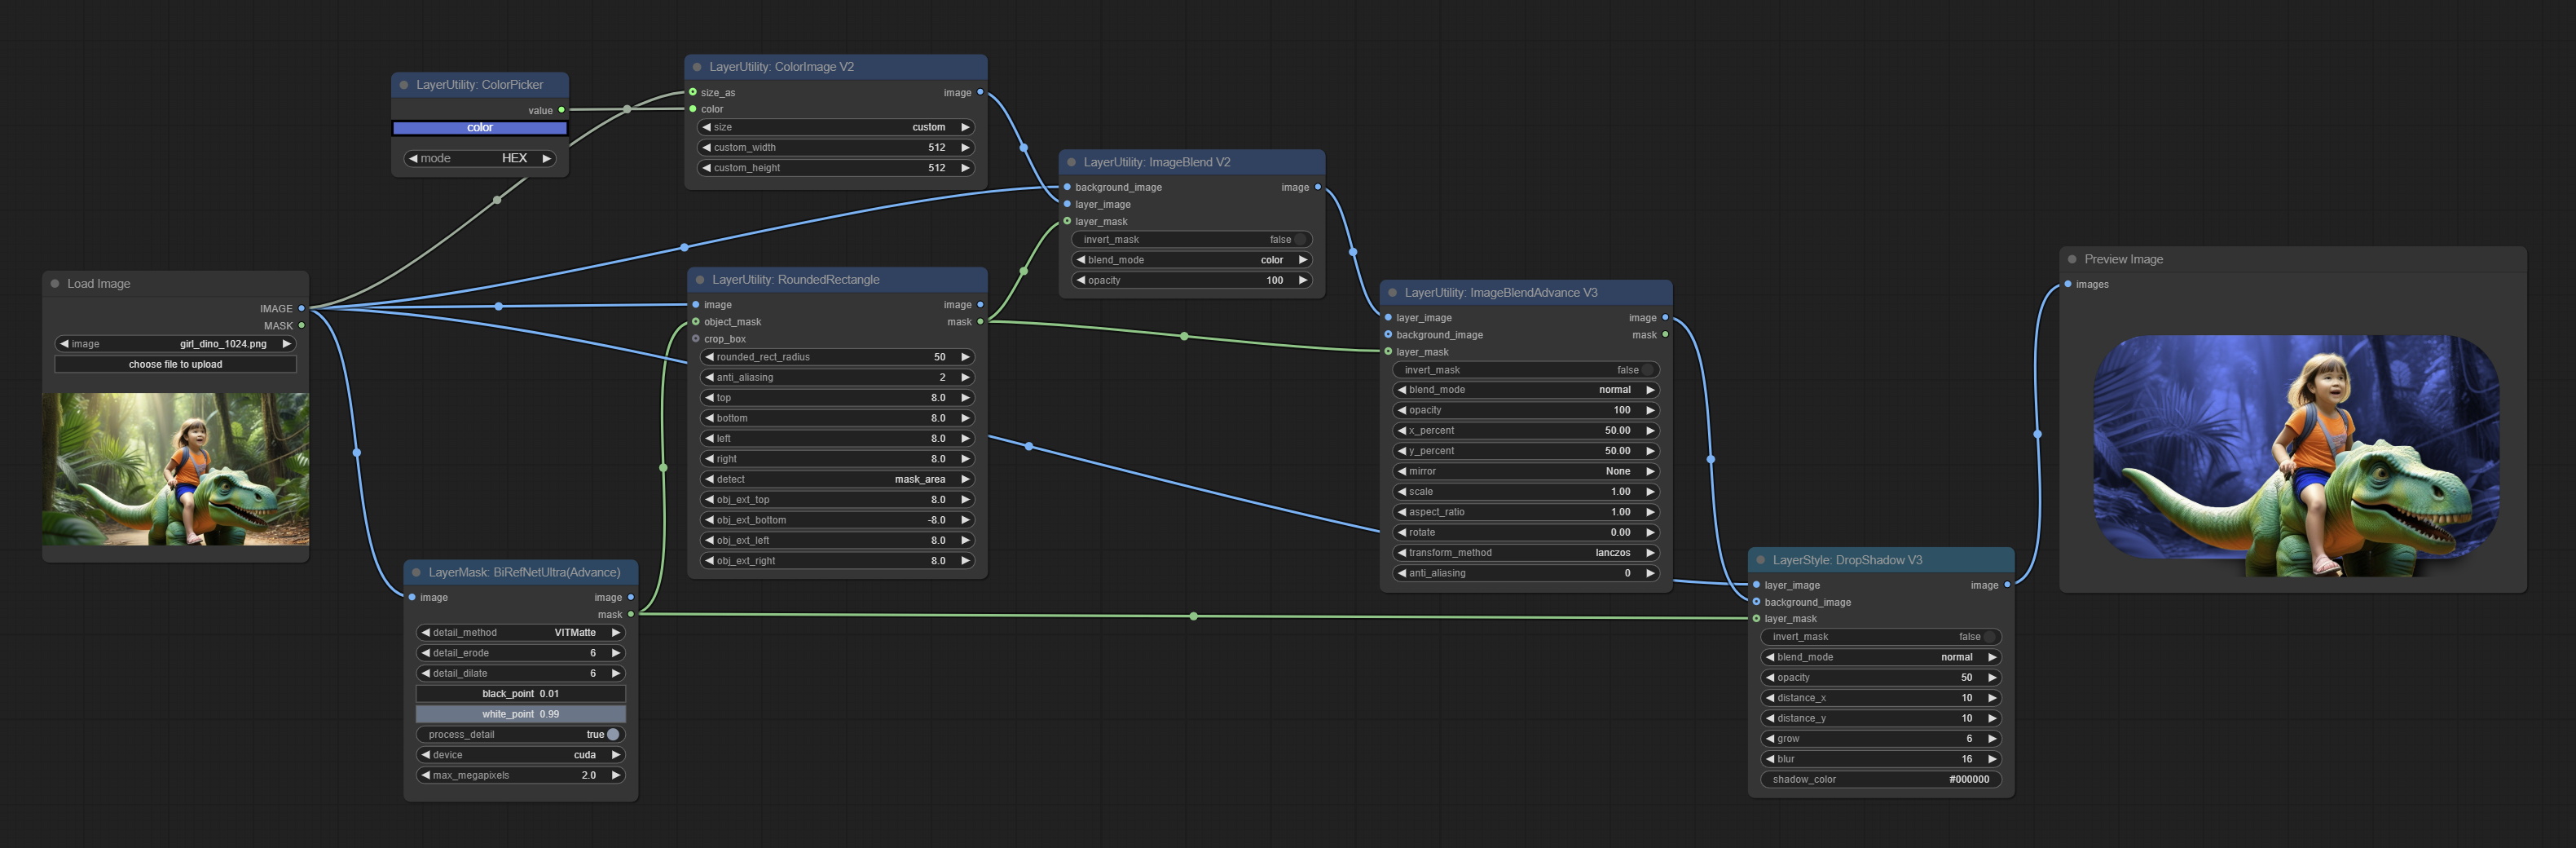
电商设计师小林需要为新款运动鞋批量生成带有复杂光影特效和透明背景的宣传海报,且必须保持图层可编辑性以便后续微调。
没有 ComfyUI_LayerStyle 时
- 软件频繁切换:必须在 Stable Diffusion 生成底图后,导出文件导入 Photoshop 进行抠图、调色和合成,工作流被强行割裂。
- 批量处理困难:面对上百张不同配色的鞋款,无法在 AI 工作流中自动应用统一的图层混合模式(如正片叠底、滤色),只能手动在 PS 中重复操作。
- 蒙版精度受限:传统的节点难以实现类似 PS 的精细蒙版运算,导致头发丝或半透明纱网等细节边缘处理生硬,需人工修补。
- 迭代成本高昂:一旦客户要求调整光影角度或背景色调,需重新经历“生成 - 导出 - 修图”的全流程,反馈周期长。
使用 ComfyUI_LayerStyle 后
- 全流程闭环:直接在 ComfyUI 中调用类 PS 节点完成图层叠加与蒙版合成,无需离开界面即可输出成品,实现一站式自动化。
- 参数化批量生产:通过节点预设图层混合算法,一键将同一套光影逻辑应用到不同颜色的鞋款生成任务中,效率提升数倍。
- 像素级精细控制:利用其强大的蒙版运算节点,轻松实现复杂边缘的无损融合,达到专业修图软件的合成效果。
- 灵活即时调整:所有合成步骤均为节点连接,修改光影参数或替换背景仅需调整连线或数值,秒级重新渲染预览。
ComfyUI_LayerStyle 将 Photoshop 的核心合成能力融入 AI 生成流,让创意从“单点生成”进化为“可控的工业化生产”。
运行环境要求
- Windows
未明确说明具体型号,但依赖 onnxruntime 和 CUDA(报错信息提及需安装正确版本的 CUDA 和 cuDNN),部分节点(如 BiRefNet, SAM2, YOLO)通常需要 NVIDIA GPU
未说明
快速开始
ComfyUI 层样式
重要提示
将一些容易出现问题的依赖节点拆分到了 ComfyUI_LayerStyle_Advance 仓库中。包括: LayerMask: BiRefNetUltra, LayerMask: BiRefNetUltraV2, LayerMask: LoadBiRefNetModel, LayerMask: LoadBiRefNetModelV2, LayerMask: EVFSAMUltra, LayerMask: Florence2Ultra, LayerMask: LoadFlorence2Model, LayerUtility: Florence2Image2Prompt, LayerUtility: GetColorTone, LayerUtility: GetColorToneV2, LayerMask: HumanPartsUltra, LayerMask: BenUltra, LayerMask: LoadBenModel, LayerUtility: ImageAutoCrop, LayerUtility: ImageAutoCropV2, LayerUtility: ImageAutoCropV3, LayerUtility: ImageRewardFilter, LayerUtility: LoadJoyCaption2Model, LayerUtility: JoyCaption2Split, LayerUtility: JoyCaption2, LayerUtility: JoyCaption2ExtraOptions, LayerUtility: LaMa, LayerUtility: LlamaVision, LayerUtility: LoadPSD, LayerMask: MaskByDifferent, LayerMask: MediapipeFacialSegment, LayerMask: BBoxJoin, LayerMask: DrawBBoxMask, LayerMask: ObjectDetectorFL2, LayerMask: ObjectDetectorMask, LayerMask: ObjectDetectorYOLO8, LayerMask: ObjectDetectorYOLOWorld, LayerMask: PersonMaskUltra, LayerMask: PersonMaskUltra V2, LayerUtility: PhiPrompt, LayerUtility: PromptEmbellish, LayerUtility: PromptTagger, LayerUtility: CreateQRCode, LayerUtility: DecodeQRCode, LayerUtility: QWenImage2Prompt, LayerMask: SAM2Ultra, LayerMask: SAM2VideoUltra, LayerUtility: SaveImagePlus, LayerUtility: SD3NegativeConditioning, LayerMask: SegmentAnythingUltra, LayerMask: SegmentAnythingUltra V2, LayerMask: TransparentBackgroundUltra, LayerUtility: UserPromptGeneratorTxt2ImgPrompt, LayerUtility: UserPromptGeneratorTxt2ImgPromptWithReference, LayerUtility: UserPromptGeneratorReplaceWord, LayerUtility: AddBlindWaterMark, LayerUtility: ShowBlindWaterMark, LayerMask: YoloV8Detect
如果近期有更新,您需要安装 ComfyUI_LayerStyle_Advance,以确保之前的流程不会丢失节点。
如果问题是由仓库拆分引起的,请将插件版本回滚到3d4a3526a9d1a19671a133e9215077bda520ee5d
在插件目录下打开终端,并使用以下命令回滚版本:
git reset --hard 3d4a3526a9d1a19671a133e9215077bda520ee5d
商务合作请联系email chflame@163.com。
For business cooperation, please contact email chflame@163.com。
一套用于 ComfyUI 的节点,可以合成图层和蒙版,实现类似 Photoshop 的功能。
它将 Photoshop 的一些基本功能迁移到 ComfyUI 中,旨在集中工作流并减少软件切换的频率。
 *此工作流(title_example_workflow.json)位于工作流目录中。
示例工作流
在 workflow 目录中有一些 JSON 工作流文件,展示了这些节点如何在 ComfyUI 中使用。
如何安装
(以 ComfyUI 官方便携包和 Aki ComfyUI 包为例,其他 ComfyUI 环境请相应修改依赖环境目录)
安装插件
建议使用 ComfyUI Manager 进行安装。
或者在 ComfyUI 的插件目录中打开命令提示符窗口,例如
ComfyUI\custom_nodes,输入:
git clone https://github.com/chflame163/ComfyUI_LayerStyle.git
- 或者下载压缩包并解压,将解压后的文件夹复制到
ComfyUI\custom_nodes目录中。
安装依赖包
对于 ComfyUI 官方便携包,在插件目录中双击
install_requirements.bat;对于 Aki ComfyUI 包,则双击插件目录中的install_requirements_aki.bat,等待安装完成。或者手动安装依赖包:在 ComfyUI_LayerStyle 插件目录中打开命令提示符窗口,例如
ComfyUI\custom_nodes\ComfyUI_LayerStyle,输入以下命令:
对于 ComfyUI 官方便携包,输入:
..\..\..\python_embeded\python.exe -s -m pip install -r requirements.txt
.\repair_dependency.bat
对于 Aki ComfyUI 包,输入:
..\..\python\python.exe -s -m pip install -r requirements.txt
.\repair_dependency_aki.bat
- 重启 ComfyUI。
下载模型文件
中国国内用户可从 百度网盘 或 夸克网盘 下载;其他用户则可从 huggingface.co/chflame163/ComfyUI_LayerStyle 下载所有文件,并将其复制到 ComfyUI\models 文件夹中。该链接提供了本插件所需的所有模型文件。
或者根据各个节点的说明单独下载模型文件。
部分名为“Ultra”的节点会使用 vitmatte 模型,请下载 vitmatte 模型 并复制到 ComfyUI/models/vitmatte 文件夹中,上述下载链接中也包含了该模型。
常见问题
如果节点无法正常加载或使用过程中出现错误,请查看 ComfyUI 终端窗口中的错误信息。以下是常见错误及其解决方法。
警告:xxxx.ini 未找到,使用默认 xxxx..
此警告表示无法找到 ini 文件,但不影响正常使用。如果您不想看到这些警告,请将插件目录中的所有 *.ini.example 文件重命名为 *.ini。
无法从 'cv2.ximgproc' 导入名称 'guidedFilter'
此错误是由于 opencv-contrib-python 包的版本不正确,或者该包被其他 OpenCV 包覆盖所致。
NameError: 名称 'guidedFilter' 未定义
问题原因同上。
针对上述问题,请在插件文件夹中双击 repair_dependency.bat(适用于官方 ComfyUI 便携版)或 repair_dependency_aki.bat(适用于 ComfyUI-aki-v1.x),即可自动修复。
无法从 'transformers' 导入名称 'VitMatteImageProcessor'
此错误是由于 transformers 包版本过低所致。
insightface 加载非常慢
此错误是由于 protobuf 包版本过低所致。
onnxruntime::python::CreateExecutionProviderInstance CUDA_PATH 已设置,但无法加载 CUDA。请按照 GPU 要求页面上的说明安装正确版本的 CUDA 和 cuDNN。
解决方案:
重新安装 onnxruntime 依赖包。
加载模型 xxx 时出错:无法连接到 huggingface.co ...
请检查网络环境。如果您在中国无法正常访问 huggingface.co,请尝试修改 huggingface_hub 包,强制使用镜像源 hf_mirror。
在 huggingface_hub 包的目录中找到
constants.py文件(通常位于虚拟环境路径下的Lib/site-packages/huggingface_hub), 在import os之后添加一行:os.environ['HF_ENDPOINT'] = 'https://hf-mirror.com'
ValueError: 三通道遮罩未包含前景像素 (xxxx...)
此错误是由于在使用 PyMatting 方法处理遮罩边缘时,遮罩区域过大或过小所致。
解决方案:
- 请调整参数以改变遮罩的有效区域。或者使用其他方法来处理边缘。
Requests.exceptions.ProxyError: HTTPSConnectionPool(xxxx...)
出现此错误时,请检查您的网络环境。
Update
**If the dependency package error after updating, please double clicking repair_dependency.bat (for Official ComfyUI Protable) or repair_dependency_aki.bat (for ComfyUI-aki-v1.x) in the plugin folder to reinstall the dependency packages.
Commit ImageBatchToList and ImageListToBatch nodes, Used for converting single batches of images into multiple small batches and vice versa, with option to define the maximum number of images in each small batch.
Commit DistortDisplace node, Generate displacement deformation effects for material images.
Commit MaskEdgeUltraDetailV3 node, By processing different partitions through inputting a trimap mask, a more refined overall mask including translucent parts is generated.
Commit ImageCompositeHandleMask node, used to generate local feathering masks and cropping data.
Commit DrawRoundedRectangle node, used to generate rounded rectangle masks.
Commit FluxKontextImageScale node, based on official node modifications, used to resizes the image to one that is more optimal for flux kontext. For images with different aspect ratio, the scale will be adjusted appropriately to maintain all information.
Commit MaskBoxExtend node, used to generate BBOX mask extension range and output as Mask.
Commit ColorNegative node, used to invert the color of image.
Commit LoadImagesFromPath and ImageTaggerSaveV2 nodes, used to load a list of images from a folder and save images and tagger text file with corresponding file names.
Commit LoadImageFromPath node, The images in a folder can be loaded and output as image list, also supporting output of a list corresponding to a file name.
Commit SegformerUltraV3, LoadSegformerModel, SegformerClothesSetting and SegformerFashionSetting nodes, Separate the loading of models and settings to save resources when using multiple nodes.
Add multiple languages and increase support for 5 languages: Chinese, French, Japanese, Korean and Russian. This feature producted by ComfyUI-Globalization-Node-Translation, thank you to the original author.
Commit HalfTone node, use for halftone processing of images.
Add QuarkNetdisk model download link.
Support numpy 2.x dependency package.
Commit PurgeVRAM V2 node.
Commit ChoiceTextPreset and TextPreseter nodes, used for preset text and selecting preset text output.
StringCondition add the option of comparing strings to determine if they are the same.
Commit NameToColor node, Output colors based on their names.
Commit ImageMaskScaleAsV2 node, Add background color settings on the basis of the original node.
Commit RoundedRectangle node, Used to create rounded rectangle and mask.
Commit AnyRerouter node, Used for reroute any type of data.
Commit ICMask and ICMaskCropBack nodes, Used for generating In-Context image and mask, and automatic crop back. The code is from lrzjason/Comfyui-In-Context-Lora-Utils , Thanks to the original author @小志Jason.
Commit GetMainColorsV2 node, add sorting by color area and output color values and proportions in the preview image. This part of the code was improved by @ HL, thanks.
Optimize dependency packages. Optimize some algorithms.
Split some nodes of the dependencies that are prone to problems into ComfyUI_LayerStyle_Advance repository. Including: LayerMask: BiRefNetUltra, LayerMask: BiRefNetUltraV2, LayerMask: LoadBiRefNetModel, LayerMask: LoadBiRefNetModelV2,
LayerMask: EVFSAMUltra, LayerMask: Florence2Ultra, LayerMask: LoadFlorence2Model, LayerUtility: Florence2Image2Prompt,
LayerUtility: GetColorTone, LayerUtility: GetColorToneV2, LayerMask: HumanPartsUltra,
LayerUtility: ImageAutoCrop, LayerUtility: ImageAutoCropV2, LayerUtility: ImageAutoCropV3,
LayerUtility: ImageRewardFilter, LayerUtility: LoadJoyCaption2Model, LayerUtility: JoyCaption2Split,
LayerUtility: JoyCaption2, LayerUtility: JoyCaption2ExtraOptions, LayerUtility: LaMa,
LayerUtility: LlamaVision, LayerUtility: LoadPSD, LayerMask: MaskByDifferent, LayerMask: MediapipeFacialSegment,
LayerMask: BBoxJoin, LayerMask: DrawBBoxMask, LayerMask: ObjectDetectorFL2, LayerMask: ObjectDetectorMask,
LayerMask: ObjectDetectorYOLO8, LayerMask: ObjectDetectorYOLOWorld, LayerMask: PersonMaskUltra, LayerMask: PersonMaskUltra V2,
LayerUtility: PhiPrompt, LayerUtility: PromptEmbellish, LayerUtility: PromptTagger, LayerUtility: CreateQRCode, LayerUtility: DecodeQRCode,
LayerUtility: QWenImage2Prompt, LayerMask: SAM2Ultra, LayerMask: SAM2VideoUltra, LayerUtility: SaveImagePlus, LayerUtility: SD3NegativeConditioning,
LayerMask: SegmentAnythingUltra, LayerMask: SegmentAnythingUltra V2, LayerMask: TransparentBackgroundUltra,
LayerUtility: UserPromptGeneratorTxt2ImgPrompt, LayerUtility: UserPromptGeneratorTxt2ImgPromptWithReference, LayerUtility: UserPromptGeneratorReplaceWord,
LayerUtility: AddBlindWaterMark, LayerUtility: ShowBlindWaterMark, LayerMask: YoloV8DetectMerge the PR submitted by alexisrolland , commit the
Image Blend Advanced v3andDrop Shadow v3nodes, support transparent background.Commit BenUltra and LoadBenModel nodes. These two nodes are the implementation of PramaLLC/BEN project in ComfyUI.
Download theBEN_Base.pthandconfig.jsonfrom huggingface or BaiduNetdisk and copy toComfyUI/models/BENfolder.Merge the PR submitted by jimlee2048, add the LoadBiRefNetModelV2 node, and support loading RMBG 2.0 models.
Download the model files from huggingface or BaiduNetdisk and copy toComfyUI/models/BiRefNet/RMBG-2.0folder.Florence2 nodes support base-PromptGen-v2.0 and large-PromptGen-v2.0, Download
base-PromptGen-v2.0andlarge-PromptGen-v2.0two folder from huggingface or BaiduNetdisk and copy toComfyUI/models/florence2folder.SAM2Ultra and ObjectDetector nodes support image batch.
SAM2Ultra and SAM2VideoUltra nodes add support for SAM2.1 model, including kijai's FP16 model. Download model files from BaiduNetdisk or huggingface.co/Kijai/sam2-safetensors and copy to
ComfyUI/models/sam2folder.Commit JoyCaption2Split and LoadJoyCaption2Model nodes, Sharing the model across multiple JoyCaption2 nodes improves efficiency.
SegmentAnythingUltra and SegmentAnythingUltraV2 add the
cache_modeloption, Easy to flexibly manage VRAM usage.Due to the high version requirements of the LlamaVision node for
transformers, which affects the loading of some older third-party plugins, so the LayerStyle plugin has lowered the default requirement to 4.43.2. If you need to run LlamaVision, please upgrade to 4.45.0 or above on your own.Commit JoyCaption2 and JoyCaption2ExtraOptions nodes. New dependency packages need to be installed. Use the JoyCaption-alpha-two model for local inference. Can be used to generate prompt words. this node is https://huggingface.co/John6666/joy-caption-alpha-two-cli-mod Implementation in ComfyUI, thank you to the original author. Download models form BaiduNetdisk and BaiduNetdisk , or huggingface/Orenguteng and huggingface/unsloth , then copy to
ComfyUI/models/LLM, Download models from BaiduNetdisk or huggingface/google , and copy toComfyUI/models/clip, Donwload thecgrkzexw-599808folder from BaiduNetdisk or huggingface/John6666 , and copy toComfyUI/models/Joy_caption。Commit LlamaVision node, Use the Llama 3.2 vision model for local inference. Can be used to generate prompt words. part of the code for this node comes from ComfyUI-PixtralLlamaMolmoVision, thank you to the original author. To use this node, the
transformersneed upgraded to 4.45.0 or higher. Download models from BaiduNetdisk or huggingface/SeanScripts , and copy toComfyUI/models/LLM.Commit RandomGeneratorV2 node, add least random range and seed options.
Commit TextJoinV2 node, add delimiter options on top of TextJion.
Commit GaussianBlurV2 node, The parameter accuracy has been improved to 0.01.
Commit UserPromptGeneratorTxtImgWithReference node.
Commit GrayValue node, output the grayscale values corresponding to the RGB color values.
LUT Apply, TextImageV2, TextImage, SimpleTextImage nodes to support defining multiple folders in
resource-dir.ini, separated by commas, semicolons, or spaces. Simultaneously supports refreshing real-time updates.LUT Apply, TextImageV2, TextImage, SimpleTextImage nodes support defining multi directory fonts and lut folders, and support refreshing and real-time updates.
Commit HumanPartsUltra node, used to generate human body parts masks. It is based on the warrper of metal3d/ComfyUI_Human_Parts, thank the original author. Download model file from BaiduNetdisk or huggingface and copy to
ComfyUI\models\onnx\human-partsfolder.ObjectDetector nodes add sort by confidence option.
Commit DrawBBoxMask node, used to convert the BBoxes output by the Object Detector node into a mask.
Commit UserPromptGeneratorTxtImg and UserPromptGeneratorReplaceWord nodes, Used to generate text and image prompts and replace prompt content.
Commit PhiPrompt node, Use Microsoft Phi 3.5 text and visual models for local inference. Can be used to generate prompt words, process prompt words, or infer prompt words from images. Running this model requires at least 16GB of video memory.
Download model files from BaiduNetdisk or huggingface.co/microsoft/Phi-3.5-vision-instruct and huggingface.co/microsoft/Phi-3.5-mini-instruct and copy toComfyUI\models\LLMfolder.Commit GetMainColors node, it can obtained 5 main colors of image. Commit ColorName node, it can obtain the color name of input color value.
Duplicate the Brightness & Contrast node as BrightnessContrastV2, the Color of Shadow & Highlight node as ColorofShadowHighlight, and Shadow & Highlight Mask to Shadow Highlight Mask V2, to avoid errors in ComfyUI workflow parsing caused by the "&" character in the node name.
Commit VQAPrompt and LoadVQAModel nodes.
Download the model from BaiduNetdisk or huggingface.co/Salesforce/blip-vqa-capfilt-large and huggingface.co/Salesforce/blip-vqa-base and copy toComfyUI\models\VQAfolder.Florence2Ultra, Florence2Image2Prompt 和 LoadFlorence2Model nodes support the MiaoshouAI/Florence-2-large-PromptGen-v1.5 and MiaoshouAI/Florence-2-base-PromptGen-v1.5 model.
Download model files from BaiduNetdisk or huggingface.co/MiaoshouAI/Florence-2-large-PromptGen-v1.5 and huggingface.co/MiaoshouAI/Florence-2-base-PromptGen-v1.5 , copy toComfyUI\models\florence2folder.Commit BiRefNetUltraV2 and LoadBiRefNetModel nodes, that support the use of the latest BiRefNet model. Download model file from BaiduNetdisk or GoogleDrive named
BiRefNet-general-epoch_244.pthtoComfyUI/Models/BiRefNet/pthfolder. You can also download more BiRefNet models and put them here.ExtendCanvasV2 node support negative value input, it means image will be cropped.
The default title color of nodes is changed to blue-green, and nodes in LayerStyle, LayerColor, LayerMask, LayerUtility, and LayerFilter are distinguished by different colors.
The Object Detector nodes added sort bbox option, which allows sorting from left to right, top to bottom, and large to small, making object selection more intuitive and convenient. The nodes released yesterday has been abandoned, please manually replace it with the new version node (sorry).
Commit SAM2Ultra, SAM2VideoUltra, ObjectDetectorFL2, ObjectDetectorYOLOWorld, ObjectDetectorYOLO8, ObjectDetectorMask and BBoxJoin nodes. Download models from BaiduNetdisk or huggingface.co/Kijai/sam2-safetensors and copy to
ComfyUI/models/sam2folder, Download models from BaiduNetdisk or GoogleDrive and copy toComfyUI/models/yolo-worldfolder. This update introduces new dependencies, please reinstall the dependency package.Commit RandomGenerator node, Used to generate random numbers within a specified range, with outputs of int, float, and boolean, supporting batch generation of different random numbers by image batch.
Commit EVF-SAMUltra node, it is implementation of EVF-SAM in ComfyUI. Please download model files from BaiduNetdisk or huggingface/EVF-SAM2, huggingface/EVF-SAM to
ComfyUI/models/EVF-SAMfolder(save the models in their respective subdirectories). Due to the introduction of new dependencies package, after the plugin upgrade, please reinstall the dependency packages.Commit ImageTaggerSave and ImageAutoCropV3 nodes. Used to implement the automatic trimming and marking workflow for the training set (the workflow
image_tagger_save.jsonis located in the workflow directory).Commit CheckMaskV2 node, Added the
simplemethod to detect masks more quickly.Commit ImageReel and ImageReelComposite nodes to composite multiple images on a canvas.
NumberCalculatorV2 and NumberCalculator add the
minandmaxmethod.Optimize node loading speed.
Florence2Image2Prompt add support for
thwri/CogFlorence-2-Large-Freezeandthwri/CogFlorence-2.1-Largemodels. Please download the model files from BaiduNetdisk or huggingface/CogFlorence-2-Large-Freeze and huggingface/CogFlorence-2.1-Large , then copy it toComfyUI/models/florence2folder.Merge branch from ClownsharkBatwing "Use GPU for color blend mode", the speed of some layer blends by more than ten times.
Commit Florence2Ultra, Florence2Image2Prompt and LoadFlorence2Model nodes.
TransparentBackgroundUltra node add new model support. Please download the model file according to the instructions.
Commit SegformerUltraV2, SegfromerFashionPipeline and SegformerClothesPipeline nodes, used for segmentation of clothing. please download the model file according to the instructions.
Commit
install_requirements.batandinstall_requirements_aki.bat, One click solution to install dependency packages.Commit TransparentBackgroundUltra node, it remove background based on transparent-background model.
Change the VitMatte model of the Ultra node to a local call. Please download all files of vitmatte model to the
ComfyUI/models/vitmattefolder.GetColorToneV2 node add the
maskmethod to the color selection option, which can accurately obtain the main color and average color within the mask.ImageScaleByAspectRatioV2 node add the "background_color" option.
LUT Apply Add the "strength" option.
Commit AutoAdjustV2 node, add optional mask input and support for multiple automatic color adjustment modes.
Due to the upcoming discontinuation of gemini-pro vision services, PromptTagger and PromptEmbellish have added the "gemini-1.5-flash" API to continue using it.
Ultra nodes added the option to run
VitMatteon the CUDA device, resulting in a 5-fold increase in running speed.Commit QueueStop node, used to terminate the queue operation.
Optimize performance of the
VitMatemethod for Ultra nodes when processing large-size image.CropByMaskV2 add option to round the cutting size by multiples.
Commit CheckMask node, it detect whether the mask contains sufficient effective areas. Commit HSVValue node, it convert color values to HSV values.
BooleanOperatorV2, NumberCalculatorV2, Integer, Float, Boolean nodes add string output to output the value as a string for use with SwitchCase.
Commit SwitchCase node, Switches the output based on the matching string. Can be used for any type of data switching.
Commit String node, Used to output a string. It is the TextBox simplified node.
Commit If node,Switches output based on Boolean conditional input. Can be used for any type of data switching.
Commit StringCondition node, Determines whether the text contains or does not contain a substring.
Commit NumberCalculatorV2 node,Add the nth root operation. Commit BooleanOperatorV2 node, Increasing greater/less than, greater/less then or equal logical judgment. The two nodes can access numeric inputs and can input numeric values within the node. Note: Numeric input takes precedence. Values in nodes will not be valid when there is input.
Commit SD3NegativeConditioning node, Encapsulate the four nodes of Negative Condition in SD3 into a separate node.
ImageRemoveAlpha node add optional mask input.
Commit HLFrequencyDetailRestore node, Using low-frequency filtering and high-frequency preserving to restore image details, the fusion is better.
Commit AddGrain and MaskGrain nodes, Add noise to a picture or mask.
Commit FilmV2 node, The fastgrain method is added on the basis of the previous one, and the noise generation speed is 10 times faster.
Commit ImageToMask node, it can be converted image into mask. Supports converting any channel in LAB, RGBA, YUV, and HSV modes into masks, while providing color scale adjustment. Support mask optional input to obtain masks that only include valid parts.
The blackpoint and whitepoint options in some nodes have been changed to slider adjustment for a more intuitive display. Include MaskEdgeUltraDetailV2, SegmentAnythingUltraV2, RmBgUltraV2,PersonMaskUltraV2,BiRefNetUltra, SegformerB2ClothesUltra, BlendIfMask and Levels.
ImageScaleRestoreV2 and ImageScaleByAspectRatioV2 nodes add the
total_pixelmethod to scale images.Commit MediapipeFacialSegment node,Used to segment facial features, including left and right eyebrows, eyes, lips, and teeth.
Commit BatchSelector node,Used to retrieve specified images or masks from batch images or masks.
LayerUtility creates new subdirectories such as SystemIO, Data, and Prompt. Some nodes are classified into subdirectories.
Commit MaskByColor node, Generate a mask based on the selected color.
Commit LoadPSD node, It read the psd format, and output layer images. Note that this node requires the installation of the
psd_toolsdependency package, If error occurs during the installation of psd_tool, such asModuleNotFoundError: No module named 'docopt', please download docopt's whl and manual install it.Commit SegformerB2ClothesUltra node, it used to segment character clothing. The model segmentation code is fromStartHua, thanks to the original author.
SaveImagePlus node adds the output workflow to the json function, supports
%dateand%timeto embeddint date or time to path and filename, and adds the preview switch.Commit SaveImagePlus node,It can customize the directory where the picture is saved, add a timestamp to the file name, select the save format, set the image compression rate, set whether to save the workflow, and optionally add invisible watermarks to the picture.
Commit AddBlindWaterMark, ShowBlindWaterMark nodes, Add invisible watermark and decoded watermark to the picture. Commit CreateQRCode, DecodeQRCode nodes, It can generate two-dimensional code pictures and decode two-dimensional codes.
ImageScaleRestoreV2, ImageScaleByAspectRatioV2, ImageAutoCropV2 nodes add options for
widthandheight, which can specify width or height as fixed values.Commit PurgeVRAM node, Clean up VRAM an RAM.
Commit AutoAdjust node, it can automatically adjust image contrast and white balance.
Commit RGBValue node to output the color value as a single decimal value of R, G, B. This idea is from vxinhao, Thanks.
Commit seed node to output the seed value. The ImageMaskScaleAs, ImageScaleBySpectRatio, ImageScaleBySpectRatioV2, ImageScaleRestore, ImageScaleRestoreV2 nodes increase
width,heightoutput.Commit Levels node, it can achieve the same color levels adjustment function as Photoshop.Sharp&Soft add the "None" option.
Commit BlendIfMask node, This node cooperates with ImgaeBlendV2 or ImageBlendAdvanceV2 to achieve the same Blend If function as Photoshop.
Commit ColorTemperature and ColorBalance nodes, used to adjust the color temperature and color balance of the picture.
Add new types of Blend Mode V2 between images. now supports up to 30 blend modes. The new blend mode is available for all V2 versions that support mixed mode nodes, including ImageBlend V2, ImageBlendAdvance V2, DropShadow V2, InnerShadow V2, OuterGlow V2, InnerGlow V2, Stroke V2, ColorOverlay V2, GradientOverlay V2.
Part of the code for BlendMode V2 is from Virtuoso Nodes for ComfyUI. Thanks to the original authors.Commit YoloV8Detect node.
Commit QWenImage2Prompt node, this node is repackage of the ComfyUI_VLM_nodes's
UForm-Gen2 Qwen Node, thanks to the original author.Commit BooleanOperator, NumberCalculator, TextBox, Integer, Float, Booleannodes. These nodes can perform mathematical and logical operations.
Commit ExtendCanvasV2 node,support color value input.
Commit AutoBrightness node,it can automatically adjust the brightness of image.
CreateGradientMask node add
centeroption.Commit GetColorToneV2 node, can select the main and average colors for the background or body.
Commit ImageRewardFilter node, can filter out poor quality pictures.
Ultra nodes add
VITMatte(local)method, You can choose this method to avoid accessing huggingface.co if you have already downloaded the model before.Commit HDR Effect node,it enhances the dynamic range and visual appeal of input images. this node is repackage of HDR Effects (SuperBeasts.AI).
Commit CropBoxResolve node.
Commit BiRefNetUltra node, it using the BiRefNet model to remove background has better recognition ability and ultra-high edge details.
Commit ImageAutoCropV2 node, it can choose not to remove the background, support mask input, and scale by long or short side size.
Commit ImageHub node, supports up to 9 sets of Image and Mask switching output, and supports random output.
Commit TextJoin node.
Commit PromptEmbellish node. it output polished prompt words, and support inputting images as references.
Ultra nodes have been fully upgraded to V2 version, with the addition of VITMatte edge processing method, which is suitable for handling semi transparent areas. Include MaskEdgeUltraDetailV2, SegmentAnythingUltraV2, RmBgUltraV2 and PersonMaskUltraV2 nodes.
Commit Color of Shadow & Highlight node, it can adjust the color of the dark and bright parts separately. Commit Shadow & Highlight Mask node, it can output mask for dark and bright areas.
Commit CropByMaskV2 node, On the basis of the original node, it supports
crop_boxinput, making it convenient to cut layers of the same size.Commit SimpleTextImage node, it generate simple typesetting images and masks from text. This node references some of the functionalities and code of ZHO-ZHO-ZHO/ComfyUI-Text_Image-Composite.
Commit PromptTagger node,Inference the prompts based on the image. and it can replace key word for the prompt(need apply for Google Studio API key). Upgrade ColorImageV2 and GradientImageV2,support user customize preset sizes and size_as input.
Commit LaMa node, it can erase objects from the image based on the mask. this node is repackage of IOPaint.
Commit ImageRemoveAlpha and ImageCombineAlpha nodes, alpha channel of the image can be removed or merged.
Commit ImageScaleRestoreV2 and ImageScaleByAspectRatioV2 nodes, supports scaling images to specified long or short edge sizes.
Commit PersonMaskUltra node, Generate masks for portrait's face, hair, body skin, clothing, or accessories. the model code for this node comes from a-person-mask-generator.
Commit LightLeak node, this filter simulate the light leakage effect of the film.
Commit Film node, this filter simulate the grain, dark edge, and blurred edge of the film, support input depth map to simulate defocus. it is reorganize and encapsulate of digitaljohn/comfyui-propost.
Commit ImageAutoCrop node, which is designed to generate image materials for training models.
Commit ImageScaleByAspectRatio node, it can be scaled image or mask according to frame ratio.
Fix the bug of color gradation in LUT Apply node rendering, and this node now support for log color space. *Please load the dedicated log lut file for the log color space image.
Commit CreateGradientMask node. Commit LayerImageTransform and LayerMaskTransform nodes.
Commit MaskEdgeUltraDetail node, it process rough masks to ultra fine edges.Commit Exposure node.
Commit Sharp & Soft node, it can enhance or smooth out image details. Commit MaskByDifferent node, it compare two images and output a Mask. Commit SegmentAnythingUltra node, Improve the quality of mask edges. *If SegmentAnything is not installed, you will need to manually download the model.
All nodes have fully supported batch images, providing convenience for video creation. (The CropByMask node only supports cuts of the same size. if a batch mask_for_crop inputted, the data from the first sheet will be used.)
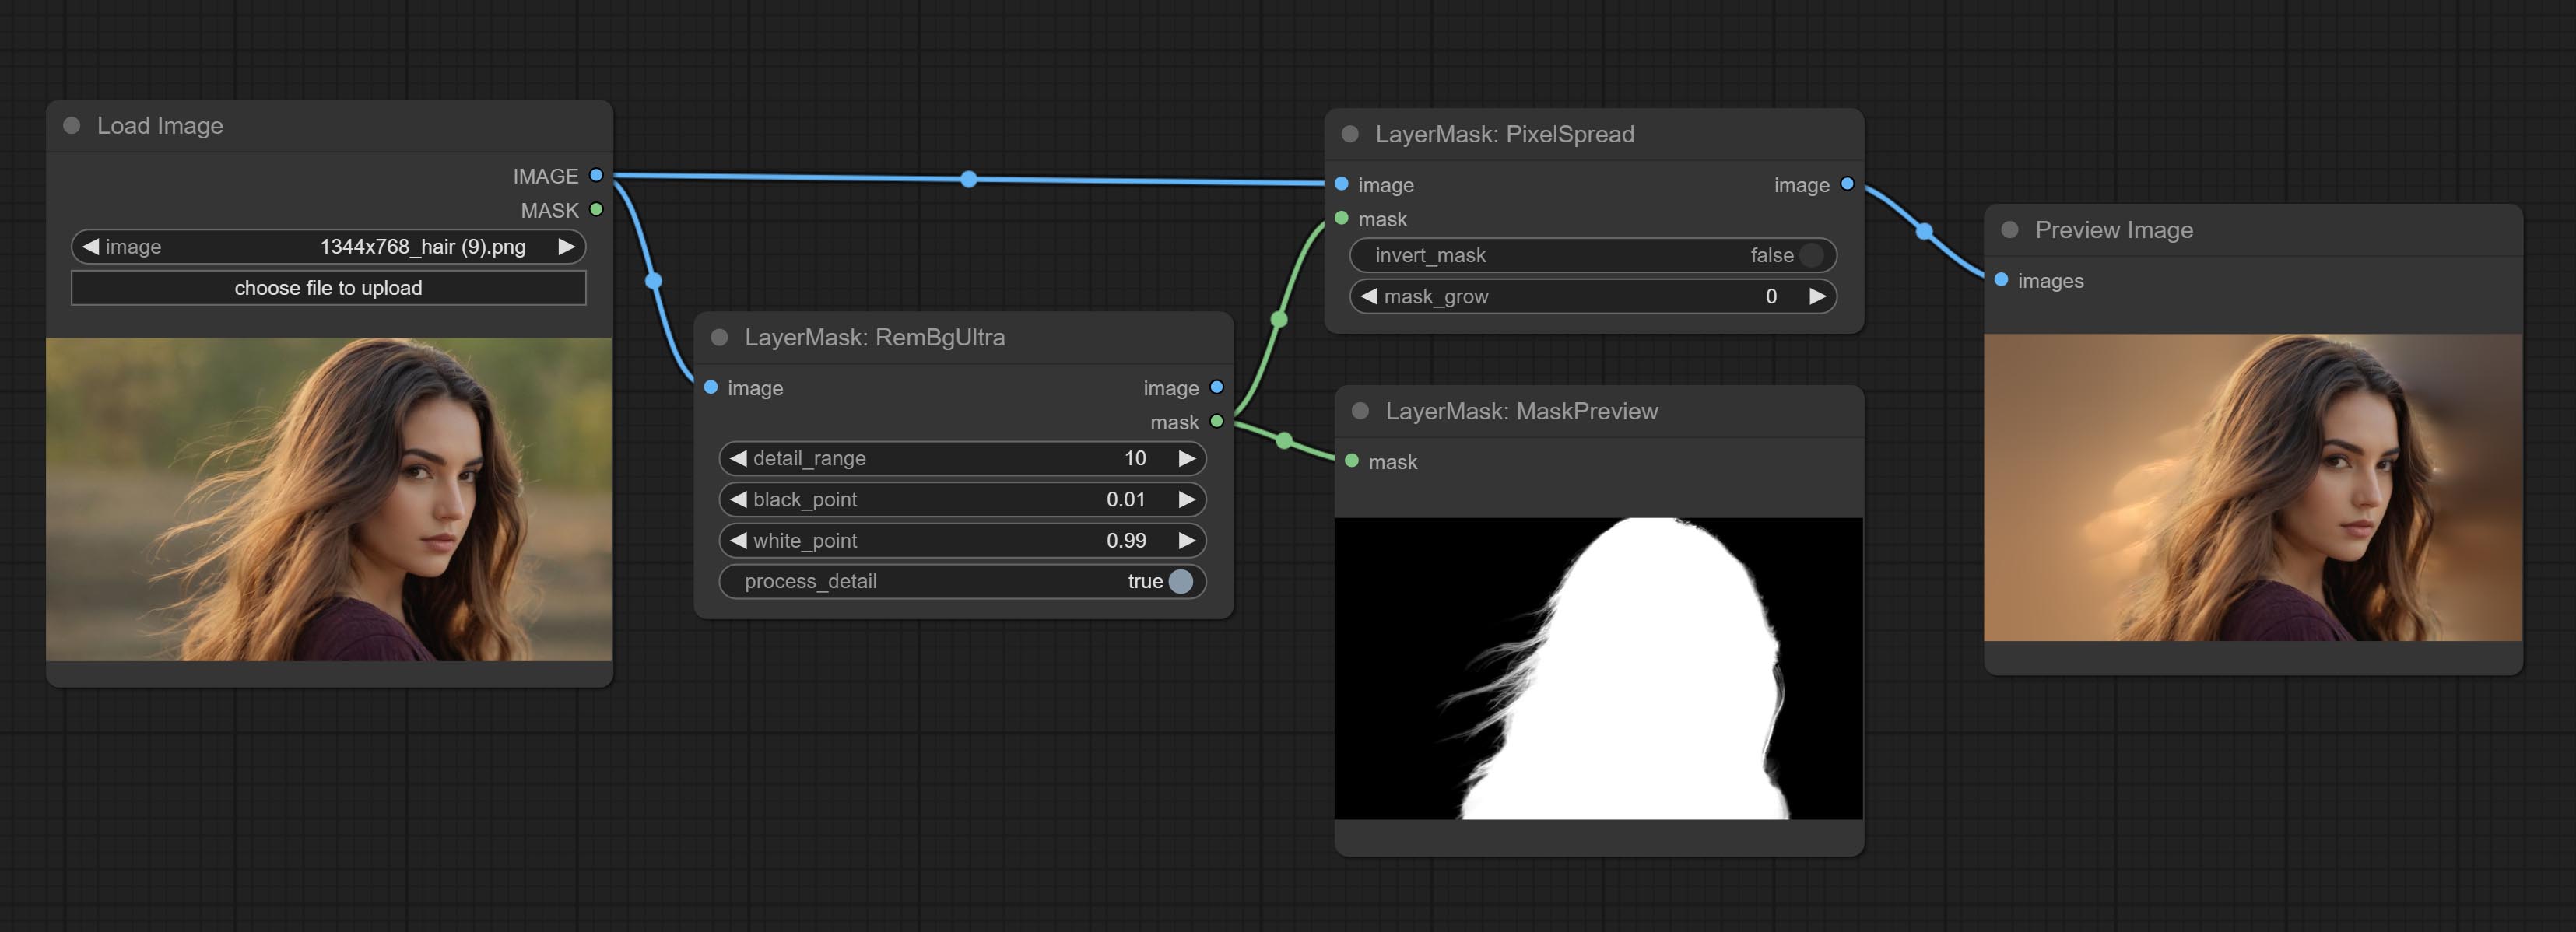
Commit RemBgUltra and PixelSpread nodes significantly improved mask quality. *RemBgUltra requires manual model download.
Commit TextImage node, it generate text images and masks.
Add new types of blend mode between images. now supports up to 19 blend modes. add color_burn, color_dodge, linear_burn, linear_dodge, overlay, soft_light, hard_light, vivid_light, pin_light, linear_light and hard_mix. The newly added blend mode is applicable to all nodes that support blend mode.
Commit ColorMap filter node to create a pseudo color heatmap effect.
Commit WaterColor and SkinBeauty nodes。These are image filters that generate watercolor and skin smoothness effects.
Commit ImageShift node to shift the image and output a displacement seam mask, making it convenient to create continuous textures.
Commit ImageMaskScaleAs node to adjust the image or mask size based on the reference image.
Commit ImageScaleRestore node to work with CropByMask for local upscale and repair works.
Commit CropByMask and RestoreCropBox nodes. The combination of these two can partially crop and redraw the image before restoring it.
Commit ColorAdapter node, that can automatically adjust the color tone of the image.
Commit MaskStroke node, it can generate mask contour strokes.
Add LayerColor node group, used to adjust image color. it include LUT Apply, Gamma, Brightness & Contrast, RGB, YUV, LAB adn HSV.
Commit ImageChannelSplit and ImageChannelMerge nodes.
Commit MaskMotionBlur node.
Commit SoftLight node.
Commit ChannelShake node, that is filter, can produce channel dislocation effect similar like Tiktok logo.
Commit MaskGradient node, can create a gradient in the mask.
Commit GetColorTone node, can obtain the main color or average color of the image. Commit MaskGrow and MaskEdgeShrink nodes.
Commit MaskBoxDetect node, which can automatically detect the position through the mask and output it to the composite node. Commit XY to Percent node to convert absolute coordinates to percent coordinates. Commit GaussianBlur node. Commit GetImageSize node.
Commit ExtendCanvas node.
Commit ImageBlendAdvance node. This node allows for the synthesis of background images and layers of different sizes, providing a more free synthesis experience. Commit PrintInfo node as a workflow debugging aid.
Commit ColorImage and GradientImage nodes, Used to generate solid and gradient color images.
Commit GradientOverlay and ColorOverlay nodes. Add invalid mask input judgment and ignore it when invalid mask is input.
Commit InnerGlow, InnerShadow and MotionBlur nodes.
Renaming all completed nodes, the nodes are divided into 4 groups:LayerStyle, LayerMask, LayerUtility, LayerFilter. workflows containing old version nodes need to be manually replaced with new version nodes.
OuterGlow node has undergone significant modifications by adding options for brightness, light_color, and glow_color.
Commit MaskInvert node.
Commit ColorPick node.
Commit Stroke node.
Commit MaskPreview node.
Commit ImageOpacity node.
The layer_mask is not a mandatory input now. it is allowed to use layers and masks with different shapes, but the size must be consistent.
Commit ImageBlend node.
Commit OuterGlow node.
Commit DropShadow node.
说明
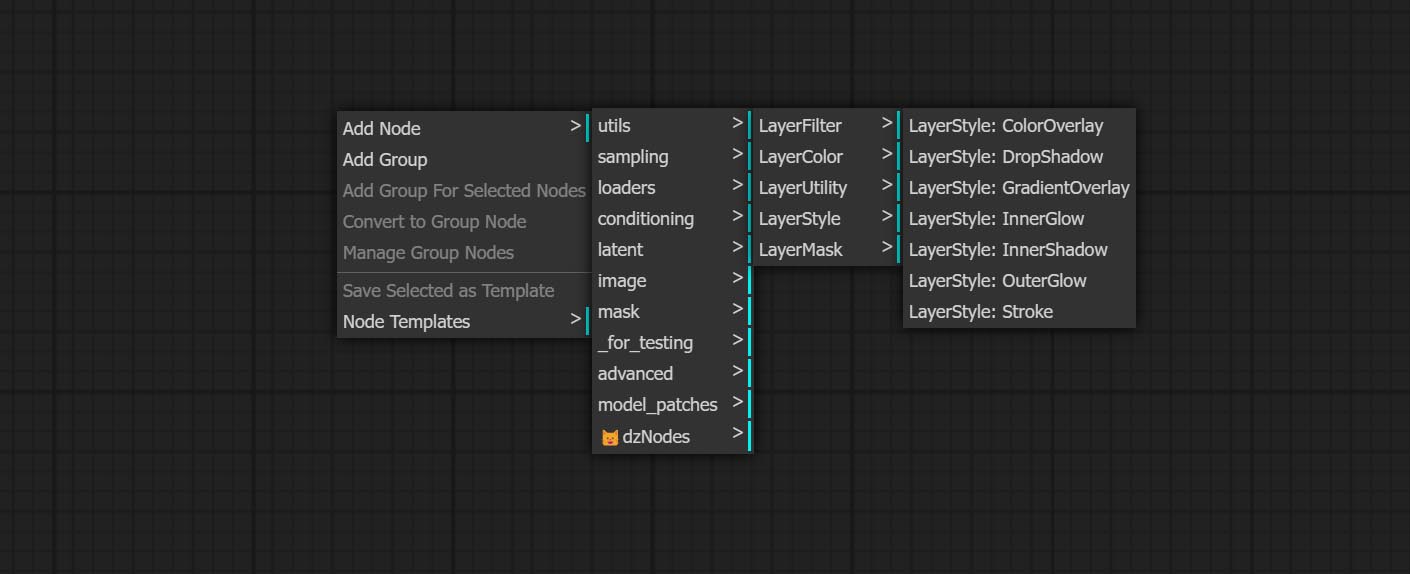
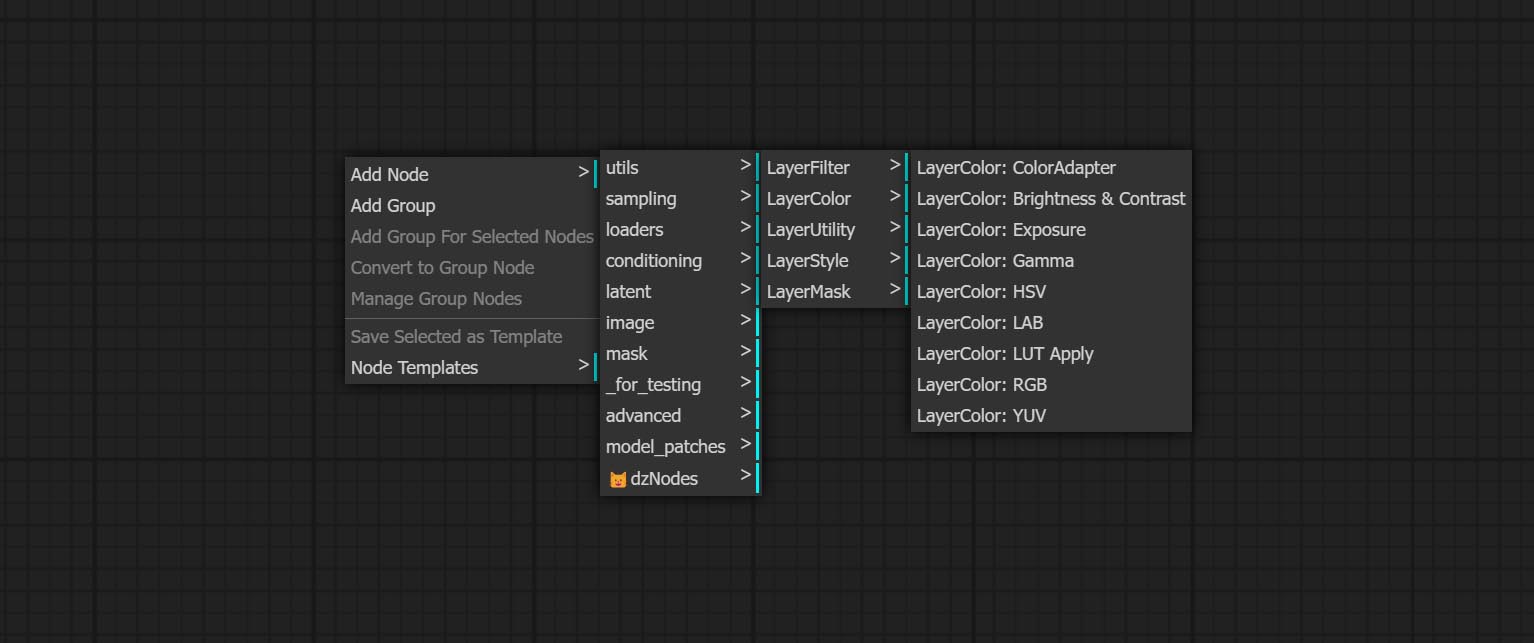
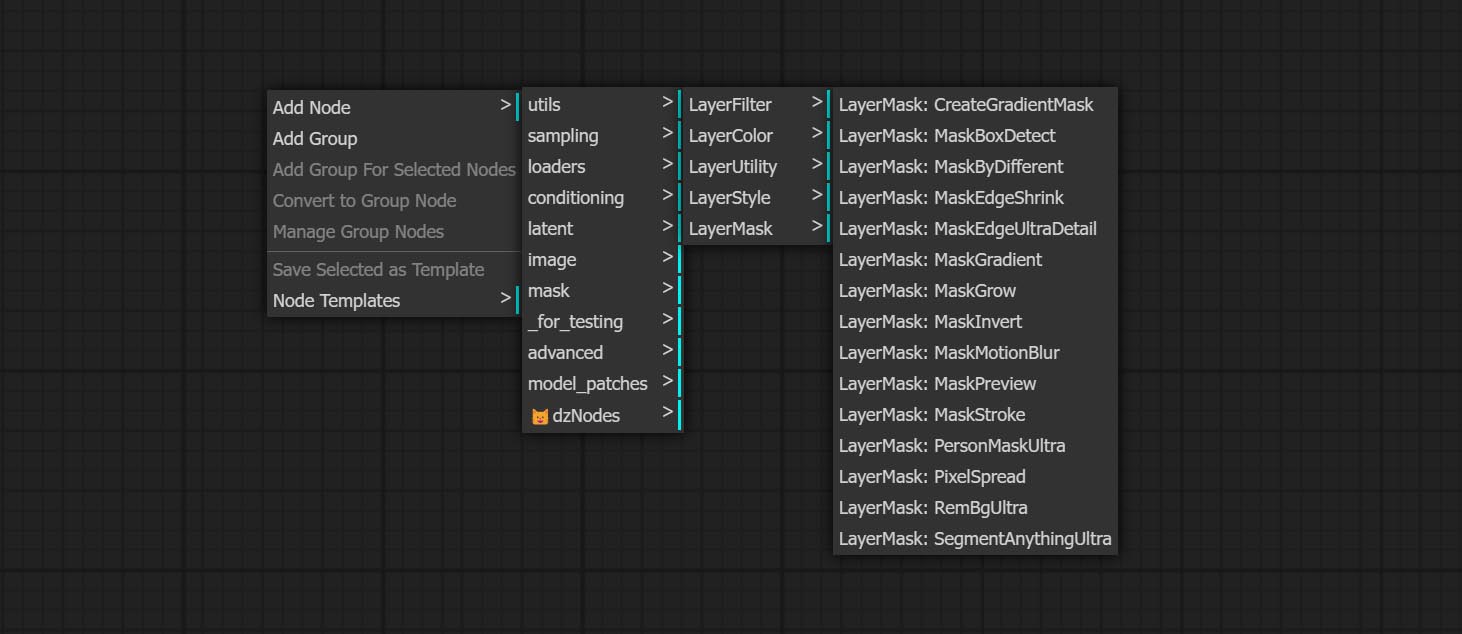
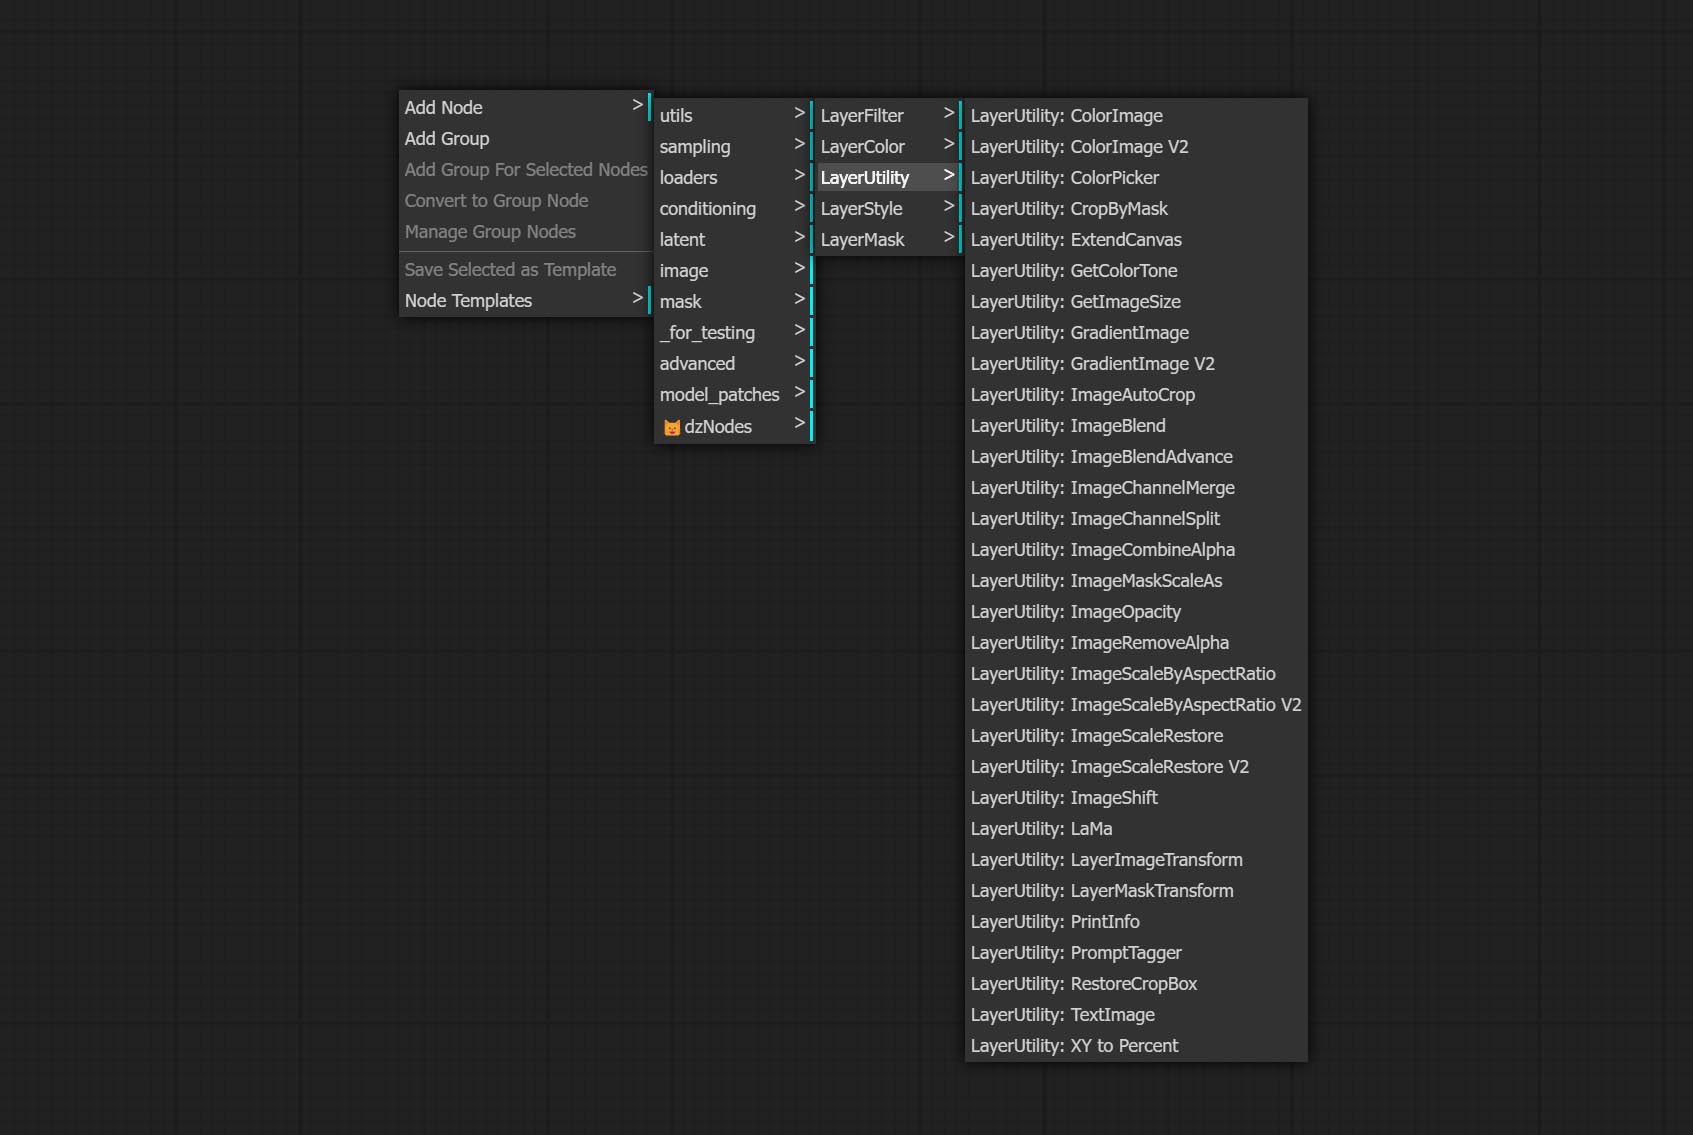
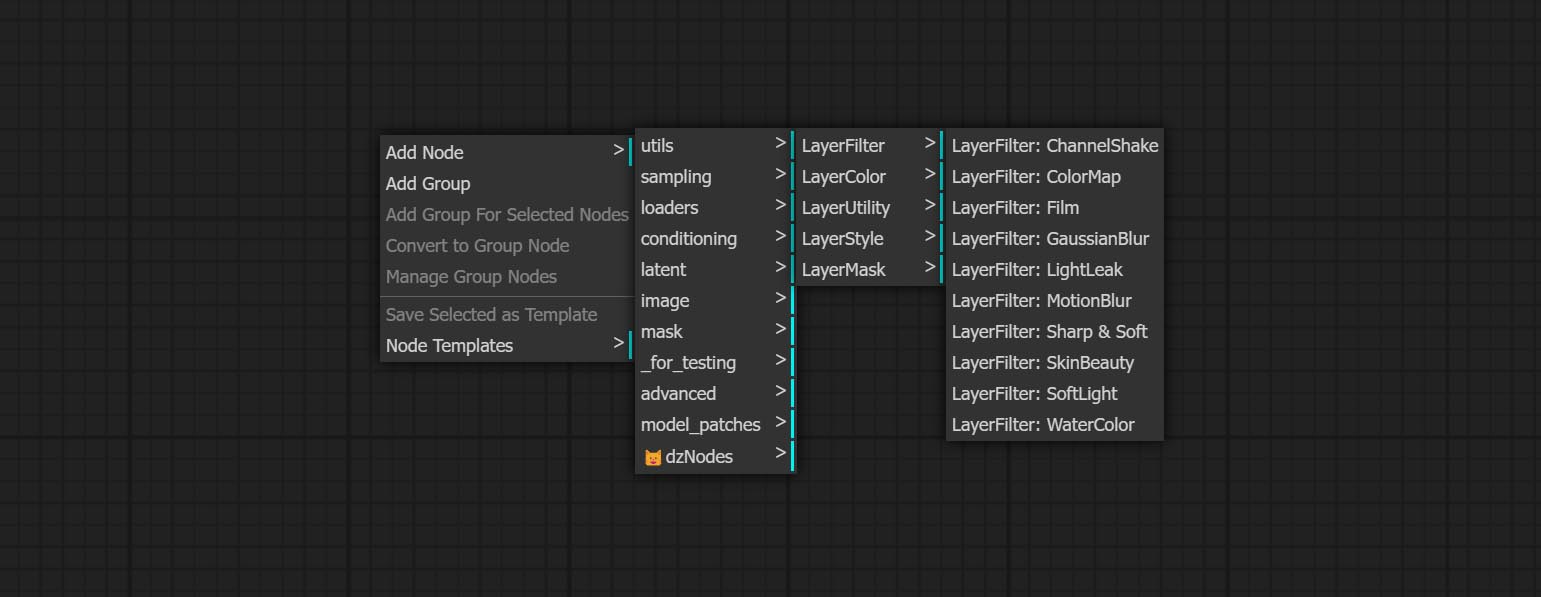
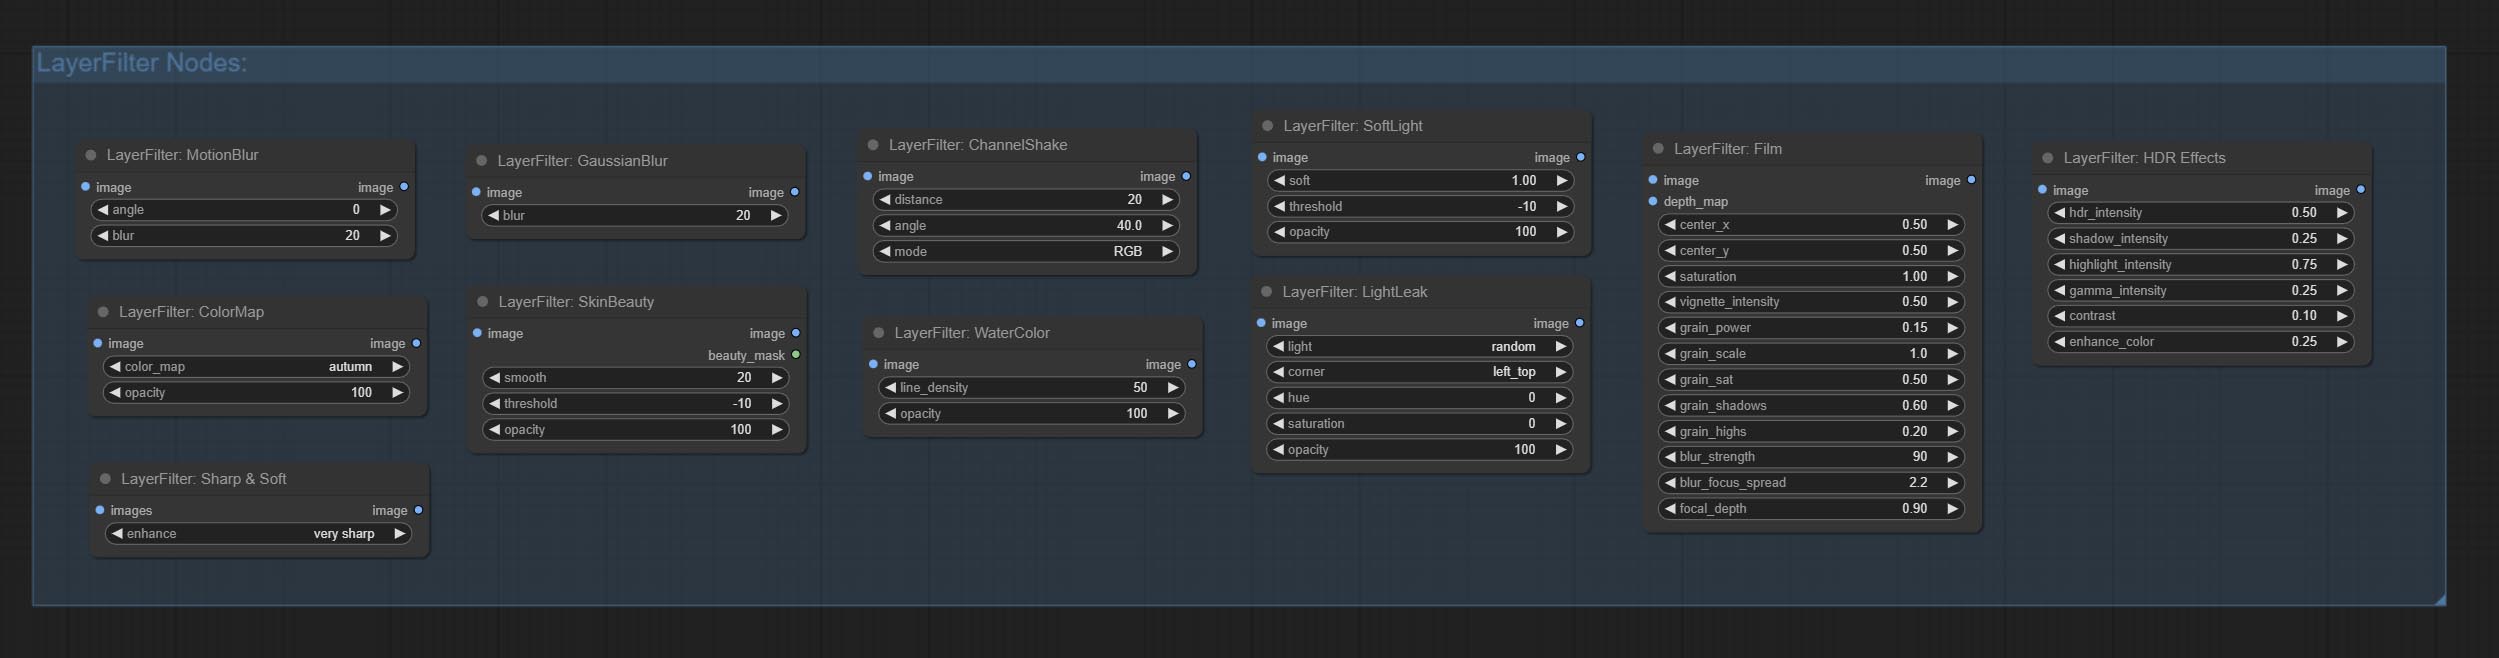
节点根据其功能分为5组:LayerStyle、LayerColor、LayerMask、LayerUtility和LayerFilter。
- LayerStyle 节点提供模仿 Adobe Photoshop 的图层样式。

- LayerColor 节点组提供颜色调整功能。
- LayerMask 节点提供蒙版辅助工具。
- LayerUtility 节点提供与图层合成工具和工作流程相关的辅助节点。
- LayerFilter 节点提供图像效果滤镜。
LayerStyle
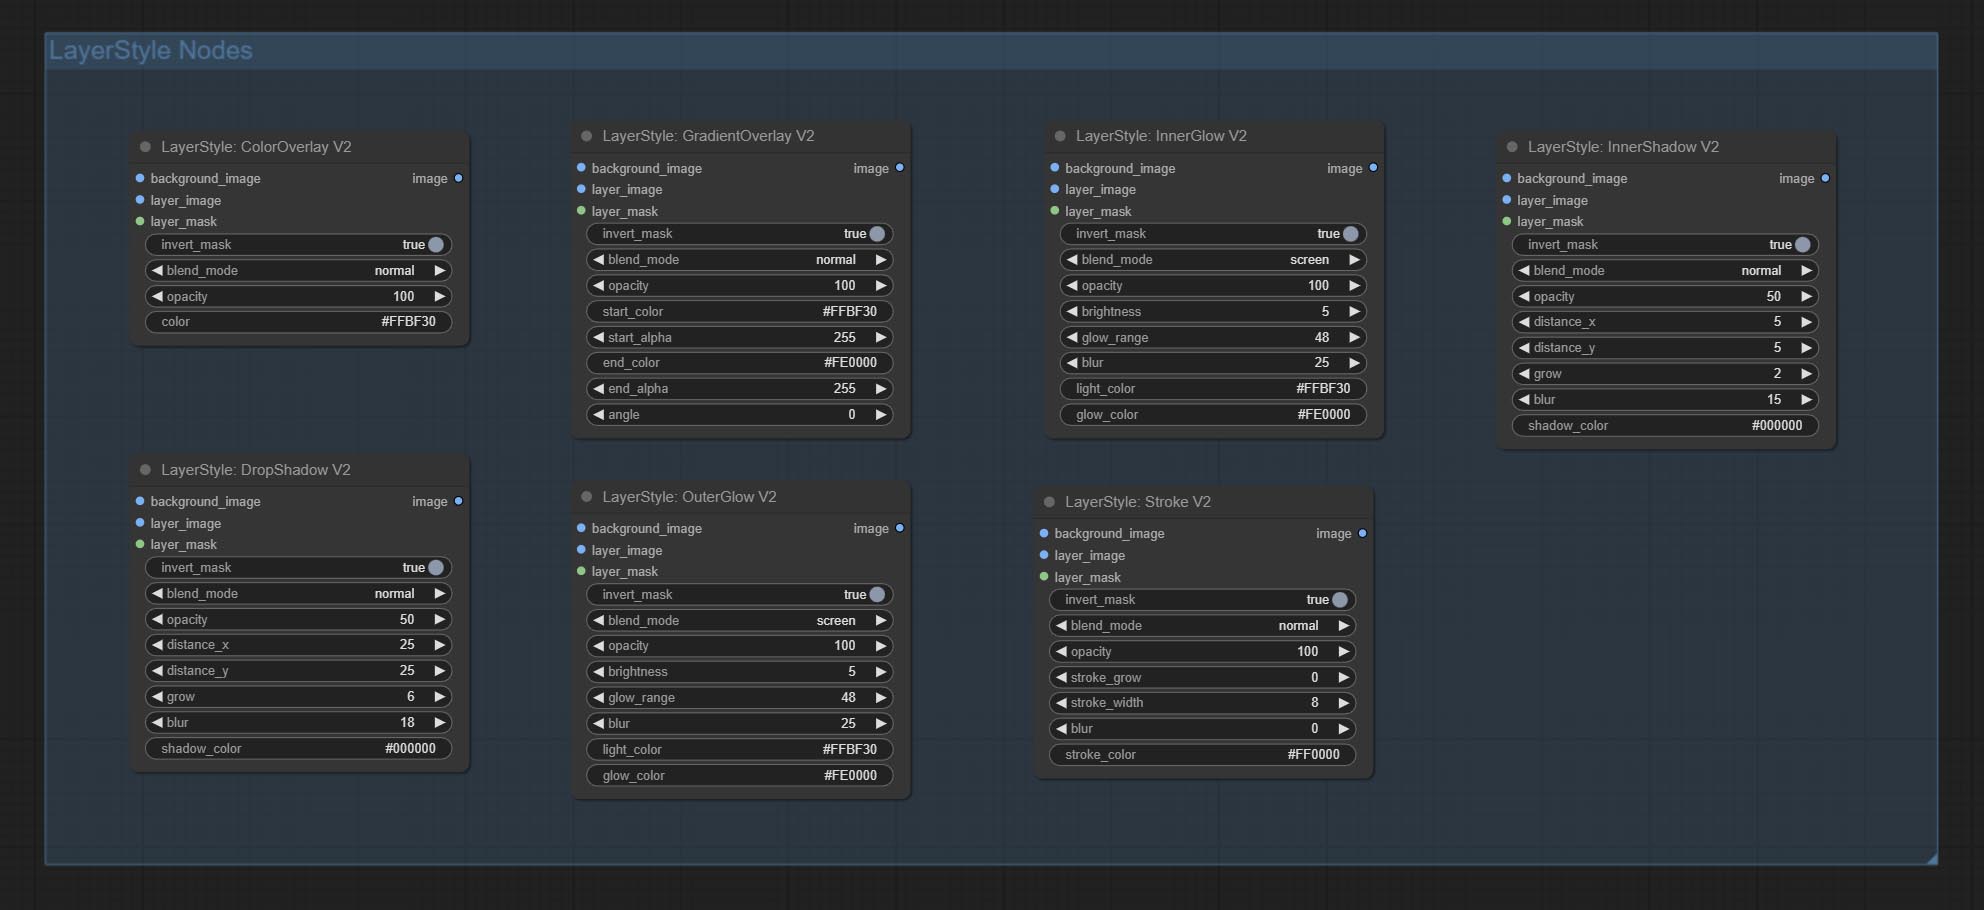
DropShadow
生成阴影
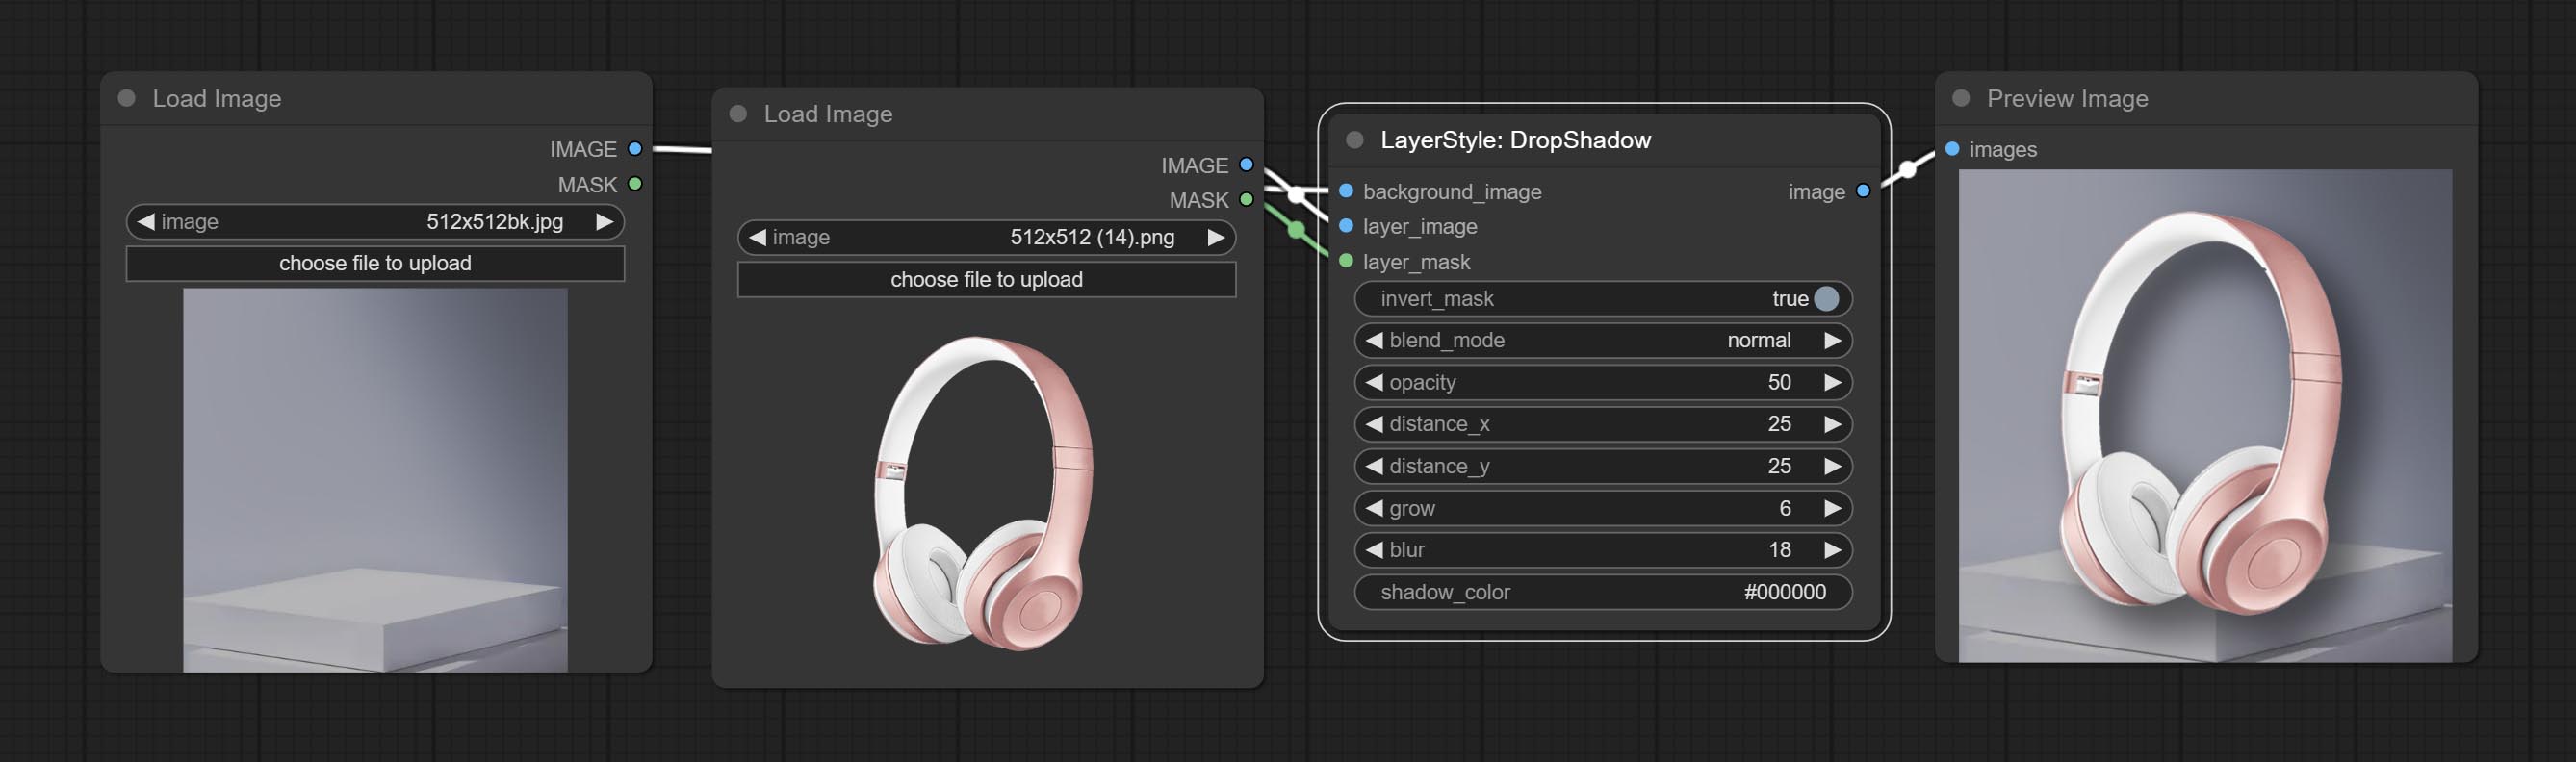
节点选项:
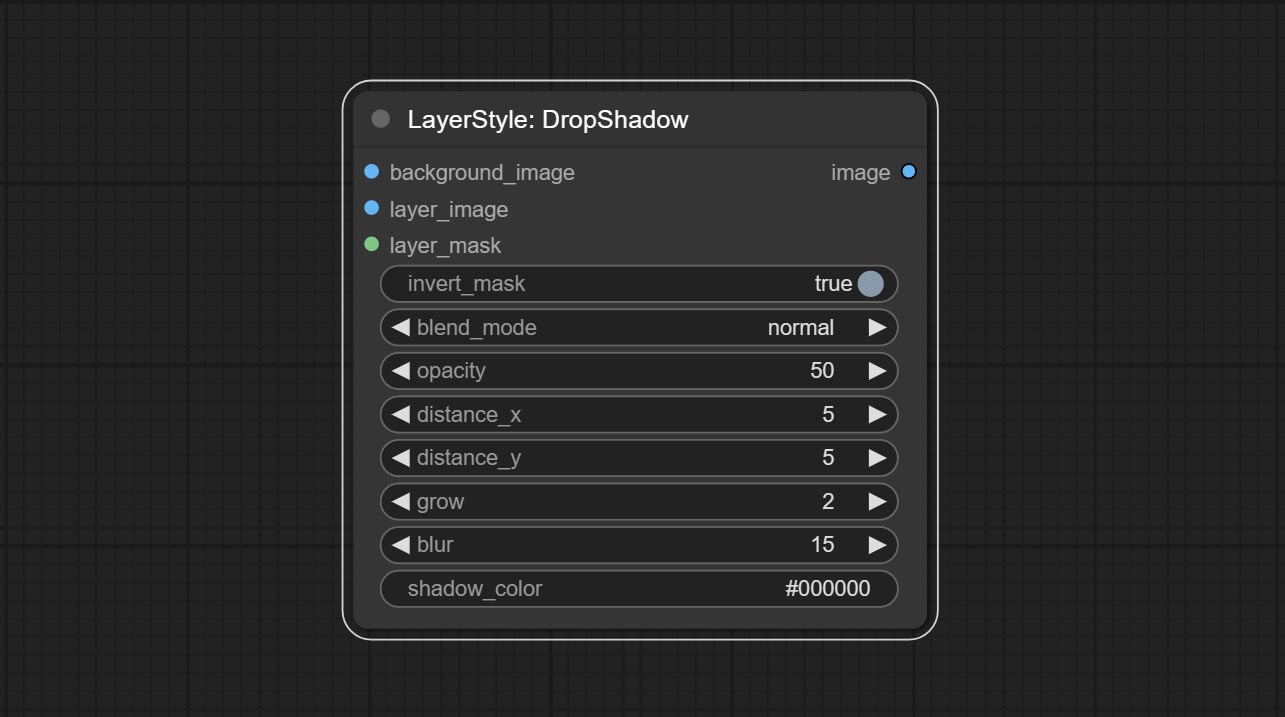
- background_image1:背景图像。
- layer_image1:用于合成的图层图像。
- layer_mask1,2:layer_image 的蒙版,阴影会根据其形状生成。
- invert_mask:是否反转蒙版。
- blend_mode3:阴影的混合模式。
- opacity:阴影的透明度。
- distance_x:阴影的水平偏移量。
- distance_y:阴影的垂直偏移量。
- grow:阴影的扩展幅度。
- blur:阴影的模糊程度。
- shadow_color4:阴影的颜色。
- note
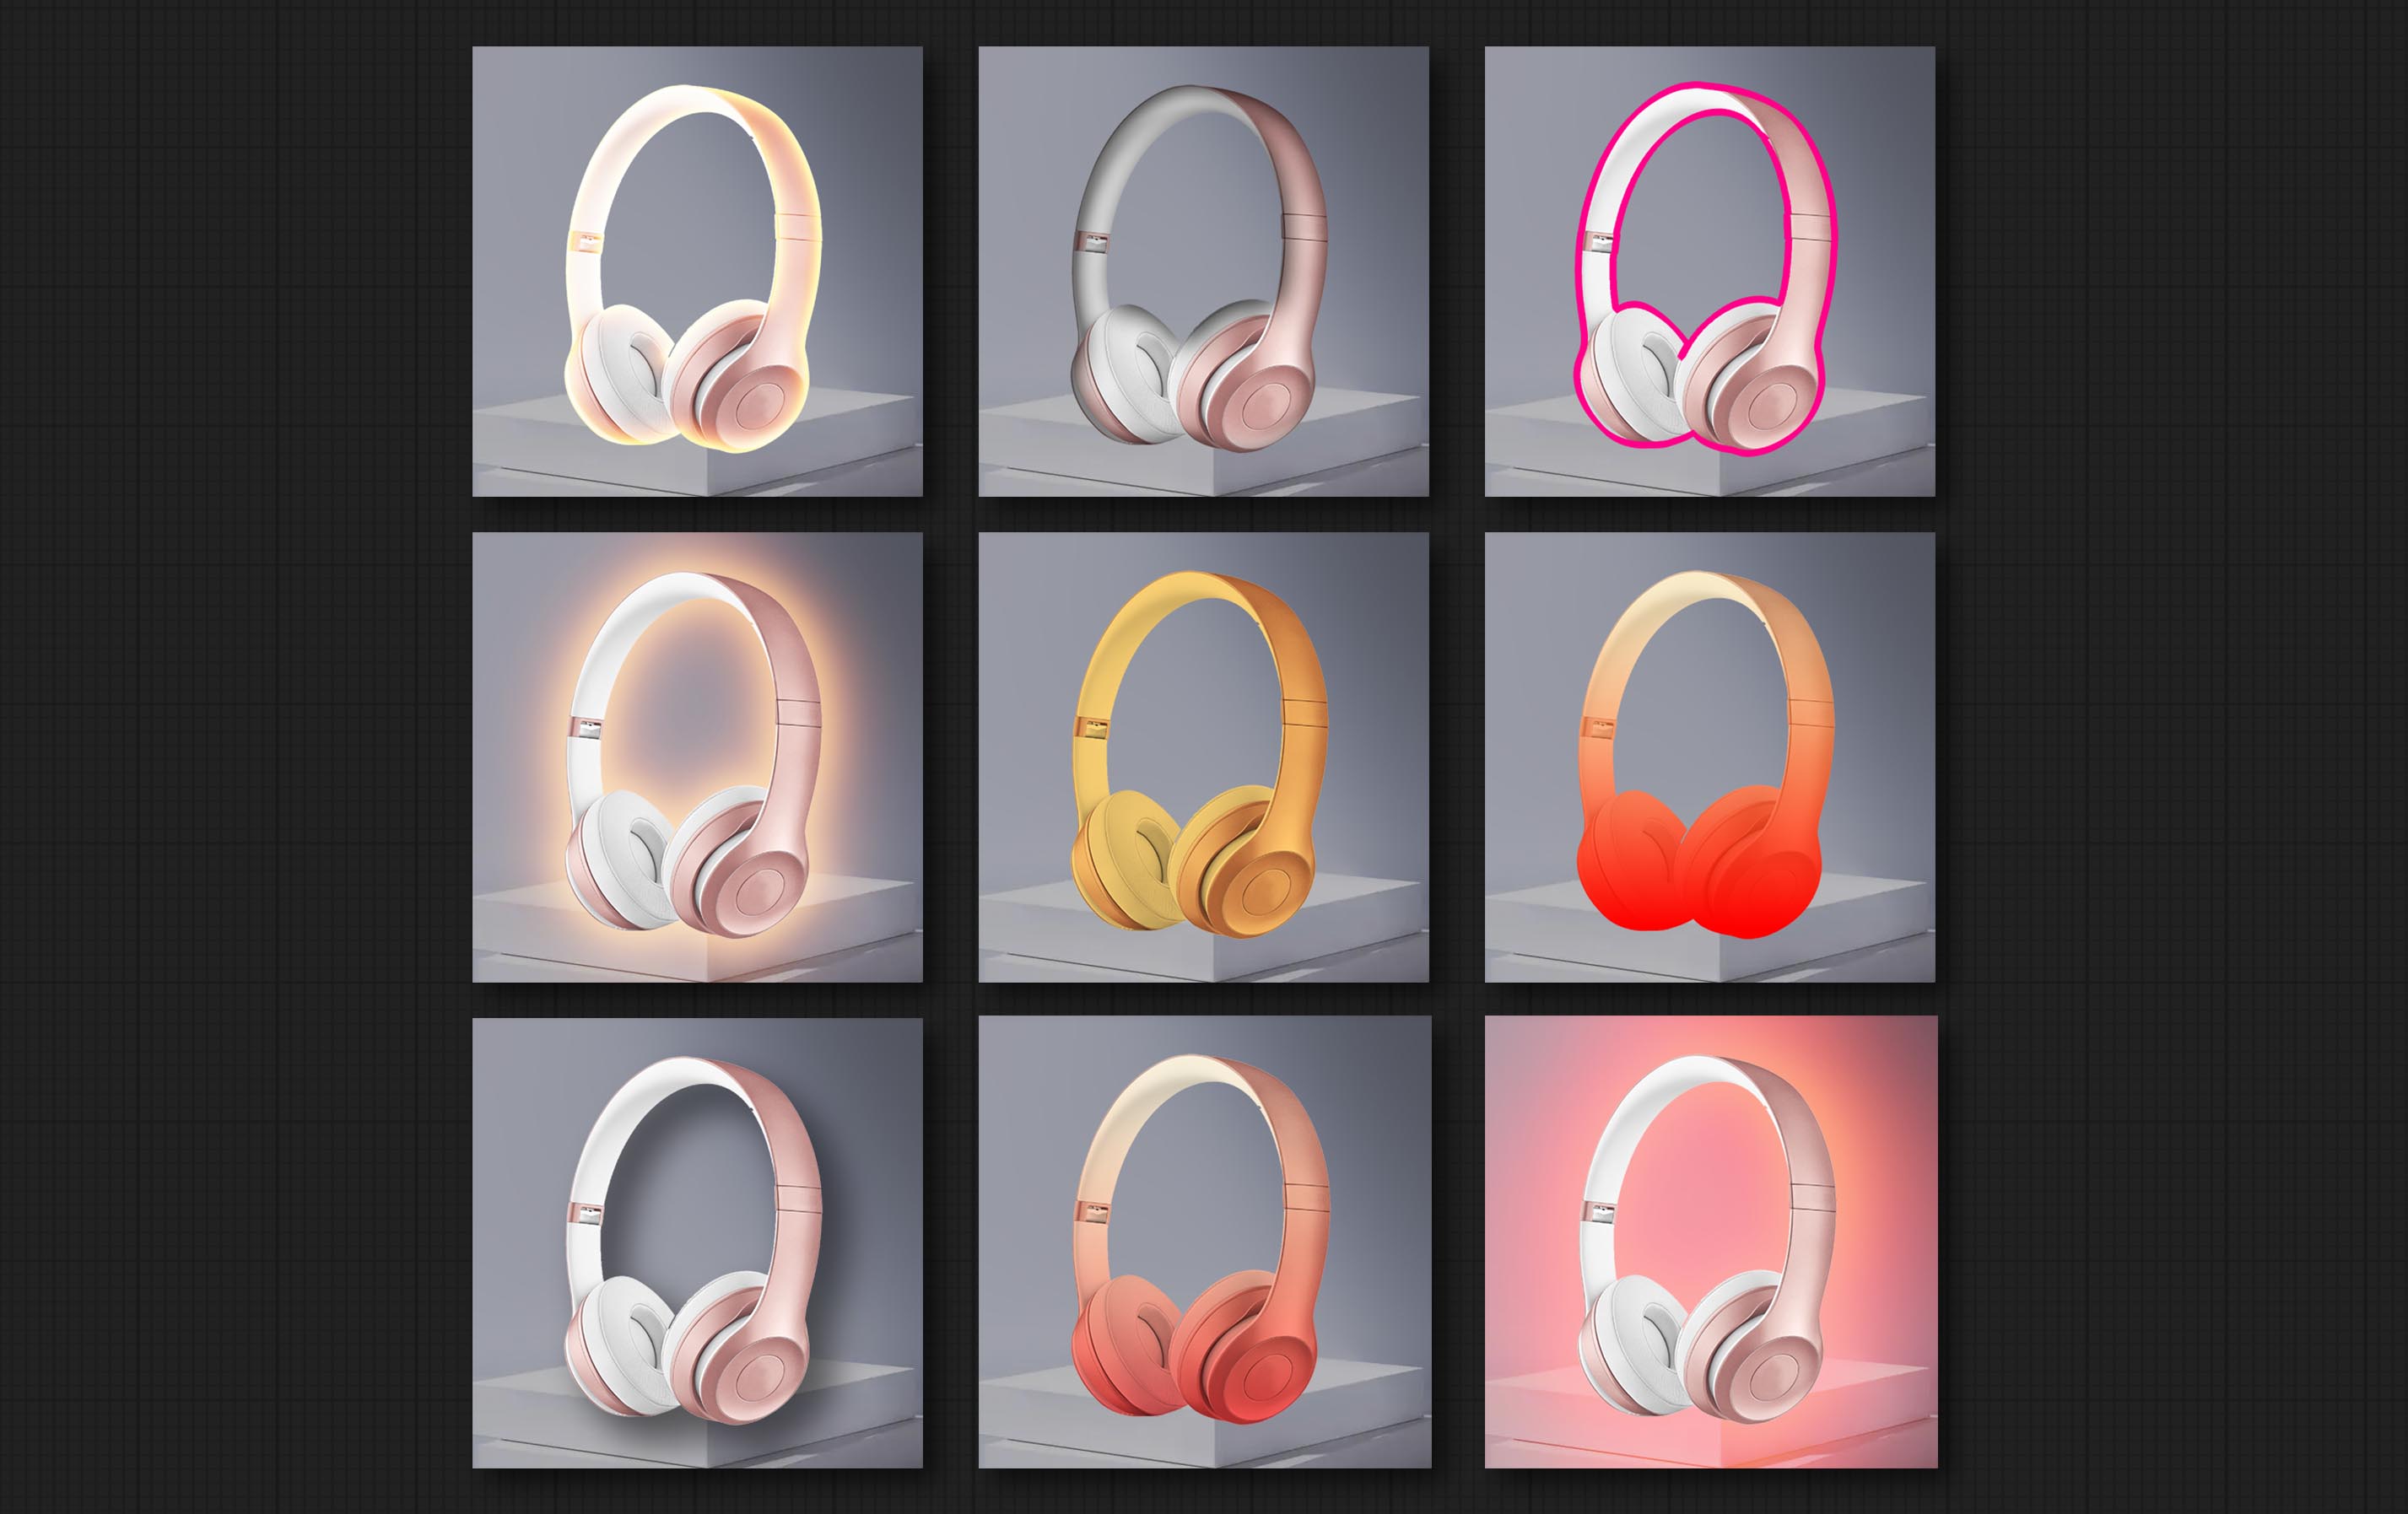
OuterGlow
生成外发光
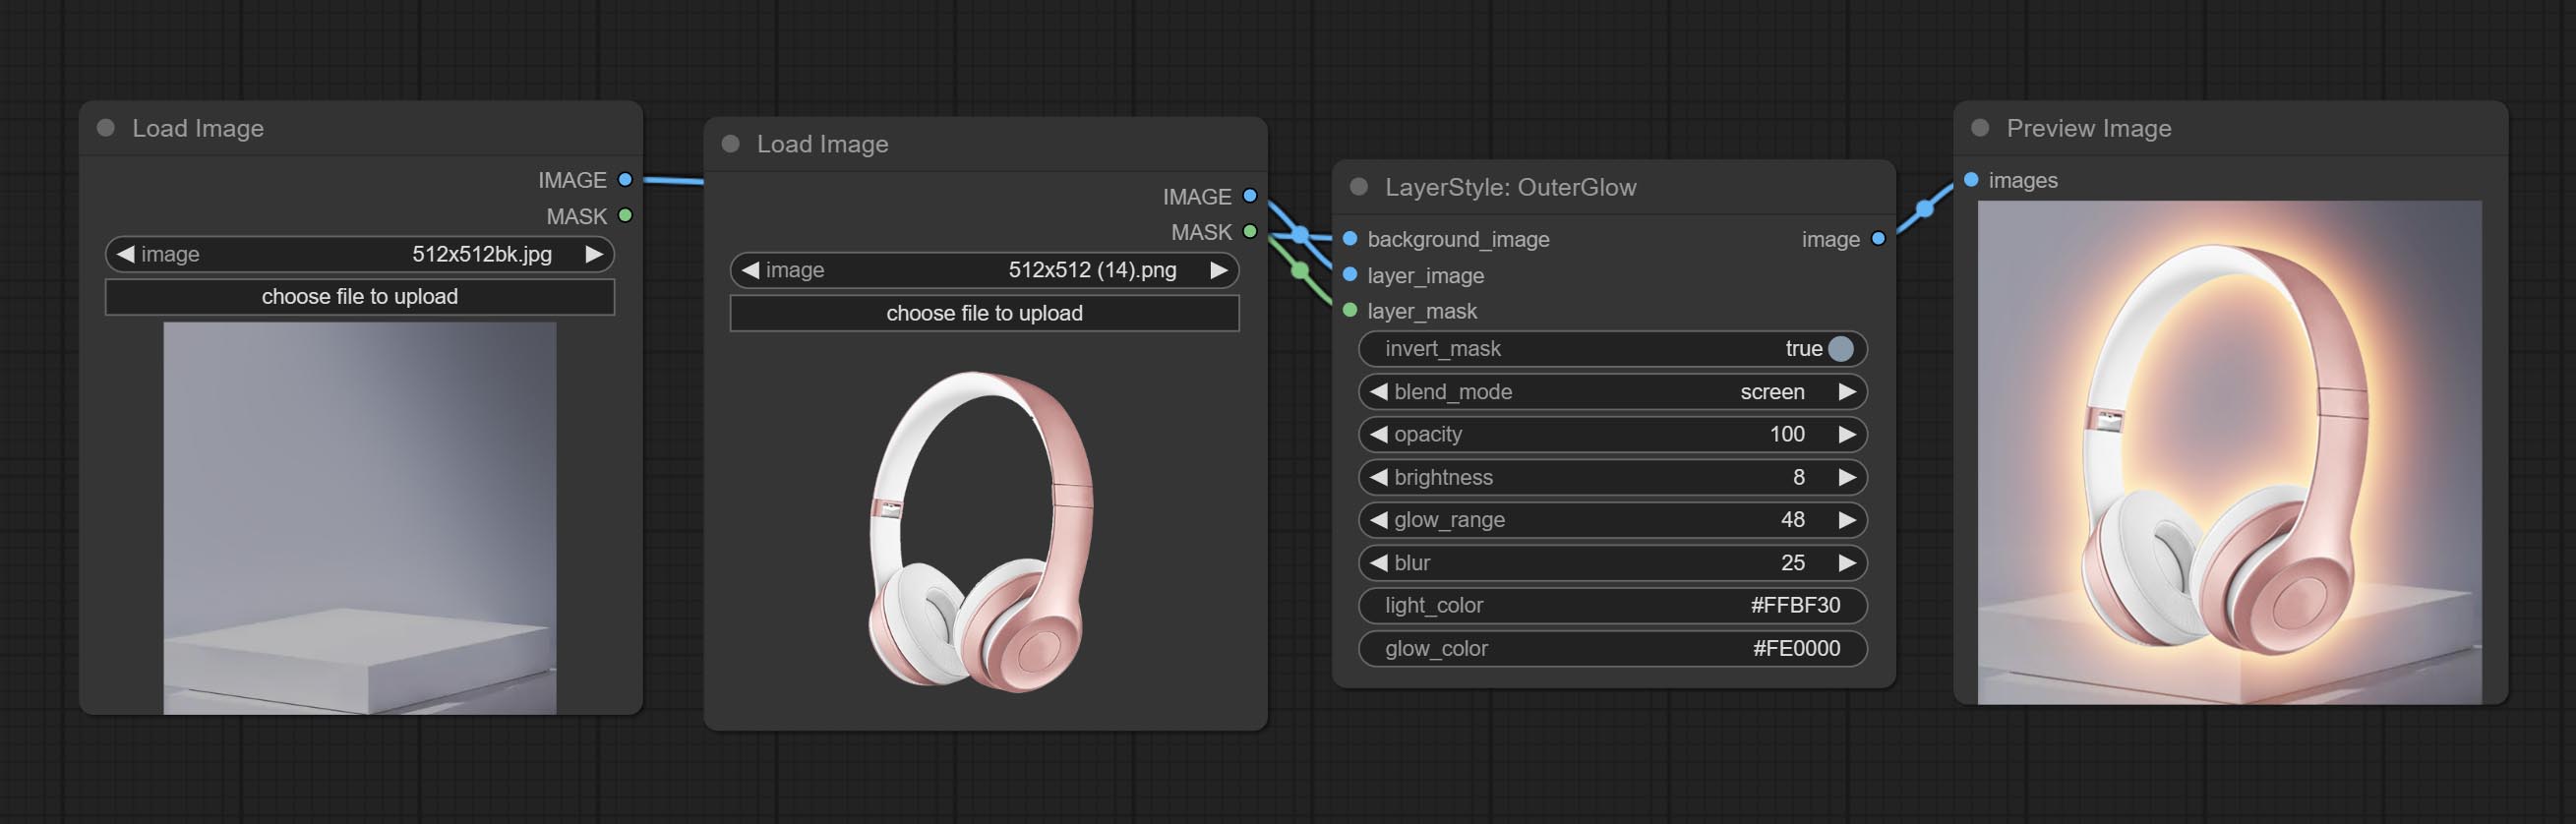
节点选项:

- background_image1:背景图像。
- layer_image1:用于合成的图层图像。
- layer_mask1,2:layer_image 的蒙版,发光会根据其形状生成。
- invert_mask:是否反转蒙版。
- blend_mode3:发光的混合模式。
- opacity:发光的透明度。
- brightness:光的亮度。
- glow_range:发光的范围。
- blur:发光的模糊程度。
- light_color4:发光中心部分的颜色。
- glow_color4:发光边缘部分的颜色。
- note
InnerShadow
生成内阴影
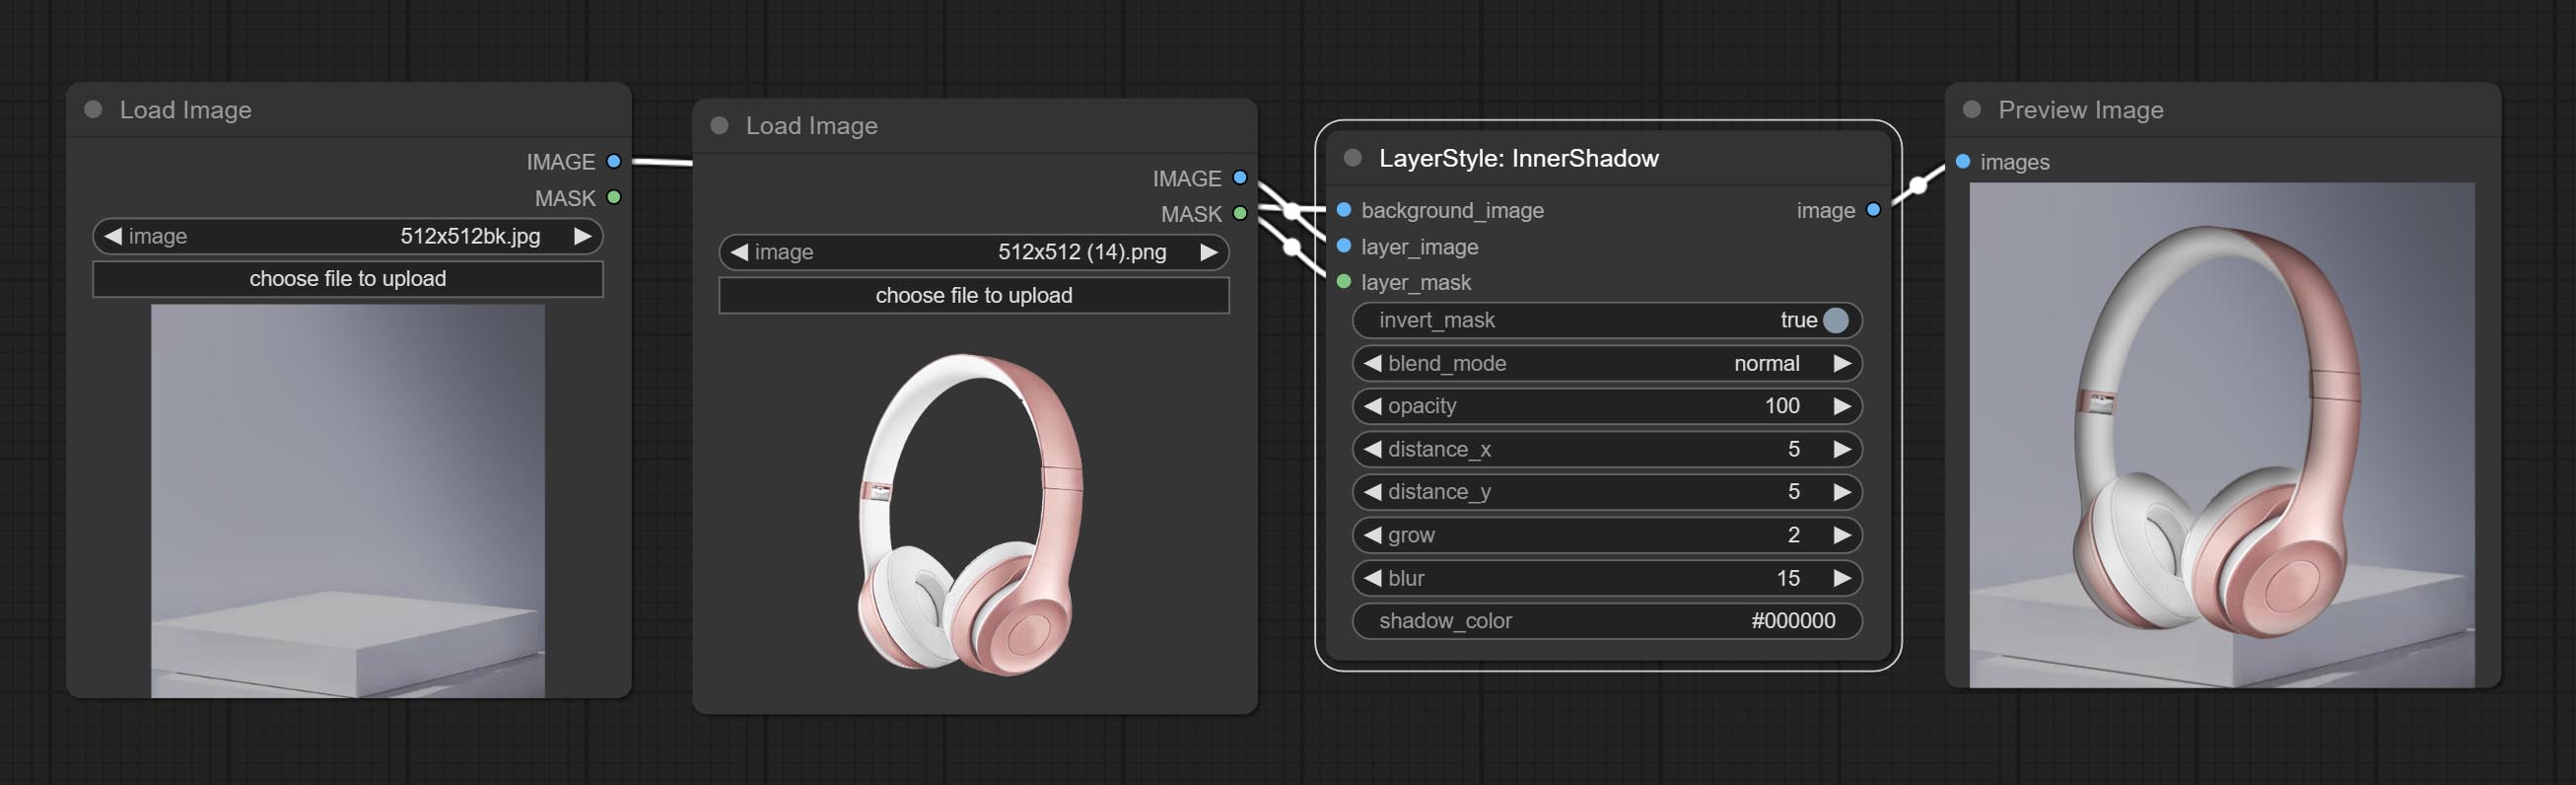
节点选项:
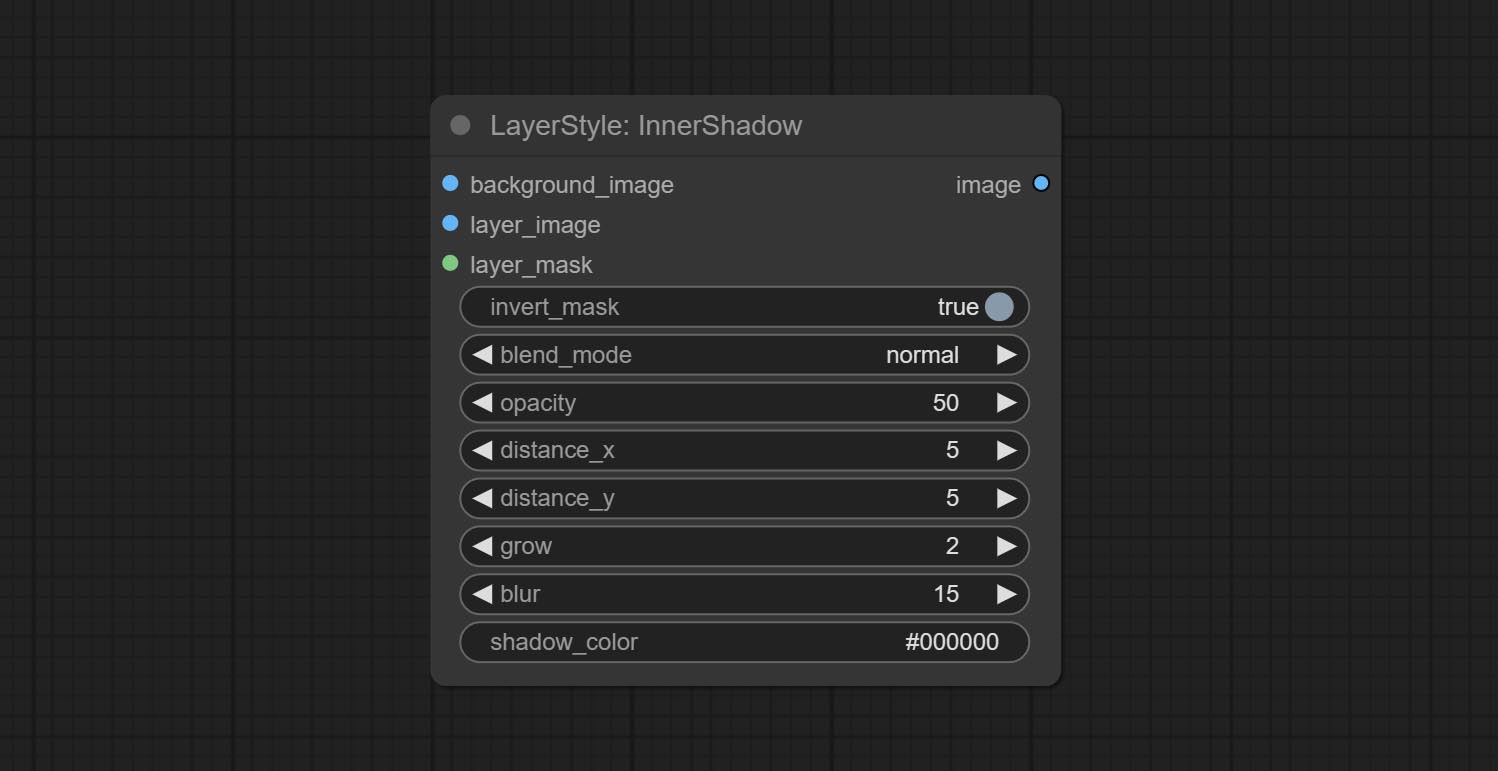
- background_image1:背景图像。
- layer_image1:用于合成的图层图像。
- layer_mask1,2:layer_image 的蒙版,阴影会根据其形状生成。
- invert_mask:是否反转蒙版。
- blend_mode3:阴影的混合模式。
- opacity:阴影的透明度。
- distance_x:阴影的水平偏移量。
- distance_y:阴影的垂直偏移量。
- grow:阴影的扩展幅度。
- blur:阴影的模糊程度。
- shadow_color4:阴影的颜色。
- note
InnerGlow
生成内发光
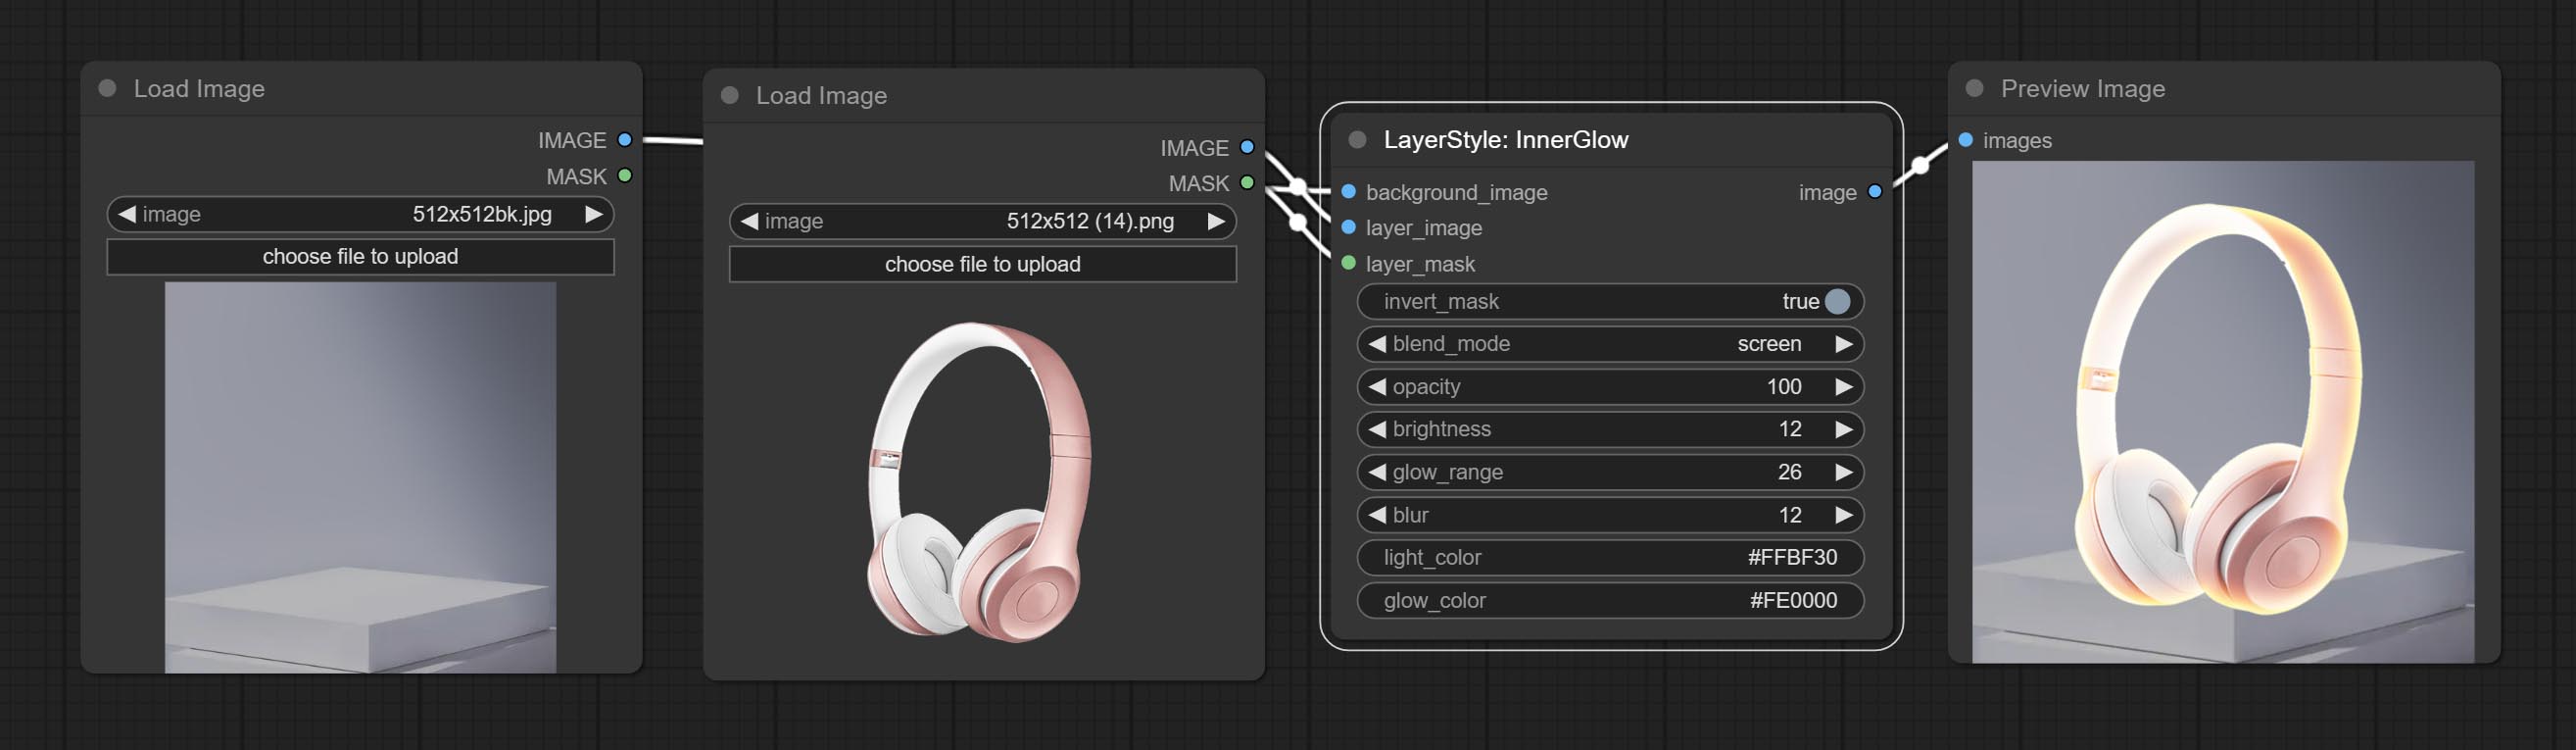
节点选项: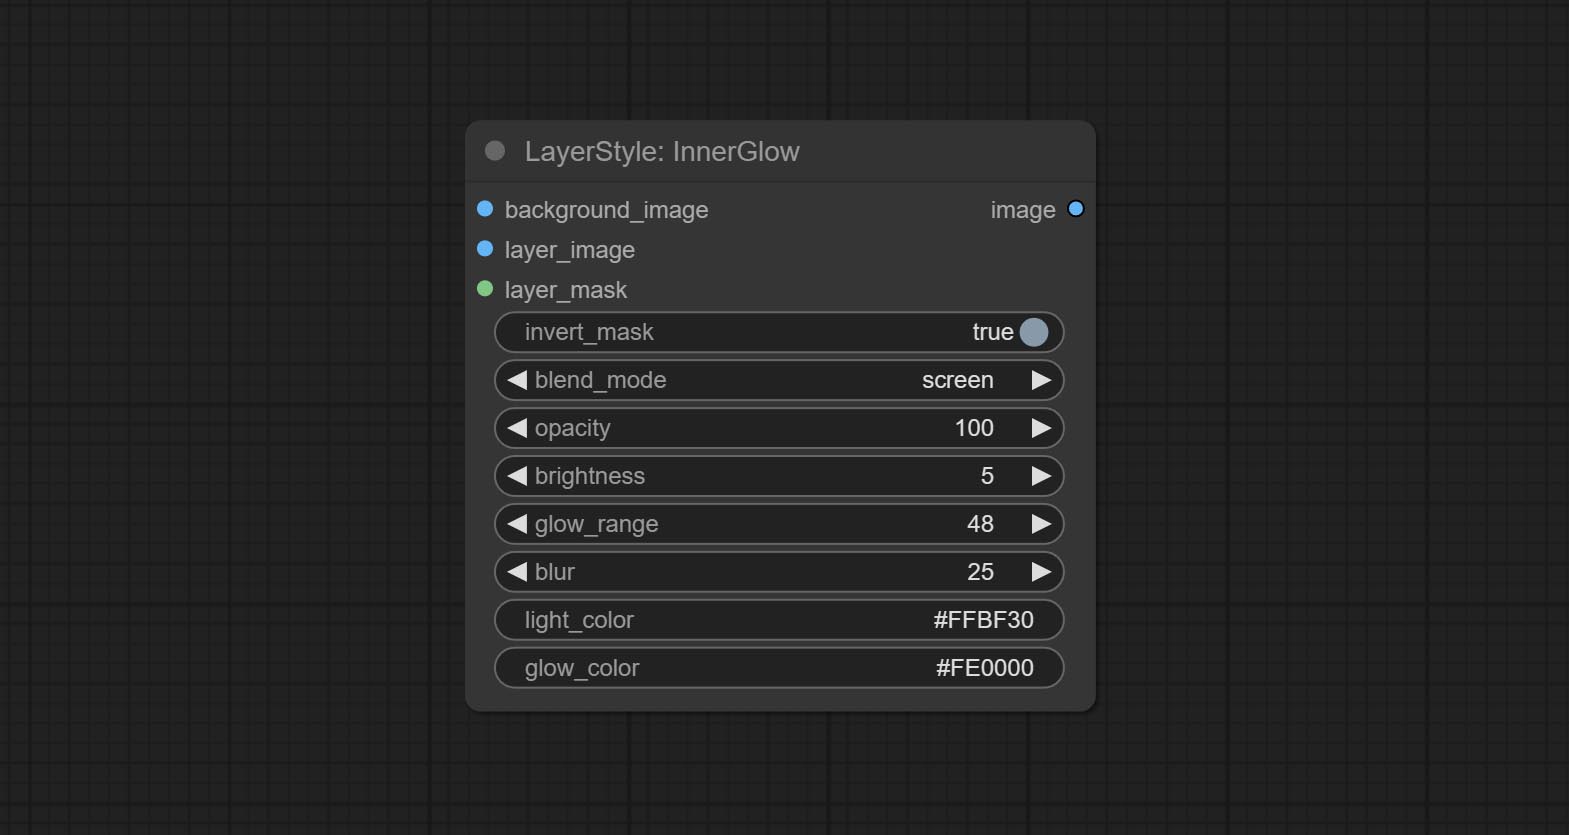
- background_image1:背景图像。
- layer_image1:用于合成的图层图像。
- layer_mask1,2:layer_image 的蒙版,发光会根据其形状生成。
- invert_mask:是否反转蒙版。
- blend_mode3:发光的混合模式。
- opacity:发光的透明度。
- brightness:光的亮度。
- glow_range:发光的范围。
- blur:发光的模糊程度。
- light_color4:发光中心部分的颜色。
- glow_color4:发光边缘部分的颜色。
- note
Stroke
为图层生成描边。
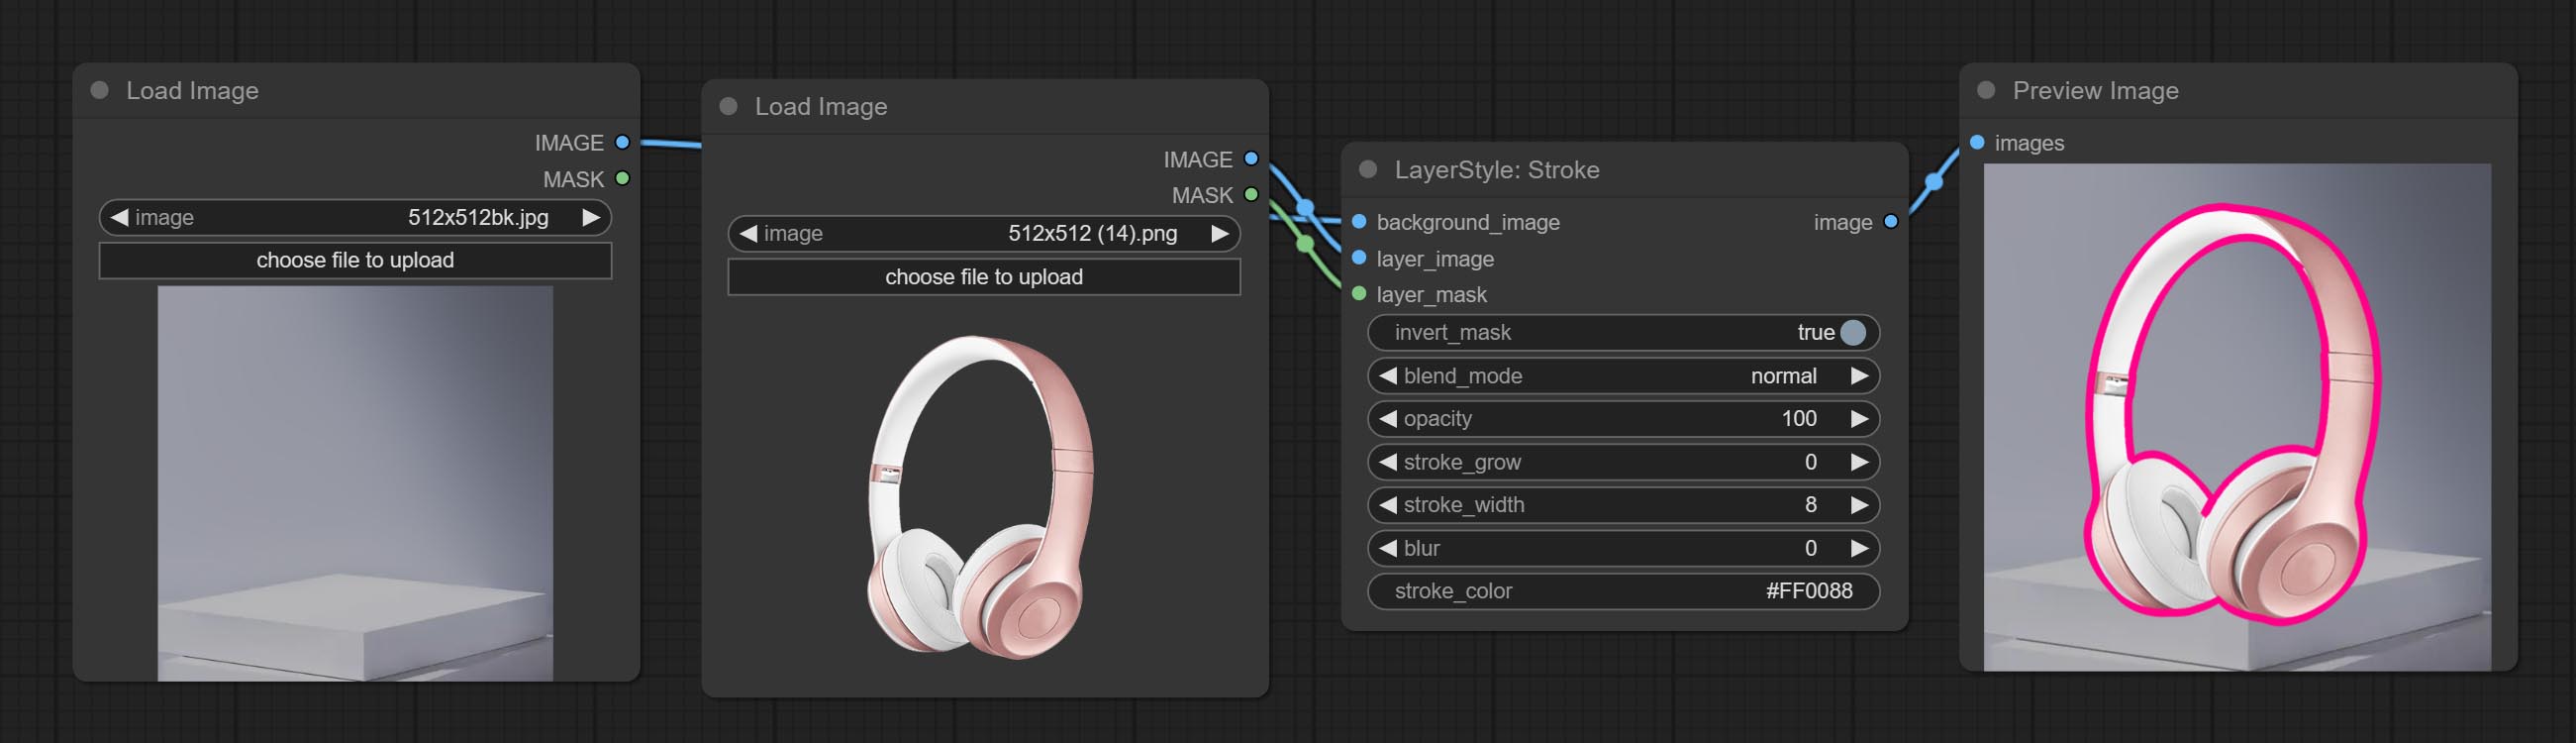
节点选项: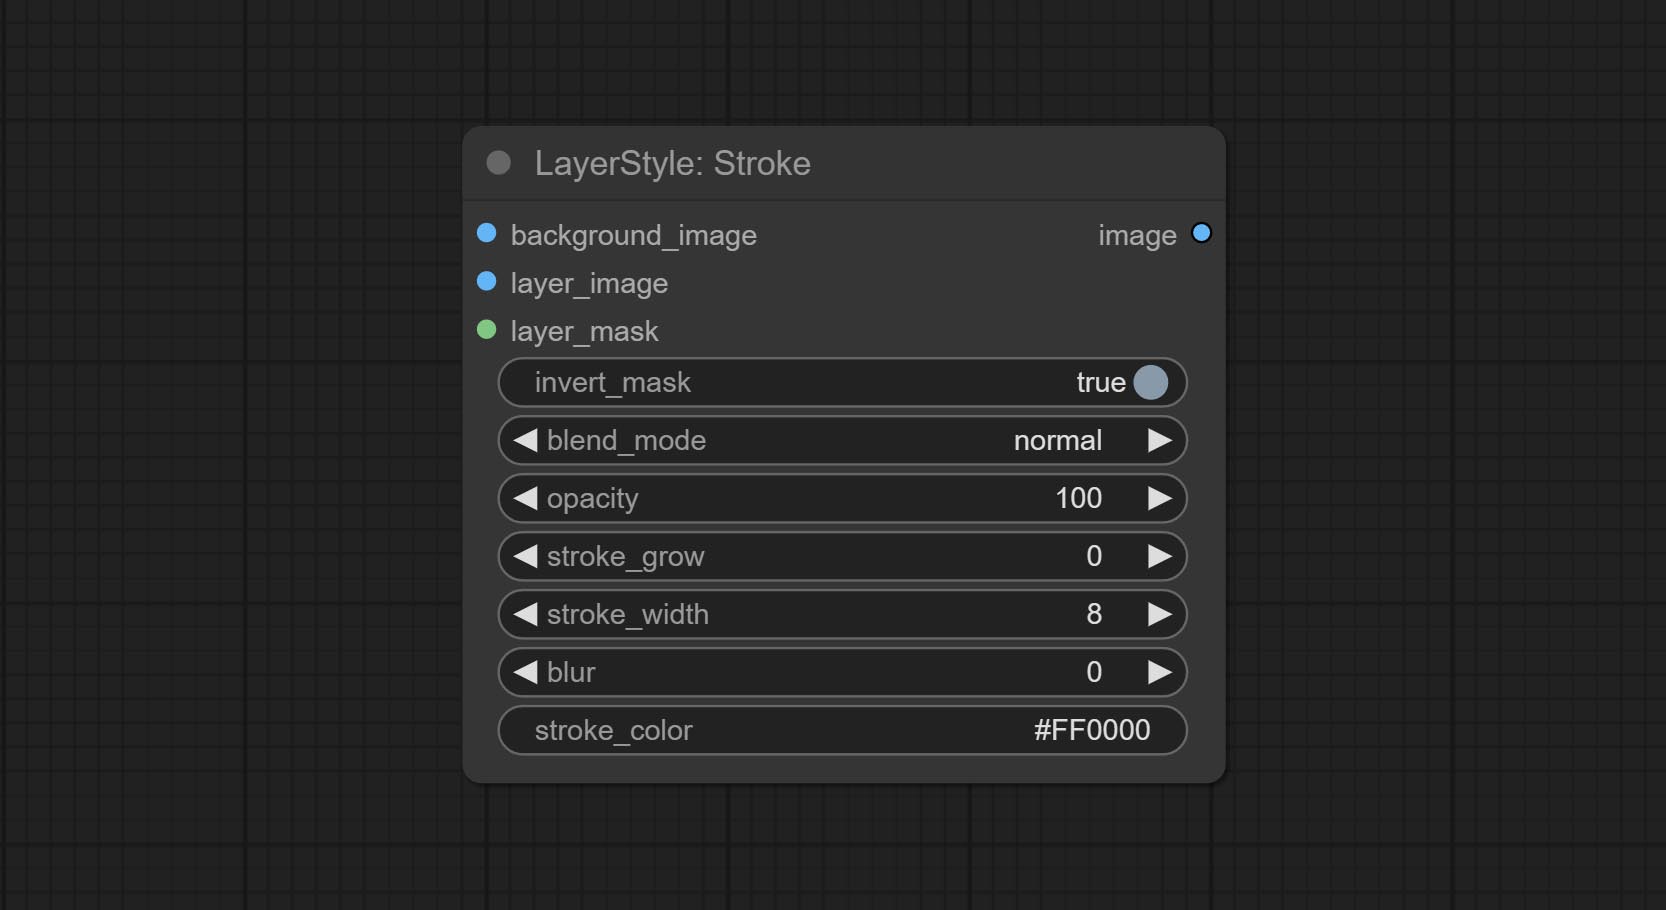
- background_image1:背景图像。
- layer_image1:用于合成的图层图像。
- layer_mask1,2:layer_image 的蒙版,描边会根据其形状生成。
- invert_mask:是否反转蒙版。
- blend_mode3:描边的混合模式。
- opacity:描边的透明度。
- stroke_grow:描边的扩展或收缩幅度,正值表示扩展,负值表示收缩。
- stroke_width:描边的宽度。
- blur:描边的模糊程度。
- stroke_color4:描边的颜色,以十六进制 RGB 格式表示。
- note
GradientOverlay
生成渐变叠加
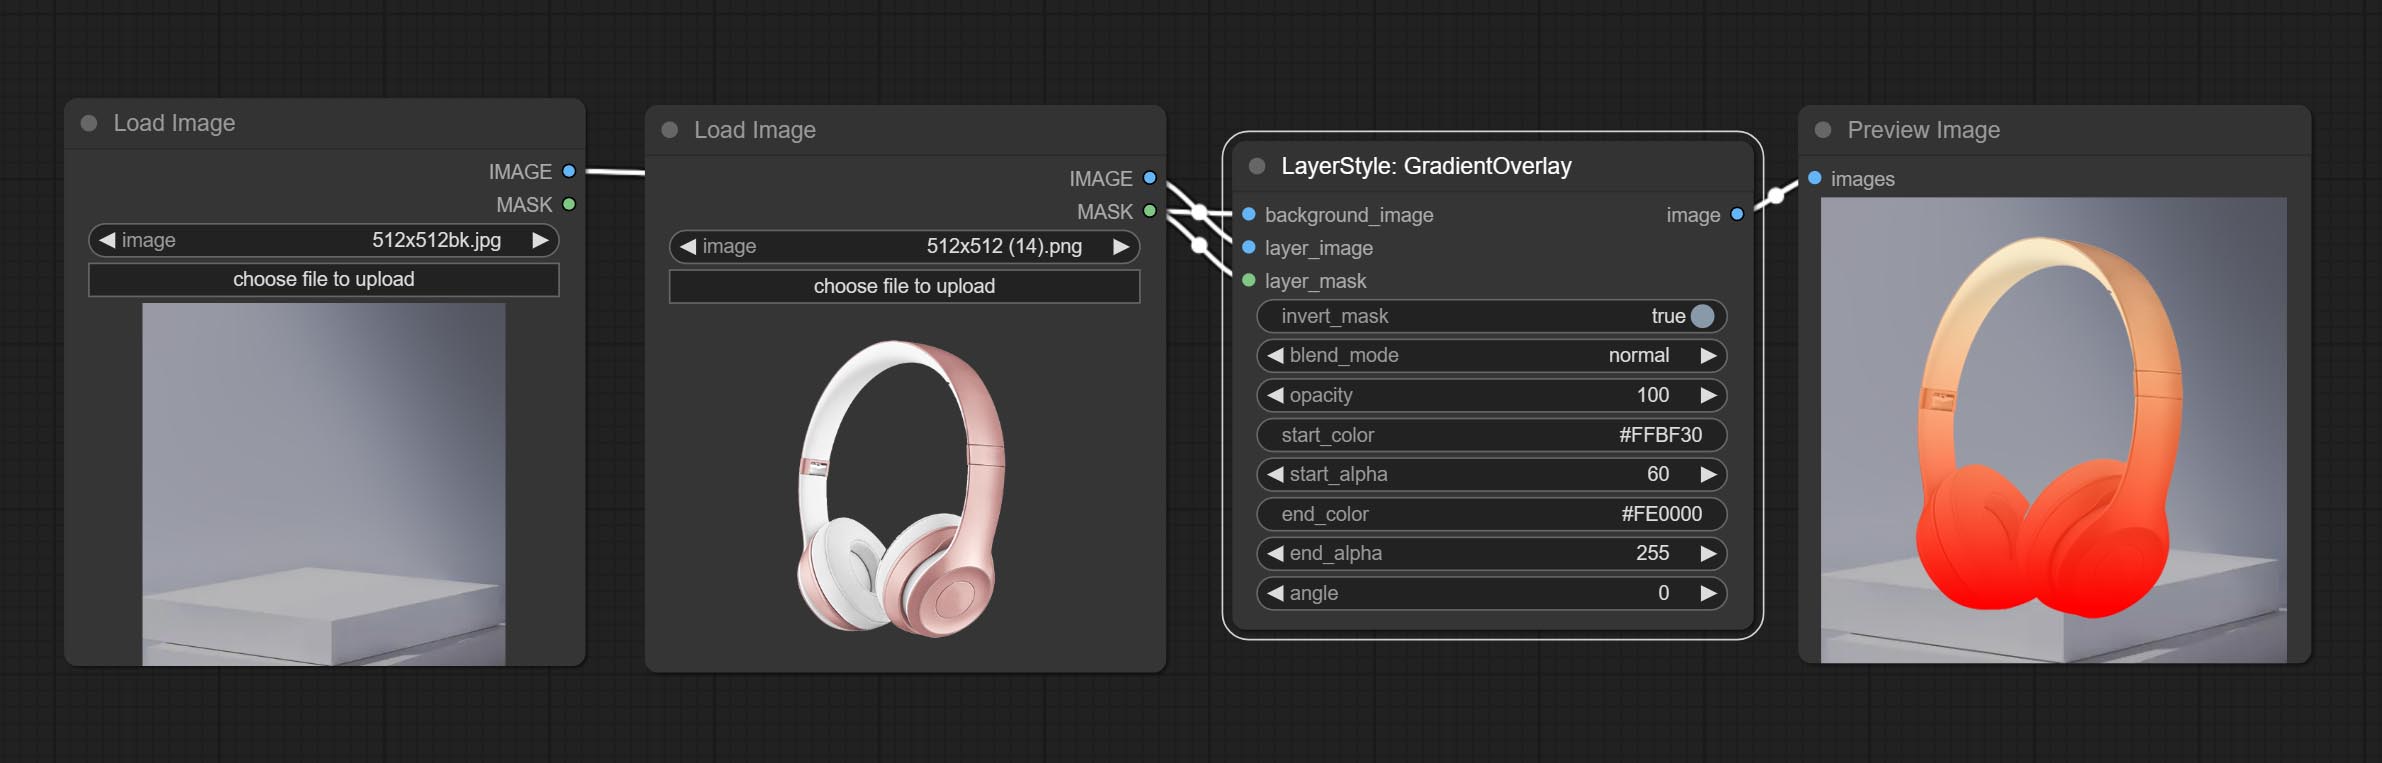
节点选项:
- background_image1:背景图像。
- layer_image1:用于合成的图层图像。
- layer_mask1,2:layer_image 的蒙版。
- invert_mask:是否反转蒙版。
- blend_mode3:渐变的混合模式。
- opacity:叠加的透明度。
- start_color:渐变起始处的颜色。
- start_alpha:渐变起始处的透明度。
- end_color:渐变结束处的颜色。
- end_alpha:渐变结束处的透明度。
- angle:渐变的旋转角度。
- note
ColorOverlay
生成颜色叠加
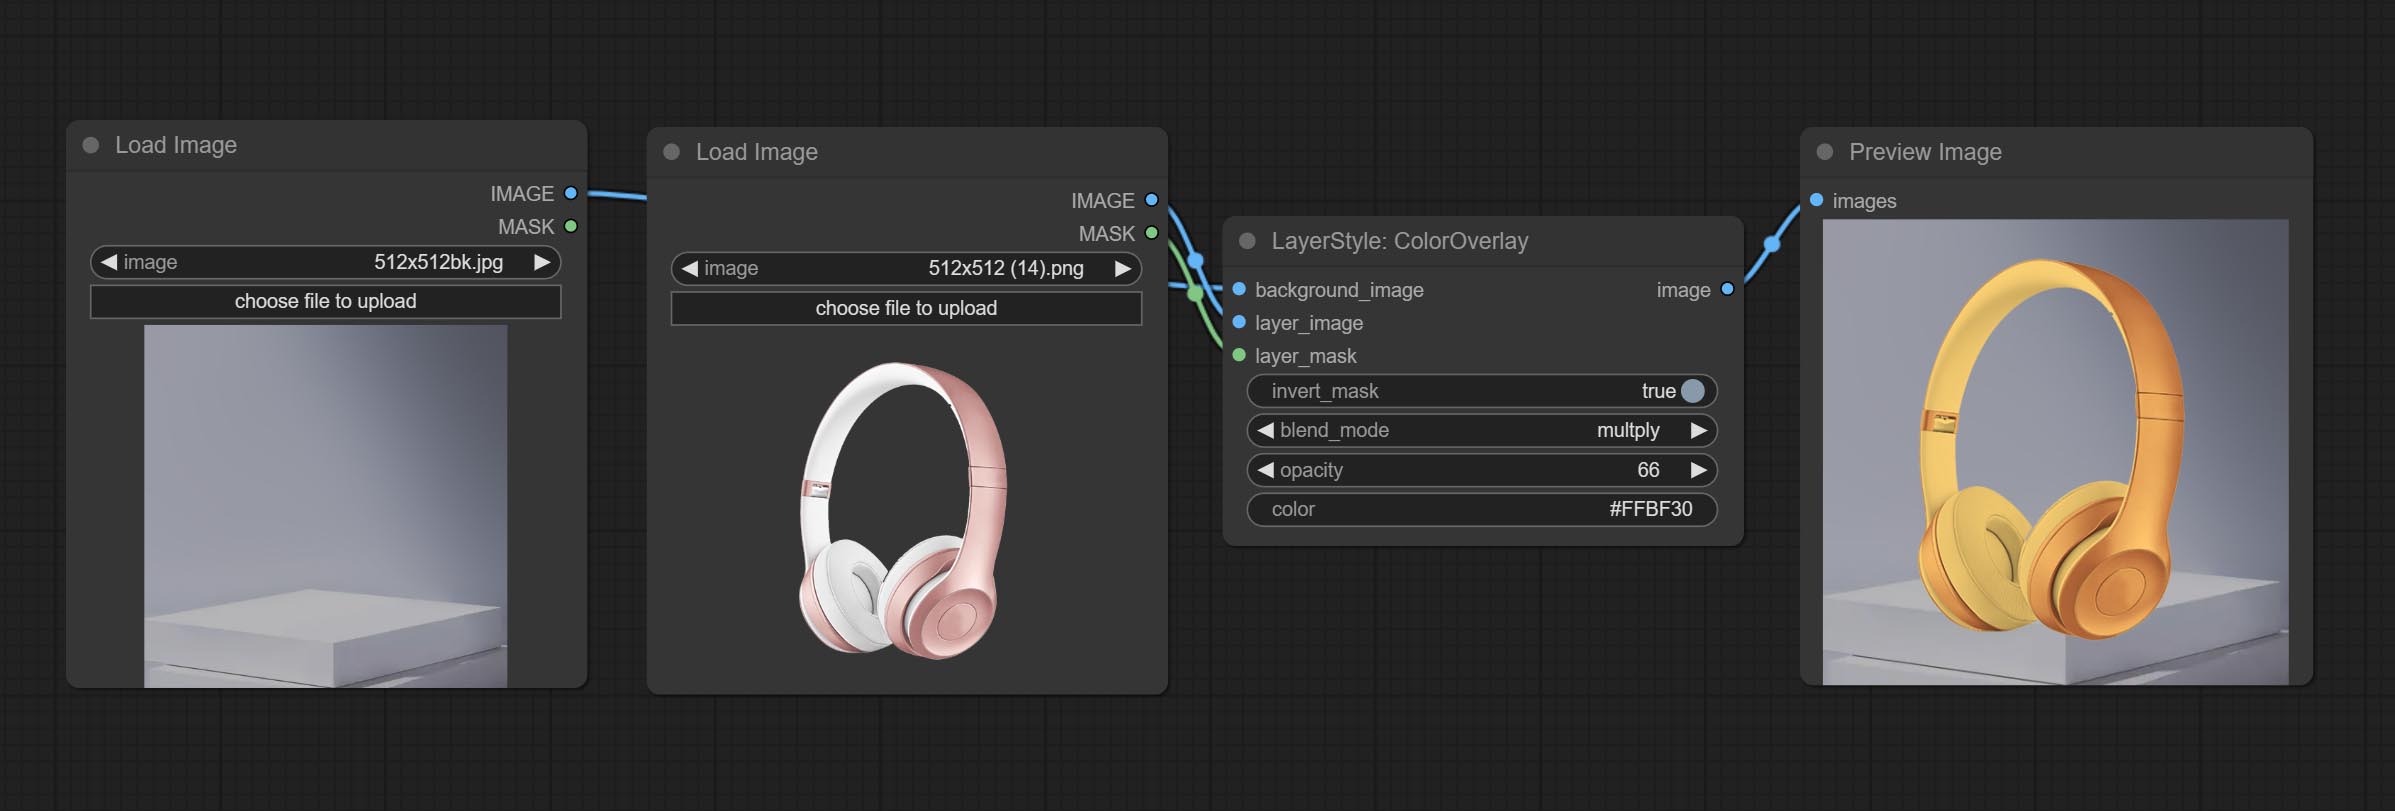
节点选项:
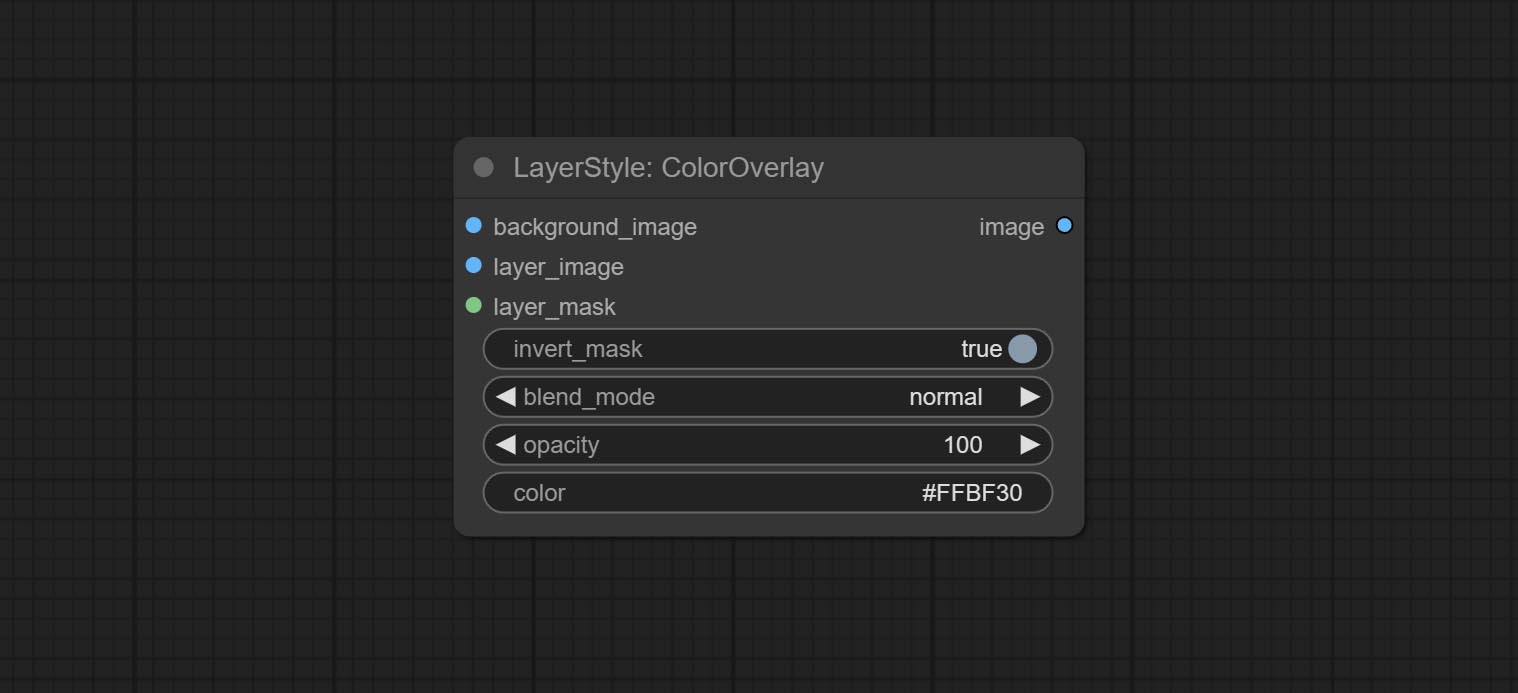
- background_image1:背景图像。
- layer_image1:用于合成的图层图像。
- layer_mask1,2:layer_image 的蒙版。
- invert_mask:是否反转蒙版。
- blend_mode3:颜色的混合模式。
- opacity:叠加的透明度。
- color:叠加的颜色。
- note
LayerColor
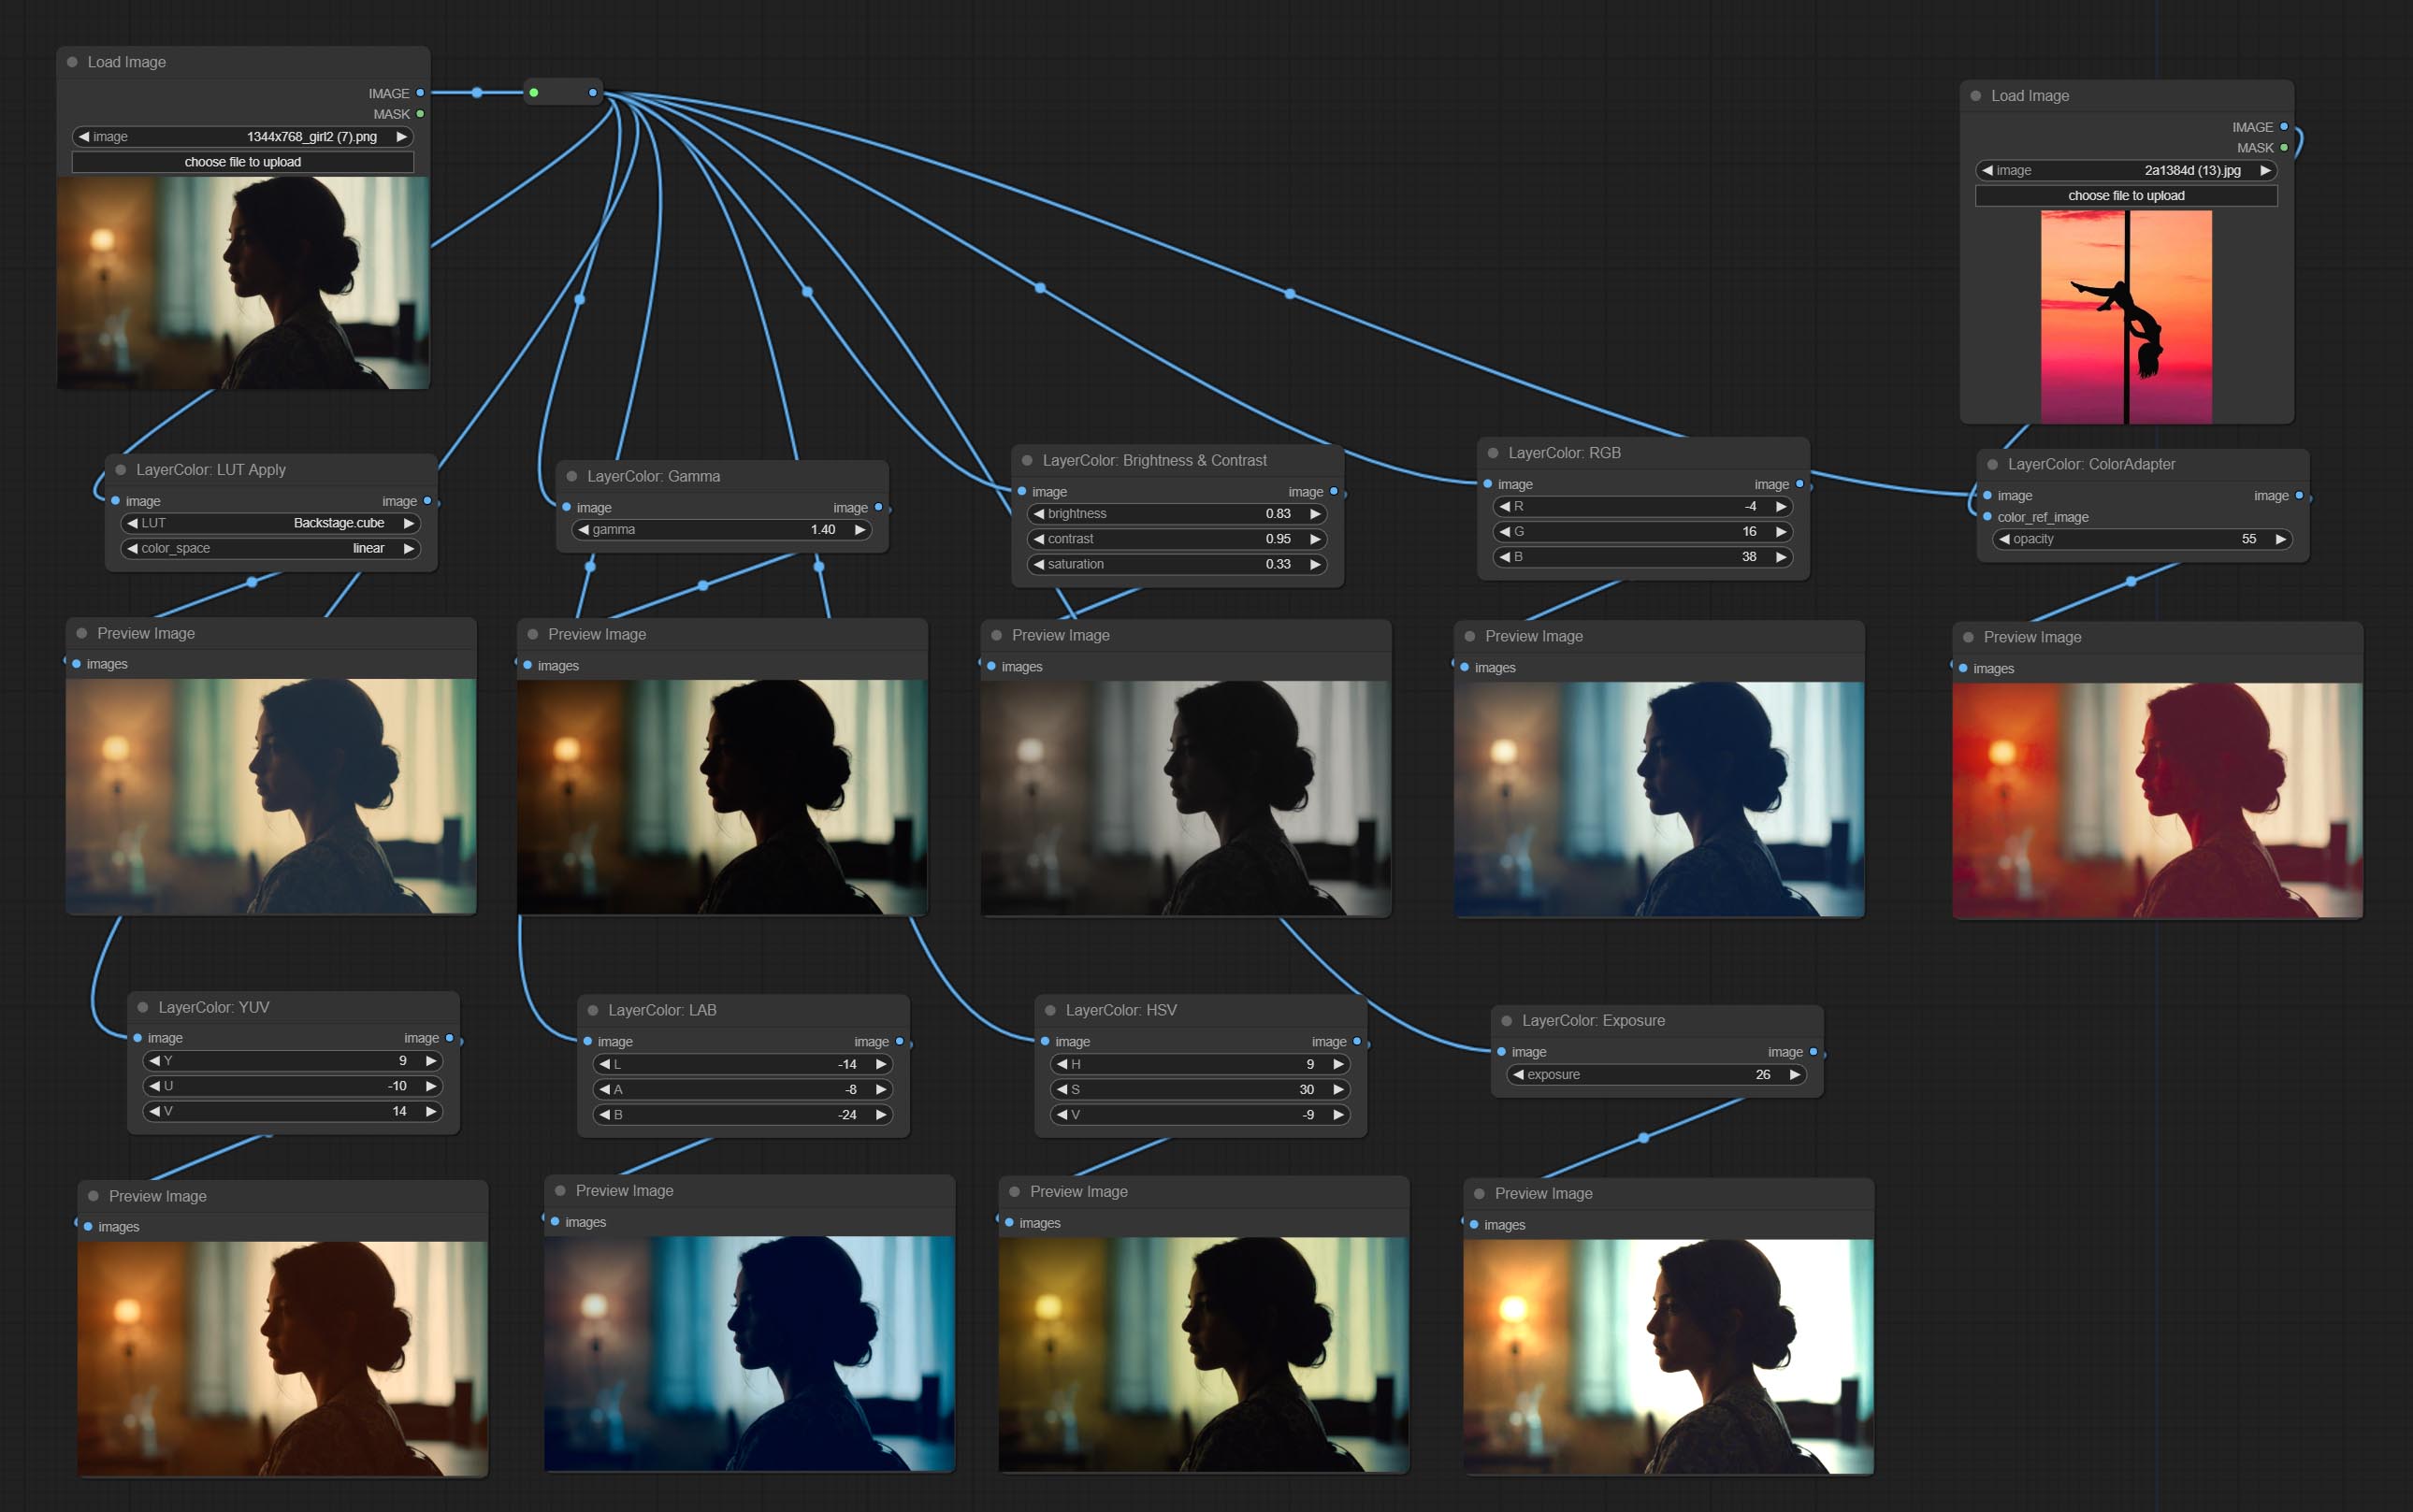
LUT 应用
将 LUT 应用于图像。仅支持 .cube 格式。
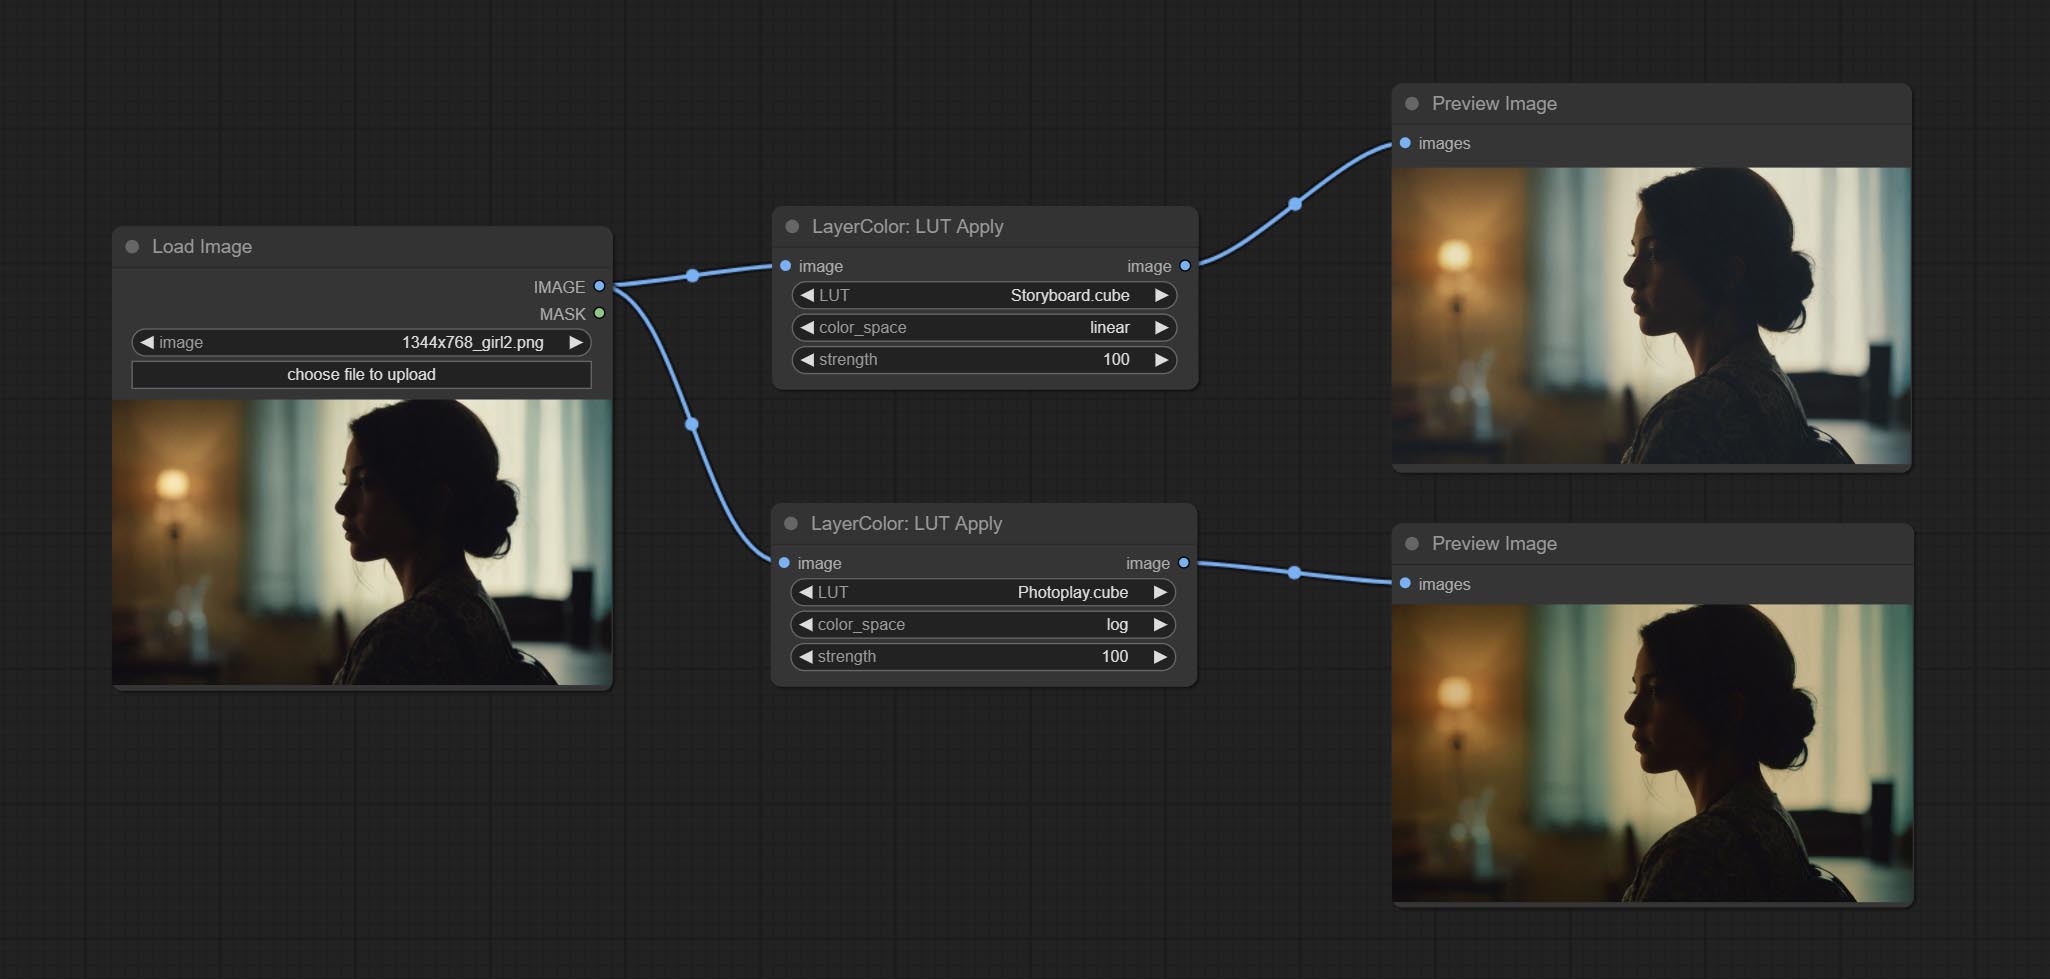
节点选项: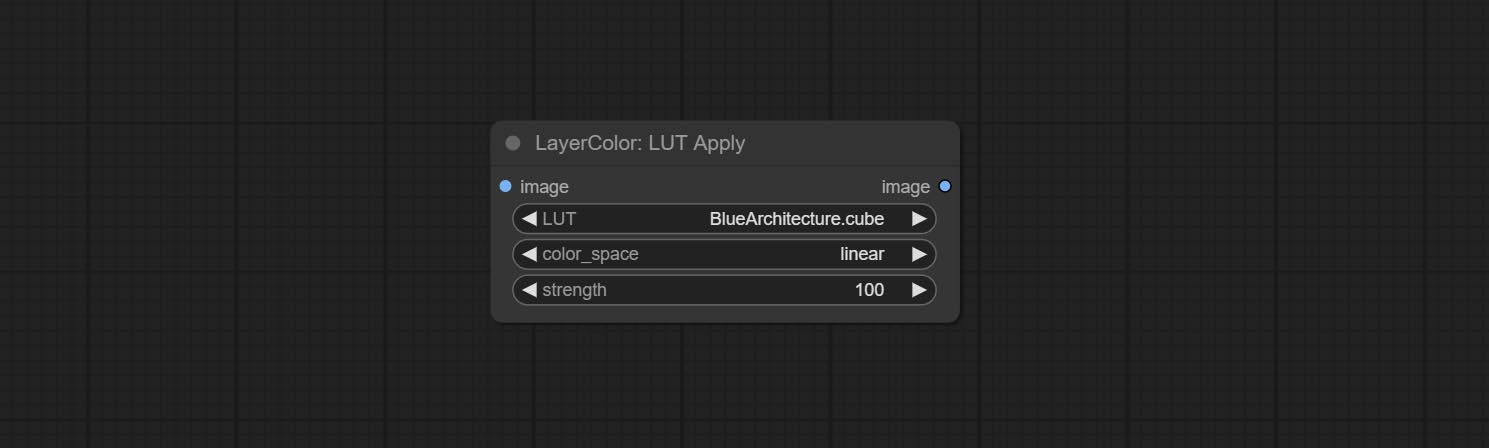
- LUT*:此处列出了 LUT 文件夹中可用的 .cube 文件,所选的 LUT 文件将被应用到图像上。
- color_space:对于常规图像,请选择 linear;对于处于 log 色彩空间的图像,请选择 log。
- strength:范围为 0~100,表示 LUT 应用强度。数值越大,与原始图像的差异越明显;数值越小,越接近原始图像。
*LUT 文件夹在 resource_dir.ini 中定义,该文件位于插件的根目录下,默认名称为 resource_dir.ini.example。首次使用时,需将文件后缀改为 .ini。
打开文本编辑软件,找到以“LUT_dir=”开头的行,在“=”号后输入自定义的文件夹路径名。
resource-dir.ini 支持定义多个文件夹,各文件夹之间可用逗号、分号或空格分隔。
ComfyUI 初始化时,会收集该文件夹中的所有 .cube 文件,并将其显示在节点列表中。
如果 ini 文件中设置的文件夹无效,则会启用插件自带的 LUT 文件夹。
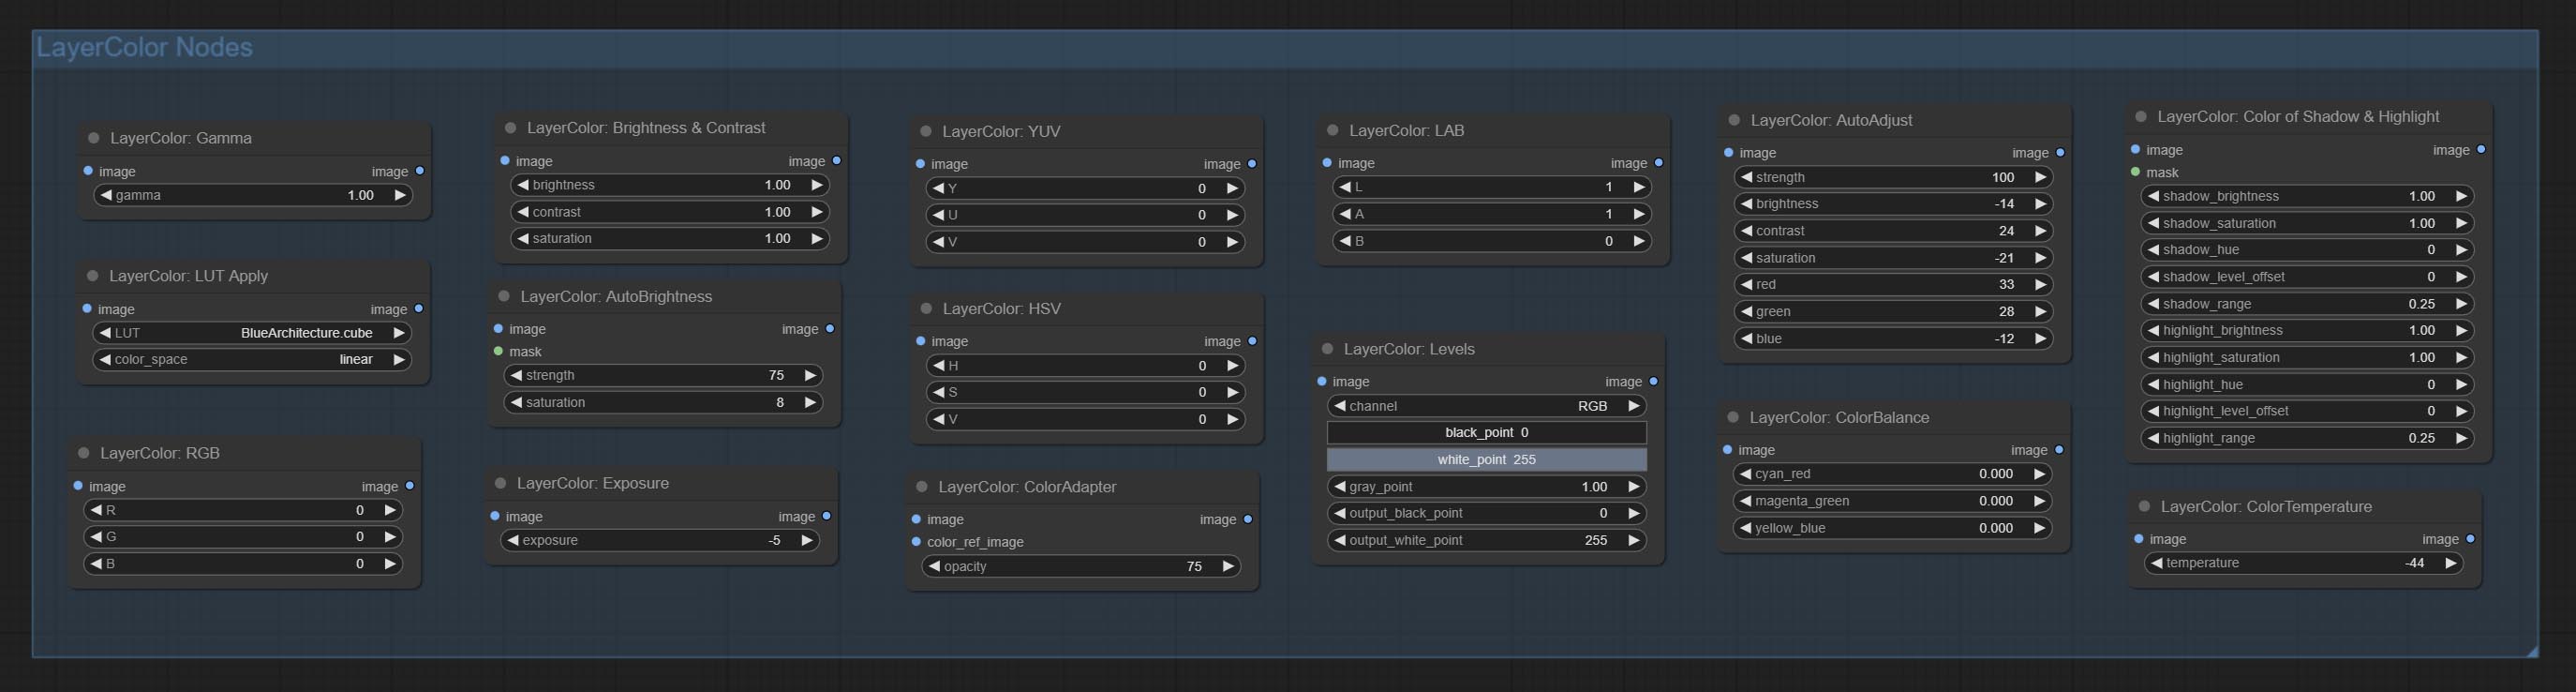
AutoAdjust
自动调整图像的亮度、对比度和白平衡。同时提供一些手动调整选项,以弥补自动调整的不足。
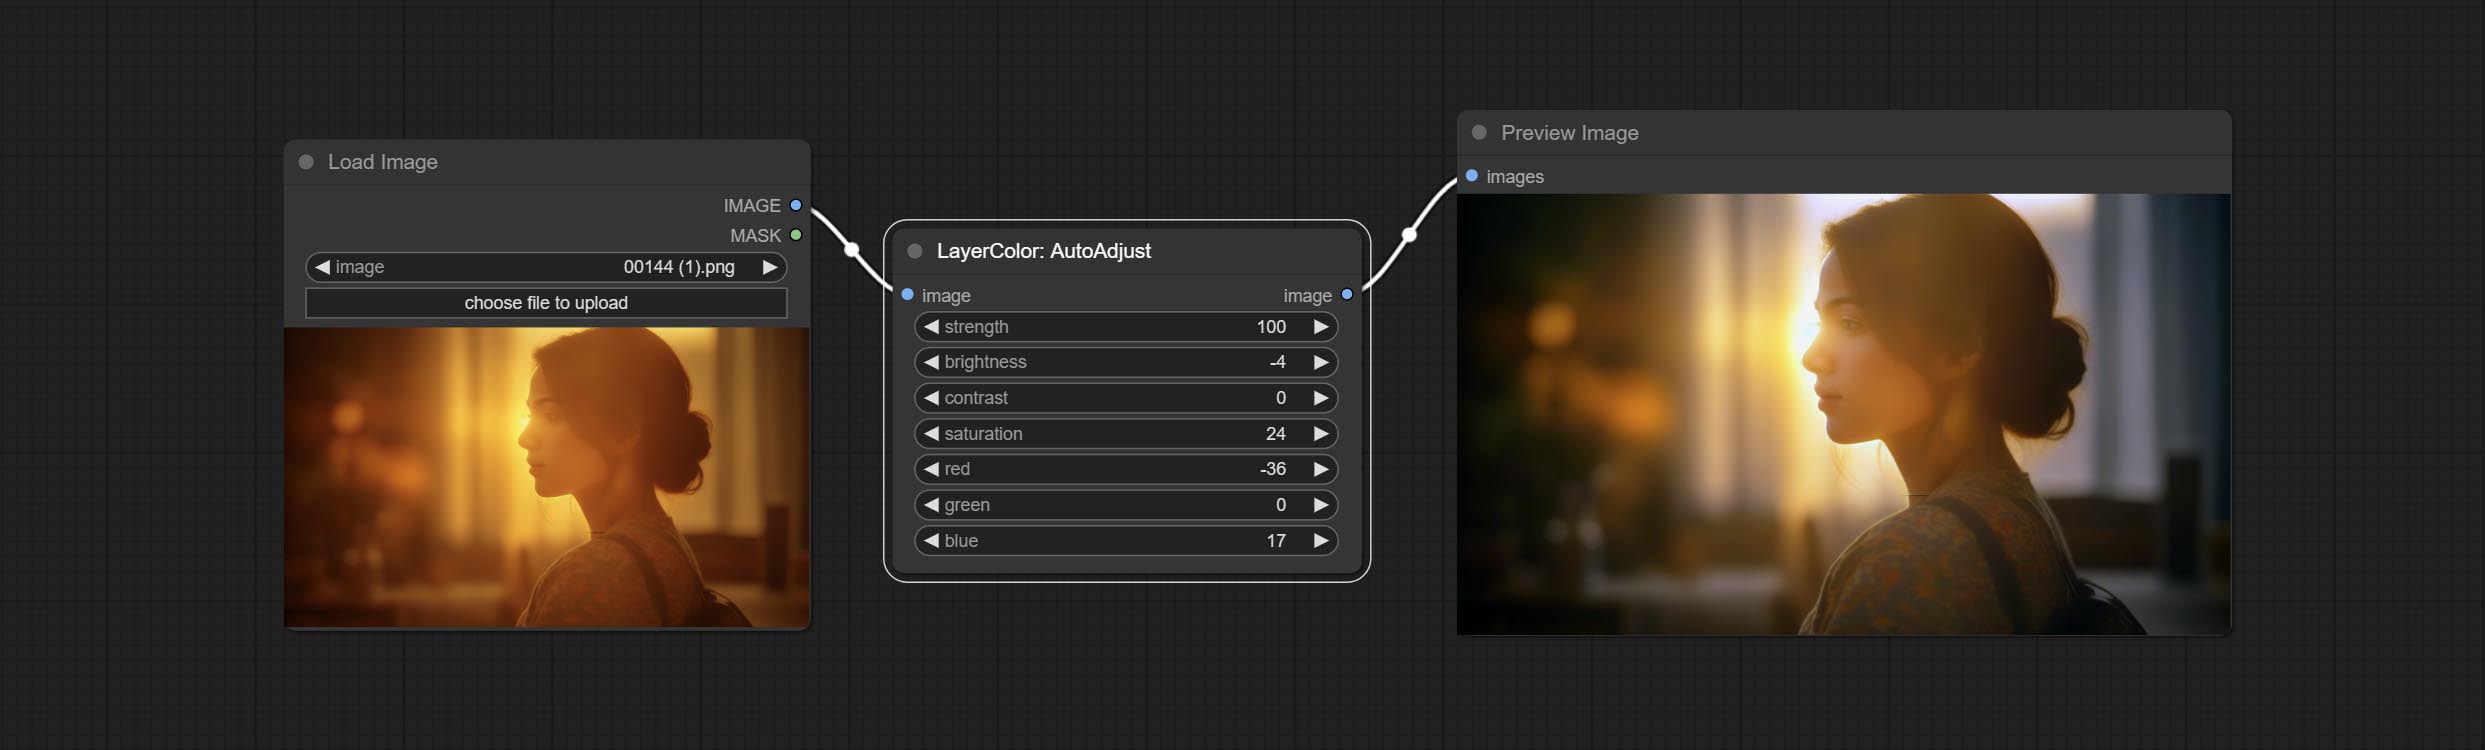
节点选项: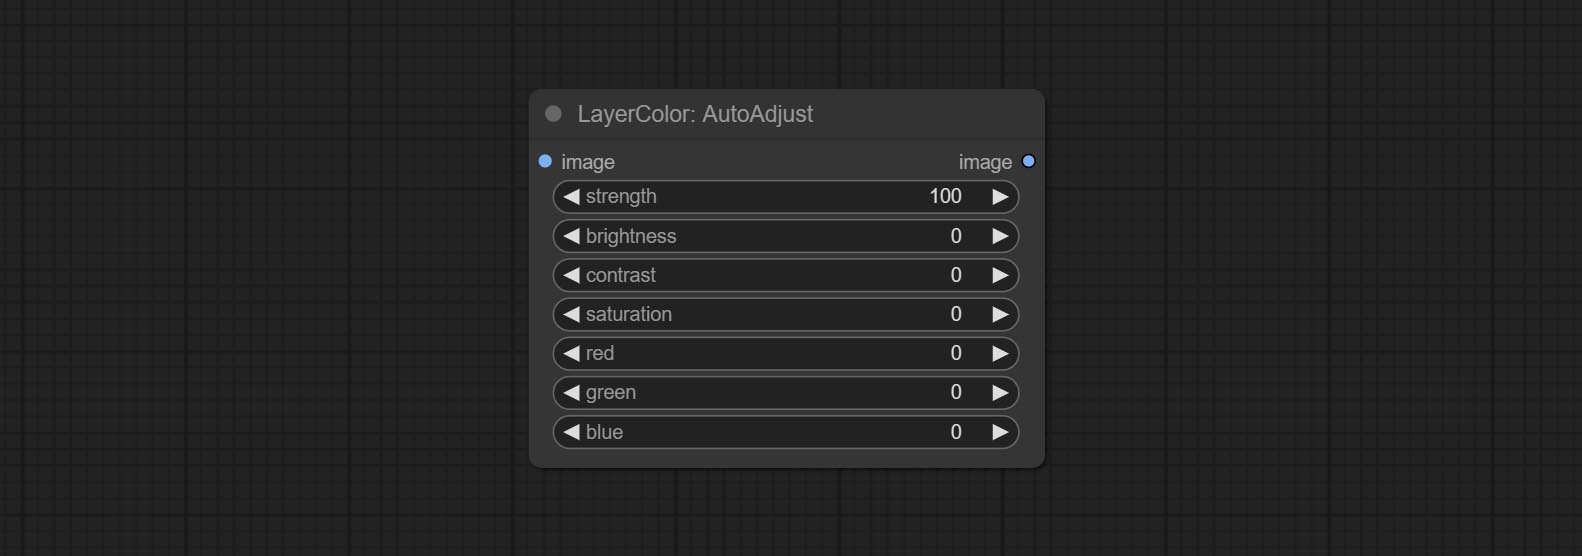
- strength:调整强度。数值越大,与原始图像的差异越大。
- brightness:手动调整亮度。
- contrast:手动调整对比度。
- saturation:手动调整饱和度。
- red:手动调整红色通道。
- green:手动调整绿色通道。
- blue:手动调整蓝色通道。
AutoAdjustV2
在 AutoAdjust 的基础上,增加了掩码输入功能,仅对掩码内的内容进行自动色彩调整。同时新增多种自动调整模式。
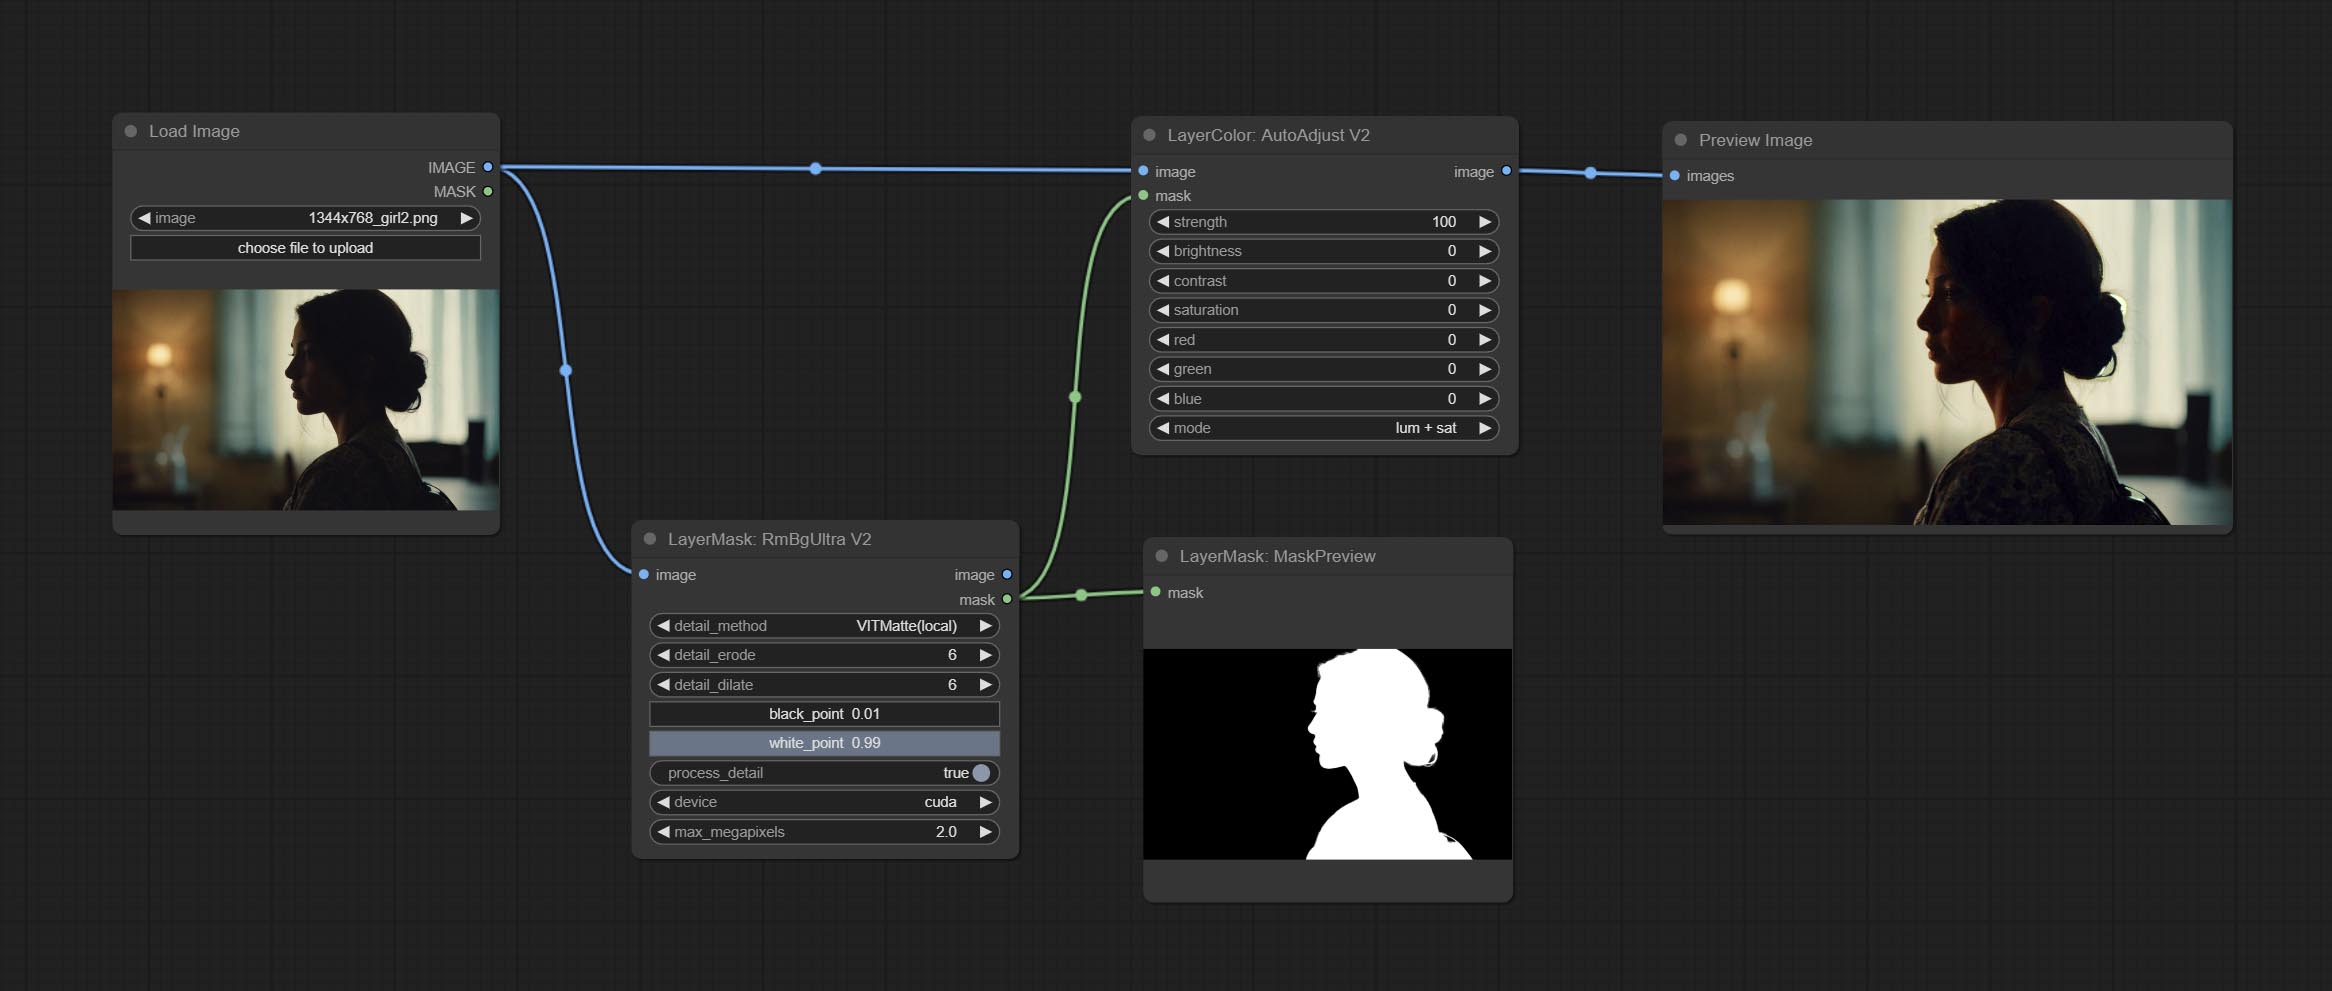
在此基础上,AutoAdjustV2 做了以下改动: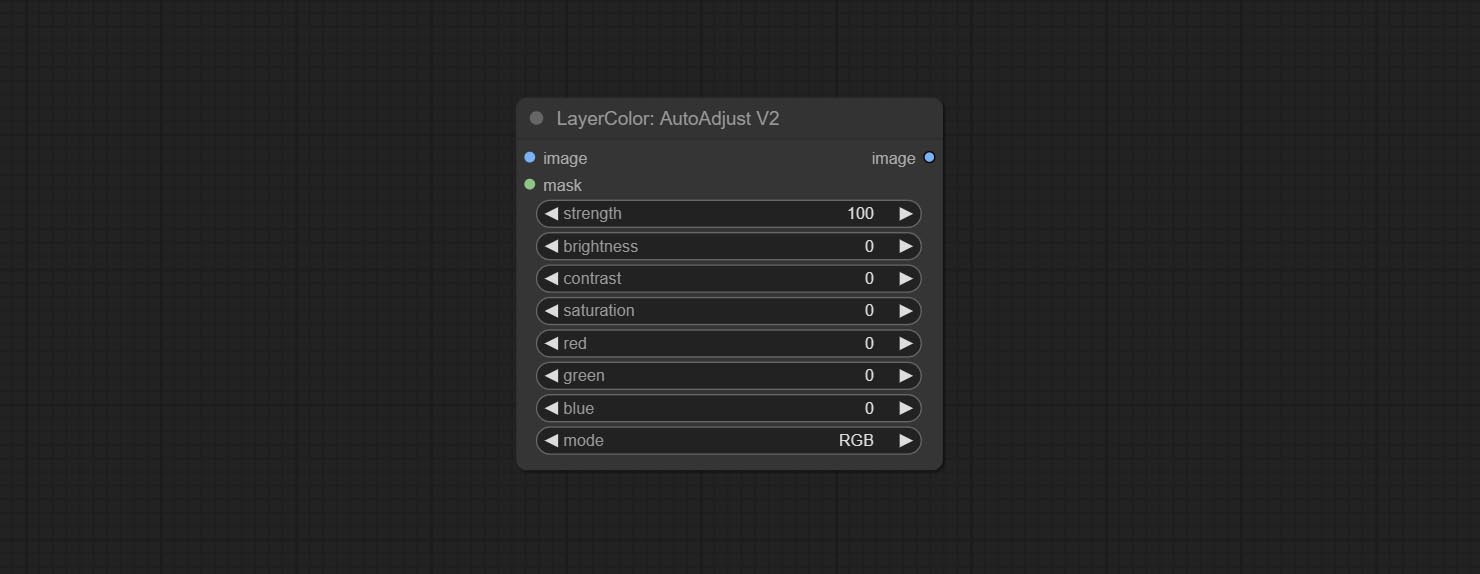
- mask:可选的掩码输入。
- mode:自动调整模式。“RGB”根据 RGB 三个通道自动调整,“lum + sat”根据亮度和饱和度自动调整,“luminance”根据亮度自动调整,“saturation”根据饱和度自动调整,“mono”则根据灰度自动调整并输出单色图像。
AutoBrightness
自动将过暗或过亮的图像调整至适中亮度,并支持掩码输入。当使用掩码输入时,仅以掩码部分的内容作为自动亮度调整的数据源,而最终输出的仍是整幅调整后的图像。
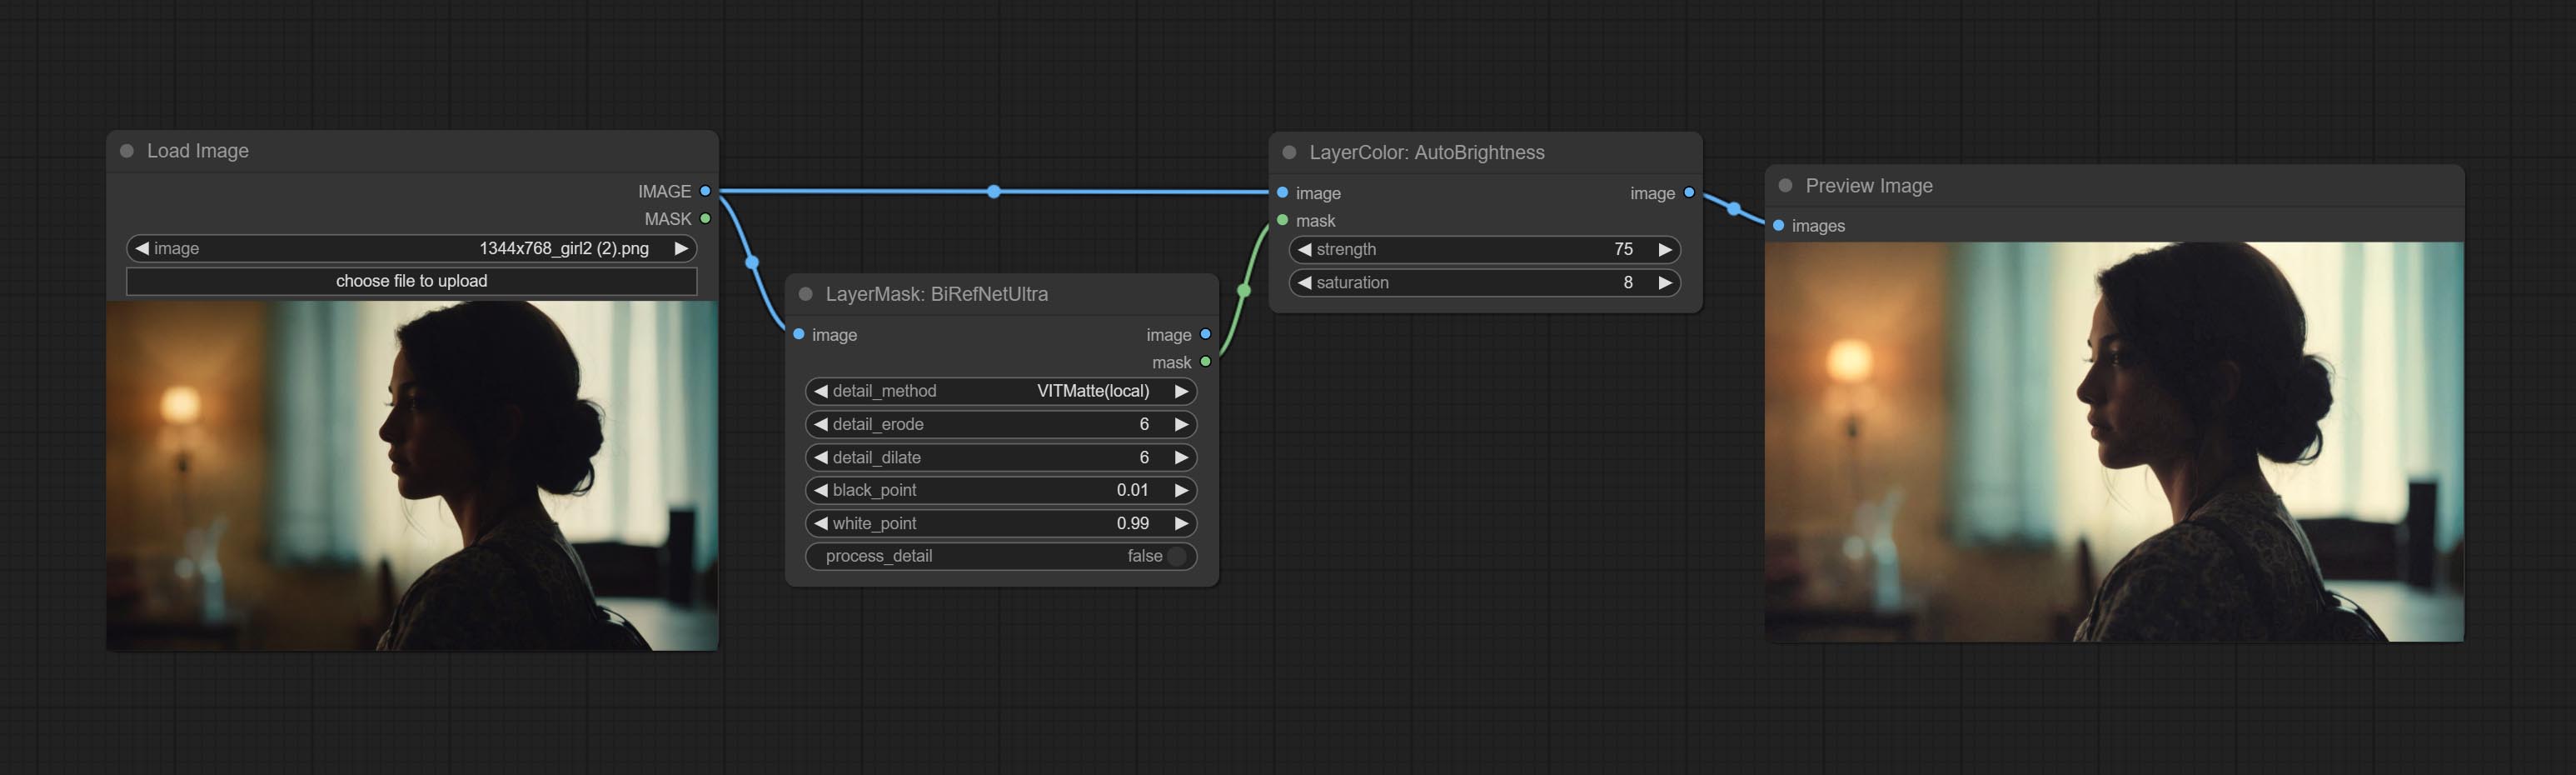
节点选项: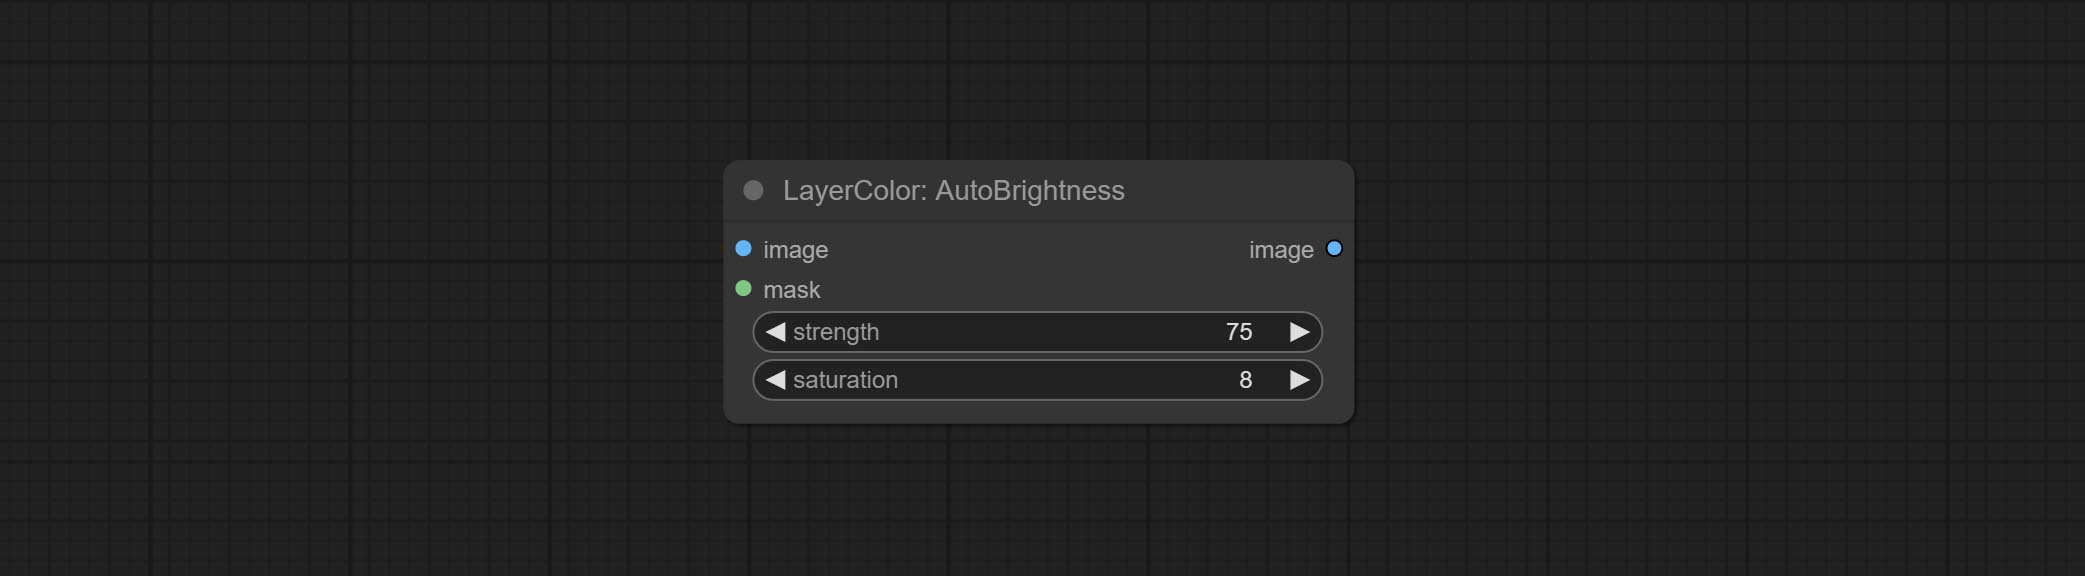
- strength:自动调整亮度的强度。数值越大,结果越偏向中间值,与原图的差异也越大。
- saturation:色彩饱和度。亮度的变化通常会导致色彩饱和度的变化,可通过此参数进行适当补偿。
ColorAdapter
自动调整图像的色调,使其更接近参考图像。
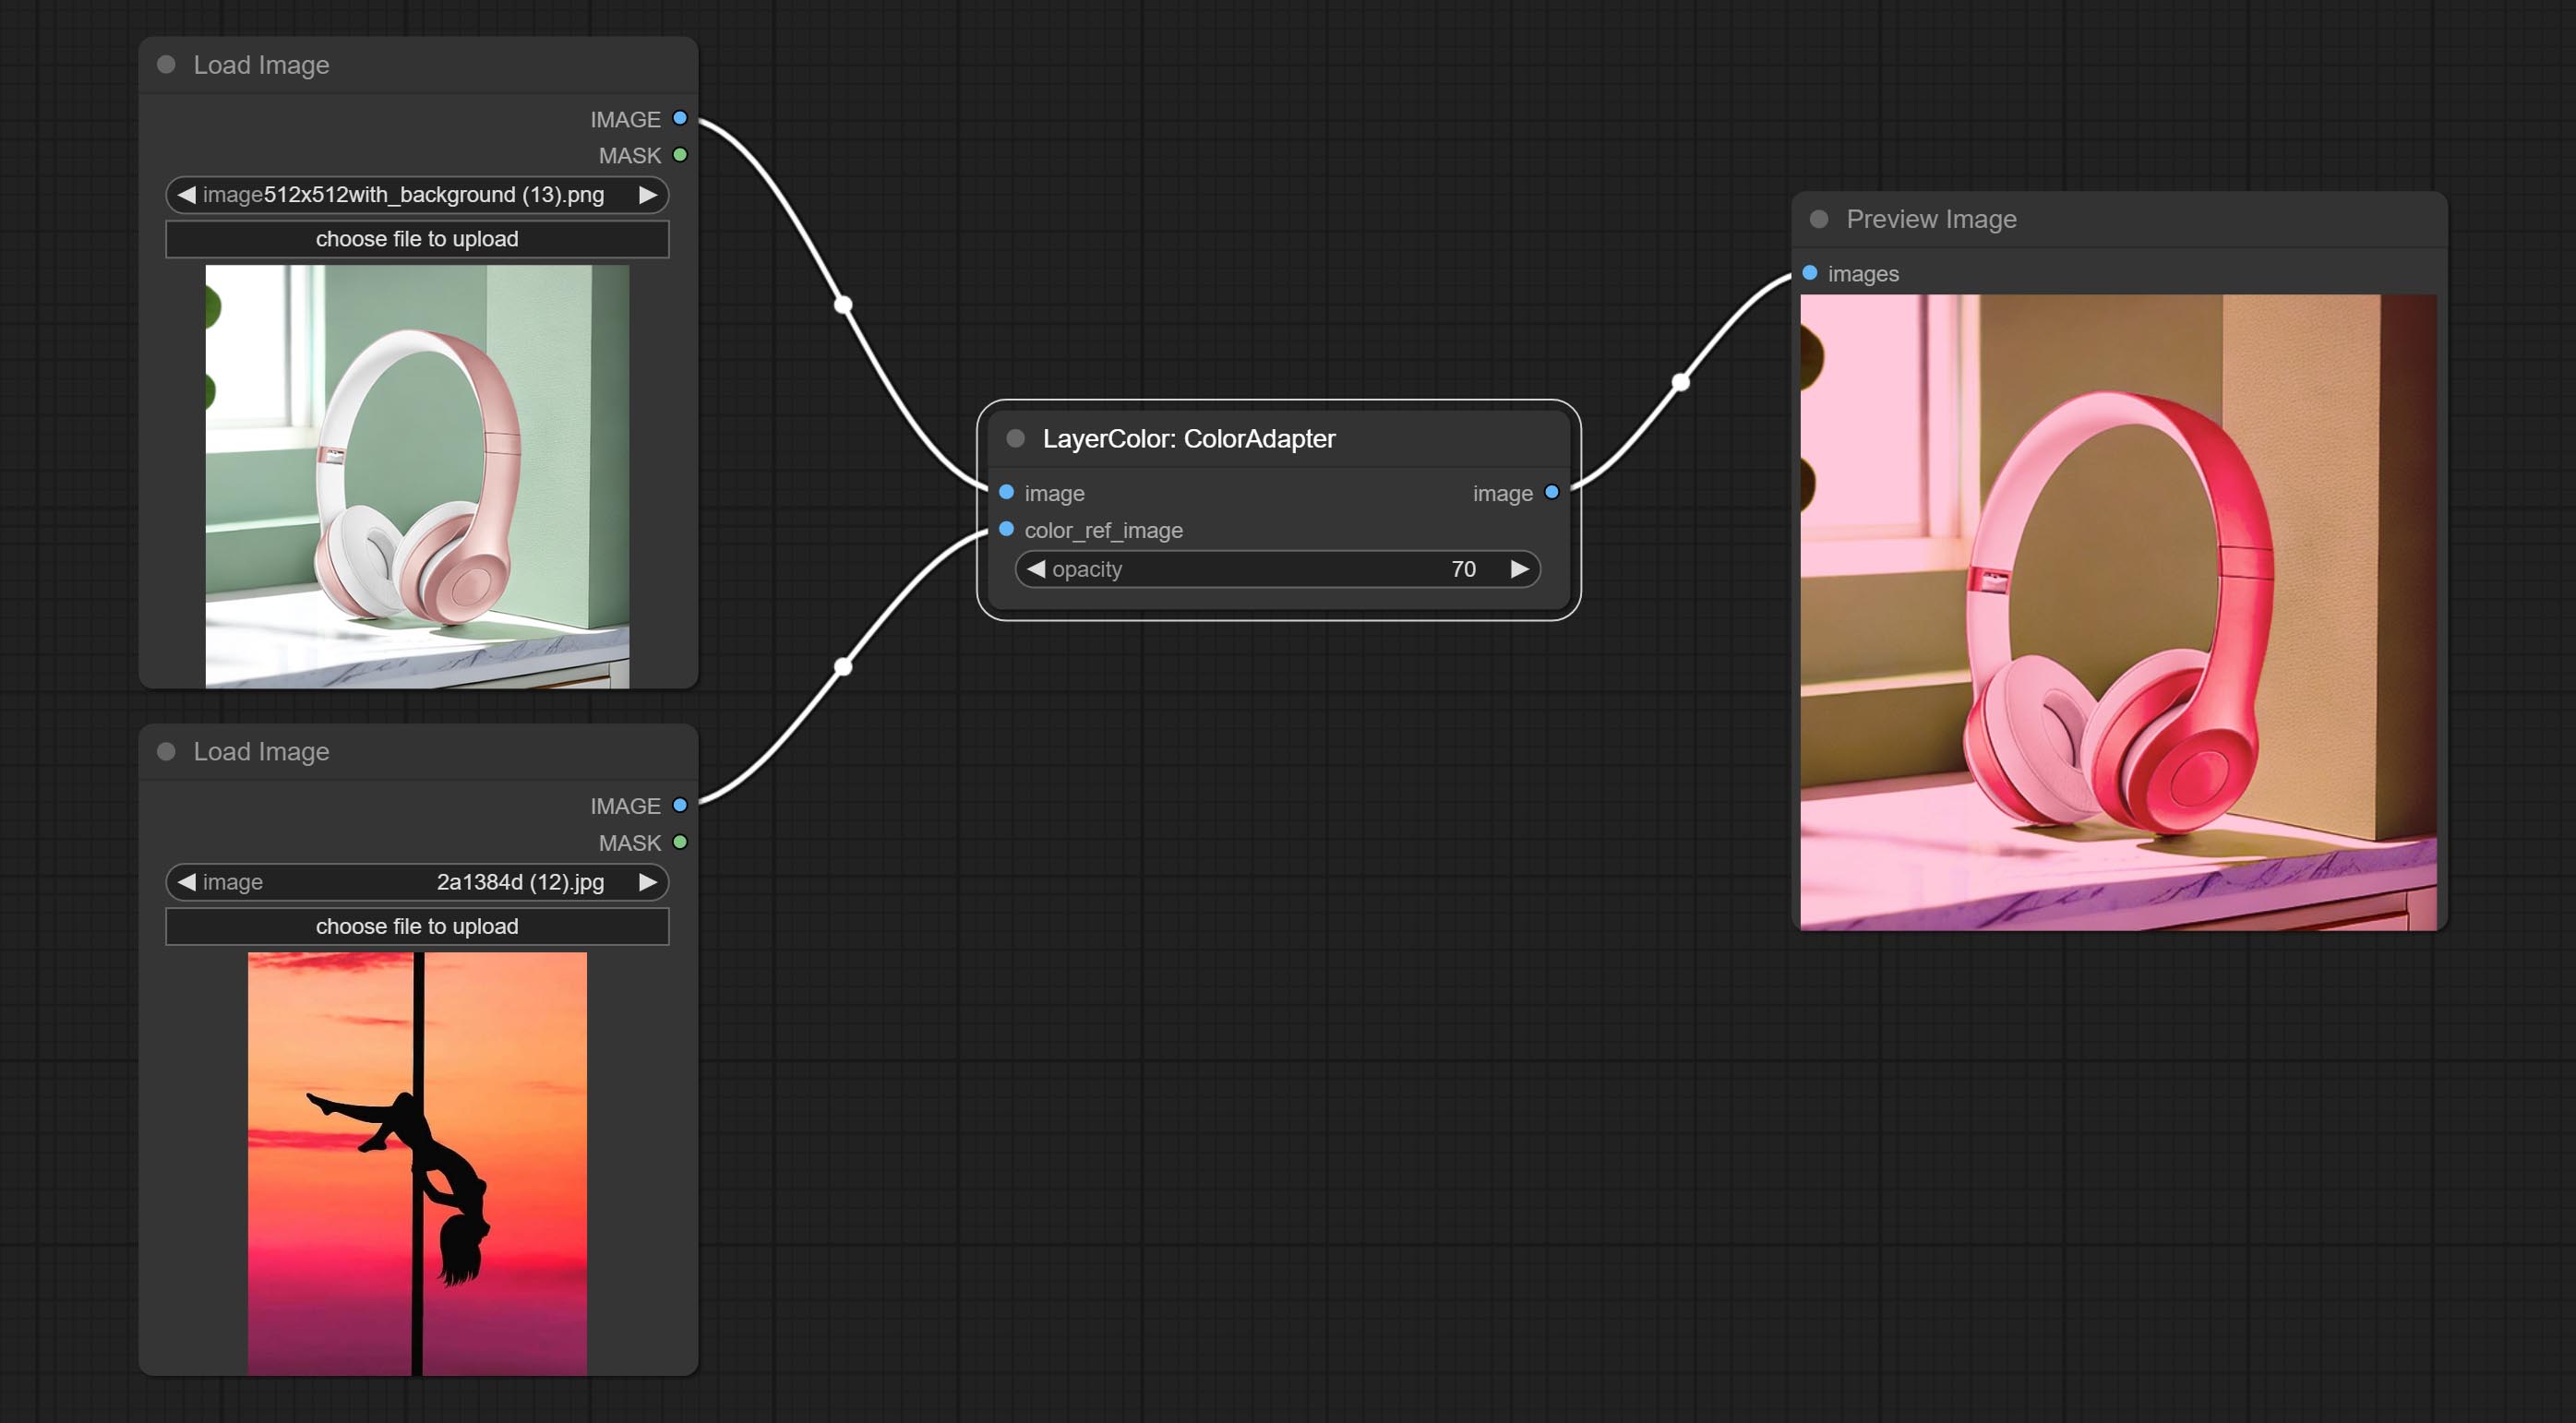
节点选项: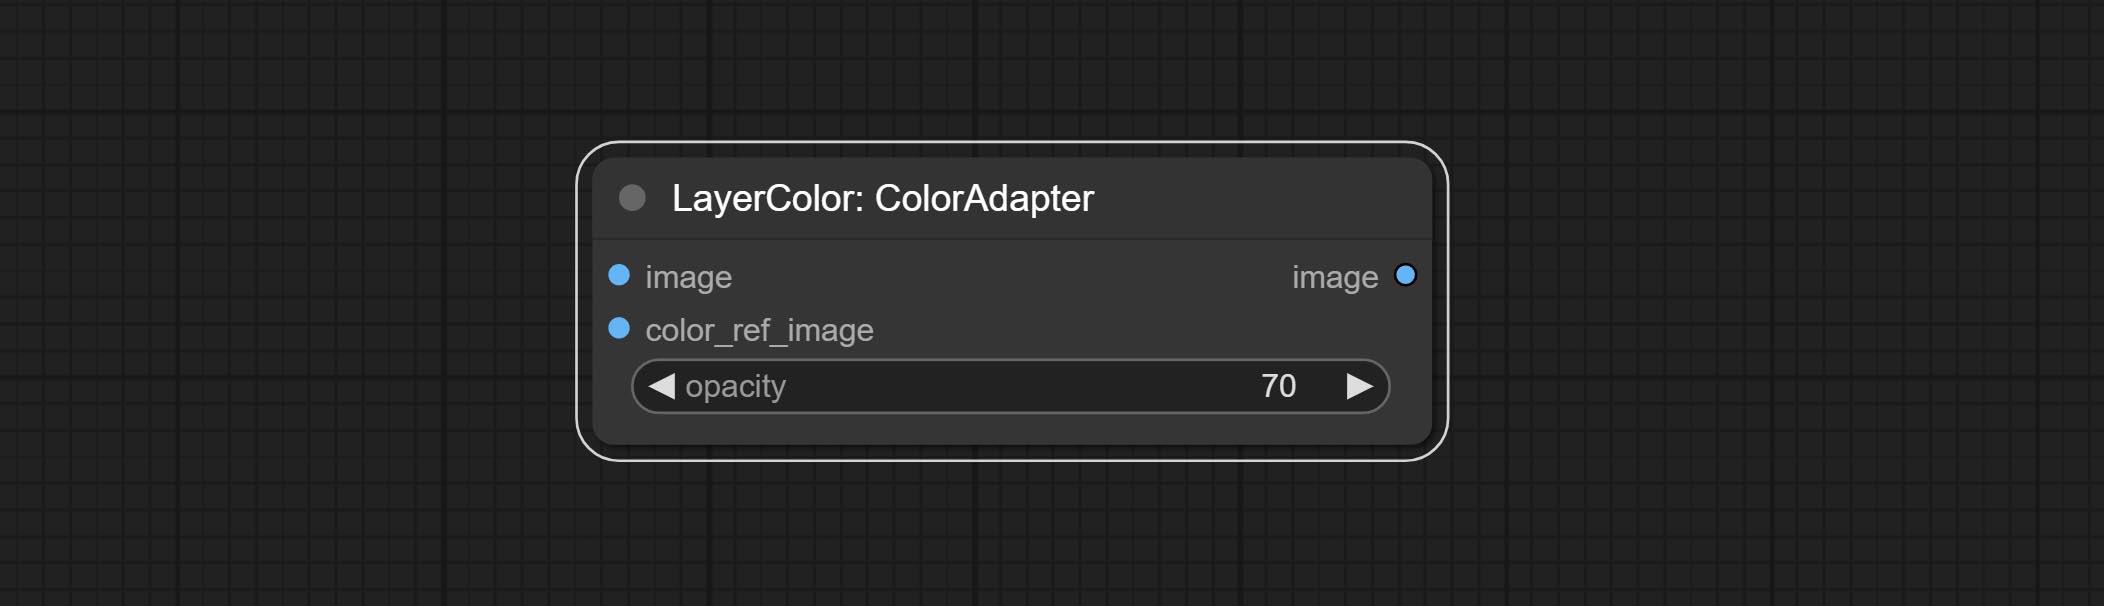
- opacity:调整色调后图像的透明度。
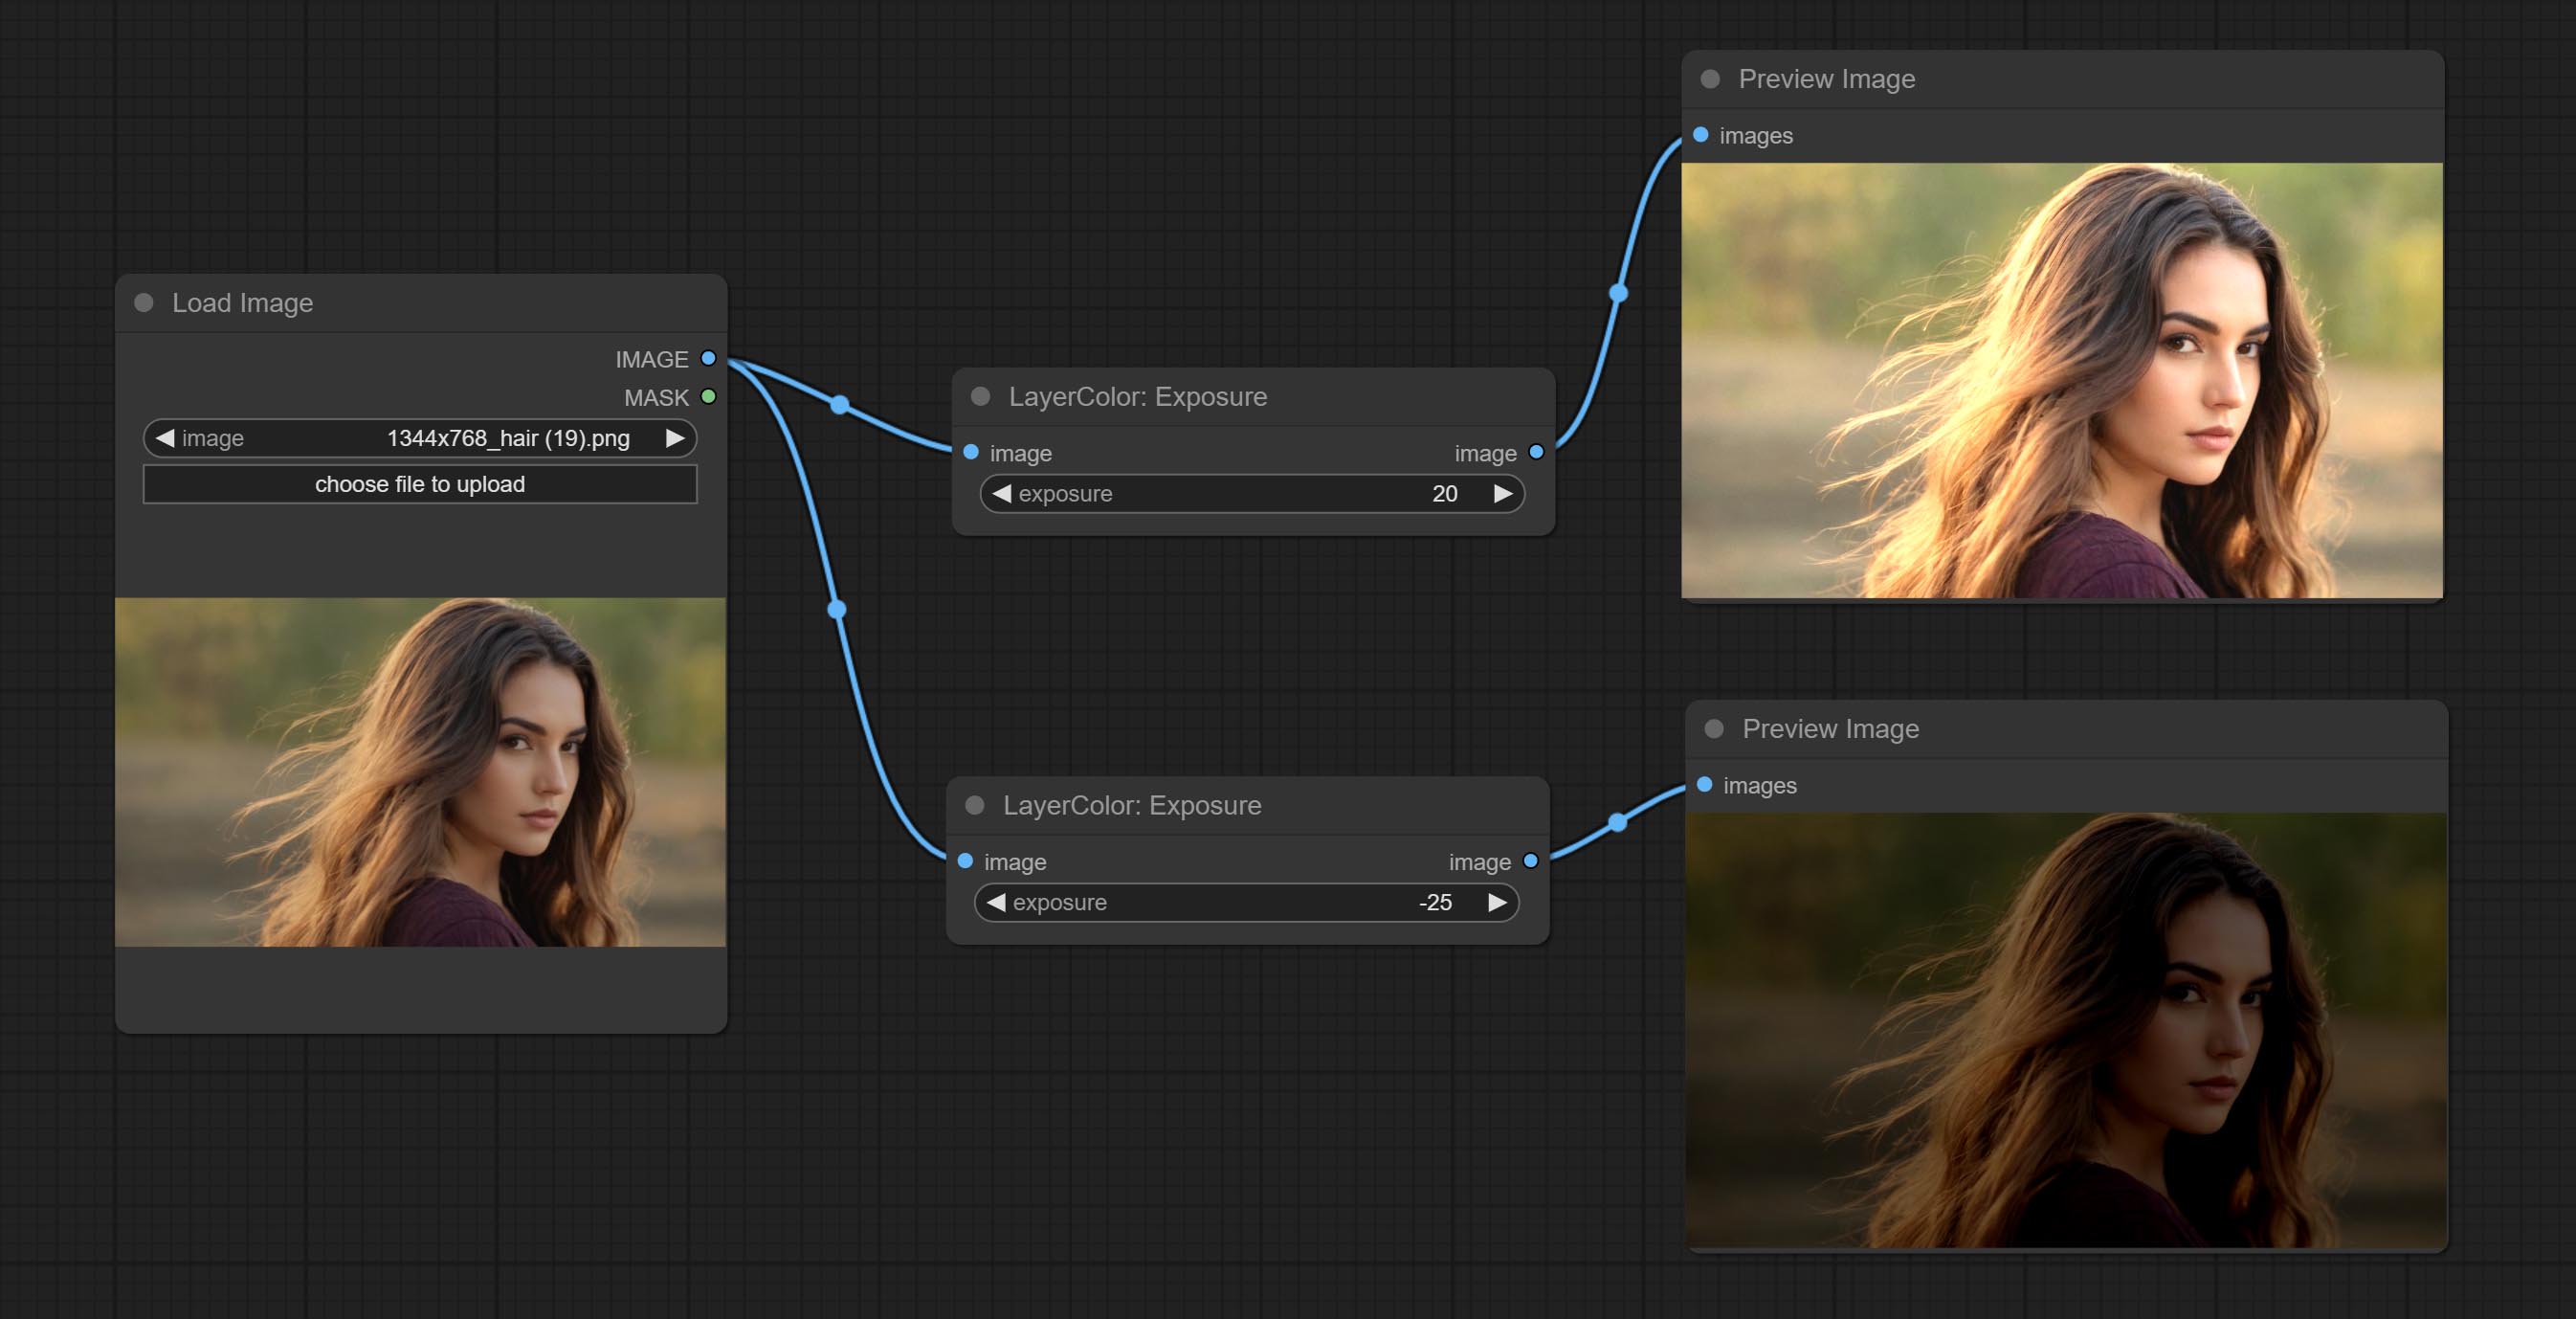
Exposure
改变图像的曝光。
阴影与高光的颜色
调整图像中暗部和亮部的颜色。
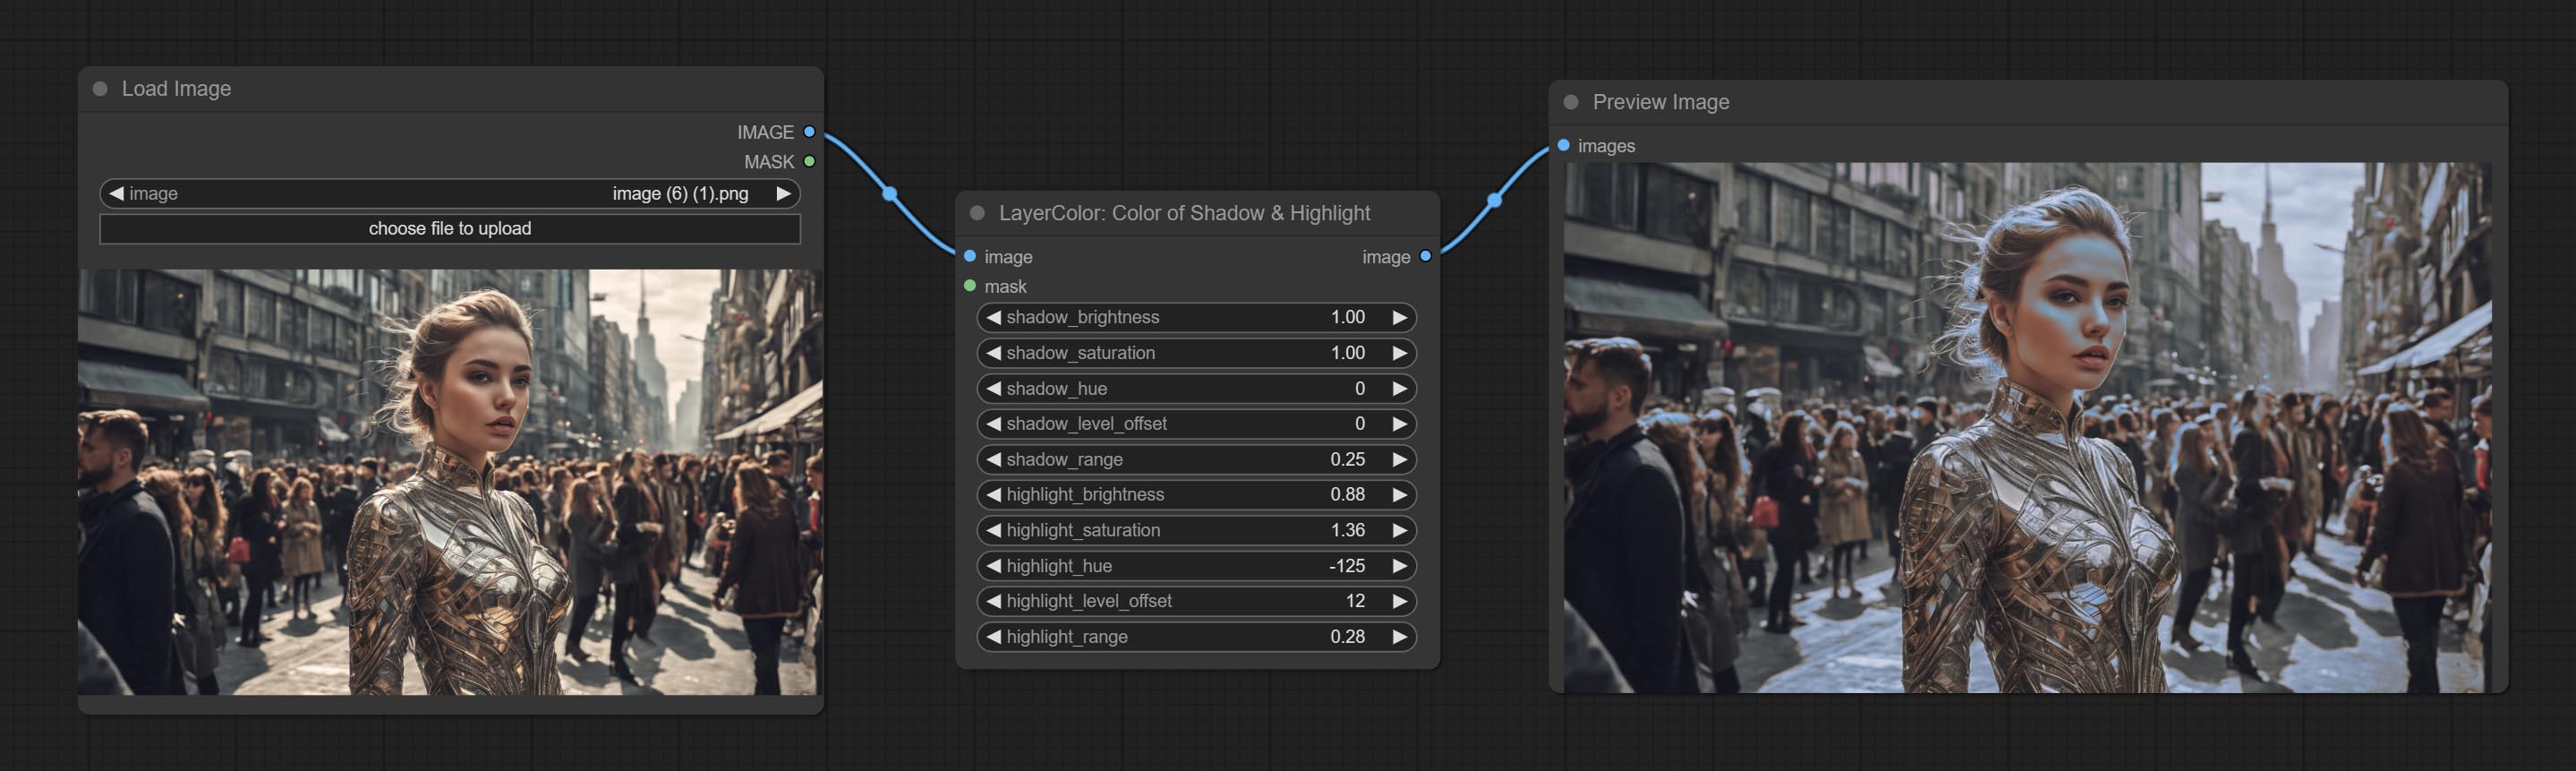
节点选项: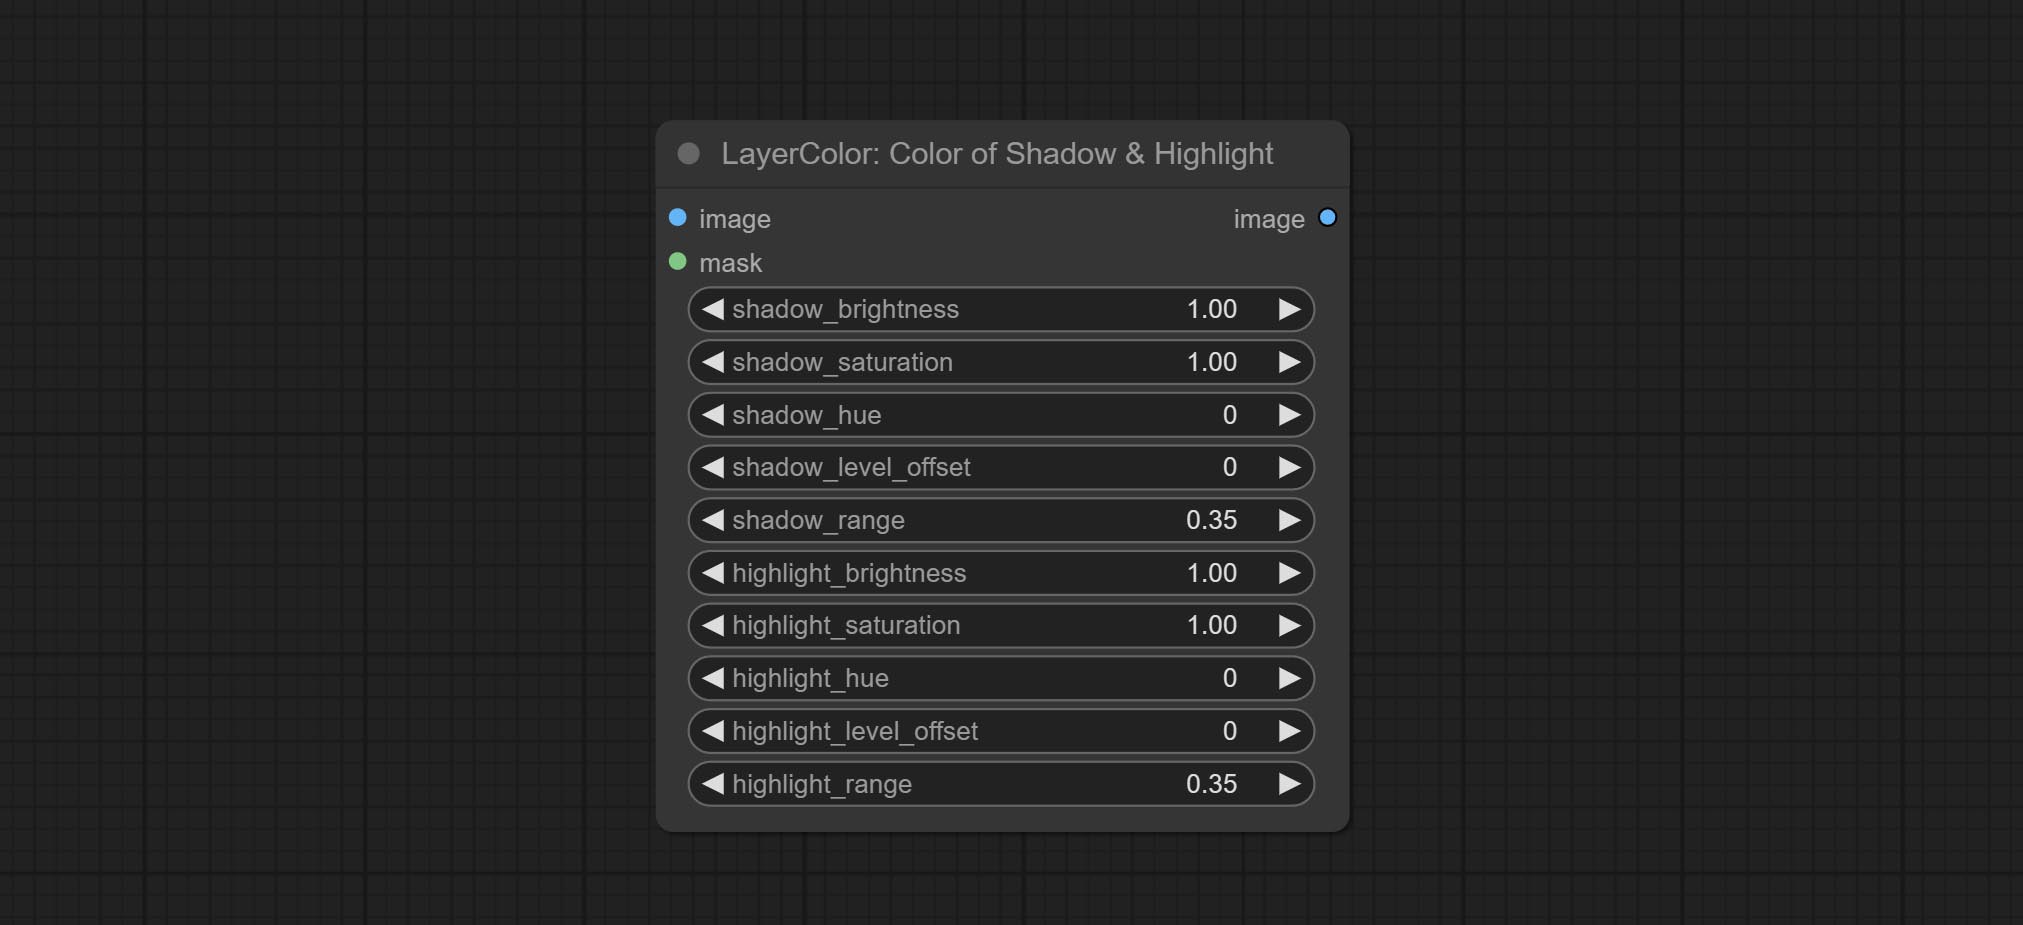
- image:输入图像。
- mask:可选输入。若提供掩码,则仅调整掩码范围内的颜色。
- shadow_brightness:暗部亮度。
- shadow_saturation:暗部色彩饱和度。
- shadow_hue:暗部色彩色调。
- shadow_level_offset:暗部数值偏移量,数值越大,越多区域会从亮部过渡到暗部。
- shadow_range:暗部过渡范围。
- highlight_brightness:亮部亮度。
- highlight_saturation:亮部色彩饱和度。
- highlight_hue:亮部色彩色调。
- highlight_level_offset:亮部数值偏移量,数值越大,越多区域会从暗部过渡到亮部。
- highlight_range:亮部过渡范围。
节点选项:
- exposure:曝光值。数值越高,图像越亮。
阴影高光V2
这是 阴影与高光 节点的复刻版,去掉了节点名称中的“&”符号,以避免 ComfyUI 工作流解析错误。
ColorTemperature
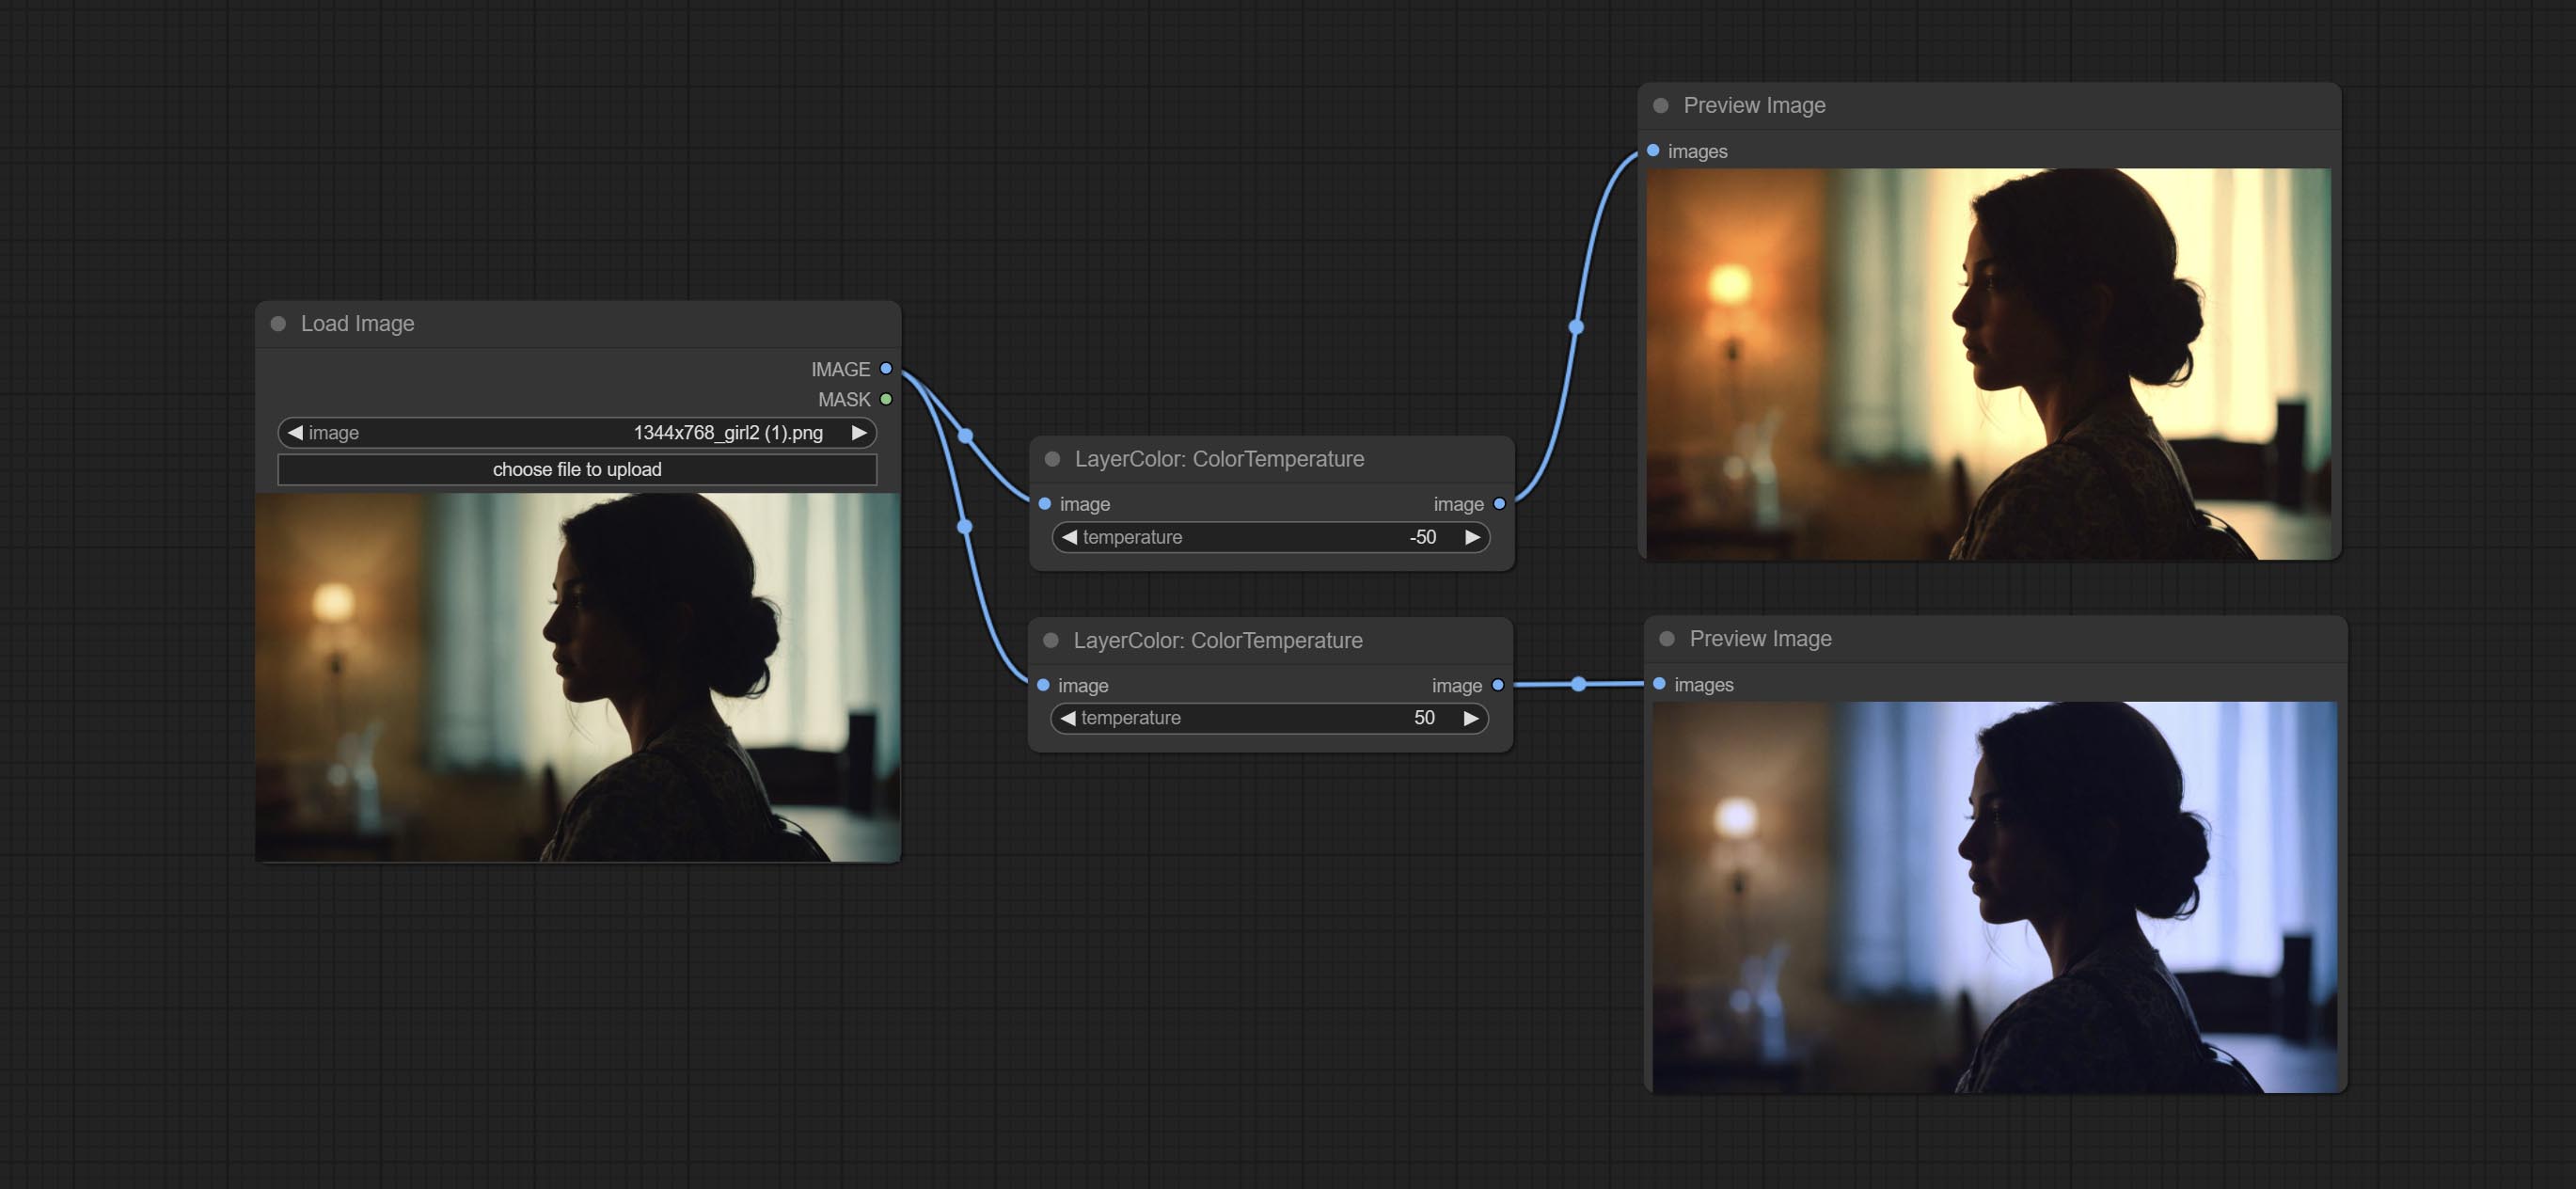
改变图像的色温。
节点选项: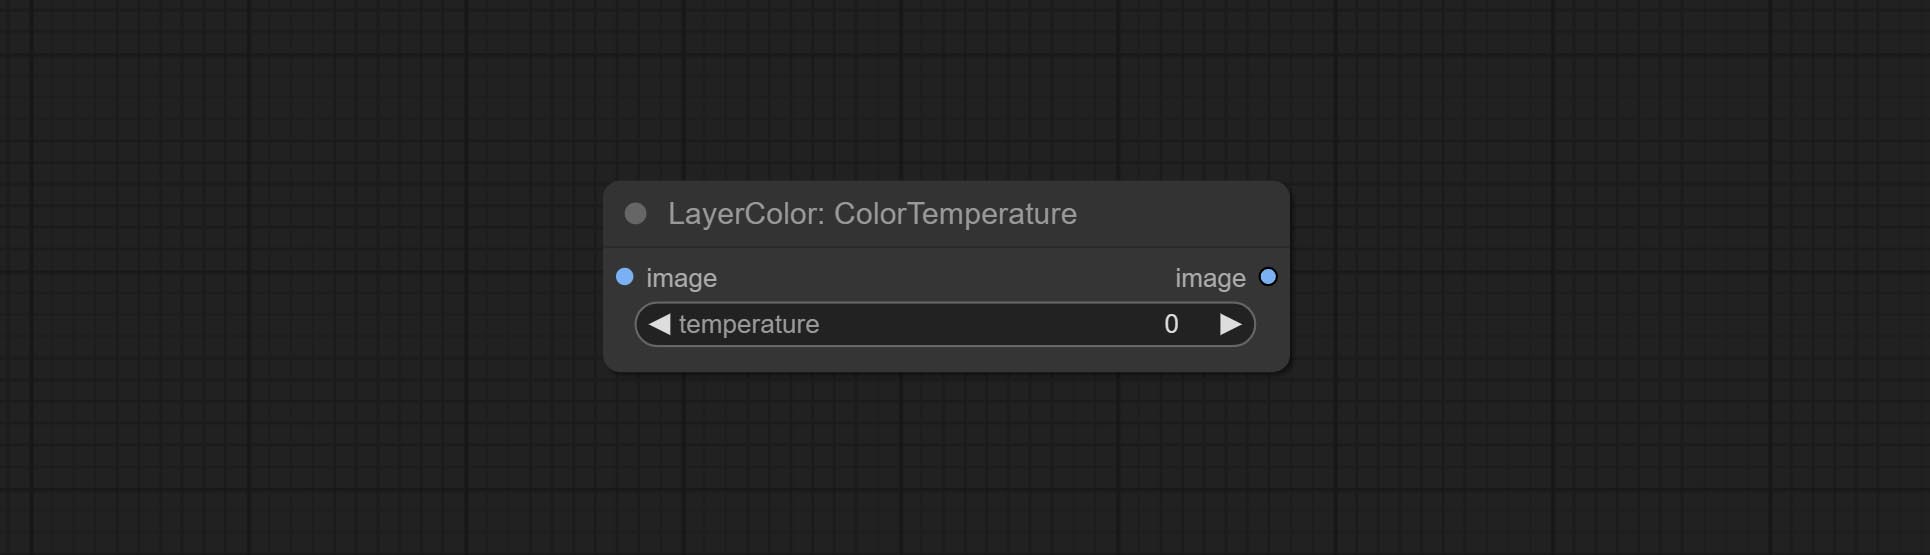
- temperature:色温值。范围在 -100 到 100 之间。数值越高,色温越高(越偏蓝);数值越低,色温越低(越偏黄)。
Levels
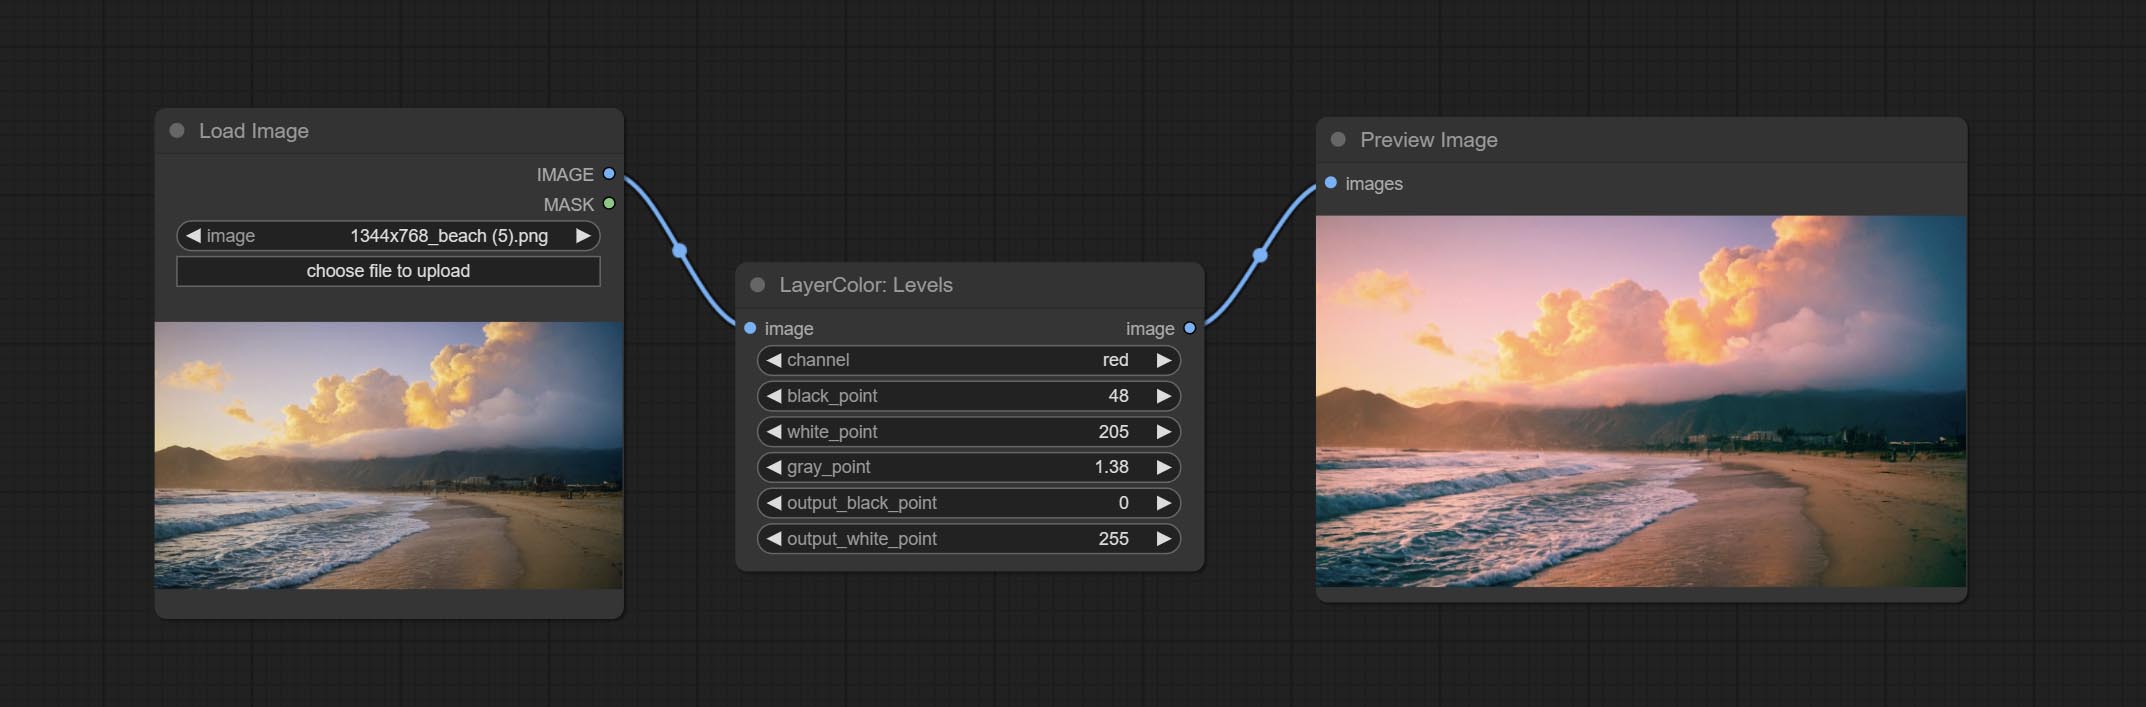
调整图像的色阶。
节点选项:
- channel:选择要调整的通道。可选 RGB、红、绿、蓝。
- black_point*:输入黑场值。取值范围 0-255,默认为 0。
- white_point*:输入白场值。取值范围 0-255,默认为 255。
- gray_point:输入灰场值。取值范围 0.01-9.99,默认为 1。
- output_black_point*:输出黑场值。取值范围 0-255,默认为 0。
- output_white_point*:输出白场值。取值范围 0-255,默认为 255。
*若 black_point 或 output_black_point 的值大于 white_point 或 output_white_point,则两者会互换位置,较大的值作为白场,较小的值作为黑场。
色彩平衡
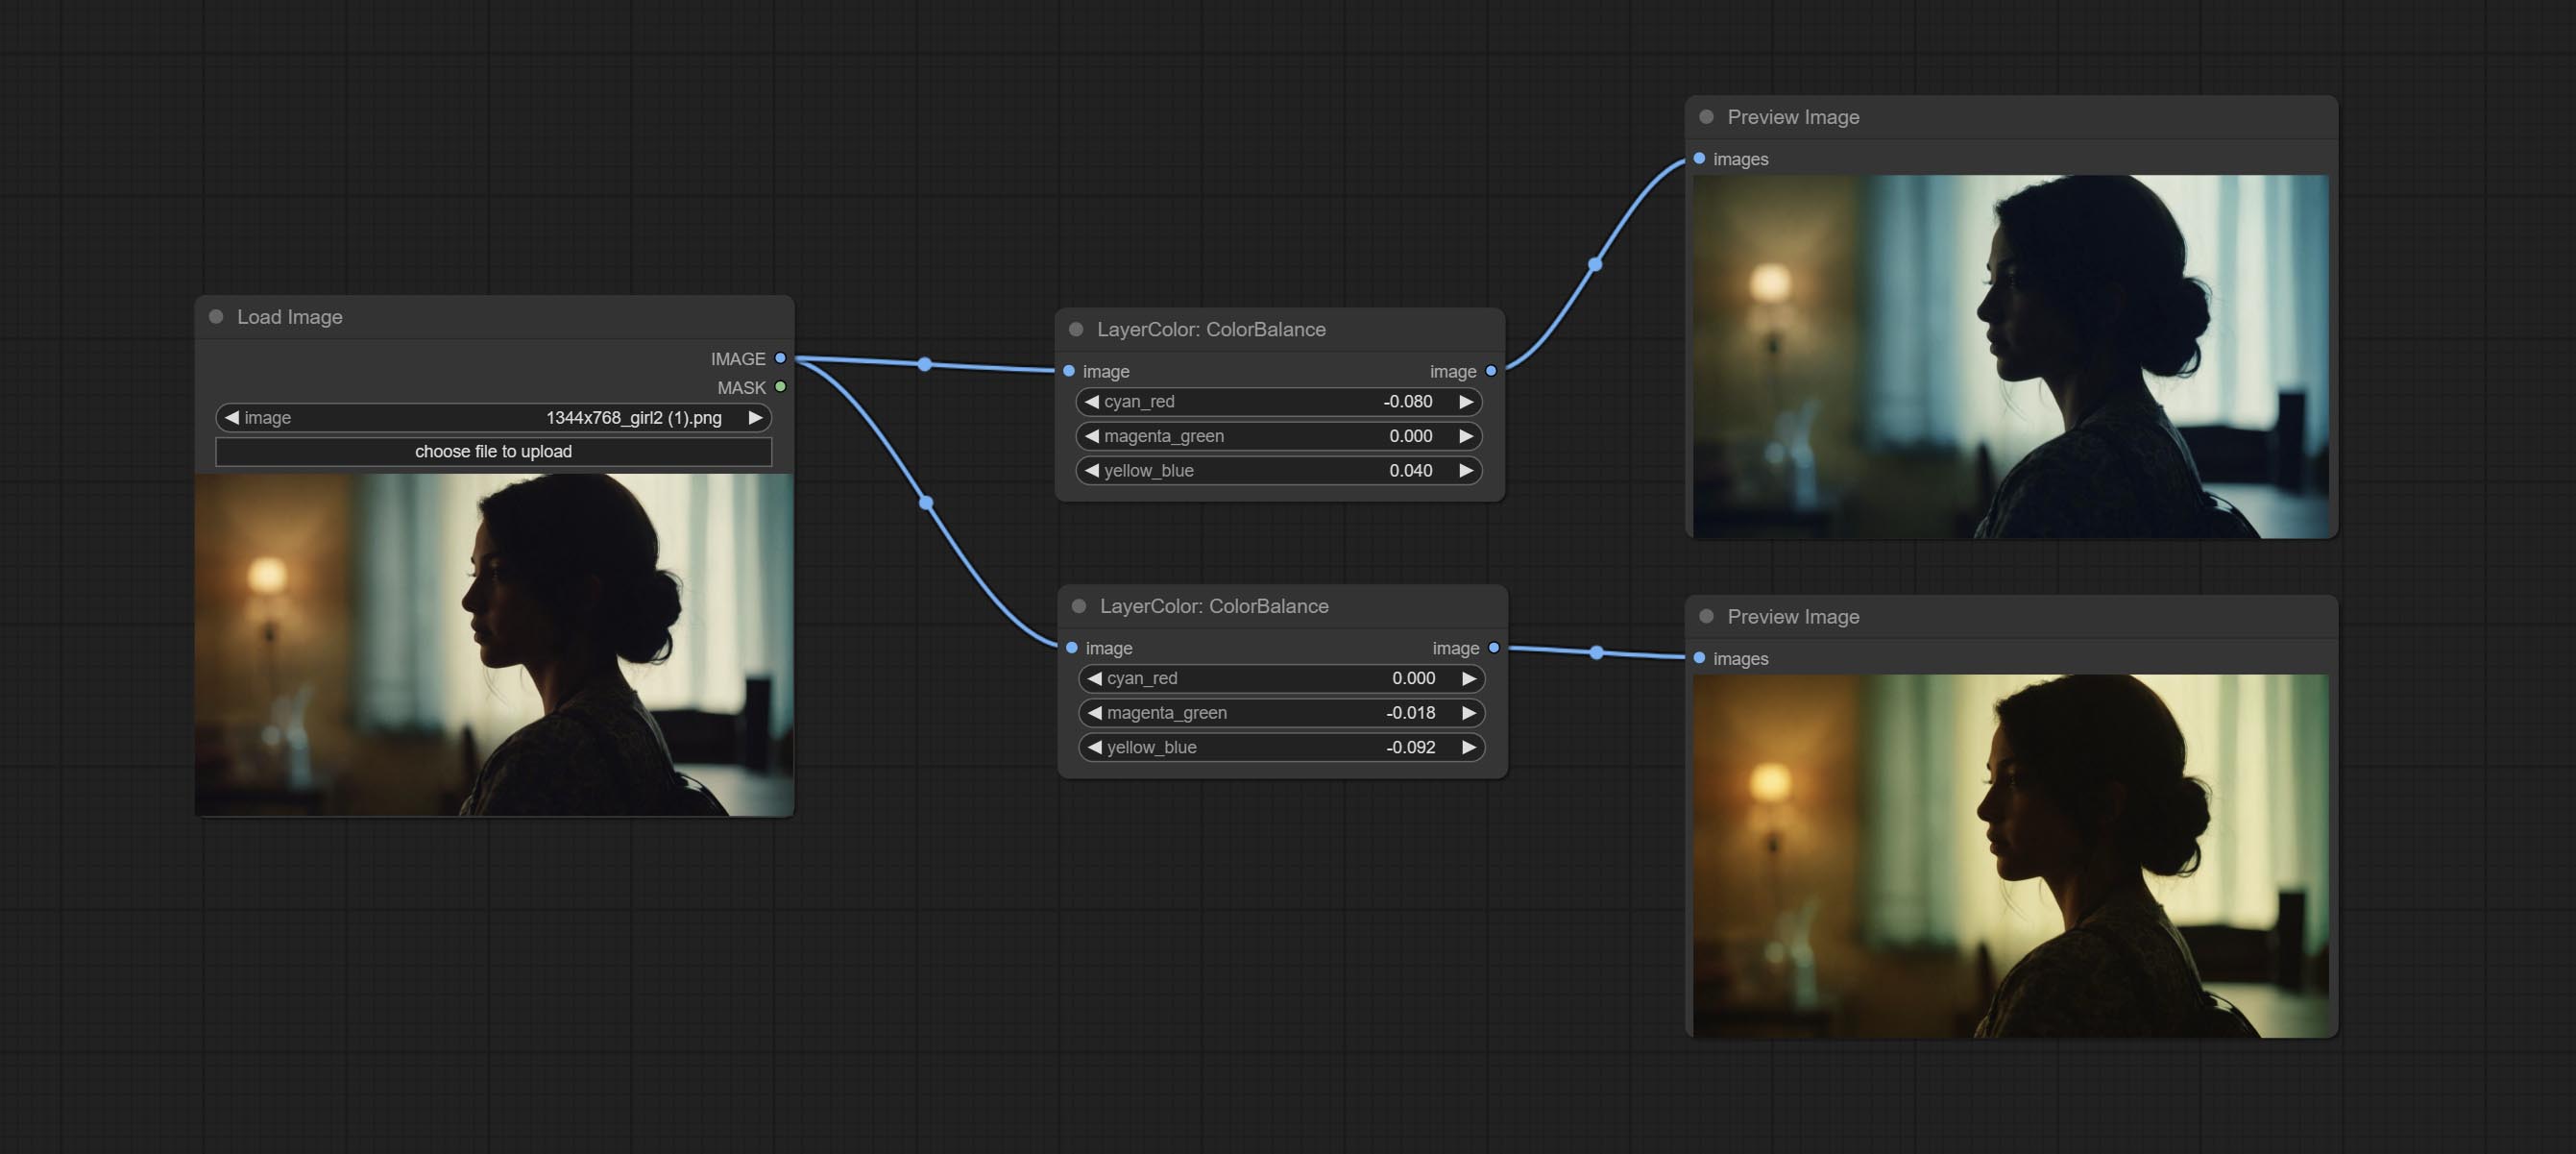
调整图像的色彩平衡。
节点选项: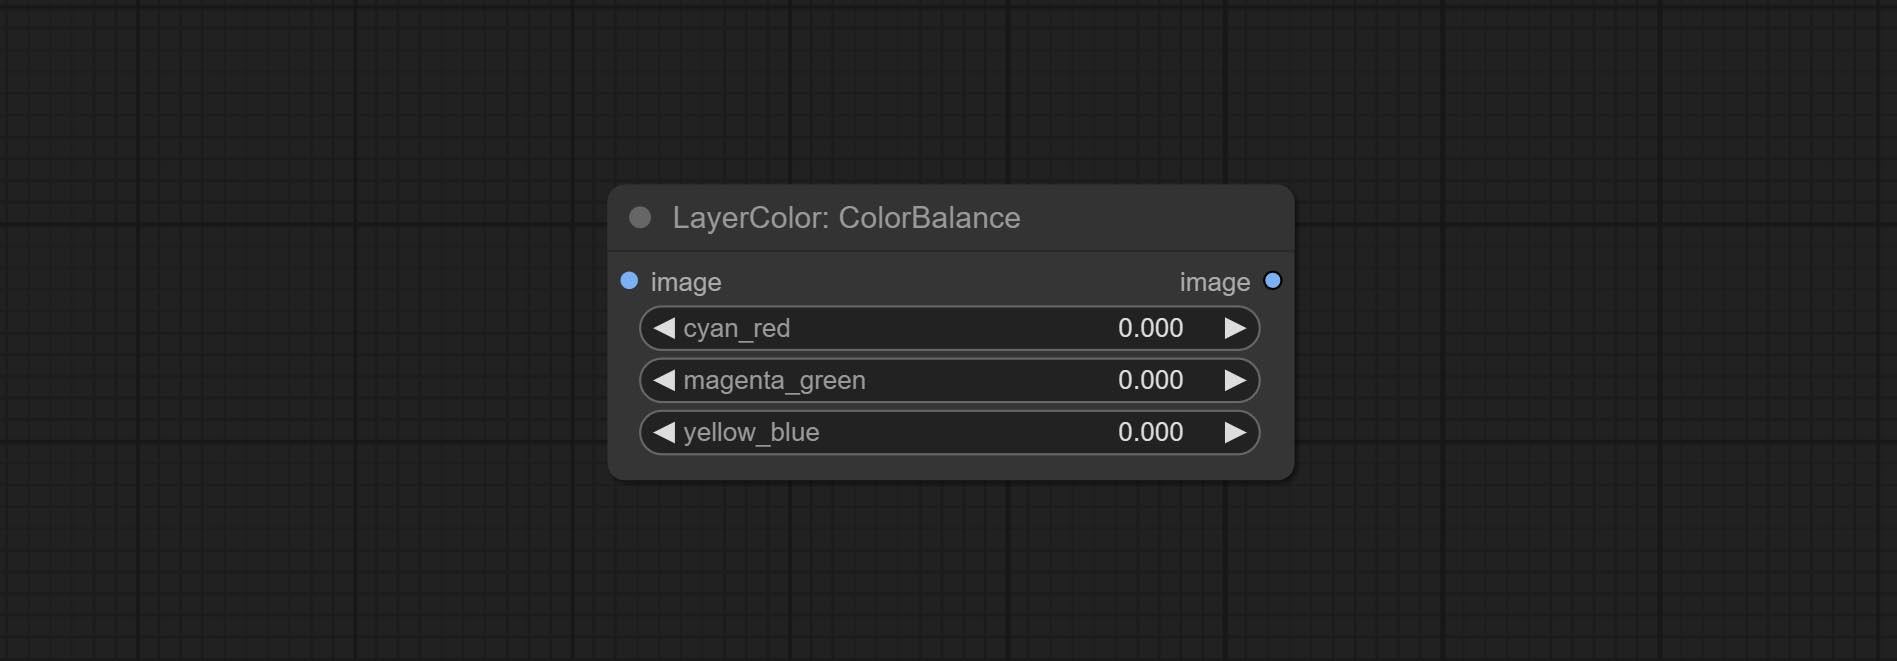
- cyan_red: 青红平衡。负值偏向青色,正值偏向红色。
- magenta_green: 洋红绿平衡。负值偏向洋红色,正值偏向绿色。
- yellow_blue: 黄蓝平衡。负值偏向黄色,正值偏向蓝色。
伽马
调整图像的伽马值。
节点选项: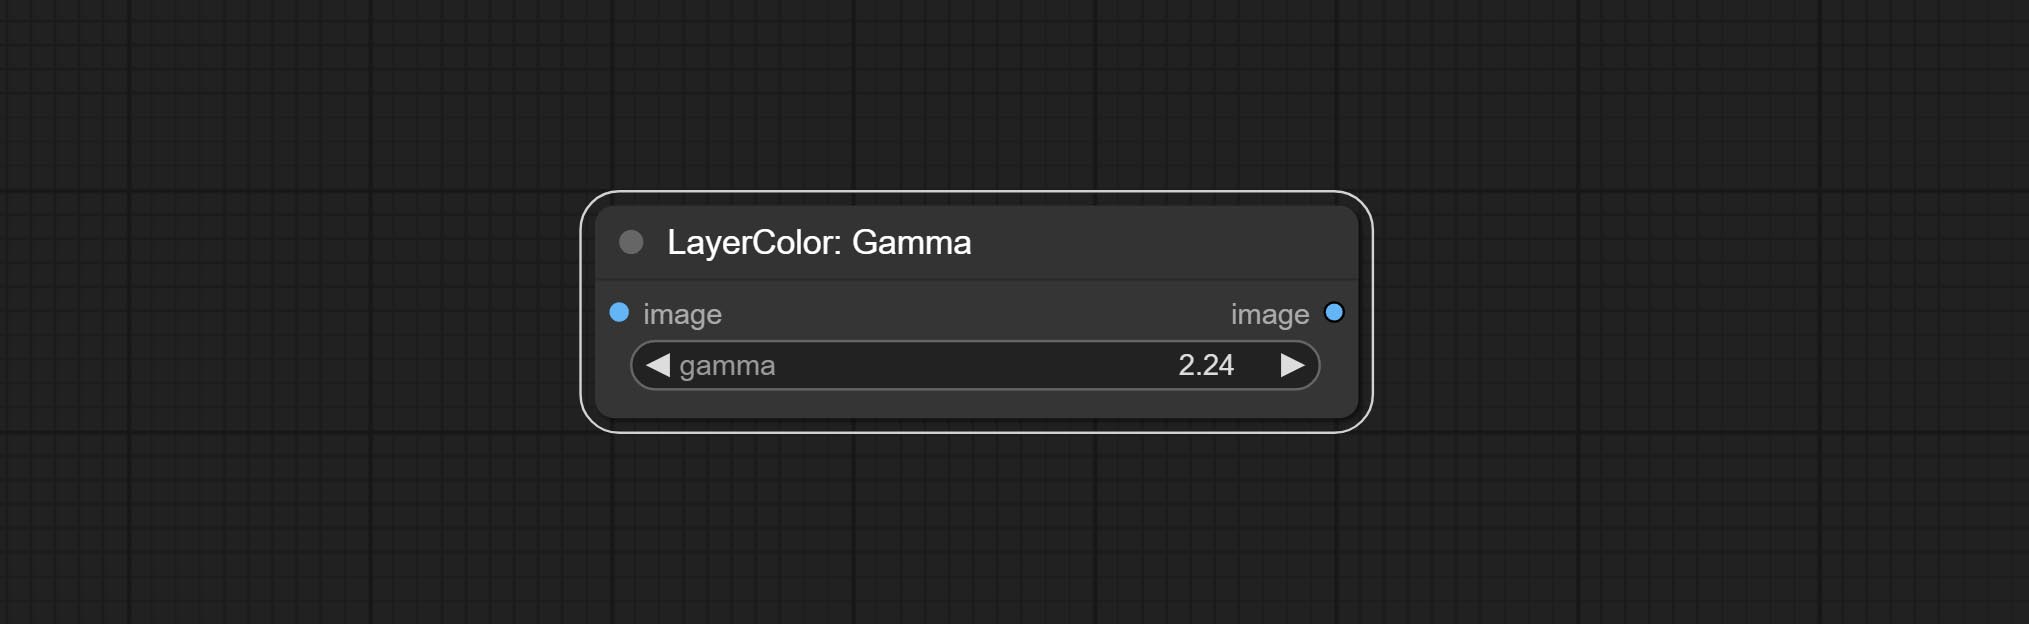
- gamma: 伽马值。
亮度与对比度
调整图像的亮度、对比度和饱和度。
节点选项: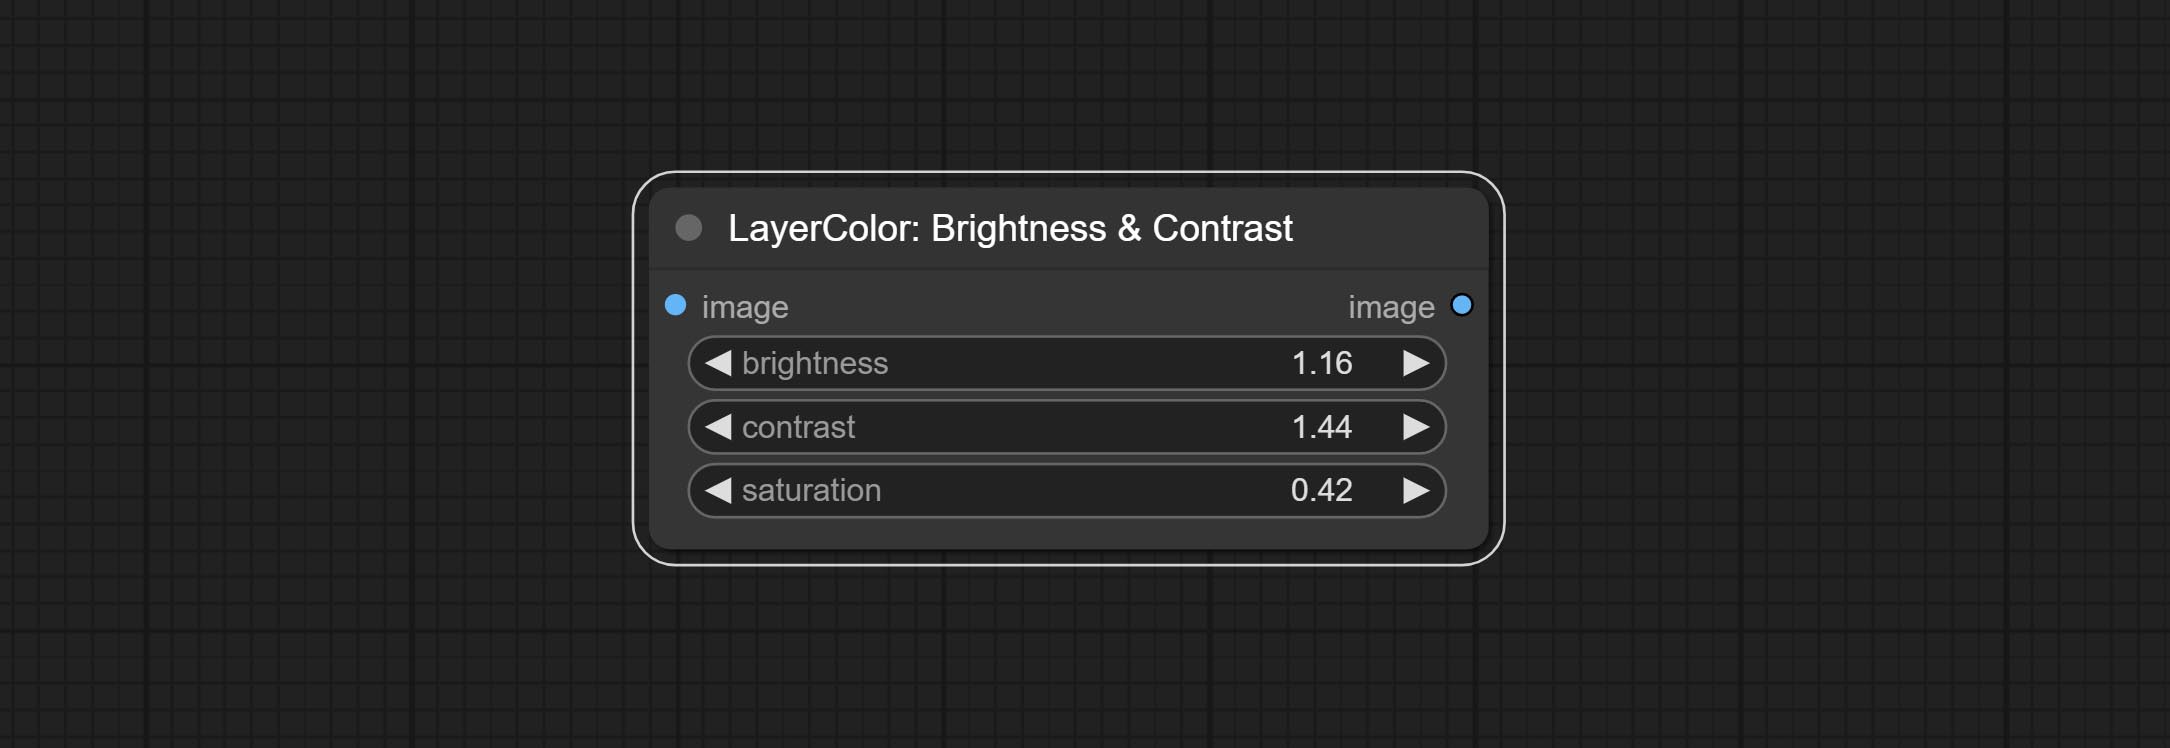
- brightness: 亮度值。
- contrast: 对比度值。
- saturation: 色饱和度值。
BrightnessContrastV2
“亮度与对比度”节点的复制品,去掉了节点名称中的“&”字符,以避免 ComfyUI 工作流解析错误。
RGB
调整图像的 RGB 通道。
节点选项: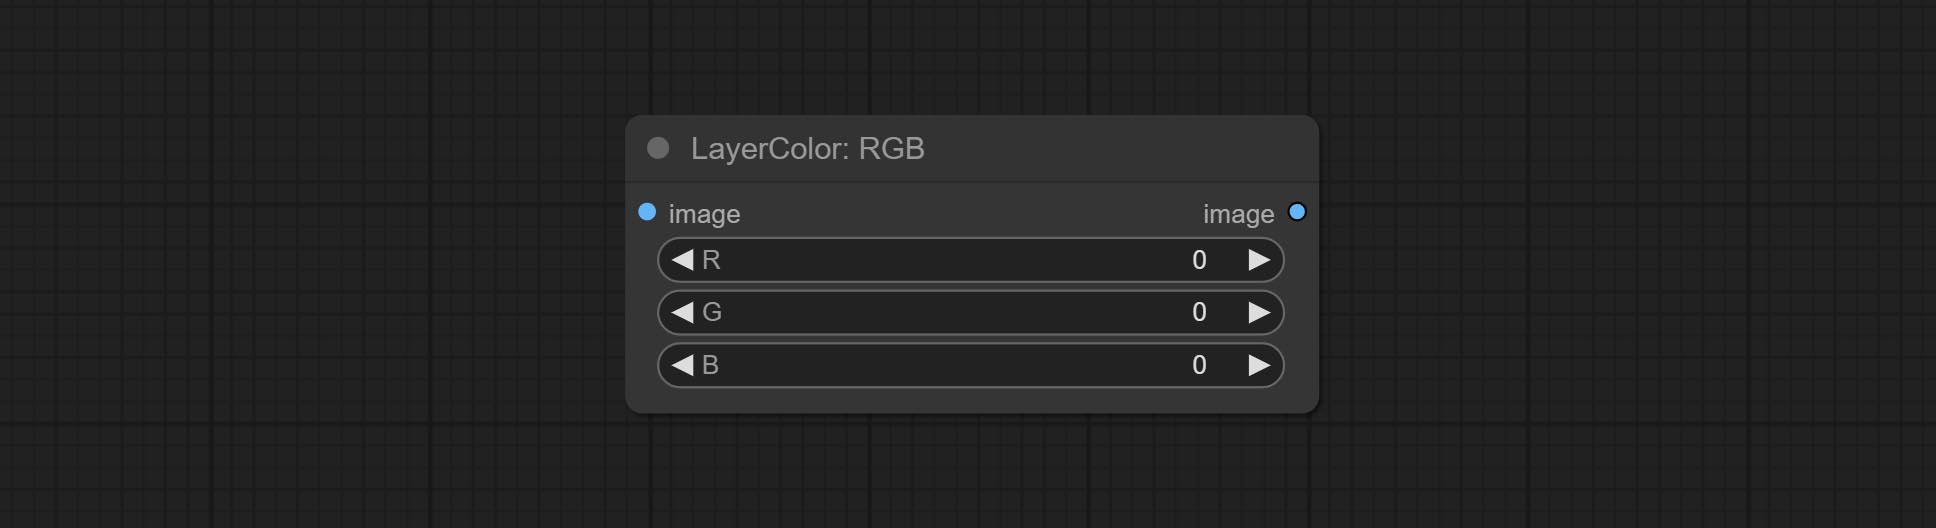
- R: R 通道。
- G: G 通道。
- B: B 通道。
YUV
调整图像的 YUV 通道。
节点选项: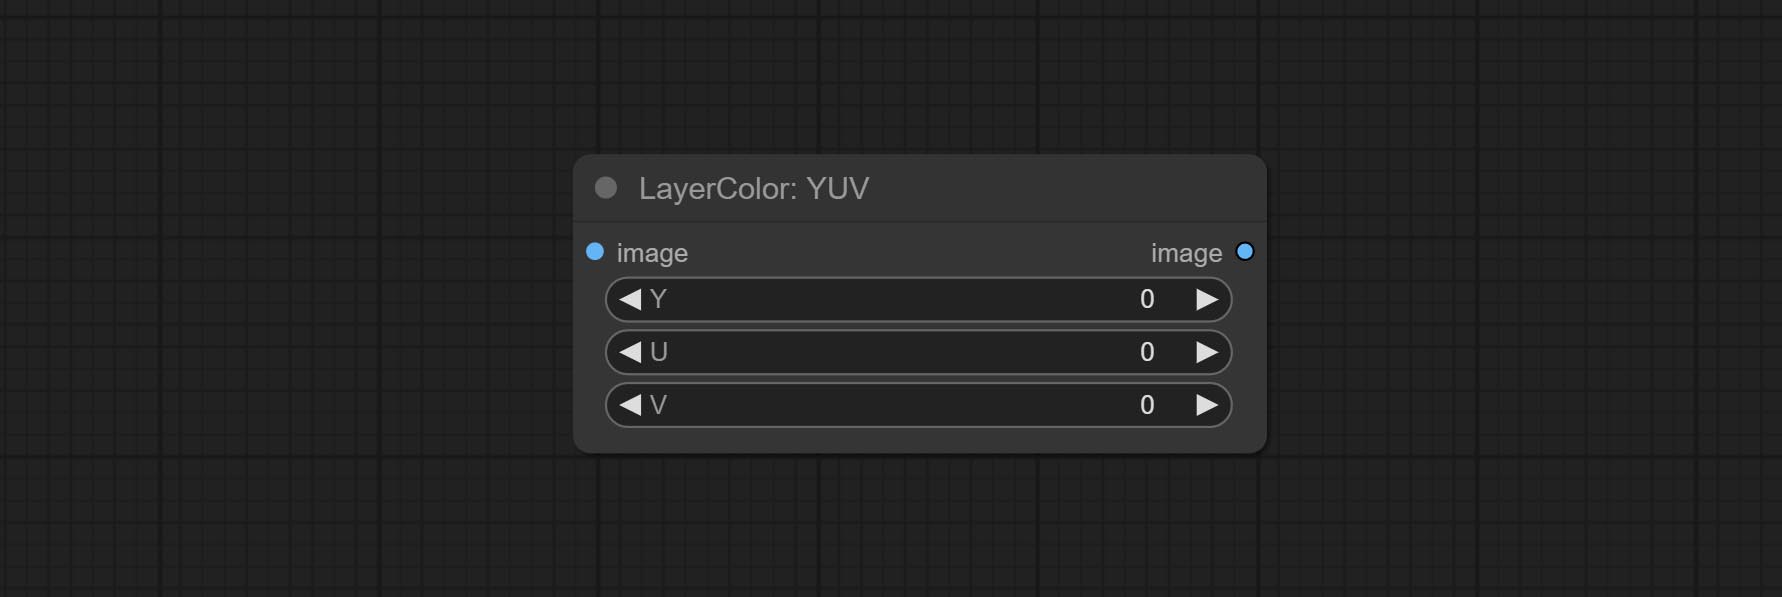
- Y: Y 通道。
- U: U 通道。
- V: V 通道。
LAB
调整图像的 LAB 通道。
节点选项: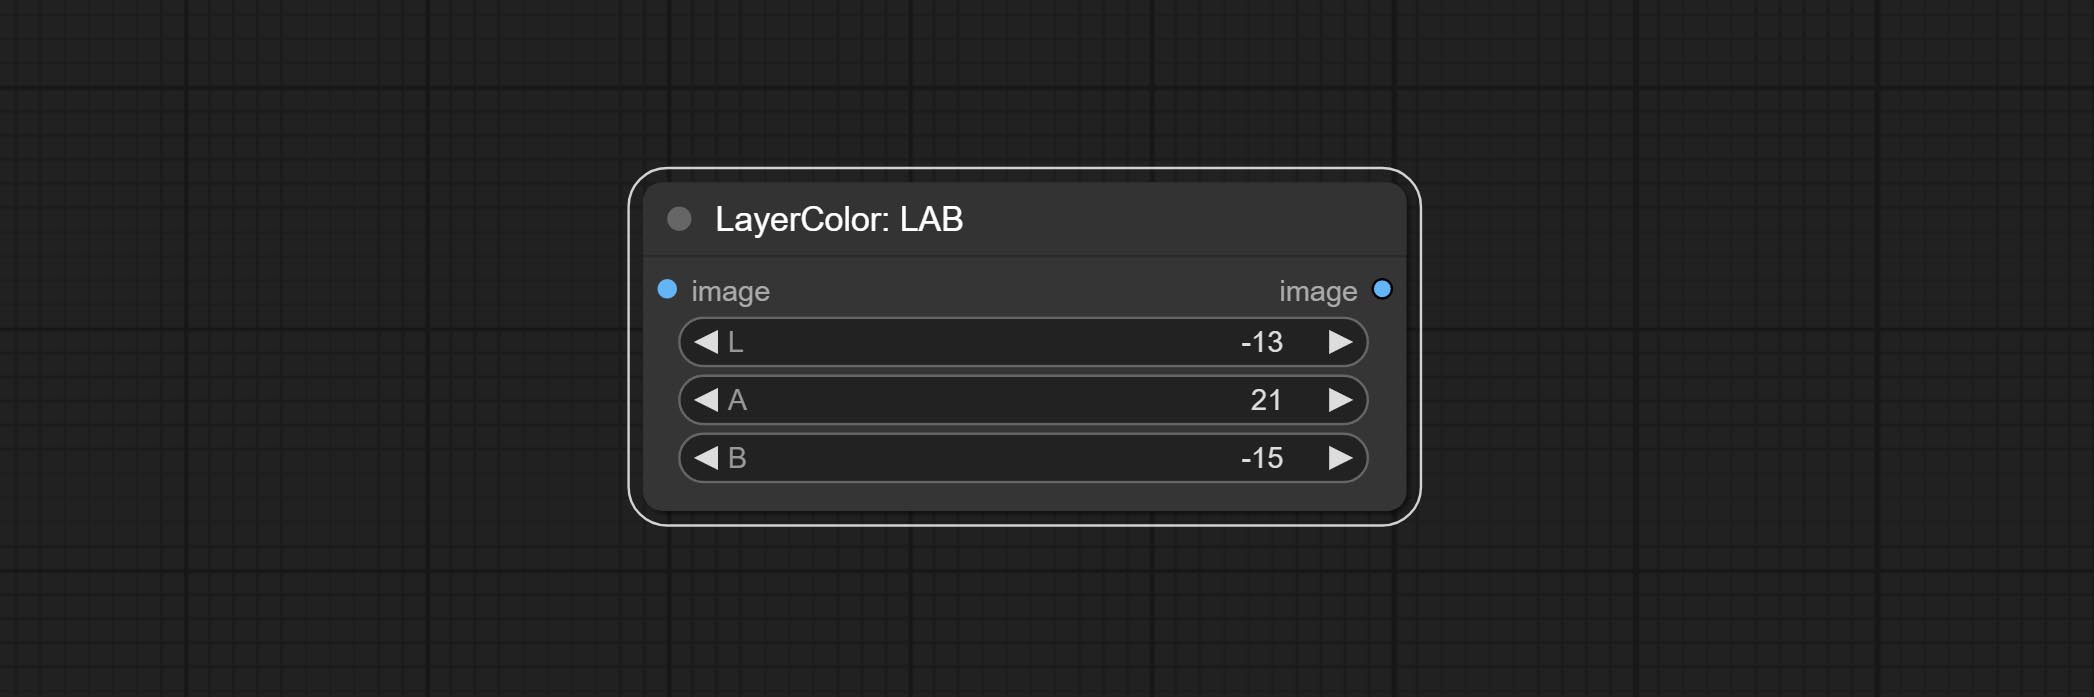
- L: L 通道。
- A: A 通道。
- B: B 通道。
HSV
调整图像的 HSV 通道。
节点选项: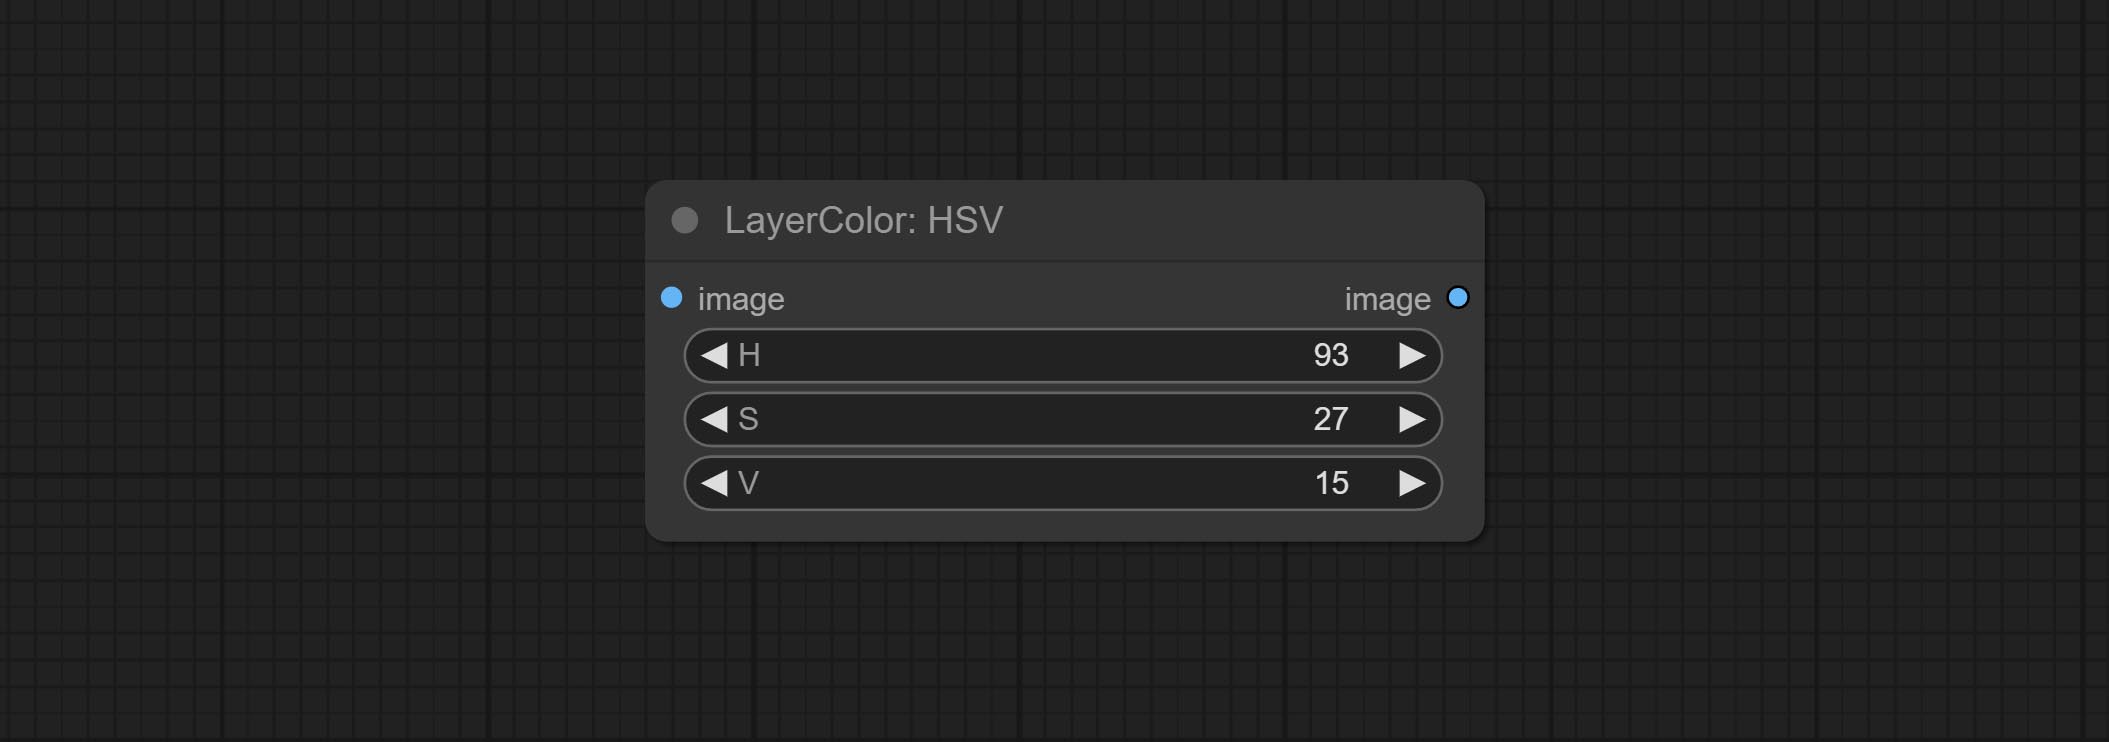
- H: H 通道。
- S: S 通道。
- V: V 通道。
色彩反转
将图像颜色反转为负片效果,可以选择 RGB 全部反转、单色反转,或单独反转 RGB 中的某一个通道。
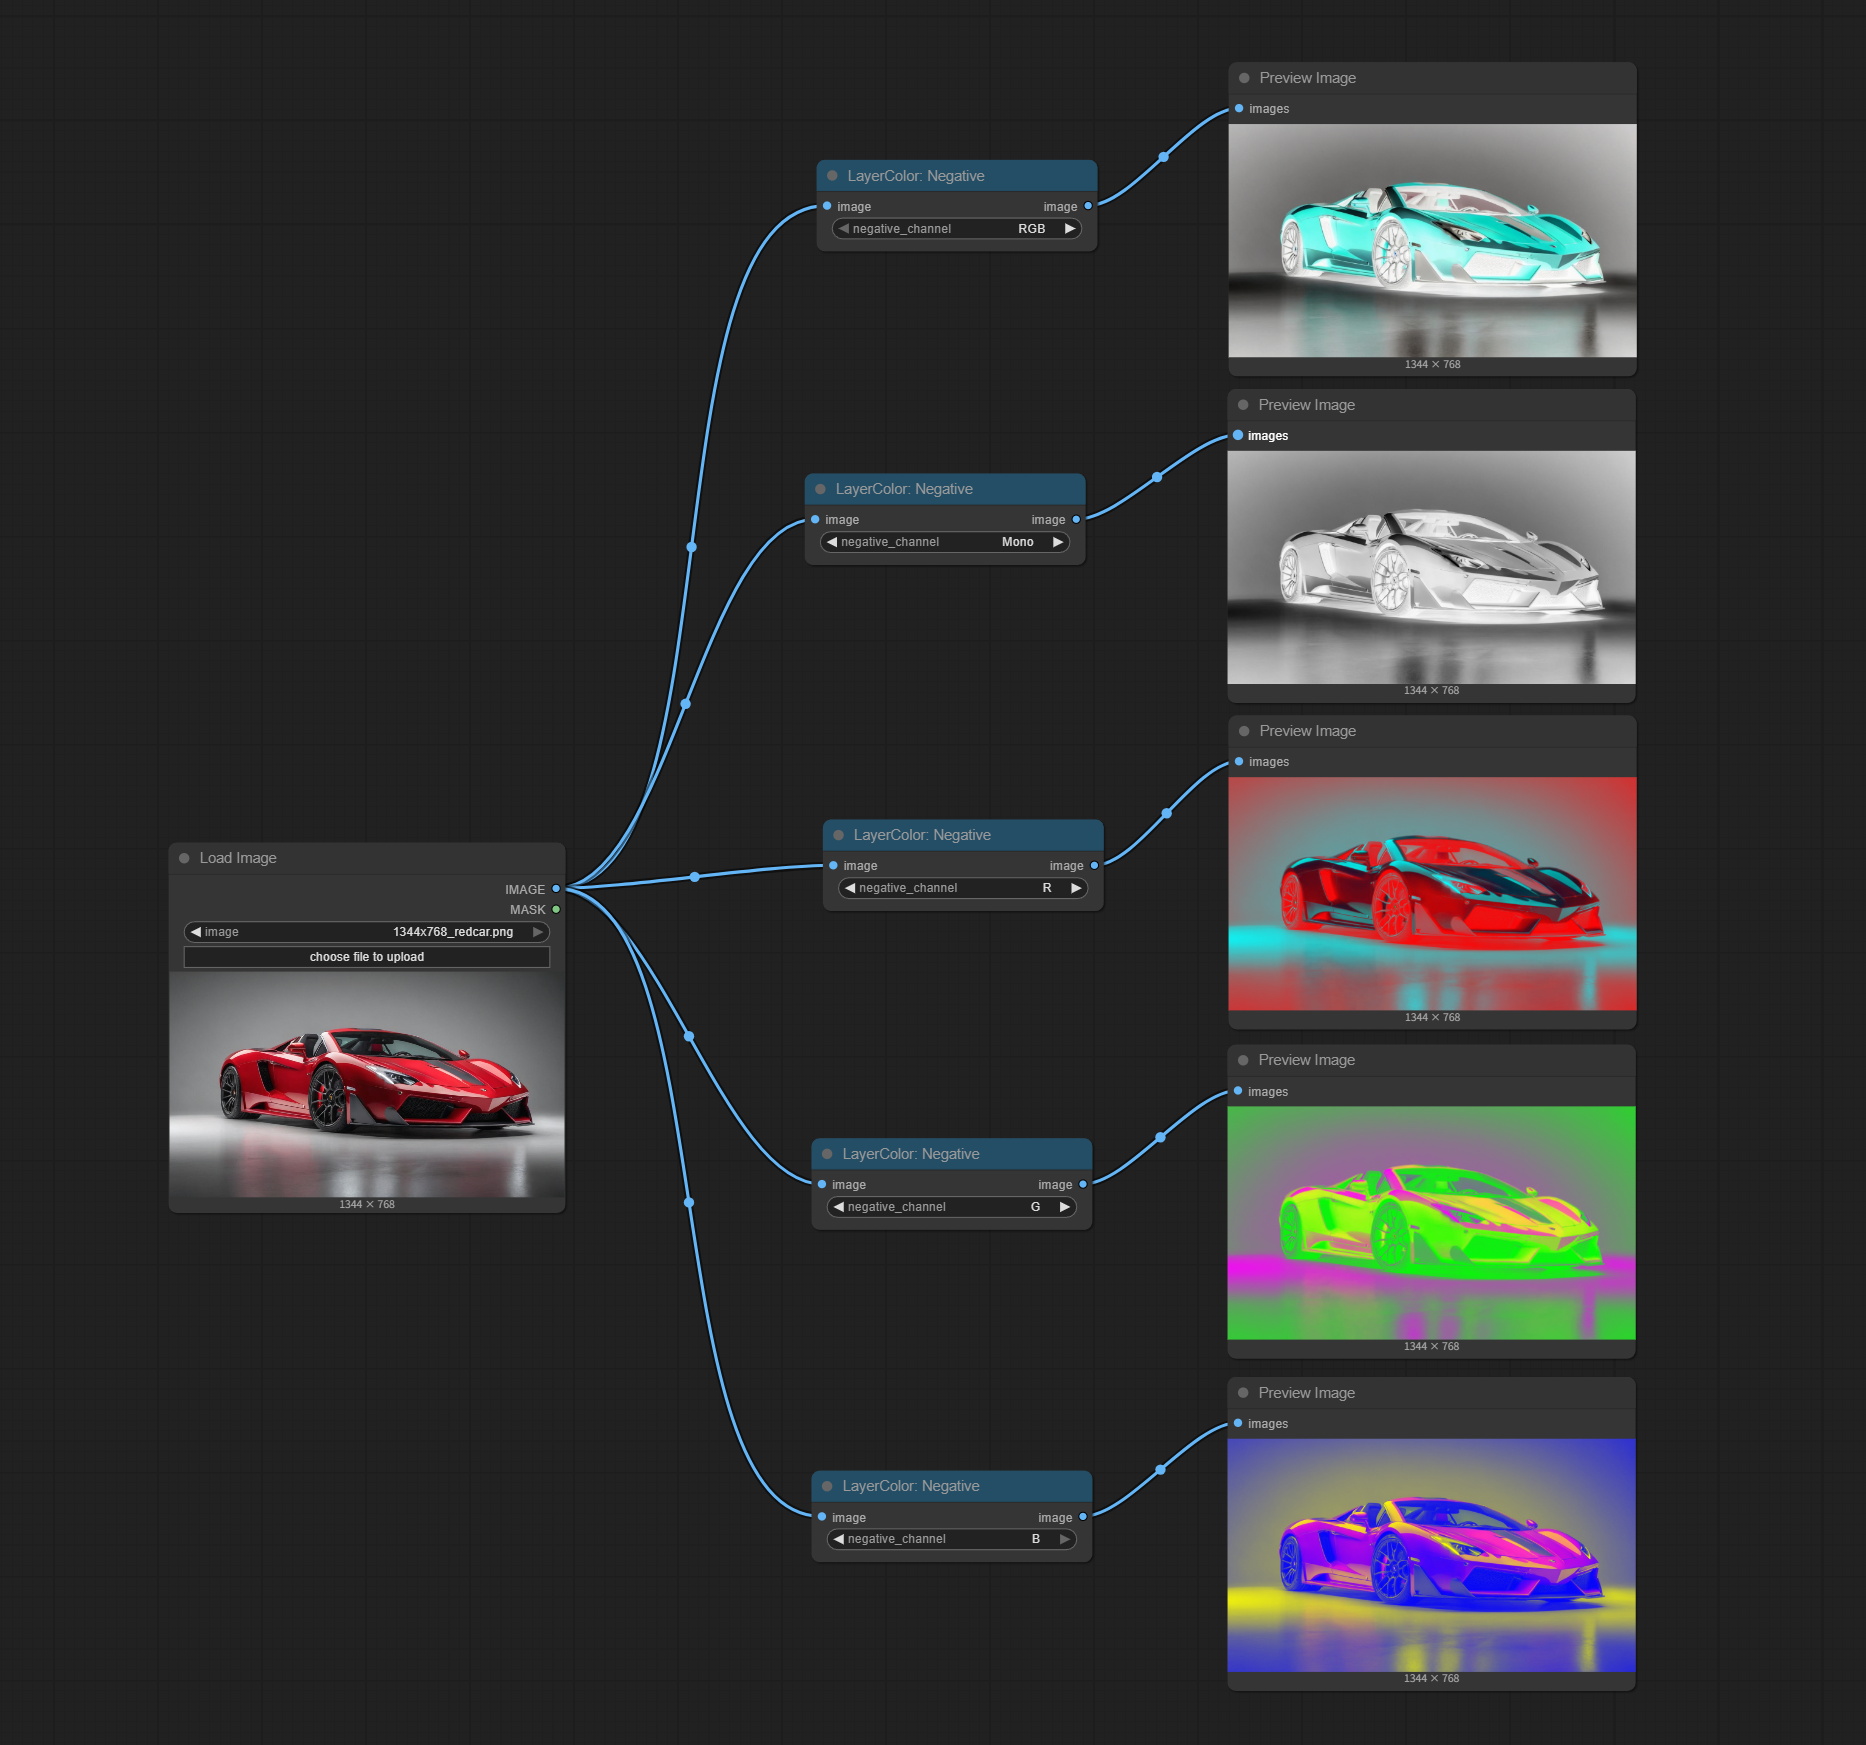
节点选项: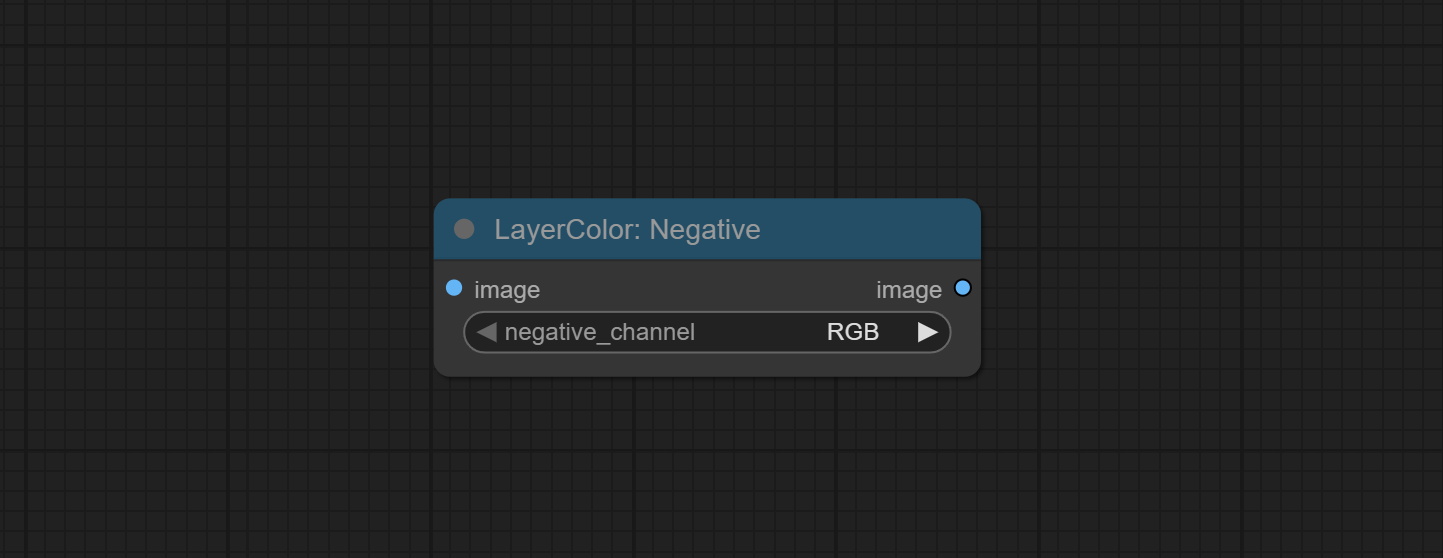
- negative_channel: 选择需要反转的通道。
图层工具
高级图像混合
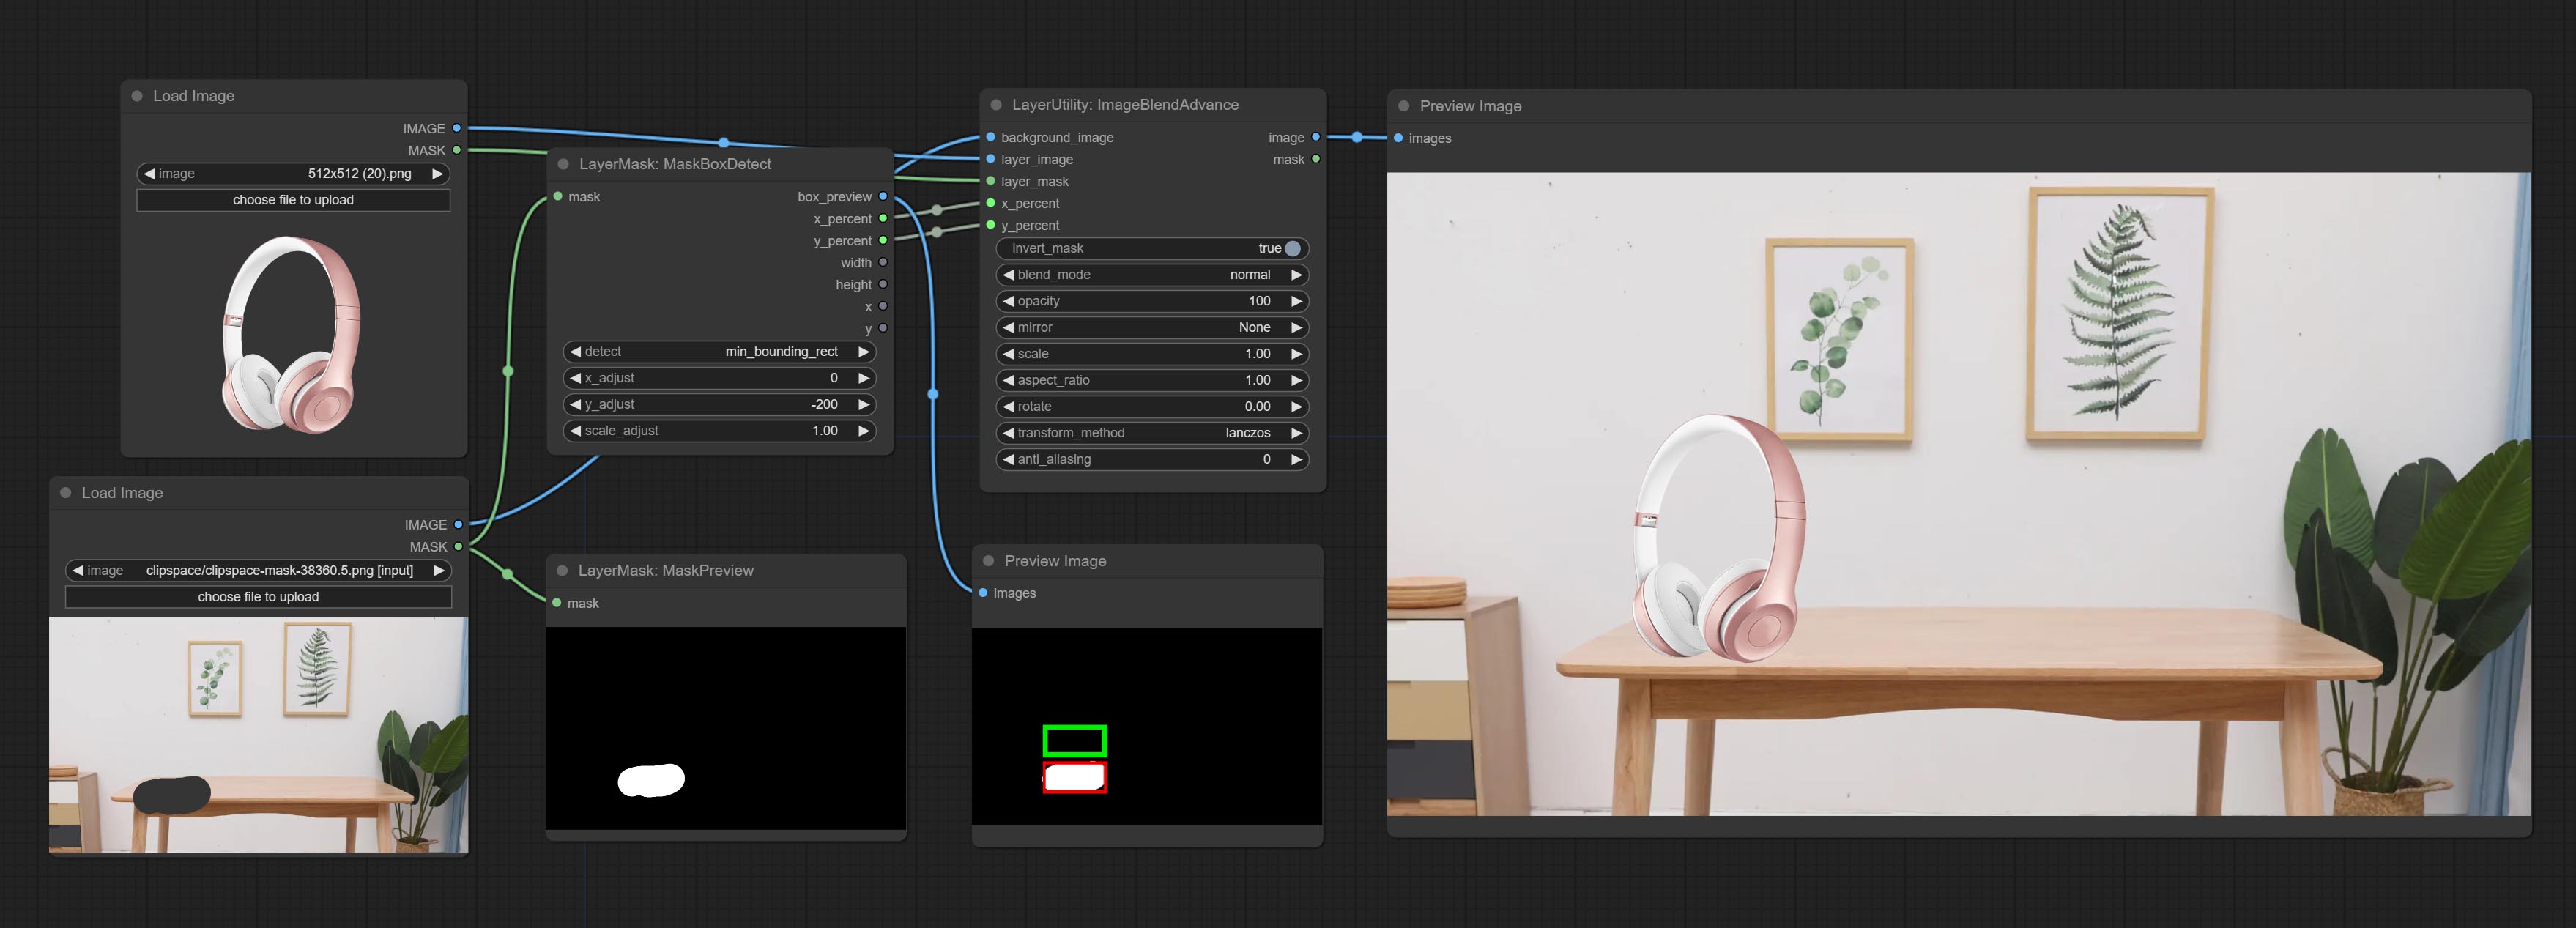
用于图层合成,允许在背景图像上合成不同尺寸的图层图像,并设置位置和变换。提供多种混合模式供选择,还可设置透明度。
该节点提供图层变换方法和抗锯齿选项,有助于提升合成图像的质量。
节点还提供可用于后续工作流的遮罩输出。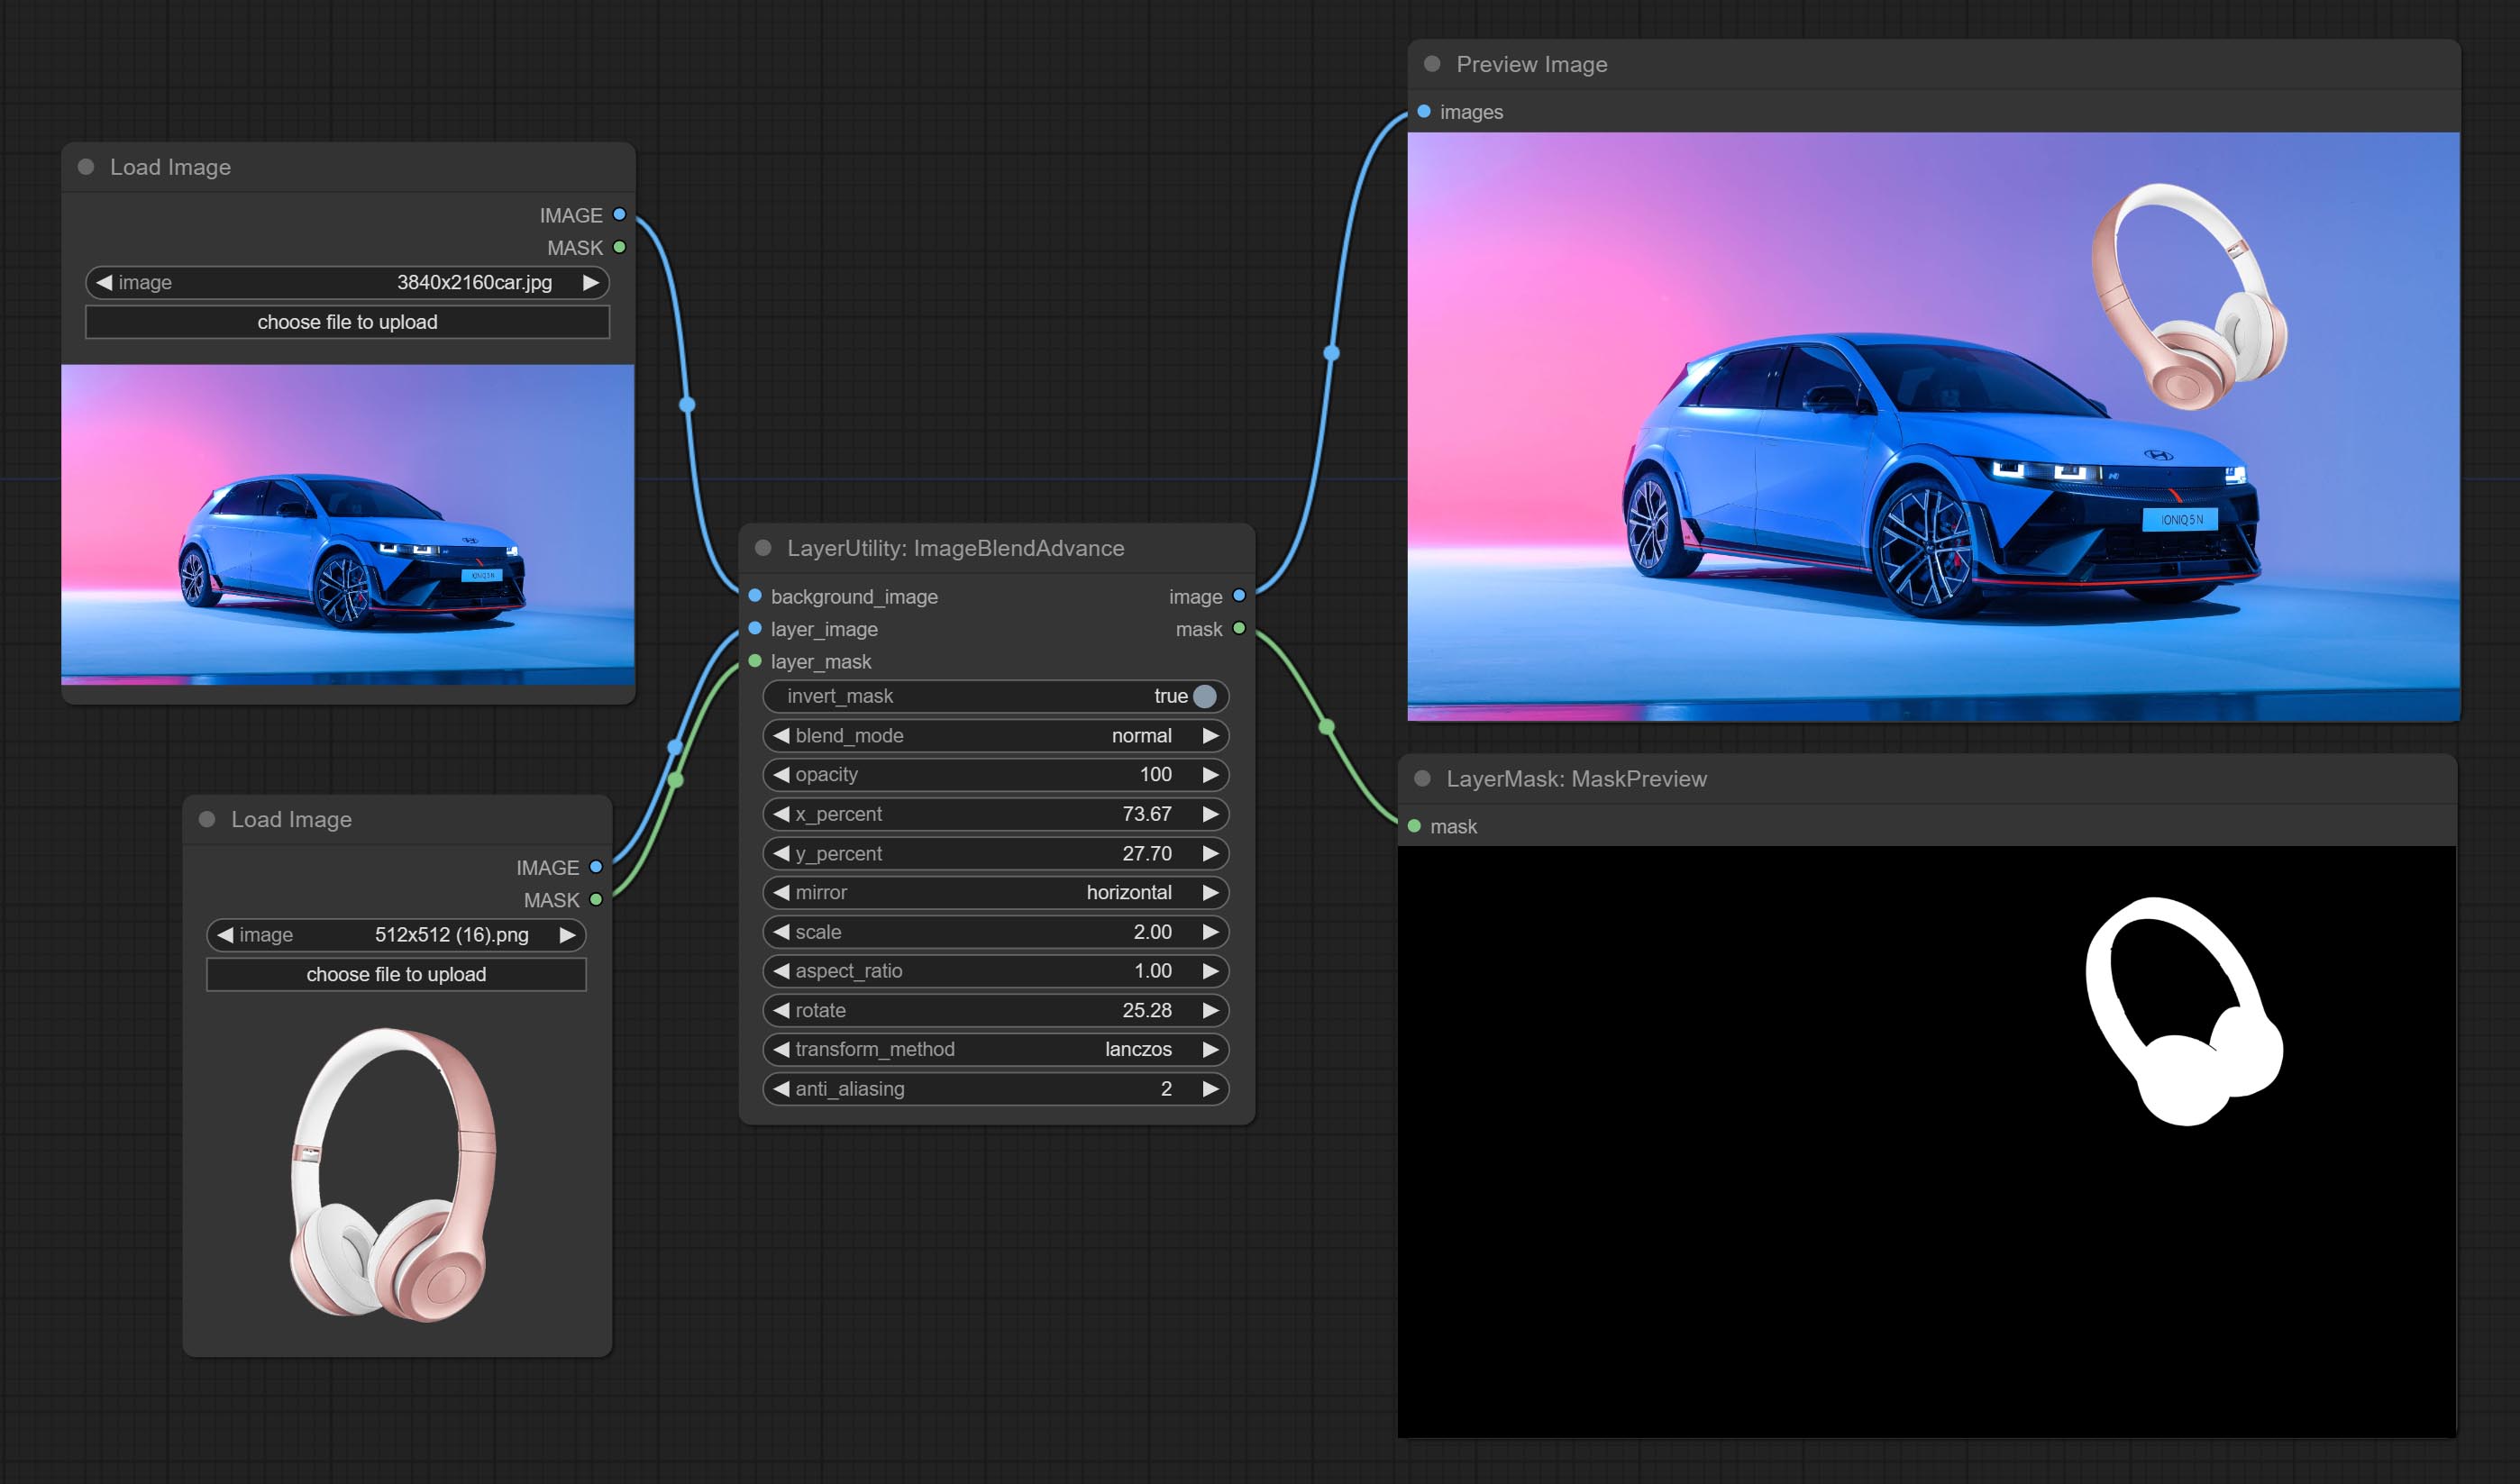
节点选项: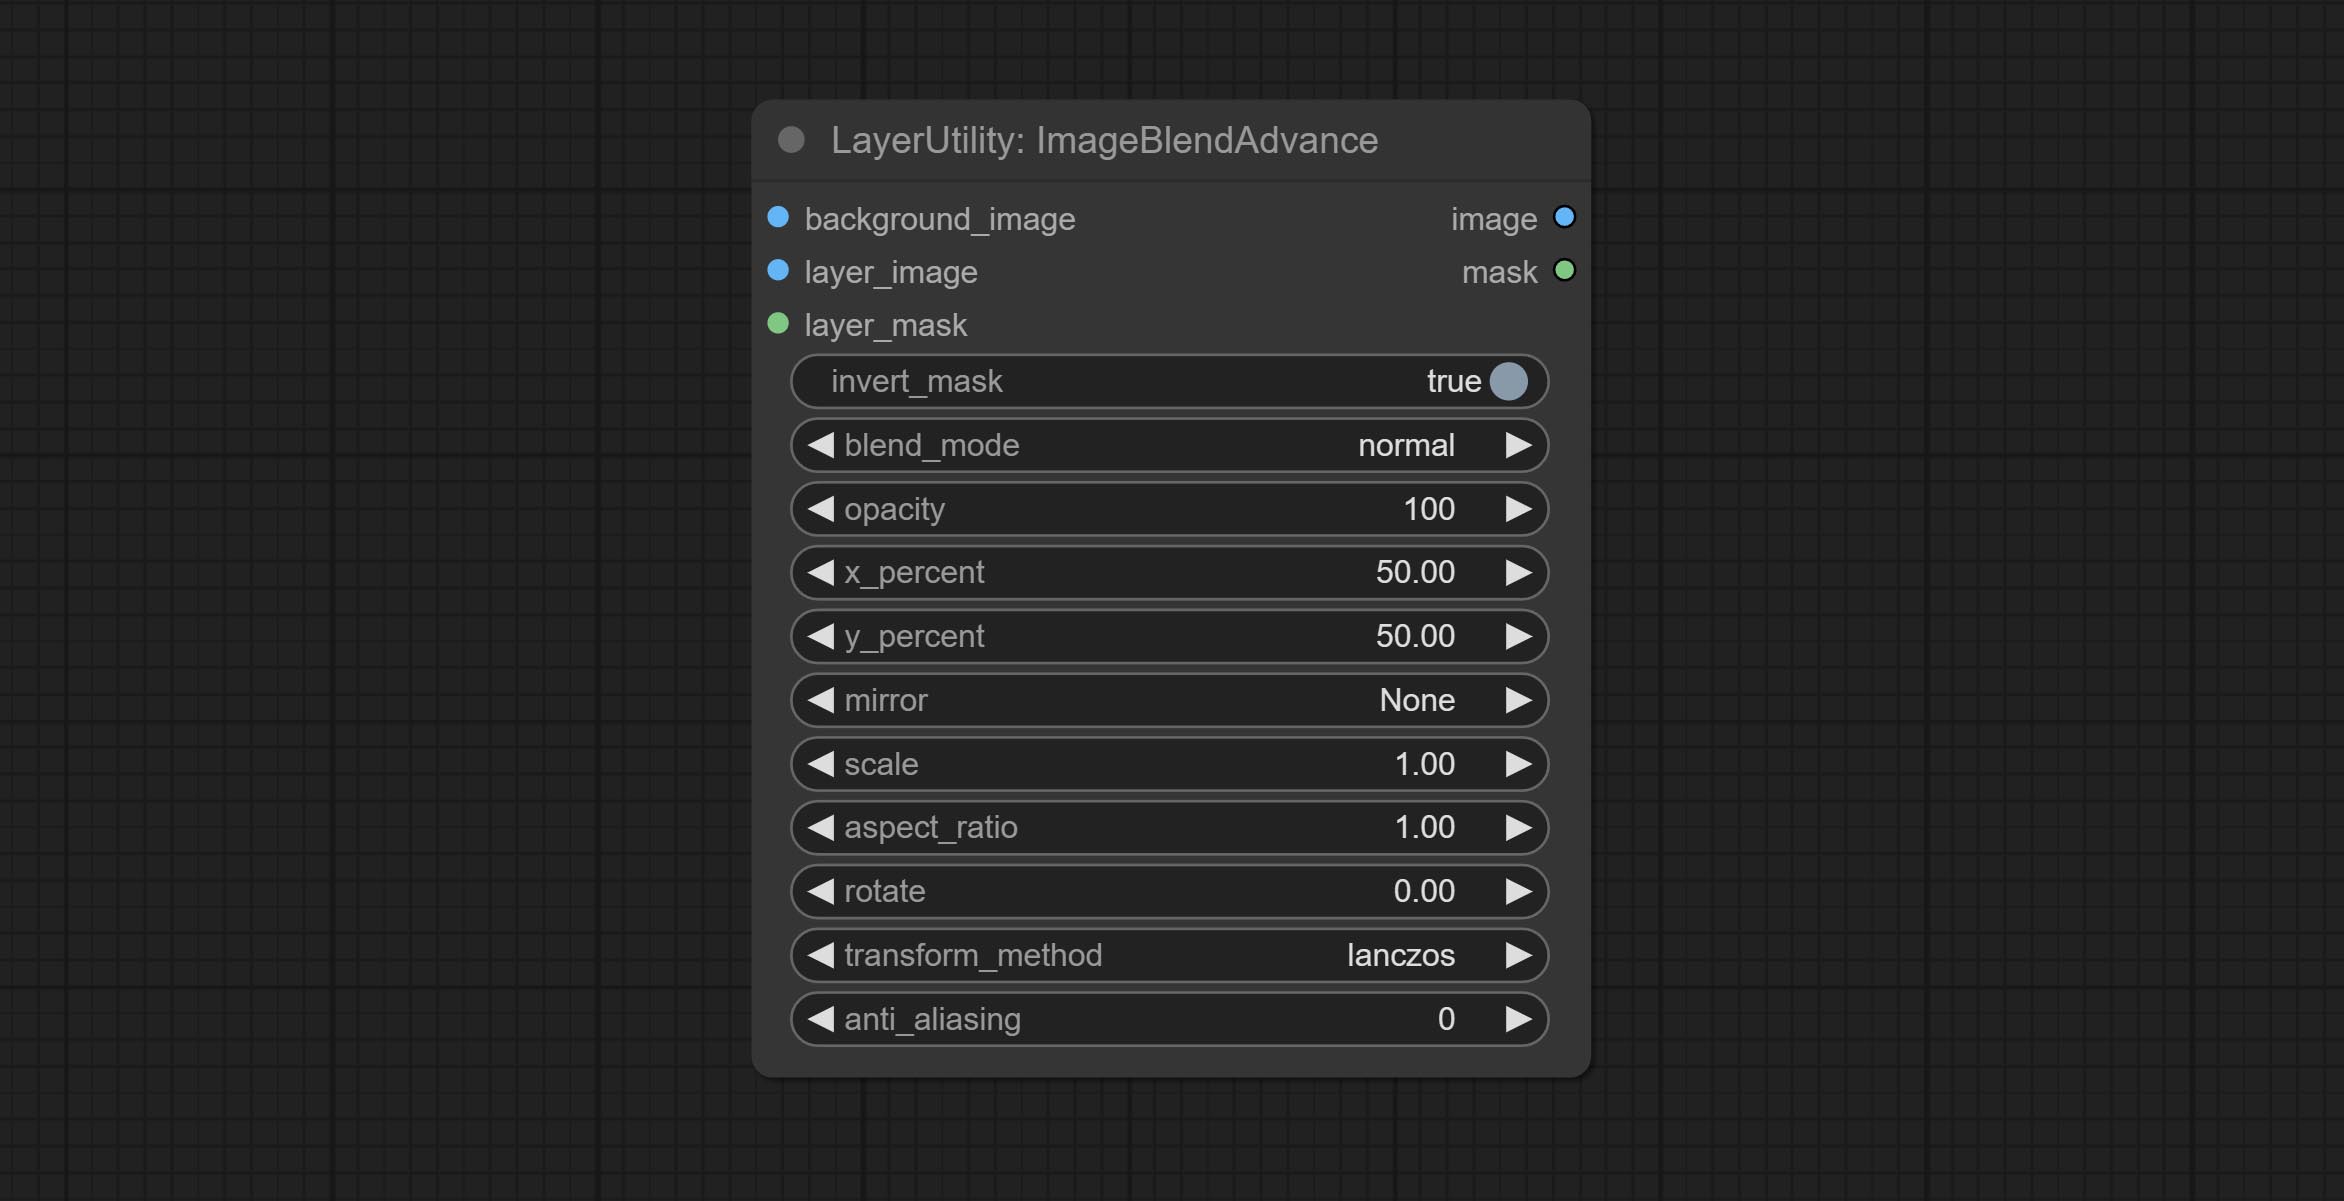
- background_image: 背景图像。
- layer_image5: 用于合成的图层图像。
- layer_mask2,5: 图层图像的遮罩。
- invert_mask: 是否反转遮罩。
- blend_mode3: 混合模式。
- opacity: 混合的透明度。
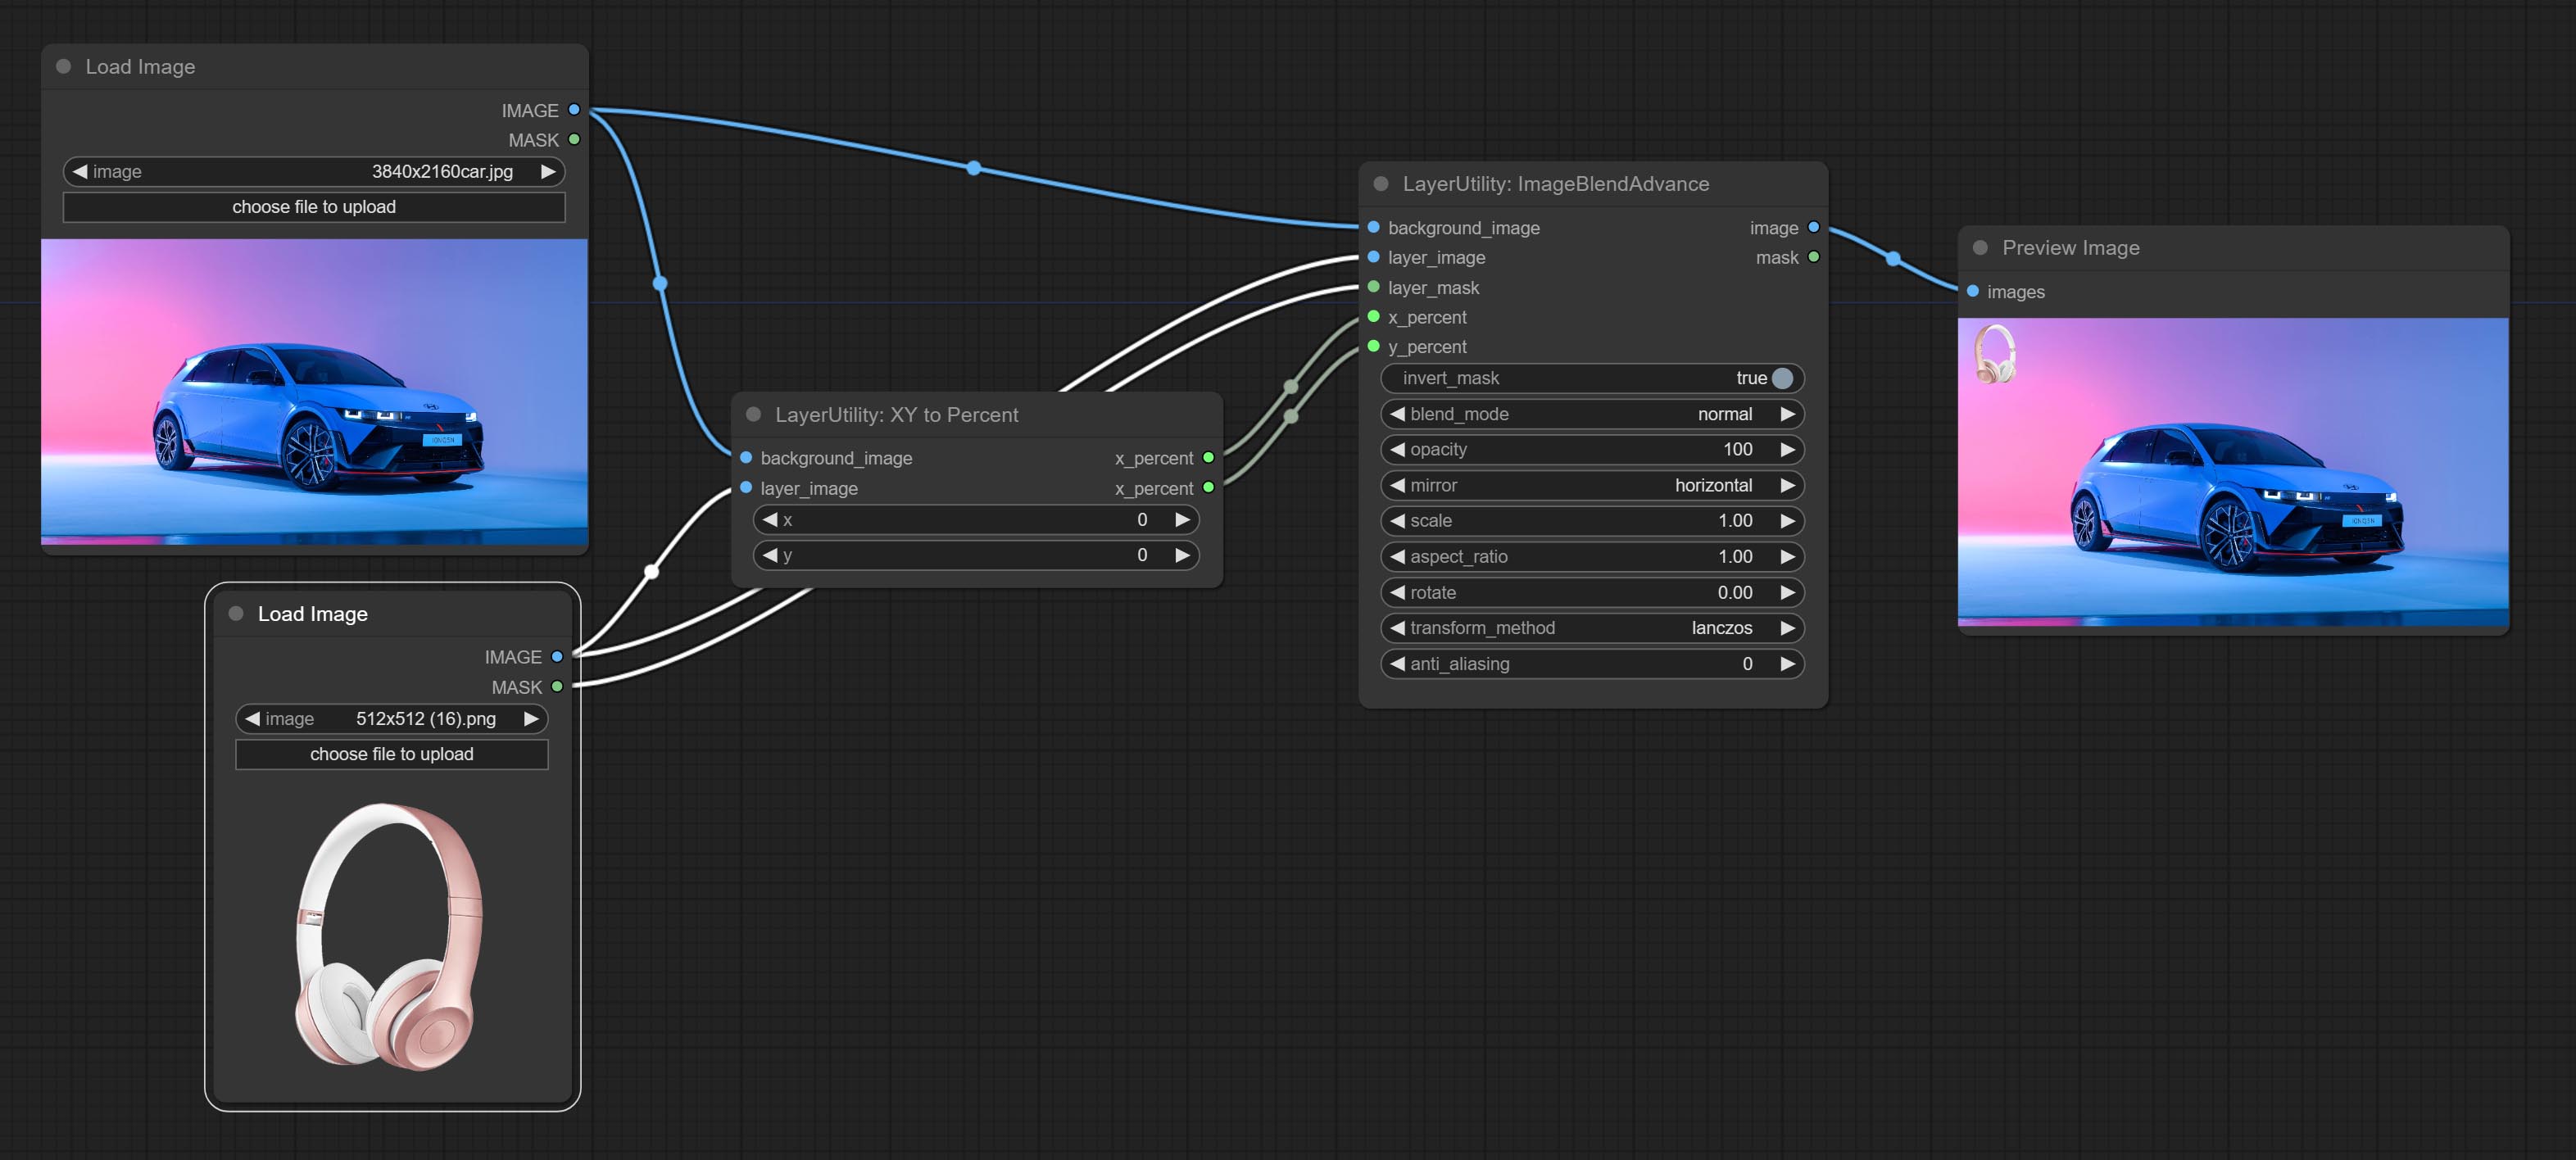
- x_percent: 图层在背景图像上的水平位置,以百分比表示,0 表示最左端,100 表示最右端。可以小于 0 或大于 100,表示图层部分内容超出画面范围。
- y_percent: 图层在背景图像上的垂直位置,以百分比表示,0 表示顶部,100 表示底部。例如,设置为 50 表示垂直居中,20 表示上中,80 表示下中。
- mirror: 镜像翻转。提供水平翻转和垂直翻转两种模式。
- scale: 图层放大倍数,1.0 代表原始大小。
- aspect_ratio: 图层宽高比。1.0 为原始比例,大于 1.0 表示拉长,小于 1.0 表示压扁。
- rotate: 图层旋转角度。
- 图层放大和旋转时的采样方法,包括 Lanczos、双三次、Hamming、双线性、Box 和最近邻。不同的采样方法会影响合成图像的质量和处理时间。
- anti_aliasing: 抗锯齿,取值范围为 0 到 16,数值越大,锯齿现象越不明显。但过高的值会显著降低节点的处理速度。
- 注释
ImageCompositeHandleMask
用于生成局部羽化蒙版及相应的裁剪数据。该节点提供可用于后续工作流的蒙版输出。
节点选项: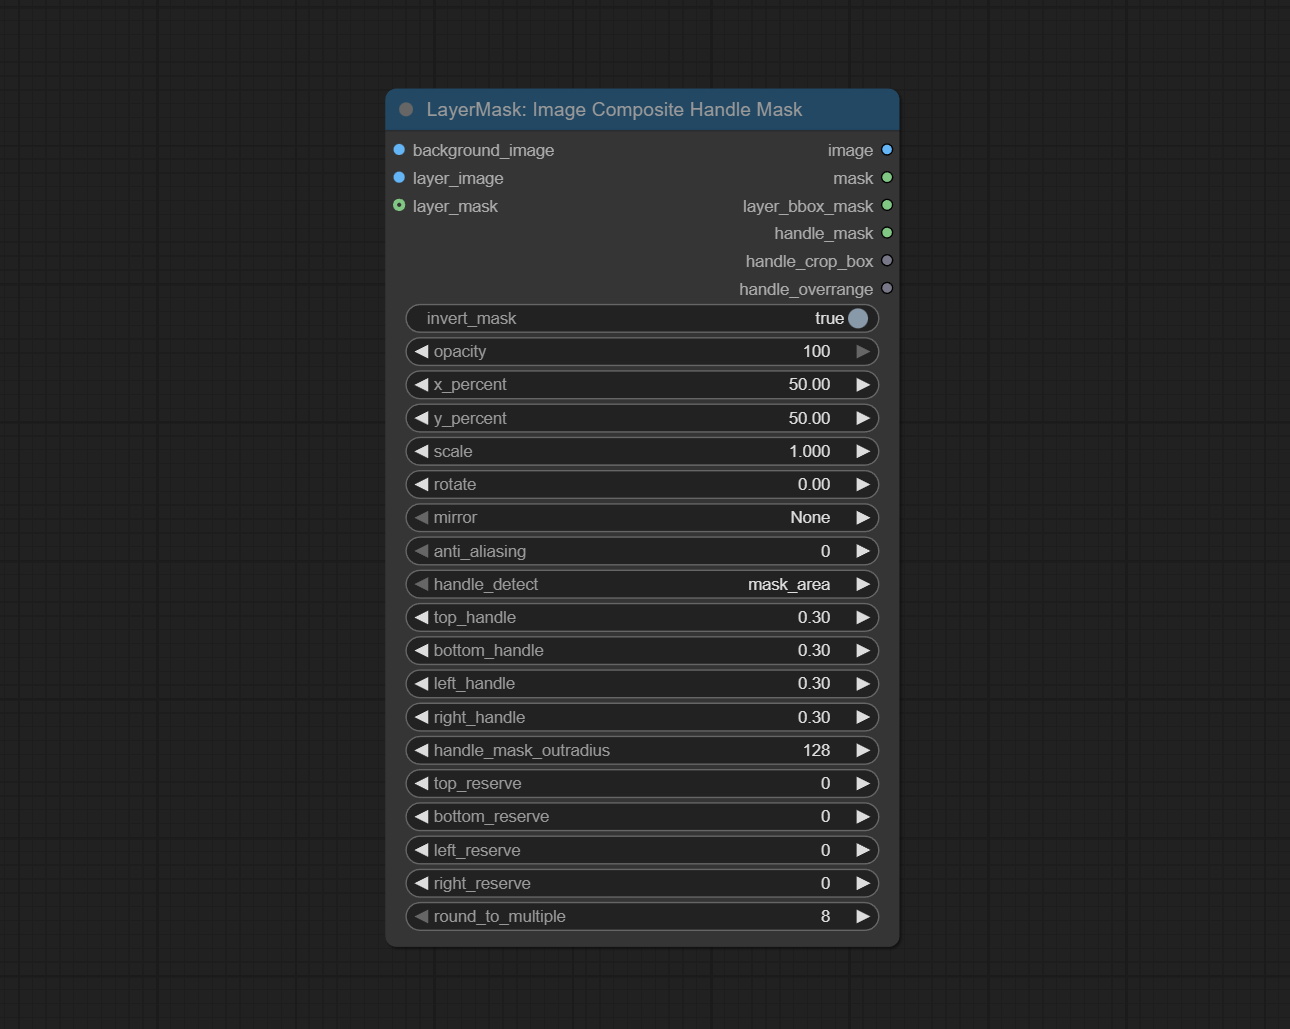
- background_image: 背景图像。
- layer_image: 用于合成的图层图像。
- layer_mask: 图层图像的蒙版。
- invert_mask: 是否反转蒙版。
- opacity: 合成图像的透明度。
- x_percent: 图层在背景图像上的水平位置,以百分比表示,0 表示最左端,100 表示最右端。该值可以小于 0 或大于 100,表示图层内容部分超出画面范围。
- y_percent: 图层在背景图像上的垂直位置,以百分比表示,0 表示顶部,100 表示底部。例如,设置为 50 表示垂直居中,20 表示上中,80 表示下中。
- scale: 图层放大倍数,1.0 表示原始大小。
- mirror: 镜像翻转。提供水平翻转和垂直翻转两种模式。
- rotate: 图层旋转角度。
- anti_aliasing: 抗锯齿级别,范围为 0 到 8,数值越大,锯齿越不明显。但过高的值会显著降低节点处理速度。
- handle_detect: 羽化蒙版位置检测方法有两种:mask_area 和 layer-bbox。
mask_area检测图层对象蒙版的有效区域,而layer-bbox检测图层对象的外接 BBox。 - top_handle: 蒙版顶部的羽化幅度。该值为蒙版平均边长的百分比。
- bottom_handle: 蒙版底部的羽化幅度。该值为蒙版平均边长的百分比。
- left_handle: 蒙版左侧的羽化幅度。该值为蒙版平均边长的百分比。
- right_handle: 蒙版右侧的羽化幅度。该值为蒙版平均边长的百分比。
- handle_mask_outradius: 羽化蒙版的圆角半径。
- top_reserve: 保留顶部裁剪后的尺寸。
- bottom_reserve: 保留底部裁剪后的尺寸。
- left_reserve: 保留左侧裁剪后的尺寸。
- right_reserve: 保留右侧裁剪后的尺寸。
- round_to_multiple: 将裁剪边长四舍五入到指定的倍数。例如,设置为 8 会使宽度和高度均为 8 的倍数。
输出:
- image: 合成后的图像。
- mask: 合成后的蒙版。
- layer_bbox_mask: 合成对象的 BBox 蒙版。
- handle_mask: 经过羽化处理后的蒙版。
- handle_crop_bbox: 羽化蒙版的裁剪数据。
- handle_overrange: 羽化蒙版是否超出背景图像范围。输出格式为包含“top”、“bottom”、“left”和“right”的字符串。
CropByMask
根据蒙版范围裁剪图像,并设置周围需保留的边框尺寸。
该节点可与 RestoreCropBox 和 ImageScaleRestore 节点配合使用,用于裁剪并调整图像中需要放大的部分,然后再将其粘贴回原位。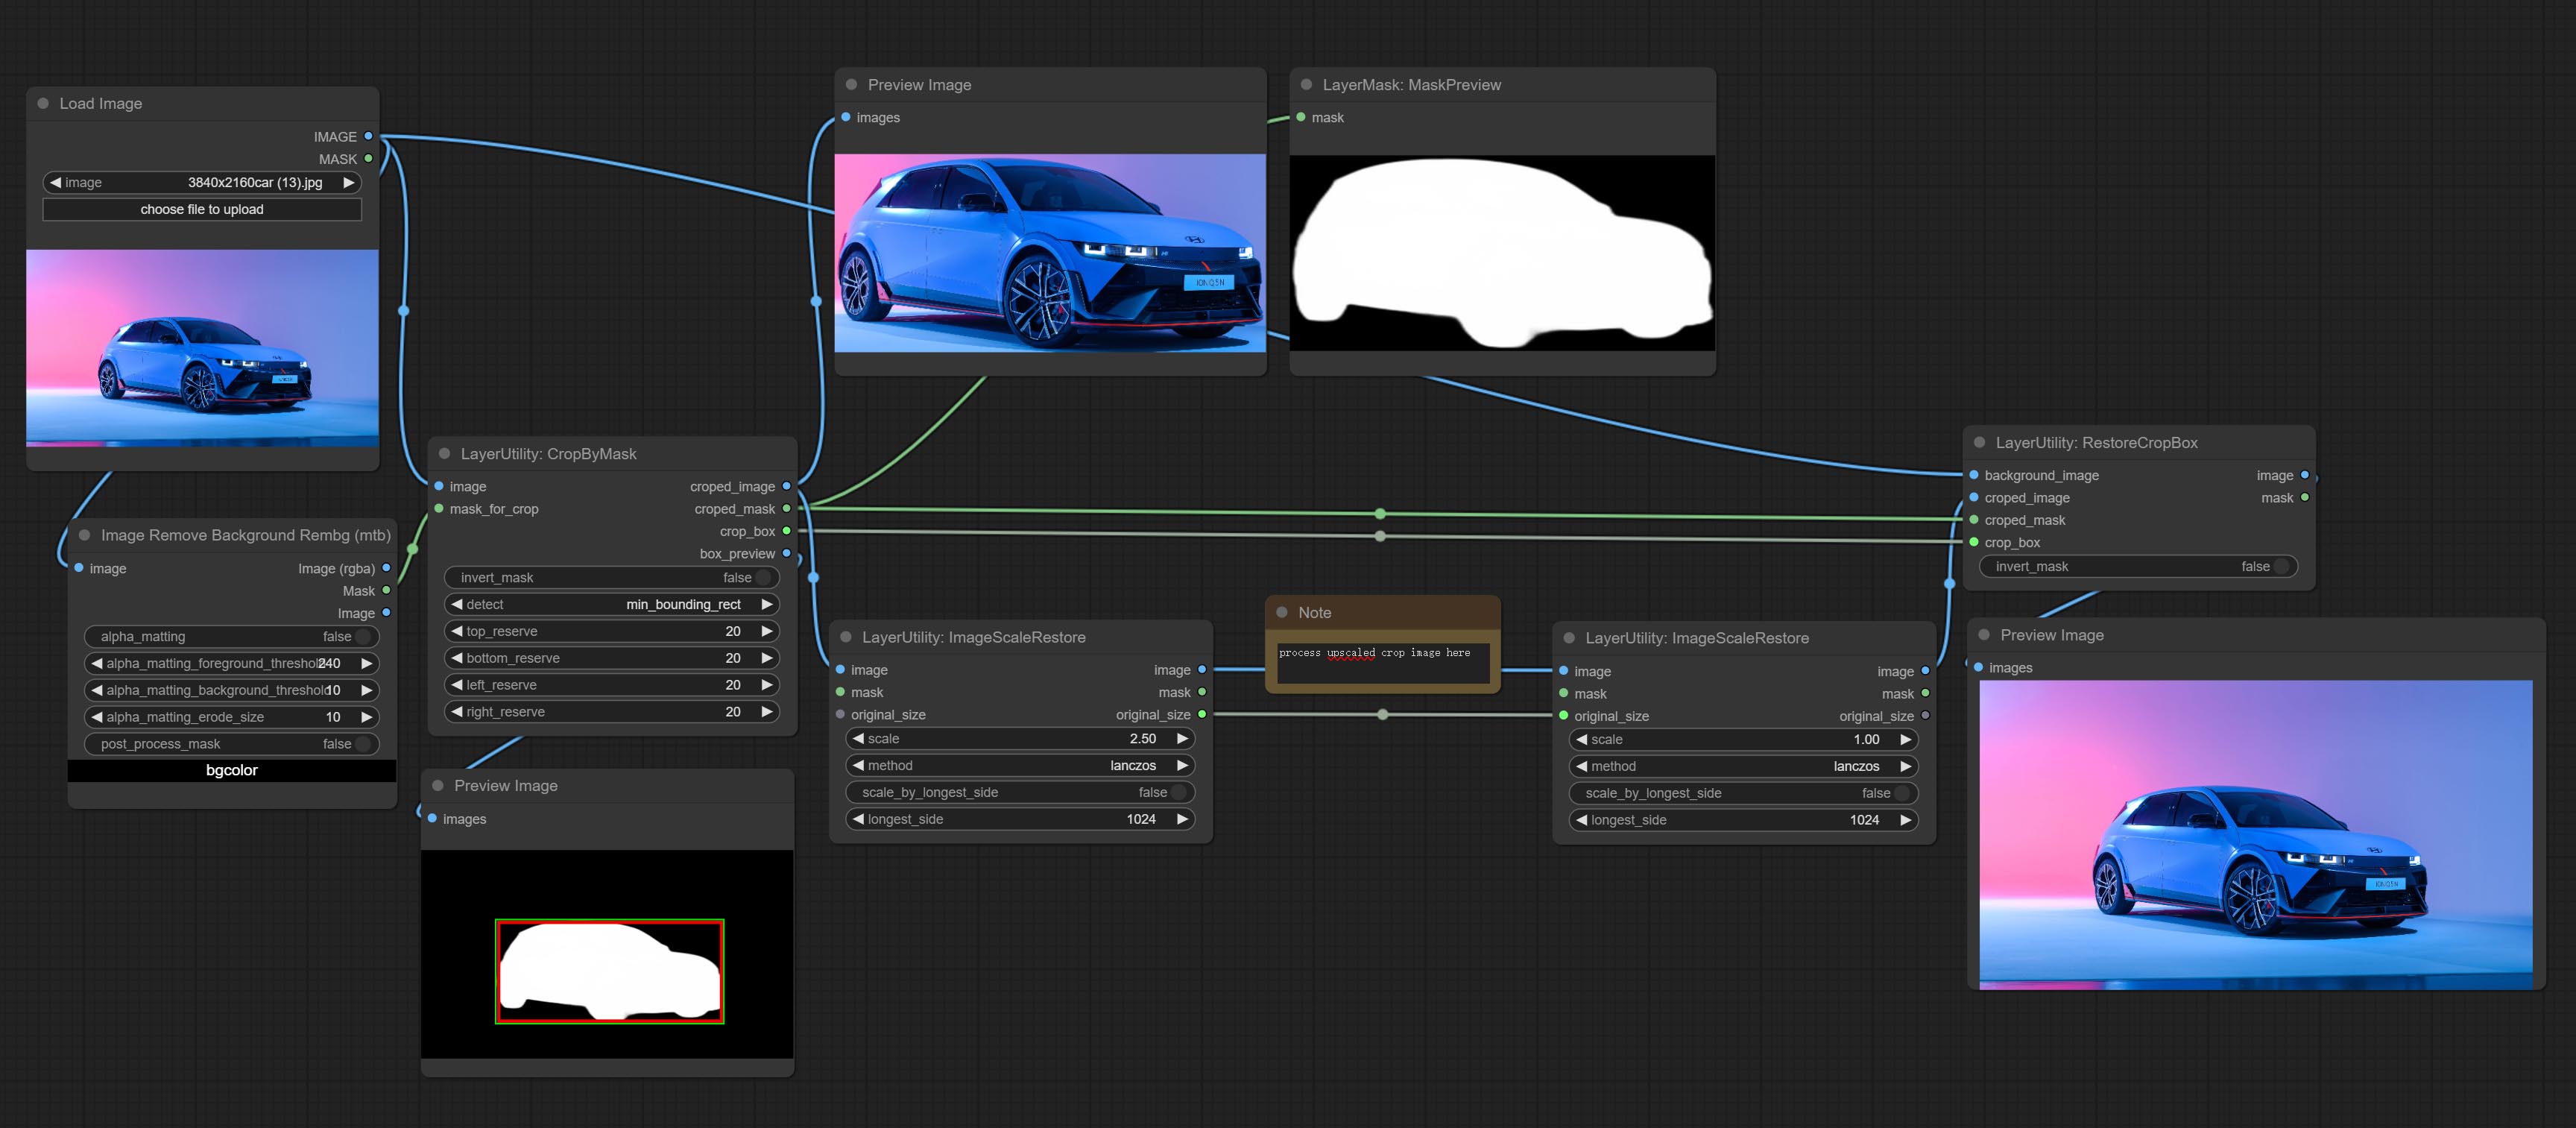
节点选项: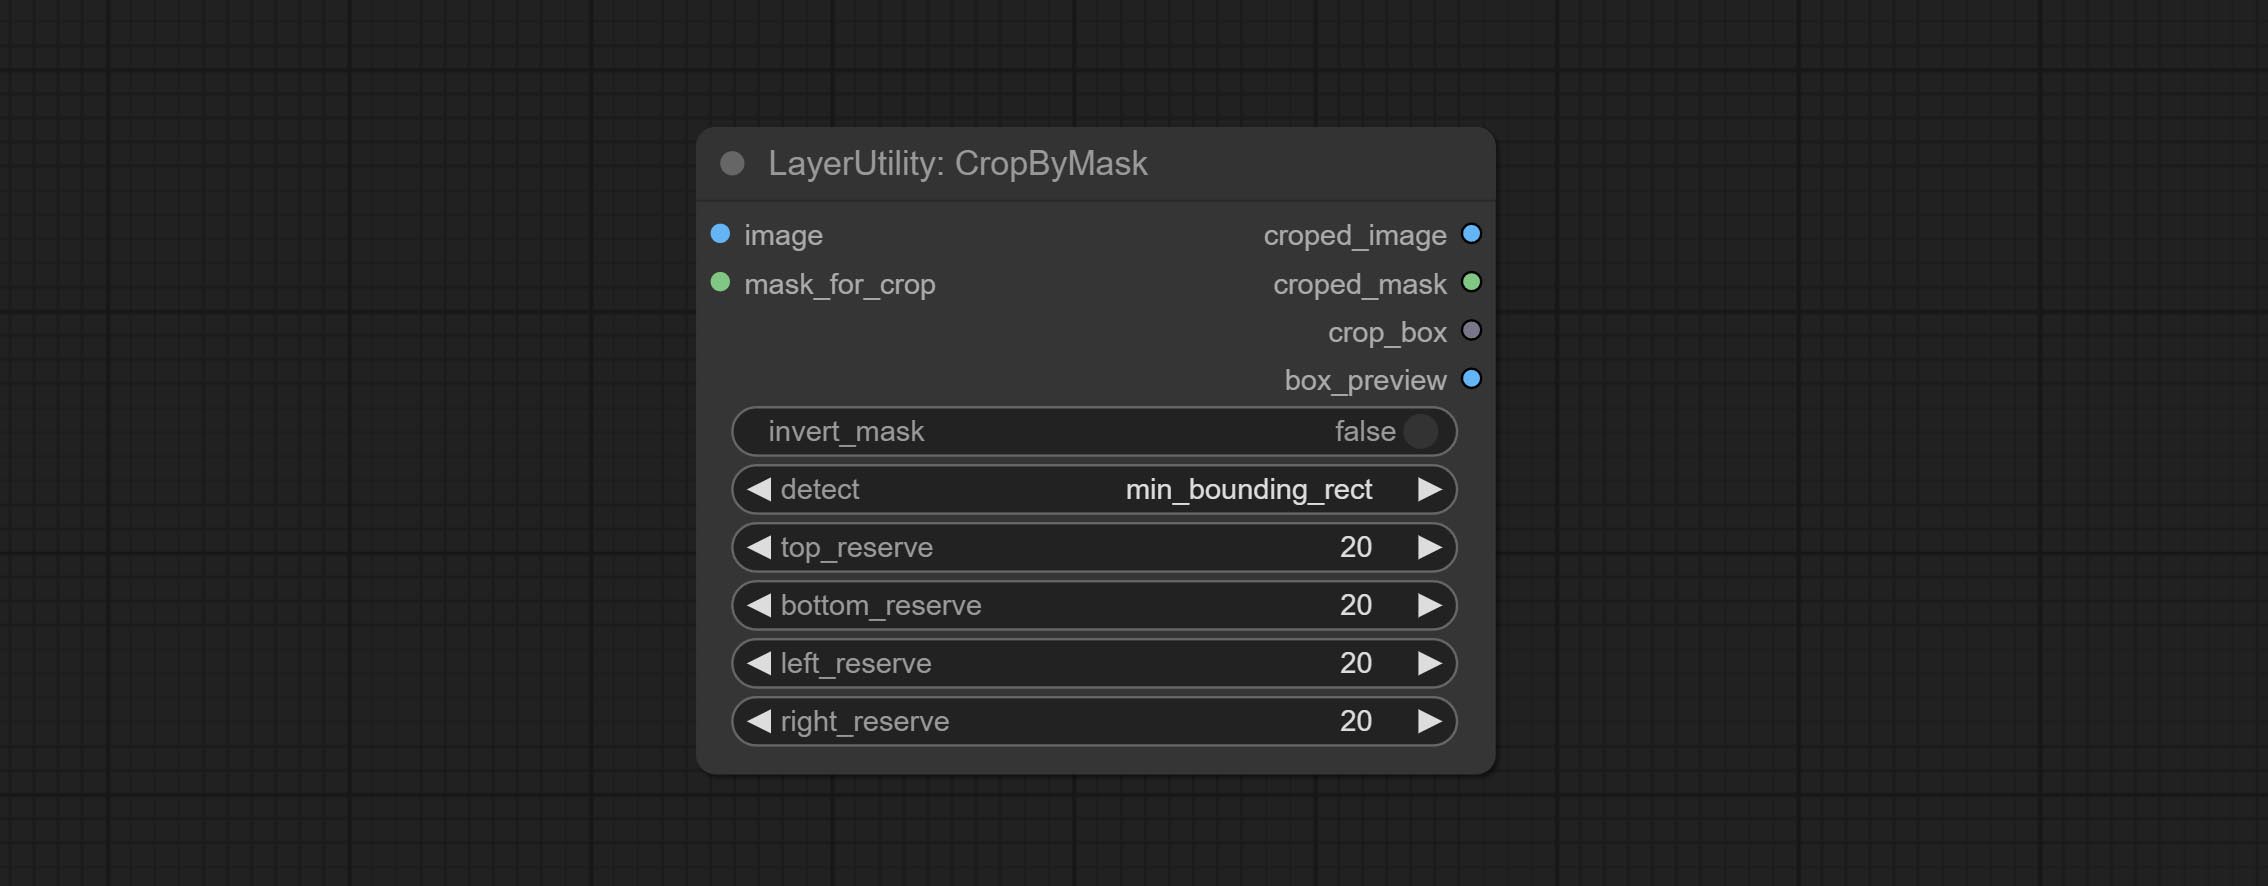
- image5: 输入图像。
- mask_for_crop5: 图像的蒙版,将自动按蒙版范围进行裁剪。
- invert_mask: 是否反转蒙版。
- detect: 检测方法,
min_bounding_rect是最小包围矩形,max_inscribed_rect是最大内接矩形,mask-area是用于遮罩像素的有效区域。 - top_reserve: 保留顶部裁剪后的尺寸。
- bottom_reserve: 保留底部裁剪后的尺寸。
- left_reserve: 保留左侧裁剪后的尺寸。
- right_reserve: 保留右侧裁剪后的尺寸。
- note
输出:
- croped_image: 裁剪后的图像。
- croped_mask: 裁剪后的蒙版。
- crop_box: 裁剪时的边界框数据,用于 RestoreCropBox 节点的还原操作。
- box_preview: 裁剪位置预览图,红色表示检测到的范围,绿色表示加上预留边框后的裁剪范围。
CropByMaskV2
CropByMask 的升级版本 V2。支持输入 crop_box,便于裁剪相同尺寸的图层。
在此基础上对 CropByMask 进行了以下更改: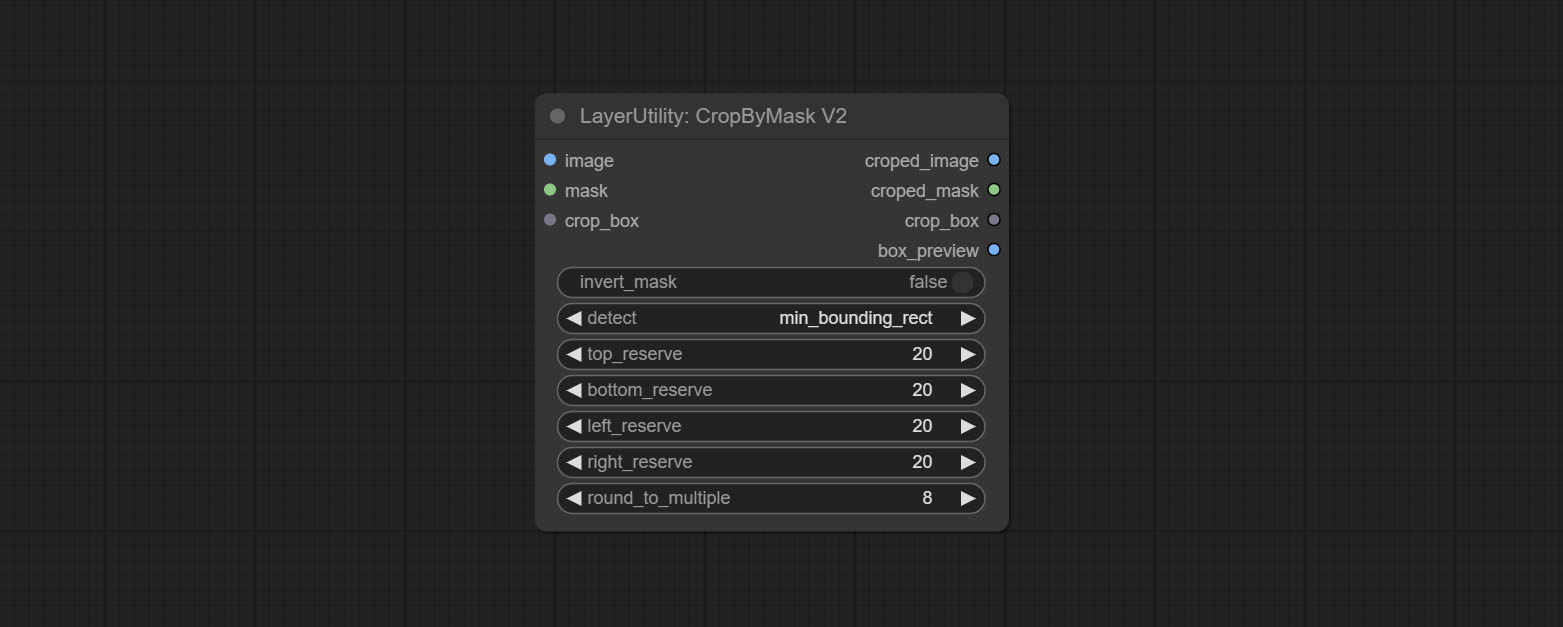
- 将输入项
mask_for_crop重命名为mask。 - 增加可选输入项
crop_box。如果此处有输入,则会忽略蒙版检测,直接使用该数据进行裁剪。 - 新增选项
round_to_multiple,用于将裁剪边长四舍五入到指定的倍数。例如,设置为 8 会使宽度和高度均为 8 的倍数。
RestoreCropBox
通过 CropByMask 将裁剪后的图像恢复为原始图像。
节点选项: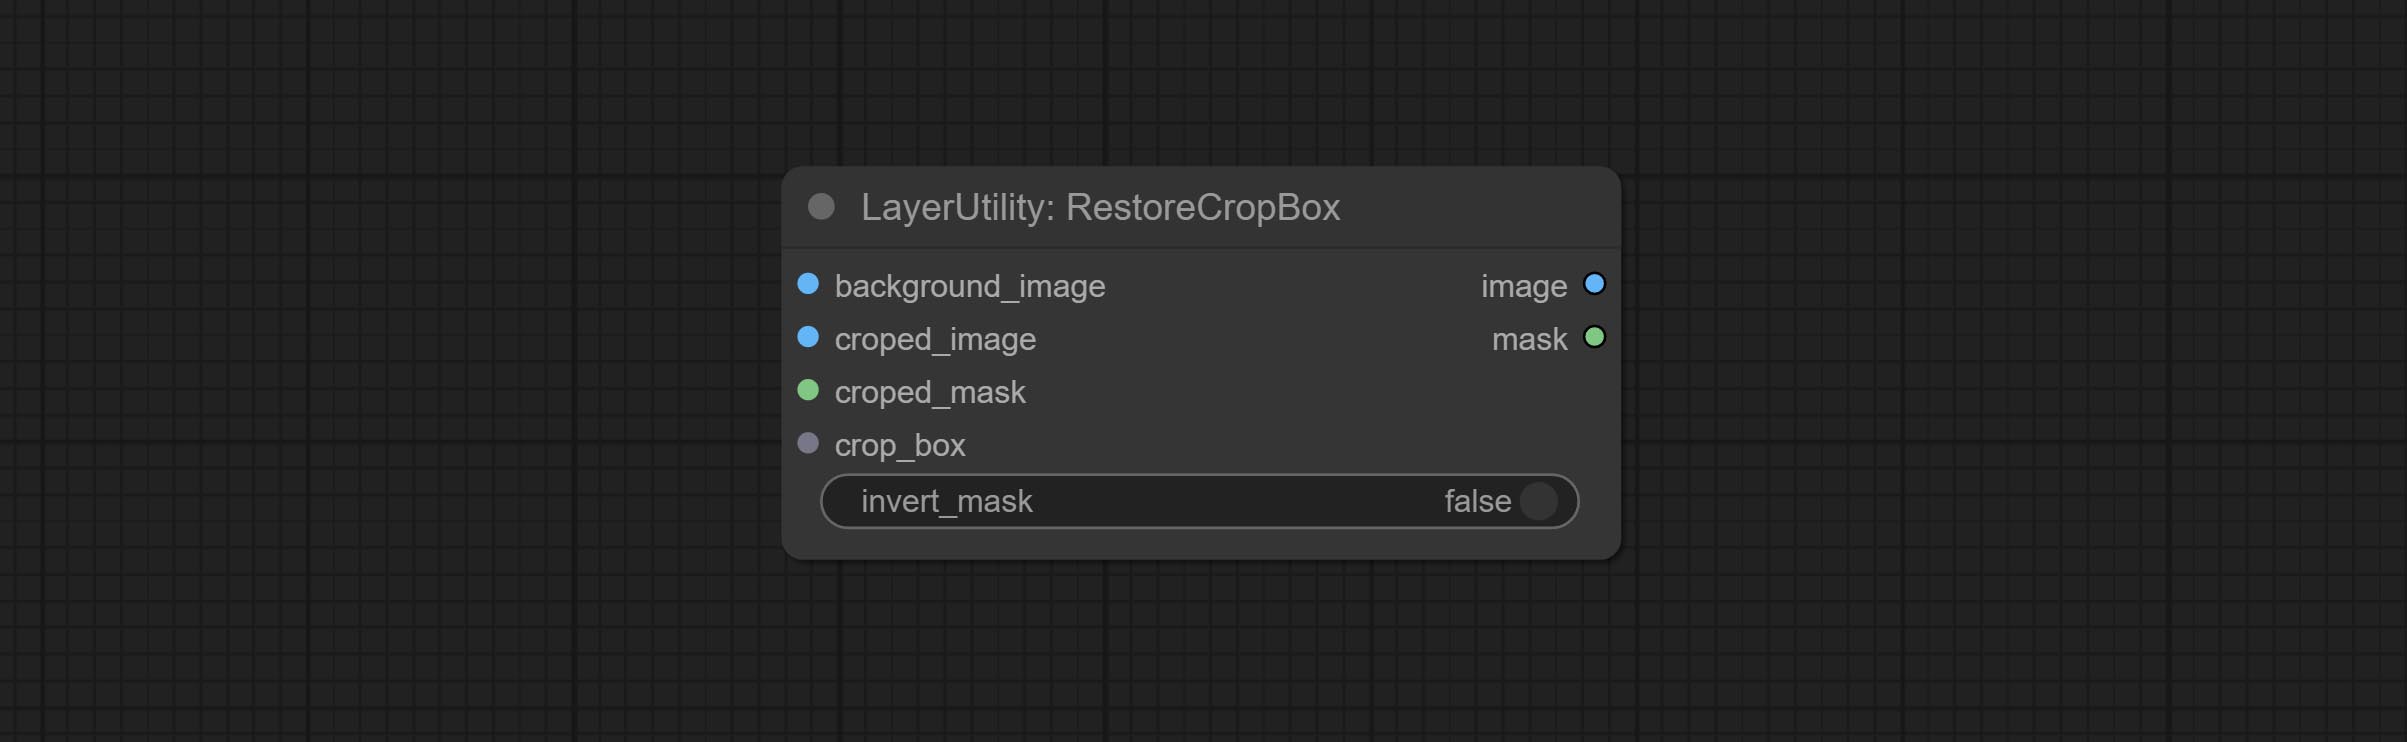
- background_image: 裁剪前的原始图像。
- croped_image5: 裁剪后的图像。如果中间部分被放大,则需要先恢复其尺寸再进行还原。
- croped_mask5: 裁剪后的蒙版。
- crop_box: 裁剪时的边界框数据。
- invert_mask: 是否反转蒙版。
- note
CropBoxResolve
将 corp_box 解析为 x、y、width、height。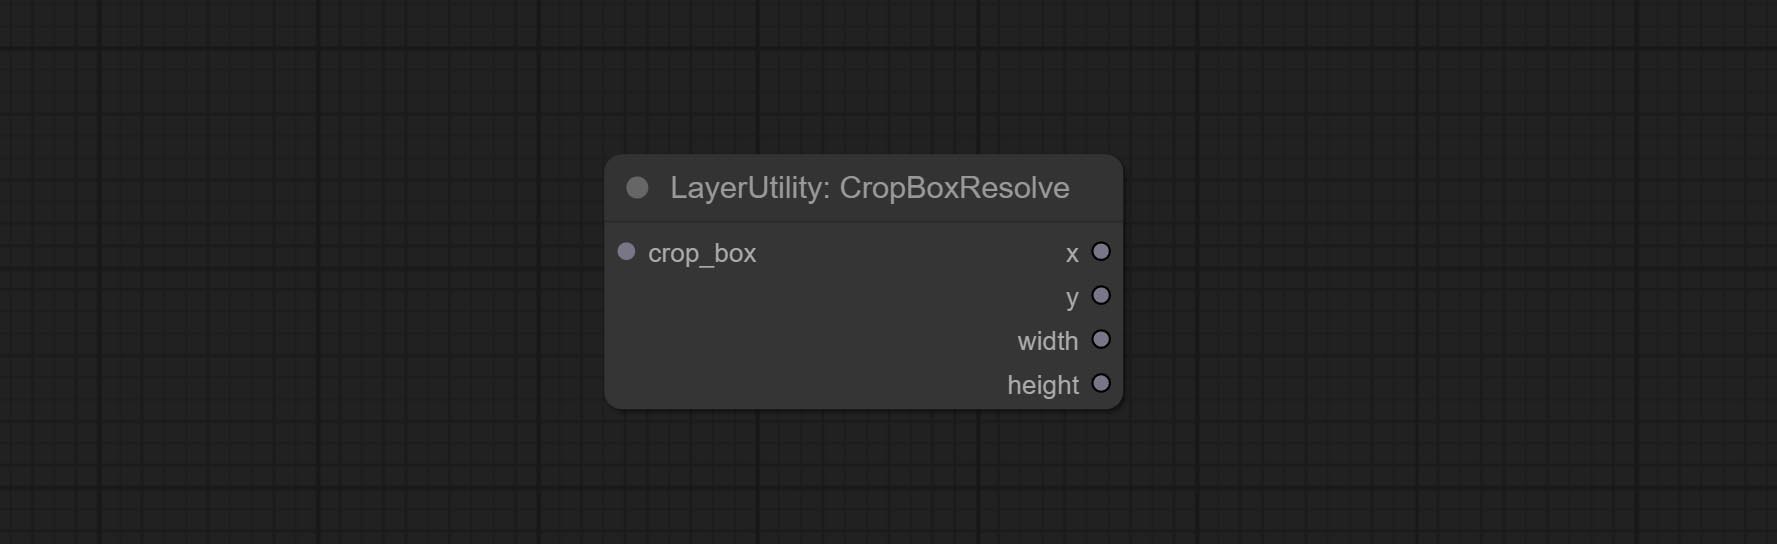
ImageScaleRestore
图像缩放。当此节点与另一节点配对使用时,可在第二个节点上自动将图像恢复到原始尺寸。
节点选项: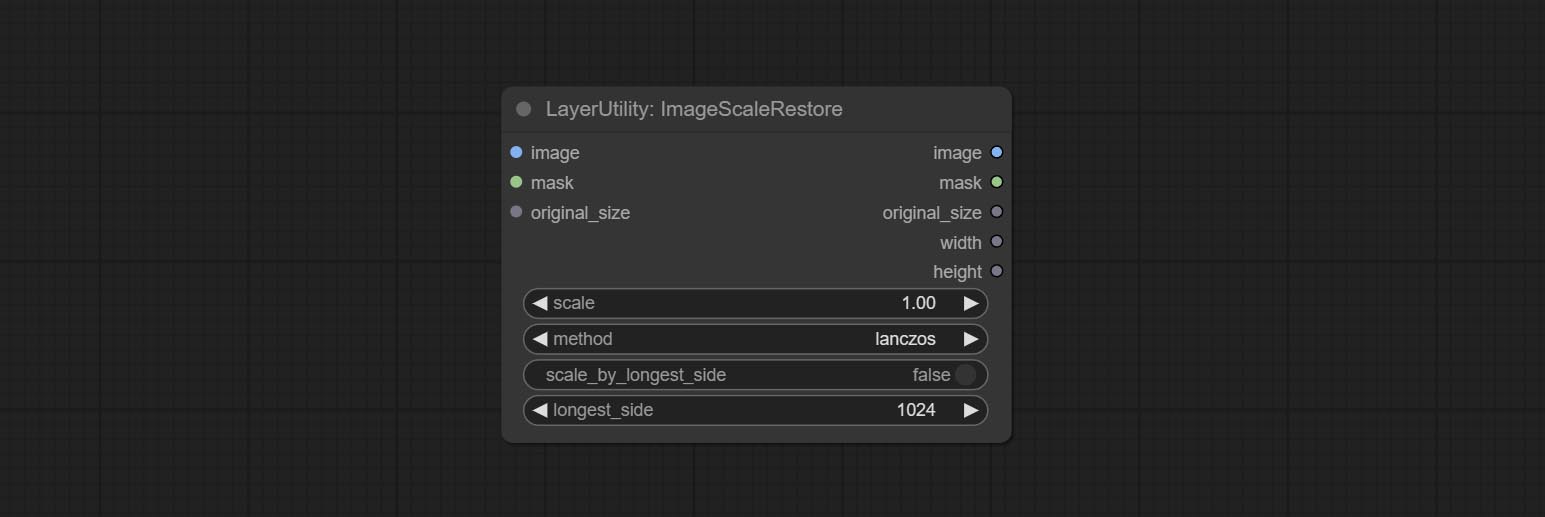
- image5: 输入图像。
- mask2,5: 图像的蒙版。
- original_size: 可选输入,用于将图像恢复到原始尺寸。
- scale: 缩放比例。当输入了 original_size,或设置了 scale_ by_longest_side 为 True 时,此设置将被忽略。
- scale_by_longest_side: 允许按最长边尺寸缩放。
- longest_side: 当 scale_by_longest_side 设置为 True 时,将以此值作为图像的最长边。如果输入了 original_size,则此设置将被忽略。
输出:
- image: 缩放后的图像。
- mask: 如果输入了蒙版,则会输出缩放后的蒙版。
- original_size: 图像的原始尺寸数据,用于后续节点的恢复操作。
- width: 输出图像的宽度。
- height: 输出图像的高度。
ImageScaleRestoreV2
ImageScaleRestore 的 V2 升级版本。
节点选项: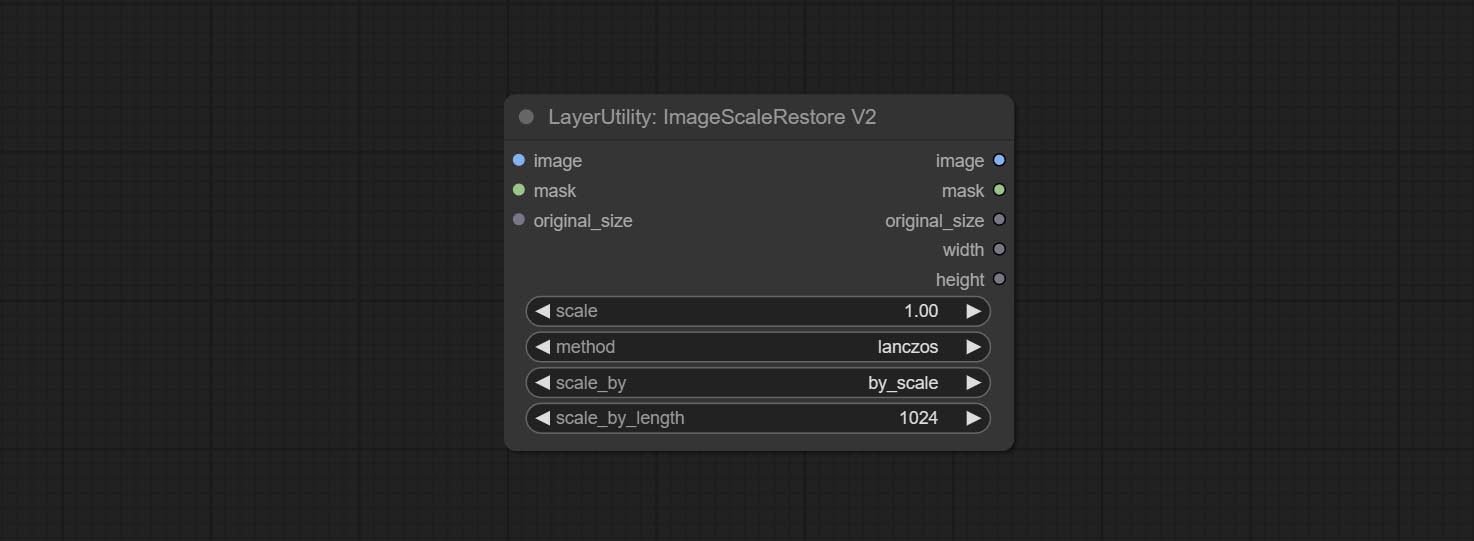
在 ImageScaleRestore 的基础上进行了以下更改:
- scale_by:允许按指定的长边、短边、宽度、高度或总像素数进行缩放。当此选项设置为 by_scale 时,使用 scale 值;对于其他选项,则使用 scale_by_length 值。
- scale_by_length:此处的值用作
scale_by来指定边的长度。
ImageMaskScaleAs
将图像或掩码缩放到参考图像(或参考掩码)的大小。
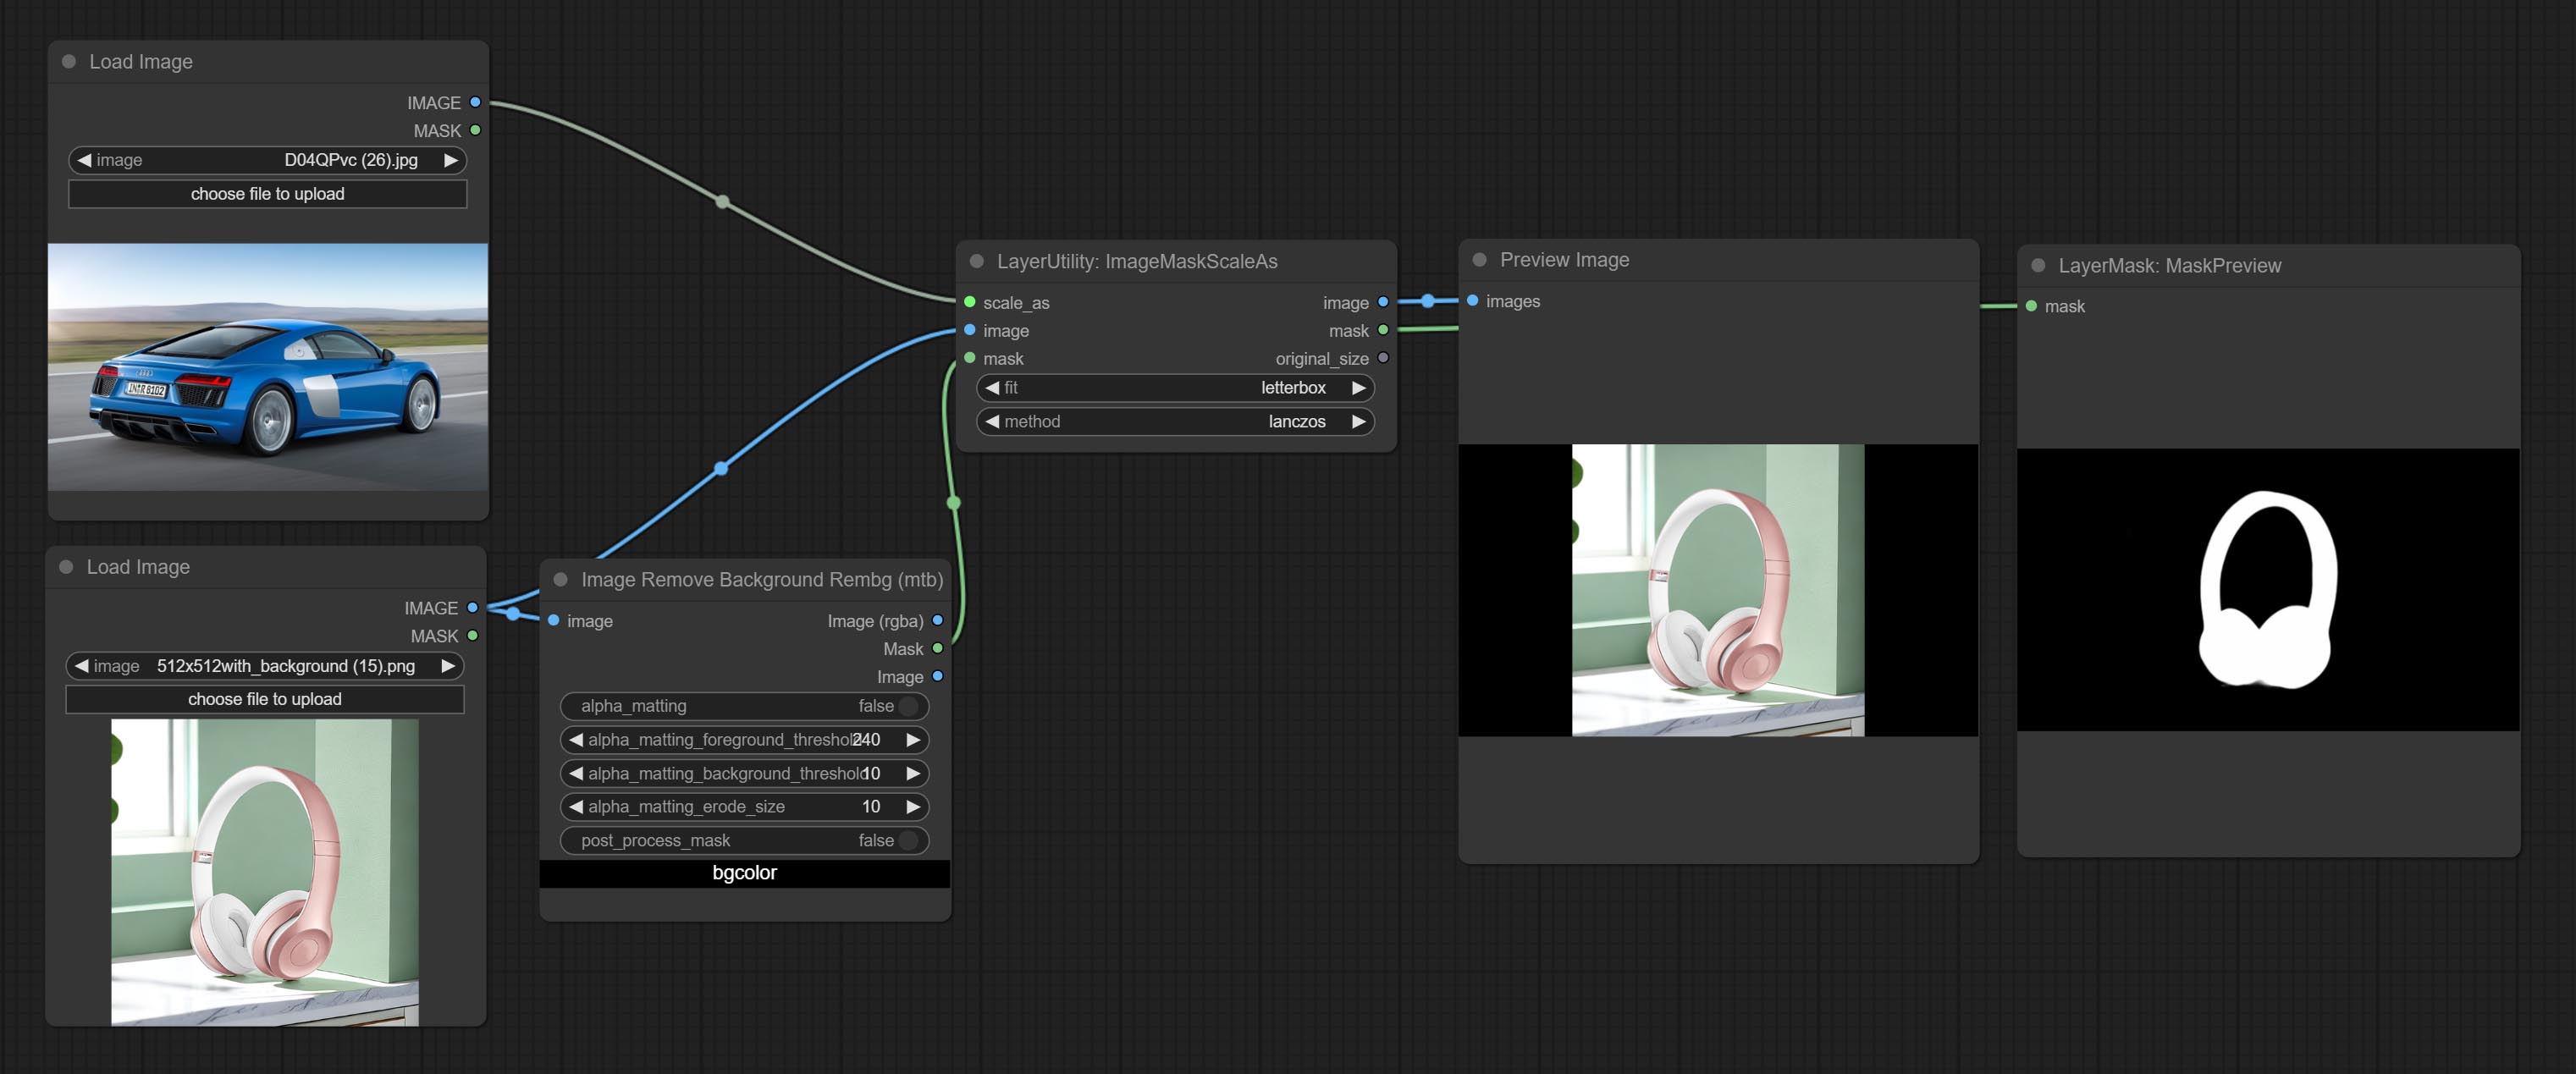
节点选项:

- scale_as*:参考尺寸。可以是图像或掩码。
- image:要缩放的图像。此选项为可选输入。如果没有输入,则输出黑色图像。
- mask:要缩放的掩码。此选项为可选输入。如果没有输入,则输出黑色掩码。
- fit:缩放宽高比模式。当原始图像的宽高比与缩放后的尺寸不匹配时,有三种模式可供选择: letterbox 模式会保留完整画面,并用黑色填充空白区域; crop 模式会保留完整的短边,而长边多余的部分会被裁剪掉; fill 模式则不保持画面比例,而是用宽度和高度填满整个屏幕。
- method:缩放采样方法,包括 lanczos、bicubic、hamming、bilinear、box 和 nearest。
*仅限于输入图像和掩码。强制集成其他类型的输入会导致节点报错。
输出:
- image:如果有图像输入,则输出缩放后的图像。
- mask:如果有掩码输入,则输出缩放后的掩码。
- original_size:图像的原始尺寸数据用于后续节点的恢复。
- width:输出图像的宽度。
- height:输出图像的高度。
ImageMaskScaleAsV2
ImageMaskScaleAs 的升级版在原有节点的基础上增加了背景颜色设置。
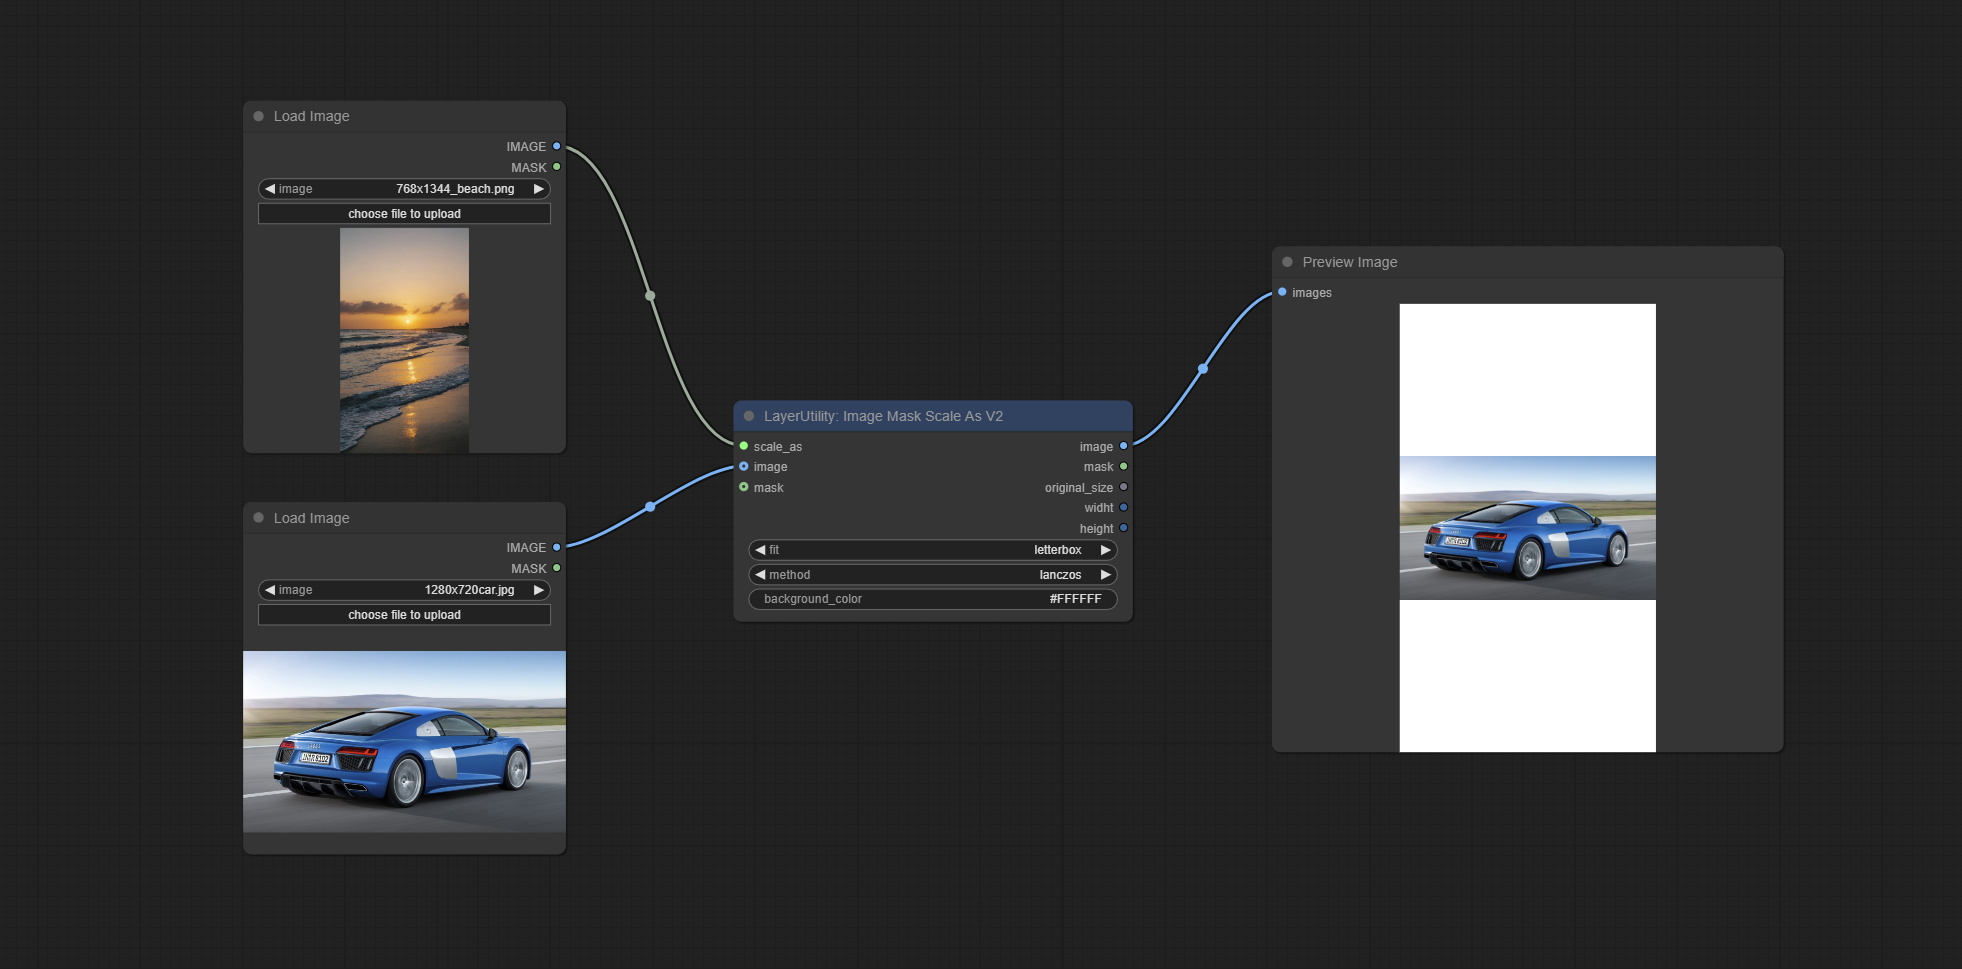
新增选项: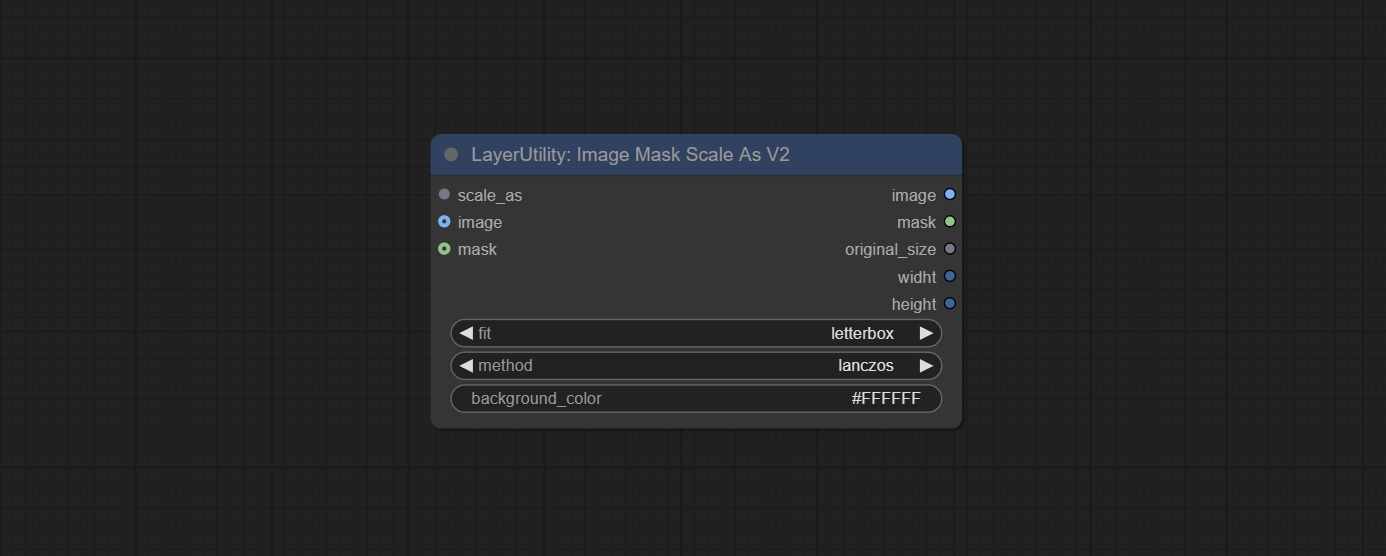
- background_color:扩展背景颜色。
ImageScaleByAspectRatio
按宽高比缩放图像或掩码。缩放后的尺寸可以四舍五入到 8 或 16 的倍数,也可以按长边尺寸进行缩放。
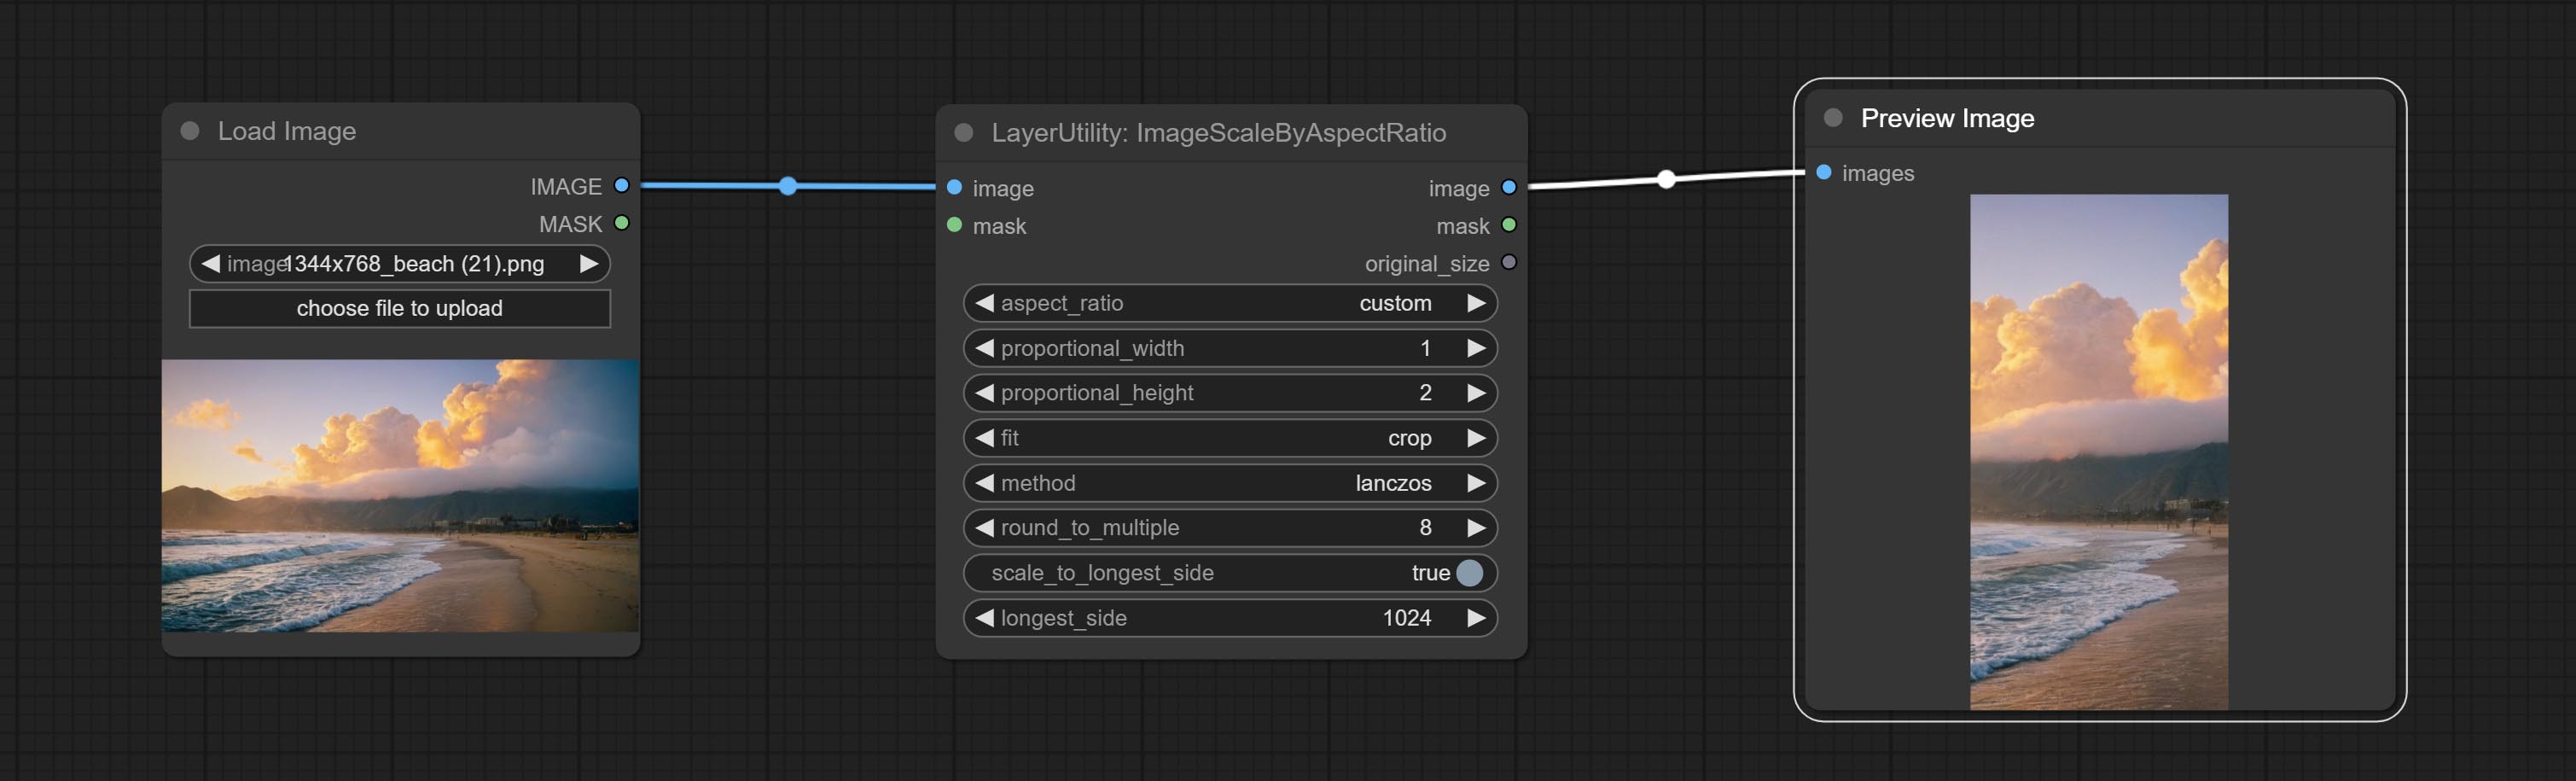
节点选项: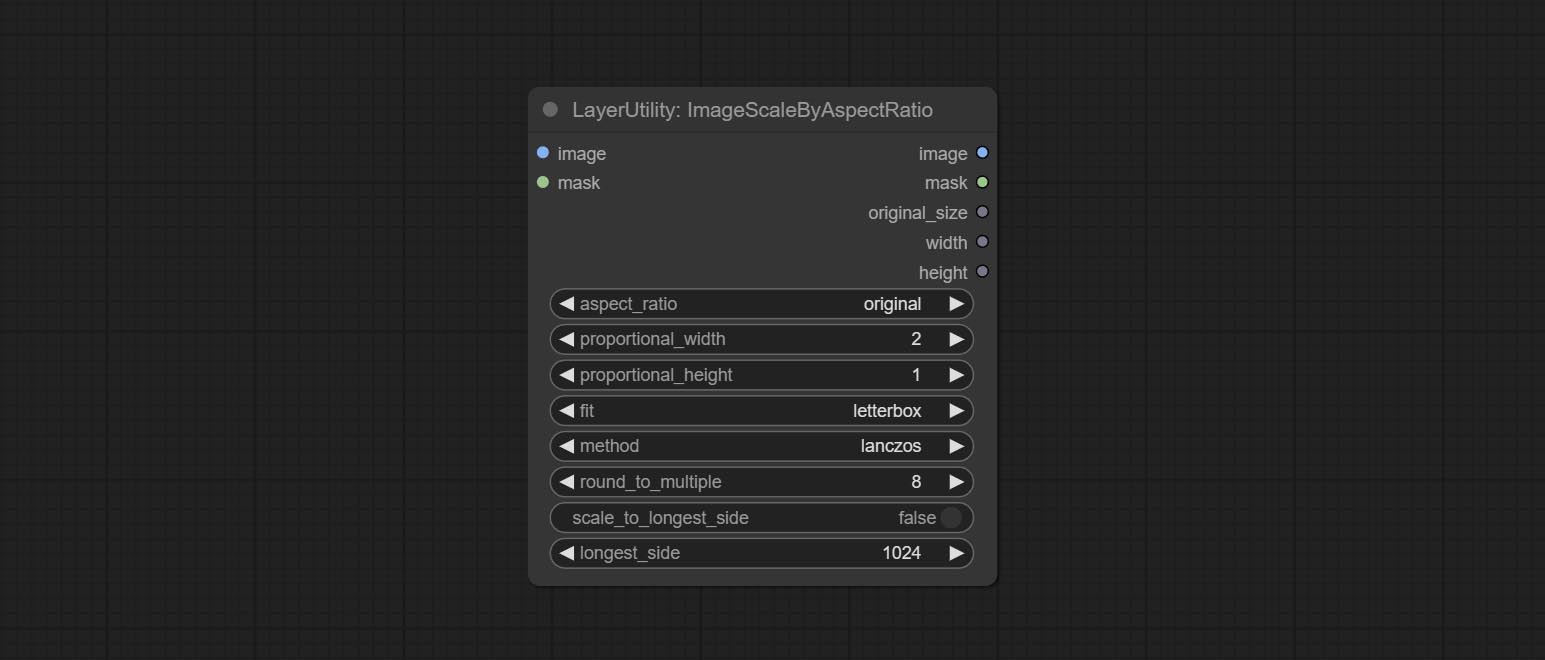
- aspect_ratio:这里提供几种常见的画面比例。此外,您还可以选择“original”以保持原始比例,或使用“custom”来自定义比例。
- proportional_width:按比例的宽度。如果 aspect_ratio 选项不是“custom”,则此设置将被忽略。
- proportional_height:按比例的高度。如果 aspect_ratio 选项不是“custom”,则此设置将被忽略。
- fit:缩放宽高比模式。当原始图像的宽高比与缩放后的尺寸不匹配时,有三种模式可供选择: letterbox 模式会保留完整画面,并用黑色填充空白区域; crop 模式会保留完整的短边,而长边多余的部分会被裁剪掉; fill 模式则不保持画面比例,而是用宽度和高度填满整个屏幕。
- method:缩放采样方法,包括 lanczos、bicubic、hamming、bilinear、box 和 nearest。
- round_to_multiple:四舍五入到倍数。例如,将其设置为 8 将使宽度和高度强制成为 8 的倍数。
- scale_by_longest_side:允许按长边尺寸进行缩放。
- longest_side:当 scale_by_longest_side 设置为 True 时,将使用此值作为图像的长边尺寸。如果提供了 original_size 输入,则此设置将被忽略。
输出:
- image:如果有图像输入,则输出缩放后的图像。
- mask:如果有掩码输入,则输出缩放后的掩码。
- original_size:图像的原始尺寸数据用于后续节点的恢复。
- width:输出图像的宽度。
- height:输出图像的高度。
ImageScaleByAspectRatioV2
ImageScaleByAspectRatio 的 V2 升级版本
节点选项:
在 ImageScaleByAspectRatio 的基础上进行了以下更改:
- scale_to_side:允许按指定的长边、短边、宽度、高度或总像素数进行缩放。
- scale_to_length:这里的数值用作指定边的长度或 total pixels(千像素)来决定 scale_to_side。
- background_color4:背景的颜色。
ICMask
用于生成上下文相关的图像和掩码。代码来自 lrzjason/Comfyui-In-Context-Lora-Utils,感谢原作者 @小志Jason。
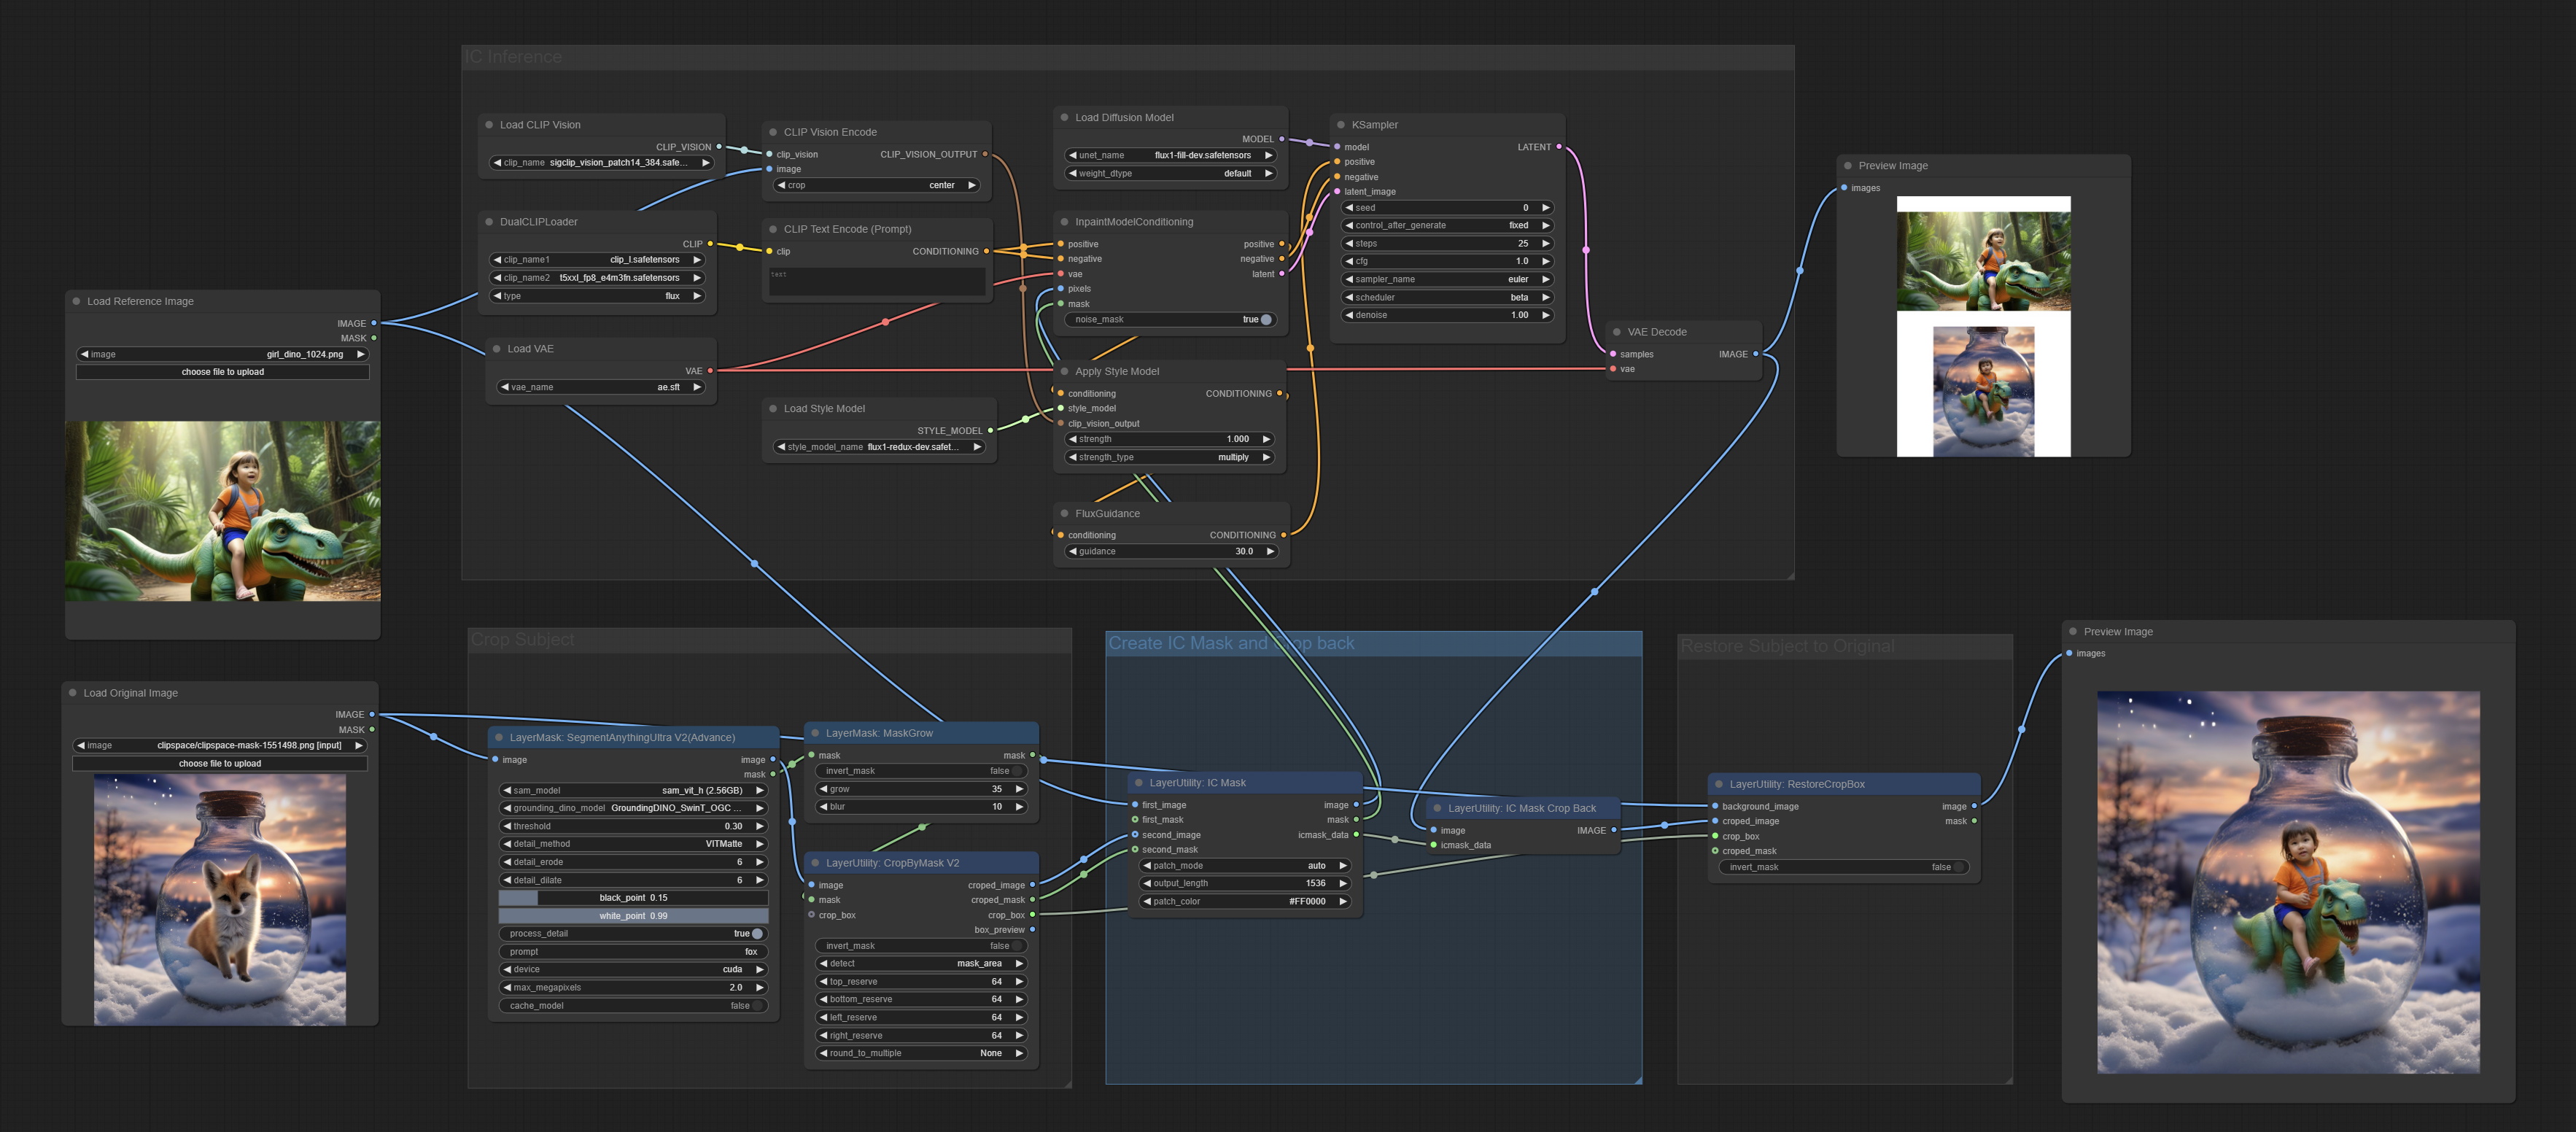
节点选项: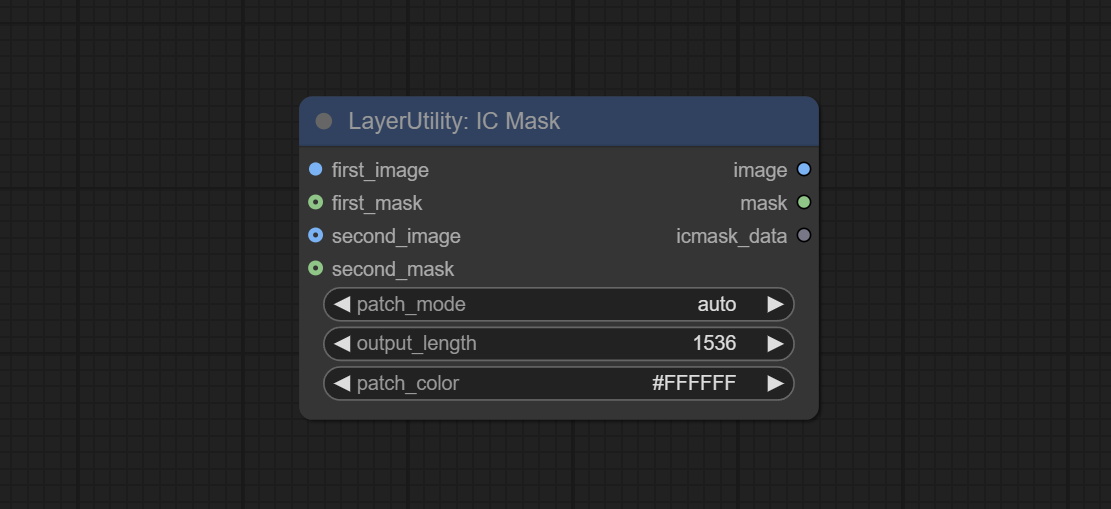
- first_image:用作上下文参考的图像。
- first_mask:可选输入,上下文参考图像的掩码。
- second_image:用于重新绘制图像。
- second_mask:用于重新绘制图像的掩码。
- patch_mode:拼接模式有三种:auto、patch_right 和 patch_bottom。
- output_length:输出图像的长边尺寸。
- patch_color:填充颜色。
输出:
- image:输出的图像。
- mask:输出的掩码。
- icmask_data:图像的拼接信息,用于后续节点的自动裁剪。
ICMaskCropBack
对 ICMask 生成的图像推理结果进行裁剪。
节点选项: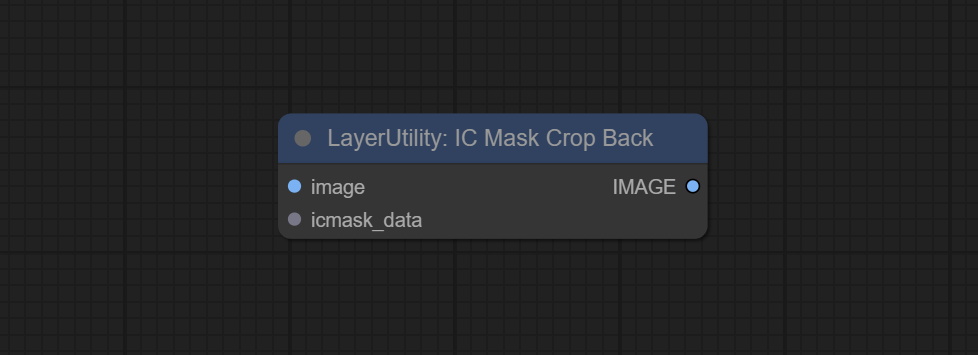
- image:输入的图像。
- icmask_data:由 ICMask 节点输出的拼接信息。
FluxKontextImageScale
基于官方节点的修改,用于将图像缩放到更适合 Flux Kontext 的尺寸。对于不同宽高比的图像,缩放比例会相应调整,以确保所有信息都能保留。
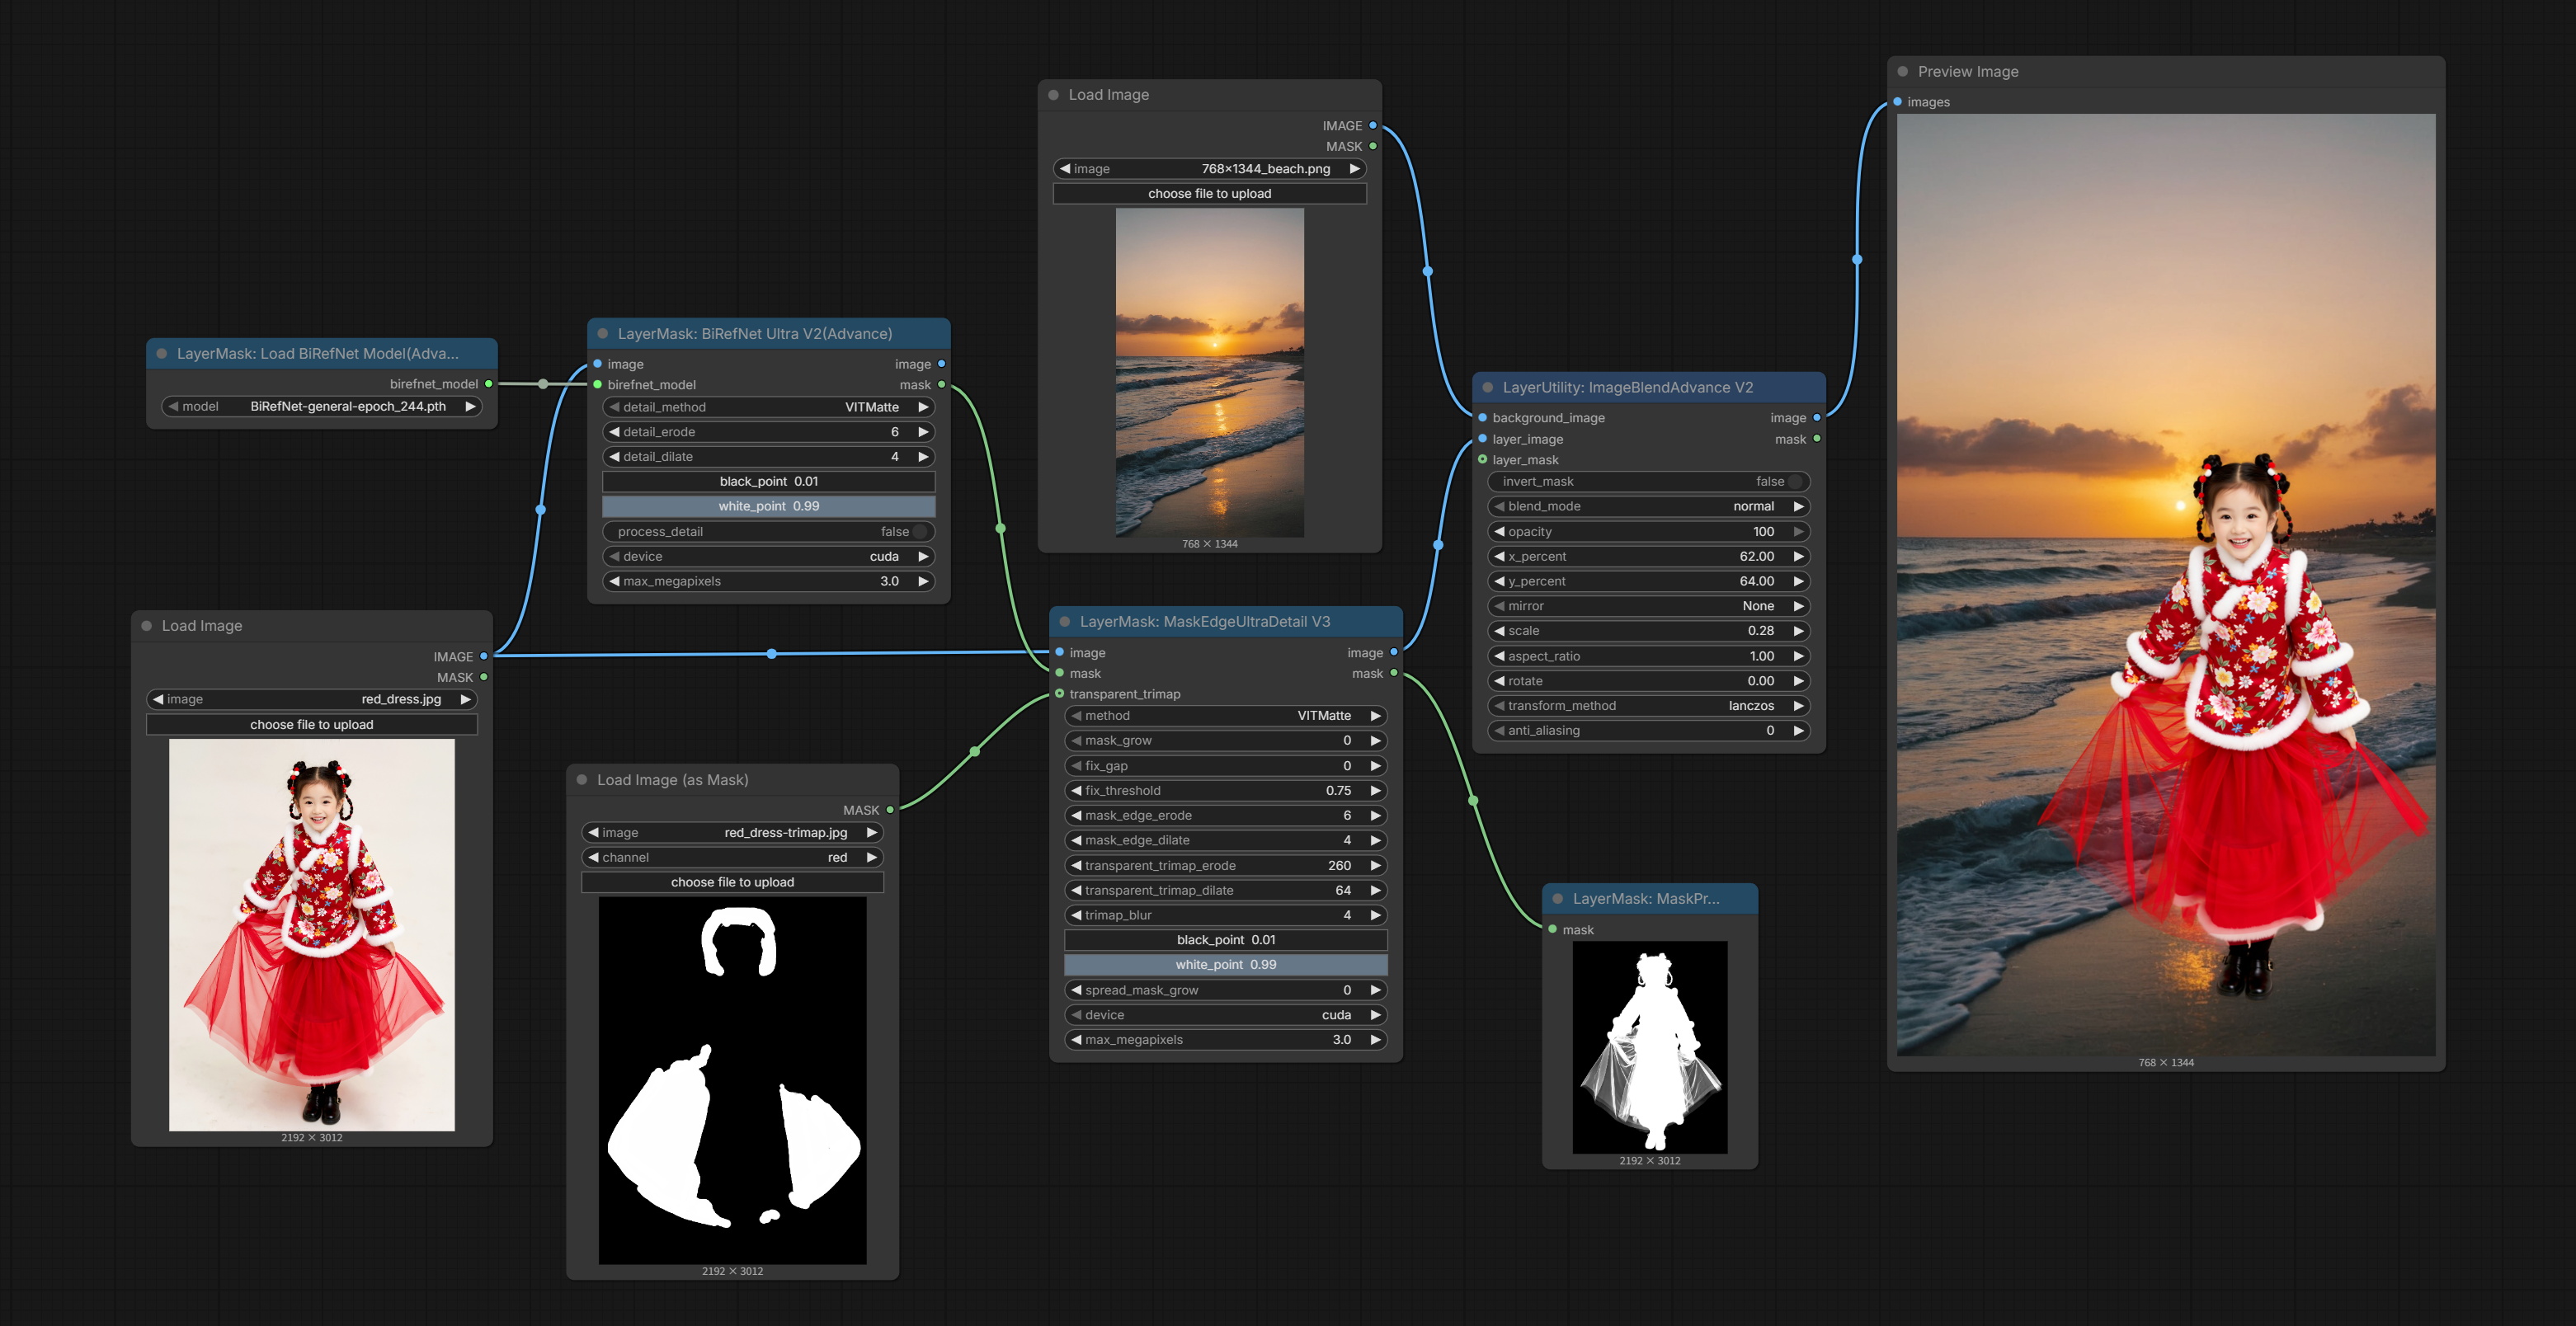
以下示例使用该节点来完整保留 4K 分辨率图像的所有信息,通过 FluxKontext 模型推理改变图像背景,再利用 HLFrequencyDetailRestore 节点实现 4K 图像质量的细节恢复。
*此工作流(flux_kontext_image_scale_example.json)位于工作流目录中。
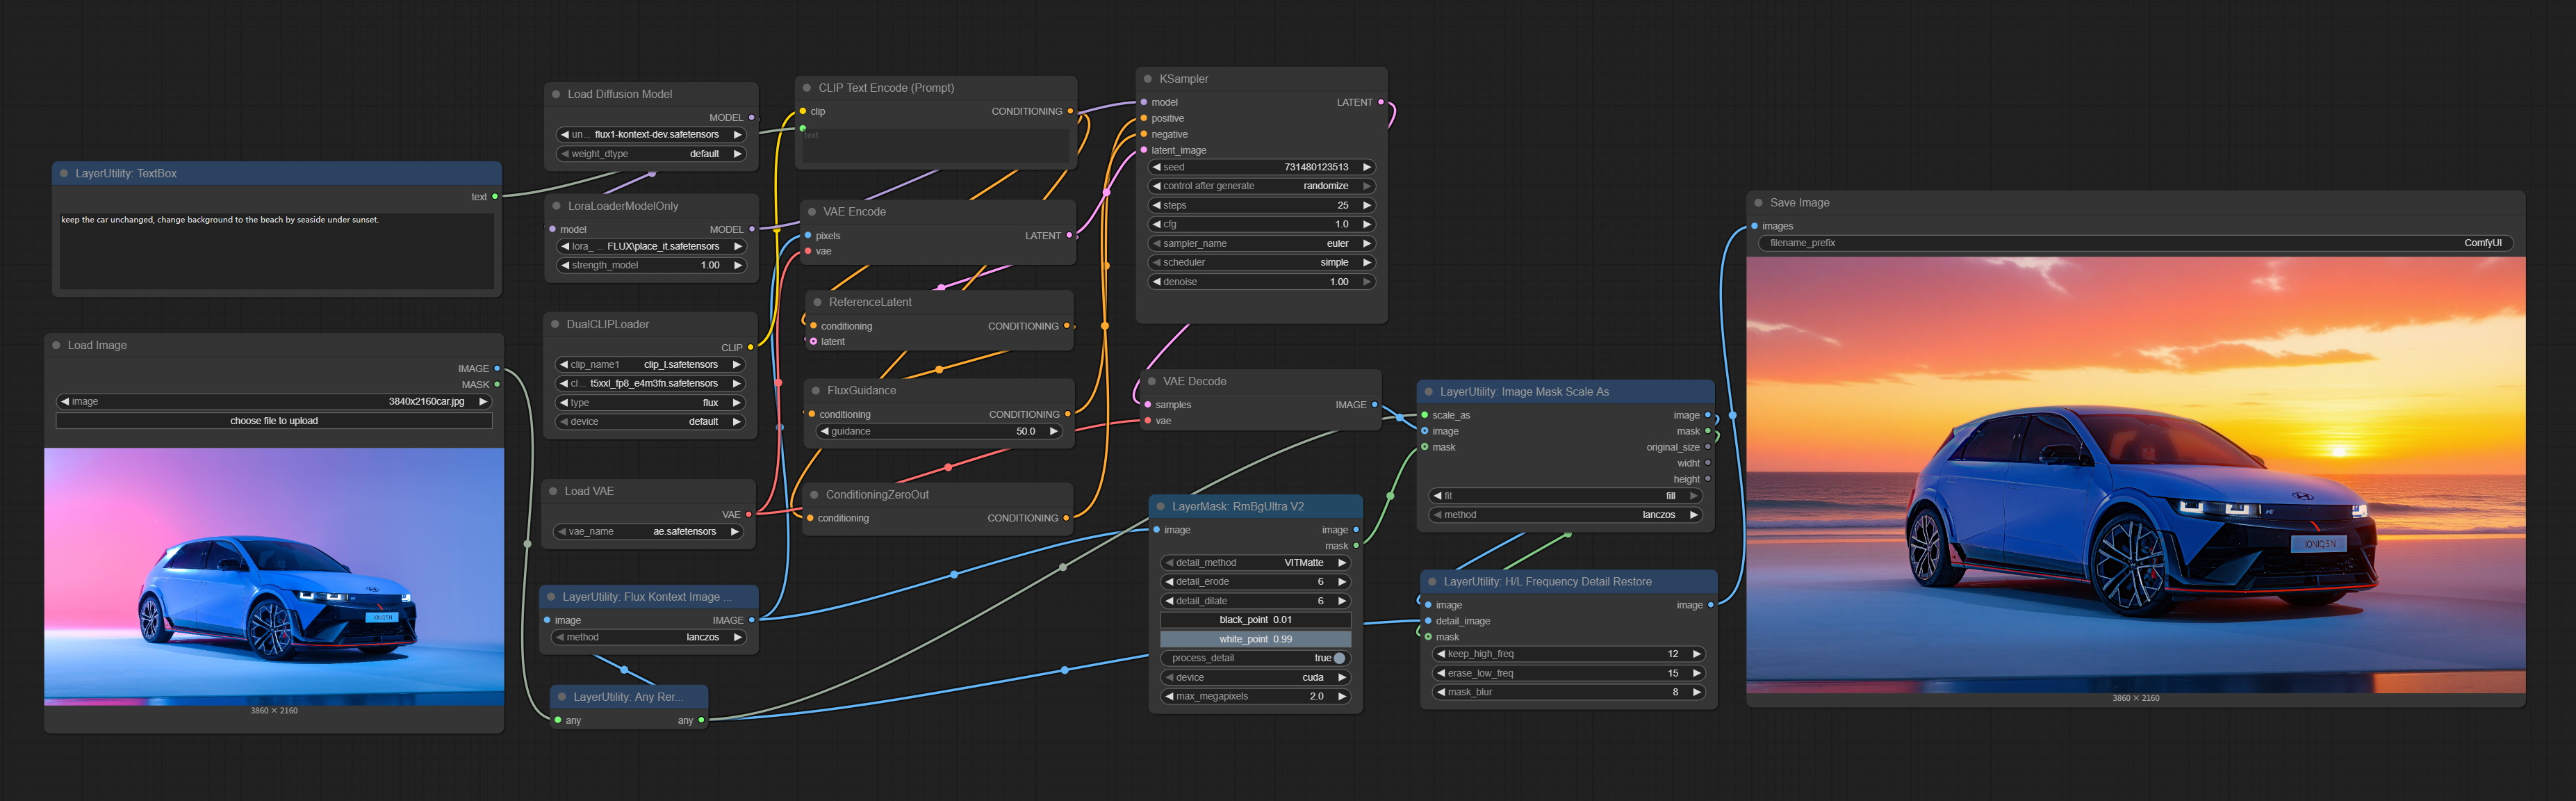
节点选项: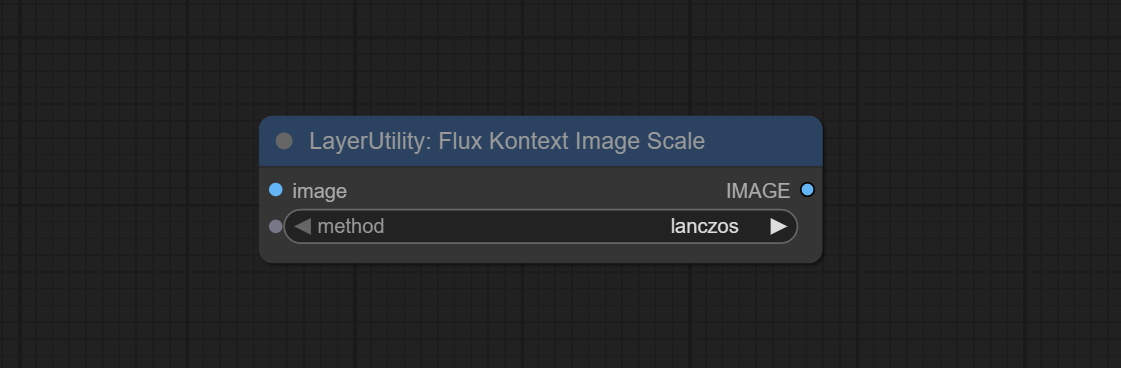
- image:输入图像。
- method:缩放采样方法,包括 lanczos、bicubic、hamming、bilinear、box 和 nearest。
输出:
- image:输出图像。
VQAPrompt
使用 blip-vqa 模型进行视觉问答。该节点的部分代码参考自 celoron/ComfyUI-VisualQueryTemplate,感谢原作者。
*请从 百度网盘 或 huggingface.co/Salesforce/blip-vqa-capfilt-large 以及 huggingface.co/Salesforce/blip-vqa-base 下载模型文件,并将其复制到 ComfyUI\models\VQA 文件夹中。
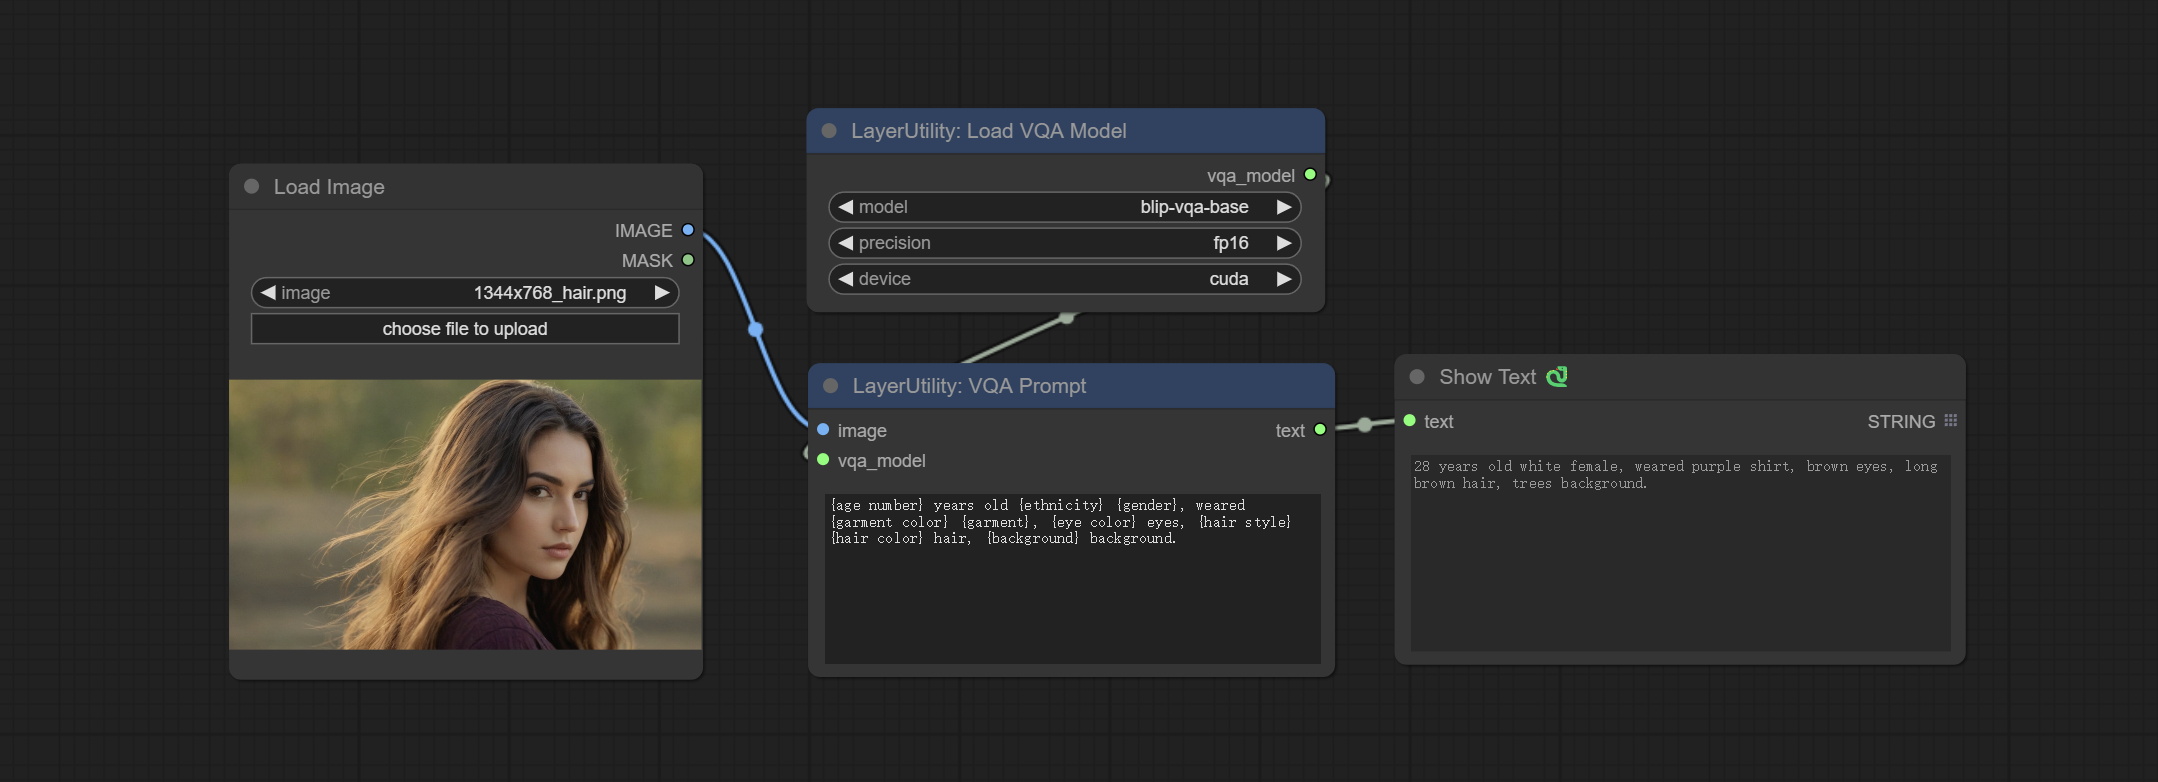
节点选项:
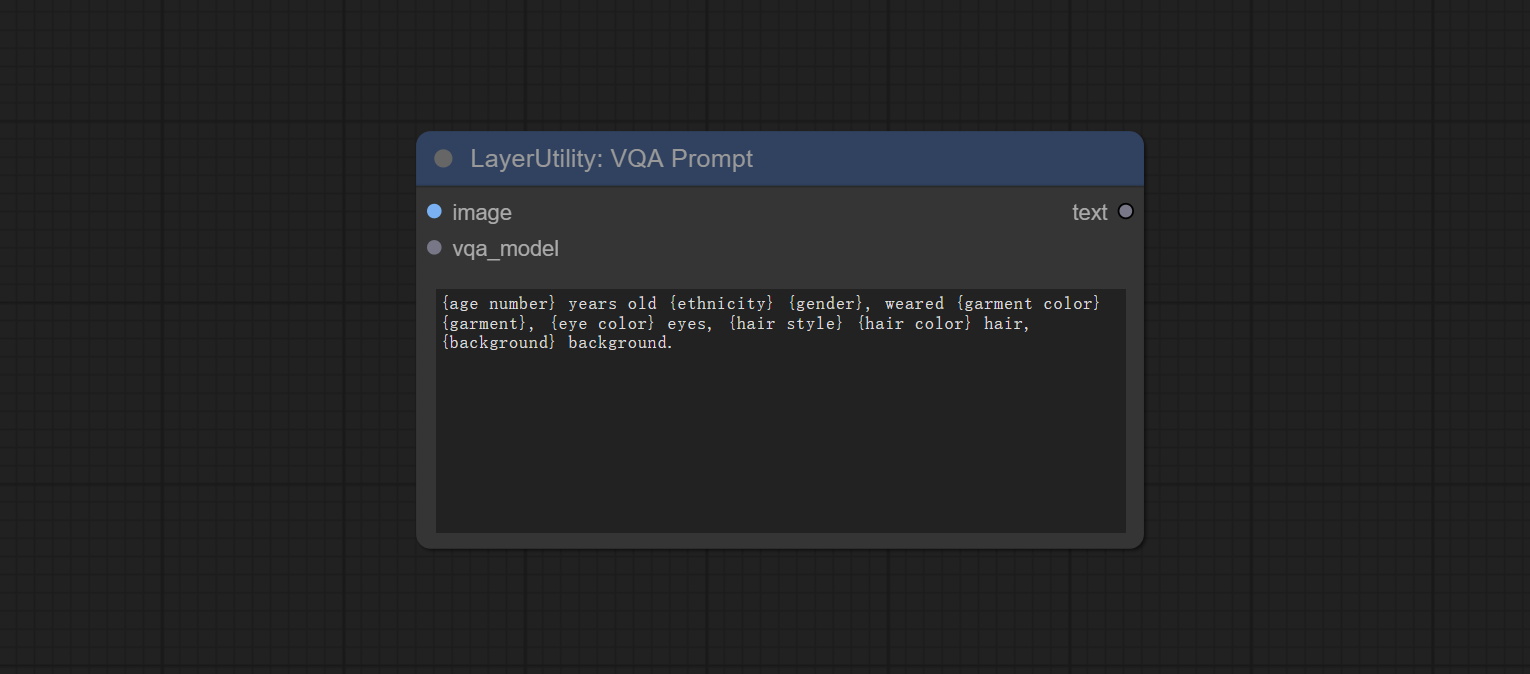
- image:图像输入。
- vqa_model:VQA 模型输入,来自 LoadVQAModel 节点。
- question:任务文本输入。单个问题用大括号“{}”括起来,问题的答案将在输出文本中替换其原始位置。多个问题可以用大括号在一次问答中定义。 例如,对于一张放置在场景中的物品图片,问题可以是:“{object color} {object} on the {scene}”。
LoadVQAModel
加载 blip-vqa 模型。
节点选项:
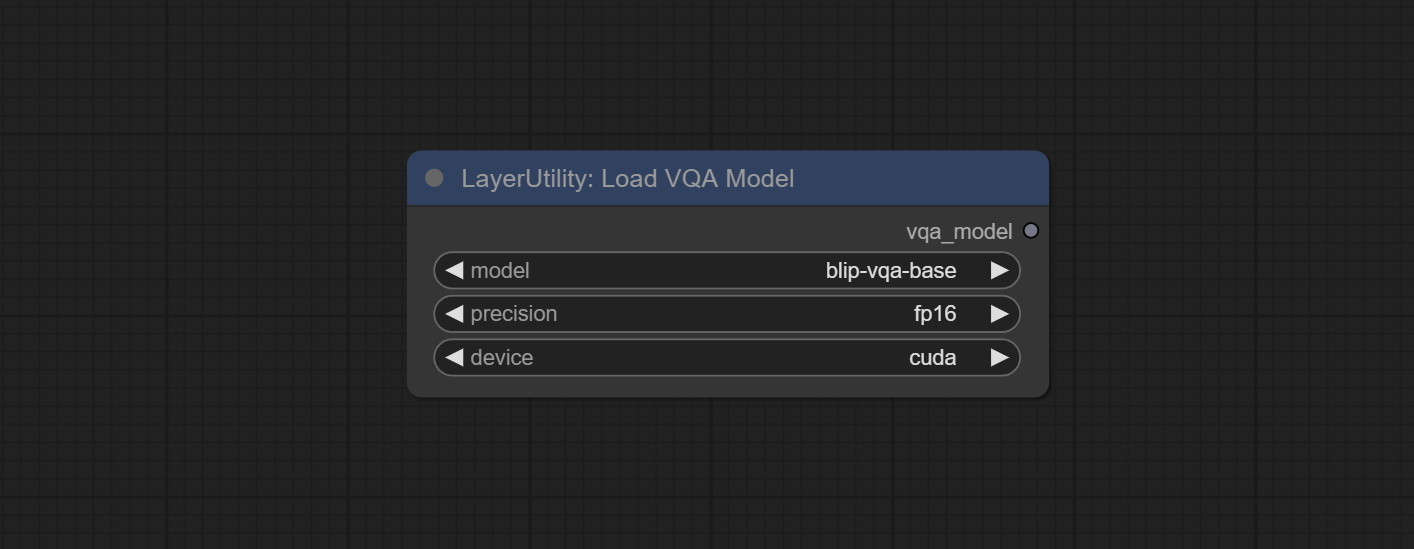
- model:目前有两个模型可供选择:“blip-vqa-base”和“blip-vqa-capfilt-large”。
- precision:模型精度有两种选项:“fp16”和“fp32”。
- device:模型运行设备有两种选项:“cuda”和“cpu”。
ImageShift
对图像进行位移。该节点支持输出位移接缝蒙版,便于创建连续纹理。

节点选项: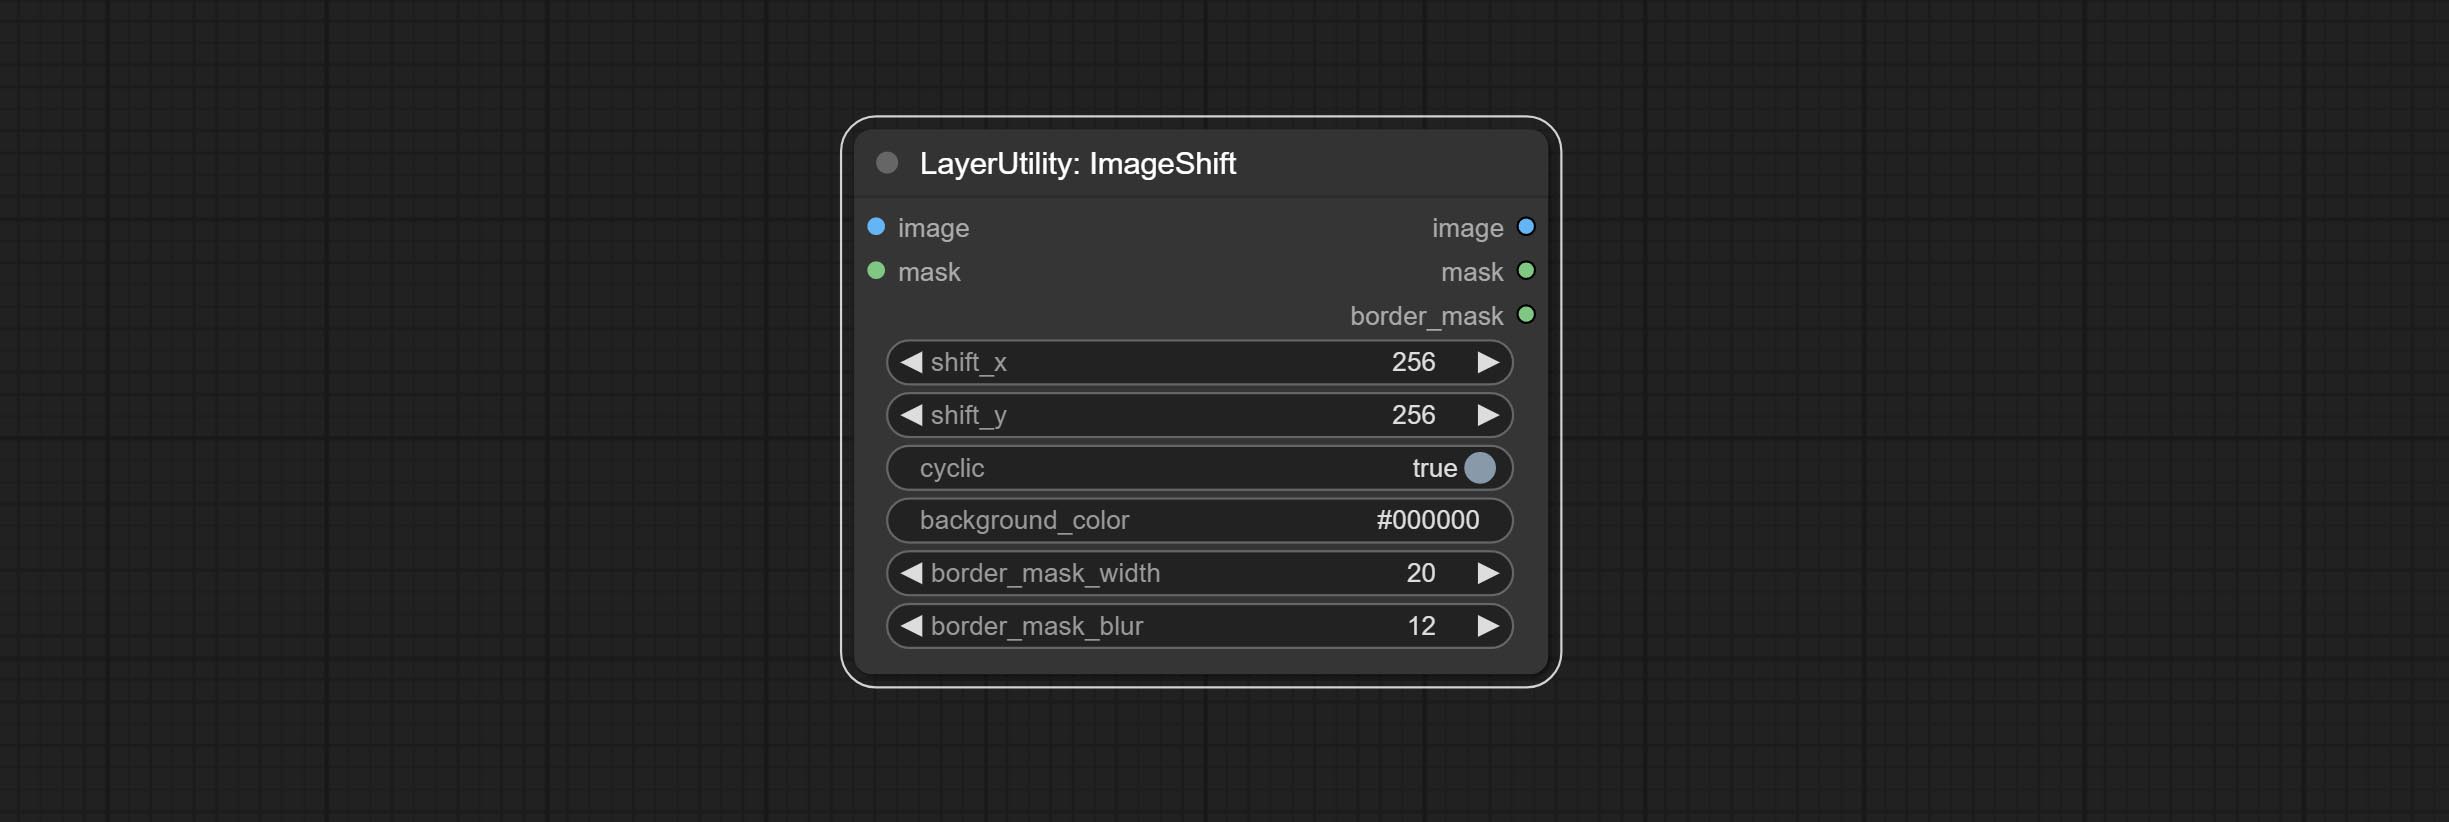
- image5:输入图像。
- mask2,5:图像的蒙版。
- shift_x:水平位移距离。
- shift_y:垂直位移距离。
- cyclic:超出边界的部分是否循环。
- background_color4:背景颜色。如果 cyclic 设置为 False,则此处设置的背景颜色将被使用。
- border_mask_width:边框蒙版宽度。
- border_mask_blur:边框蒙版模糊度。
- note
ImageBlend
一个用于合成图层图像和背景图像的简单节点,提供多种混合模式供选择,并可设置透明度。

节点选项:
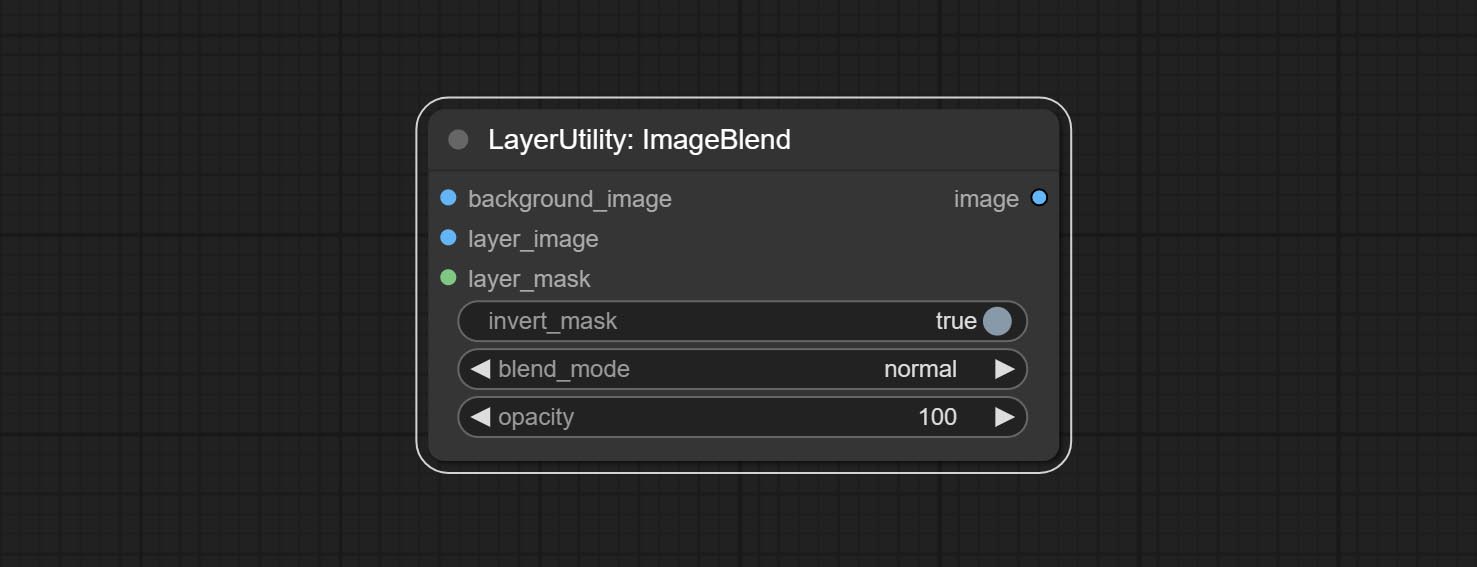
- background_image1:背景图像。
- layer_image1:用于合成的图层图像。
- layer_mask1,2:图层图像的蒙版。
- invert_mask:是否反转蒙版。
- blend_mode3:混合模式。
- opacity:混合的透明度。
- note
ImageReel
在一个卷轴中显示多张图像。可以为卷轴中的每张图像添加文字说明。通过使用 ImageReelComposite 节点,可以将多个卷轴合并成一张图像。
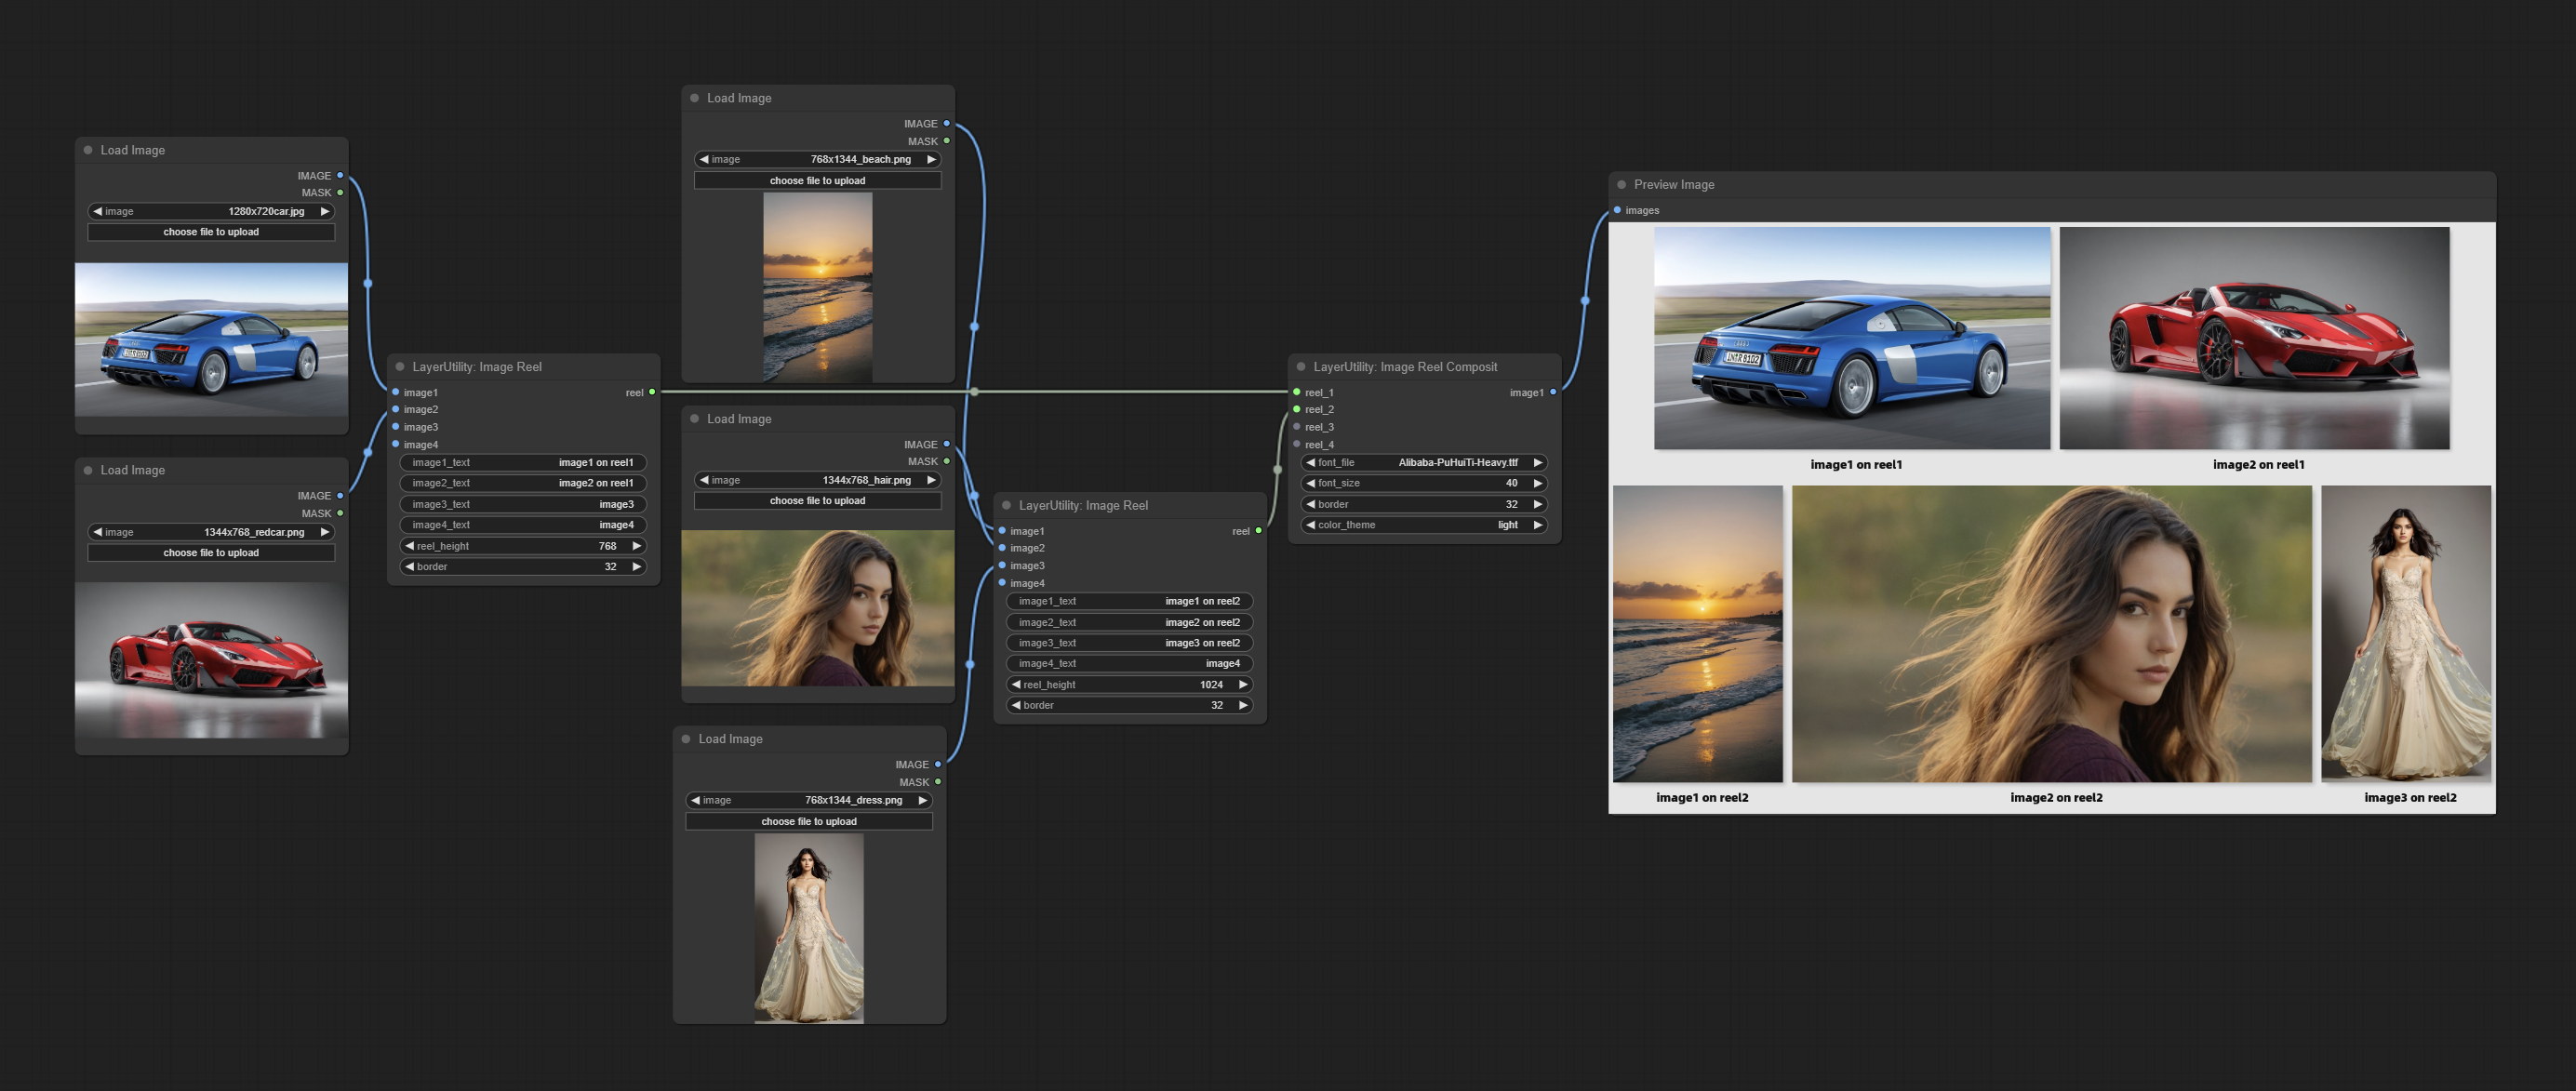
节点选项: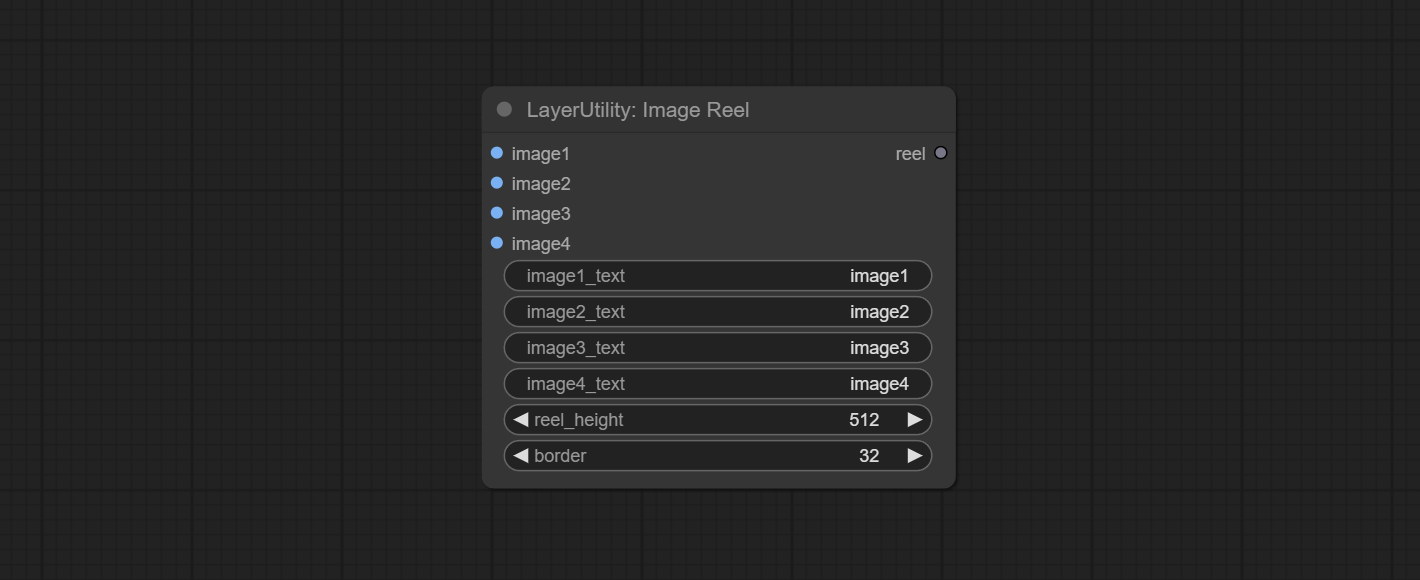
- image1:第一张图像,必须输入。
- image2:第二张图像,可选输入。
- image3:第三张图像,可选输入。
- image4:第四张图像,可选输入。
- image1_text:第一张图像的文字说明。
- image2_text:第二张图像的文字说明。
- image3_text:第三张图像的文字说明。
- image4_text:第四张图像的文字说明。
- reel_height:卷轴的高度。
- border:卷轴中图像的边框宽度。
输出:
- reel:ImageReelComposite 节点的输入卷轴。
ImageReelComposite
将多个卷轴合并成一张图像。
节点选项:
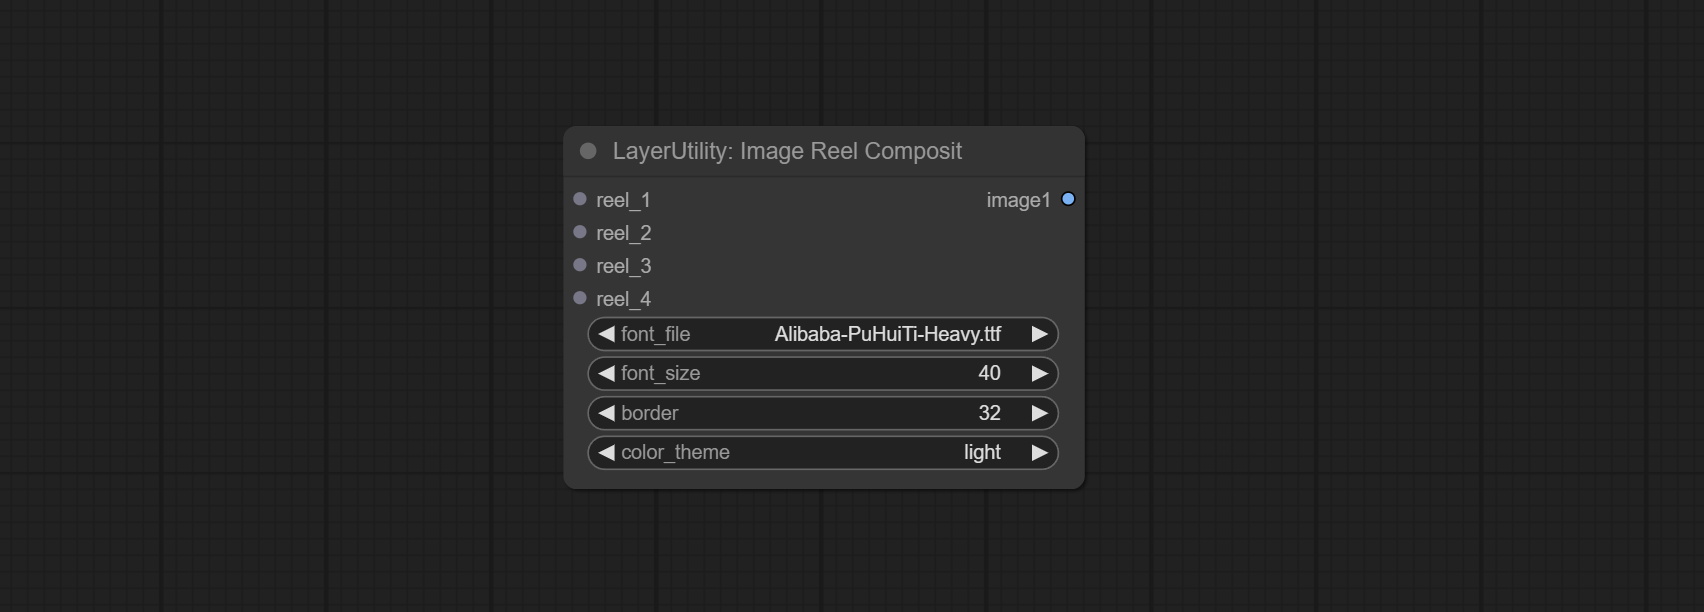
- reel_1:第一个卷轴,必须输入。
- reel_2:第二个卷轴,可选输入。
- reel_3:第三个卷轴,可选输入。
- reel_4:第四个卷轴,可选输入。
- font_file**:此处列出字体文件夹中可用的字体文件,所选字体文件将用于生成图像。
- border:卷轴的边框宽度。
- color_theme:输出图像的主题颜色。
*字体文件夹在resource_dir.ini中定义,该文件位于插件根目录,默认名称为resource_dir.ini.example。首次使用时,需将文件后缀改为.ini。 打开文本编辑软件,找到以“FONT_dir=”开头的行,在“=”后面输入自定义的文件夹路径名。
支持在resource-dir.ini中定义多个文件夹,用逗号、分号或空格分隔。
插件初始化时,该文件夹中的所有字体文件都将被收集并显示在节点列表中。
如果 ini 中设置的文件夹无效,则启用插件自带的字体文件夹。
ImageOpacity
调整图像透明度
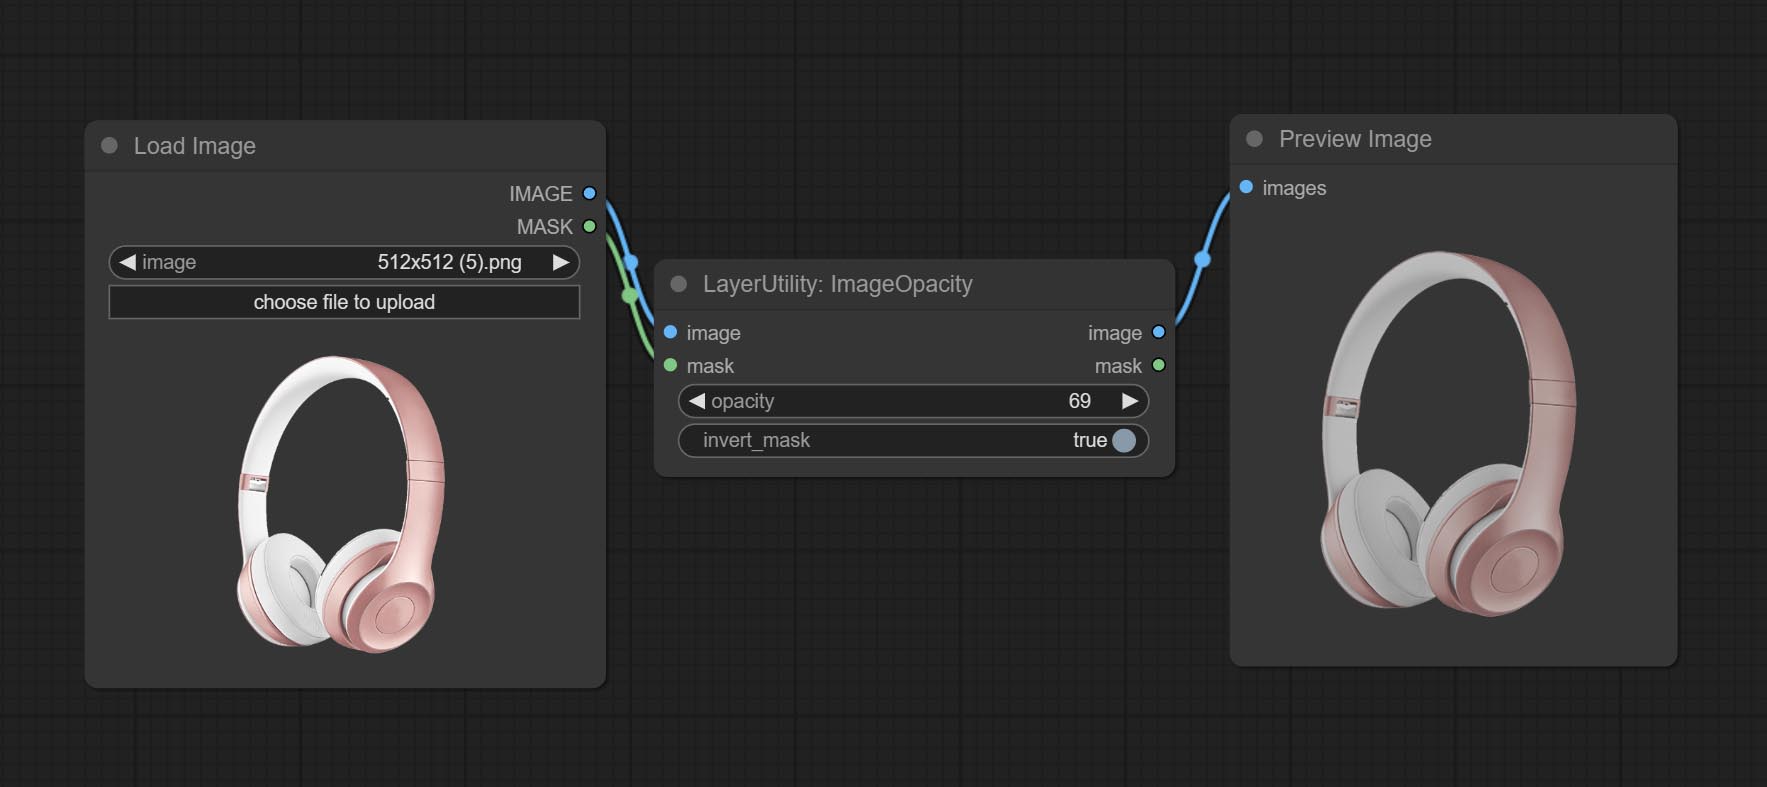
节点选项:
- image5:图像输入,支持 RGB 和 RGBA。如果是 RGB,则会自动为整张图像添加 alpha 通道。
- mask2,5:蒙版输入。
- invert_mask:是否反转蒙版。
- opacity:图像的透明度。
- note
ColorPicker
源自 mtb nodes 的网页扩展修改版本。可在调色板上选择颜色并输出 RGB 值,感谢原作者。
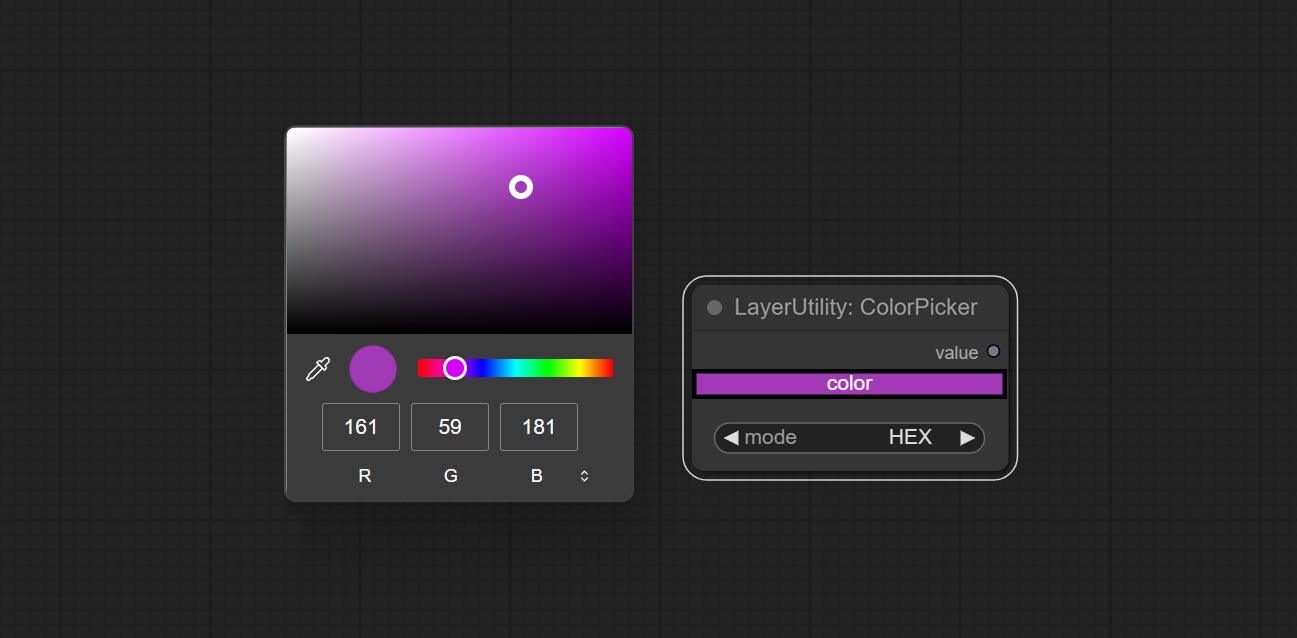
节点选项:
- mode:输出格式有十六进制 (HEX) 和十进制 (DEC) 两种。
输出类型:
- value:字符串格式。
RGBValue
将颜色值以单独的 R、G、B 三个十进制数值形式输出。支持 ColorPicker 节点输出的 HEX 和 DEC 格式。
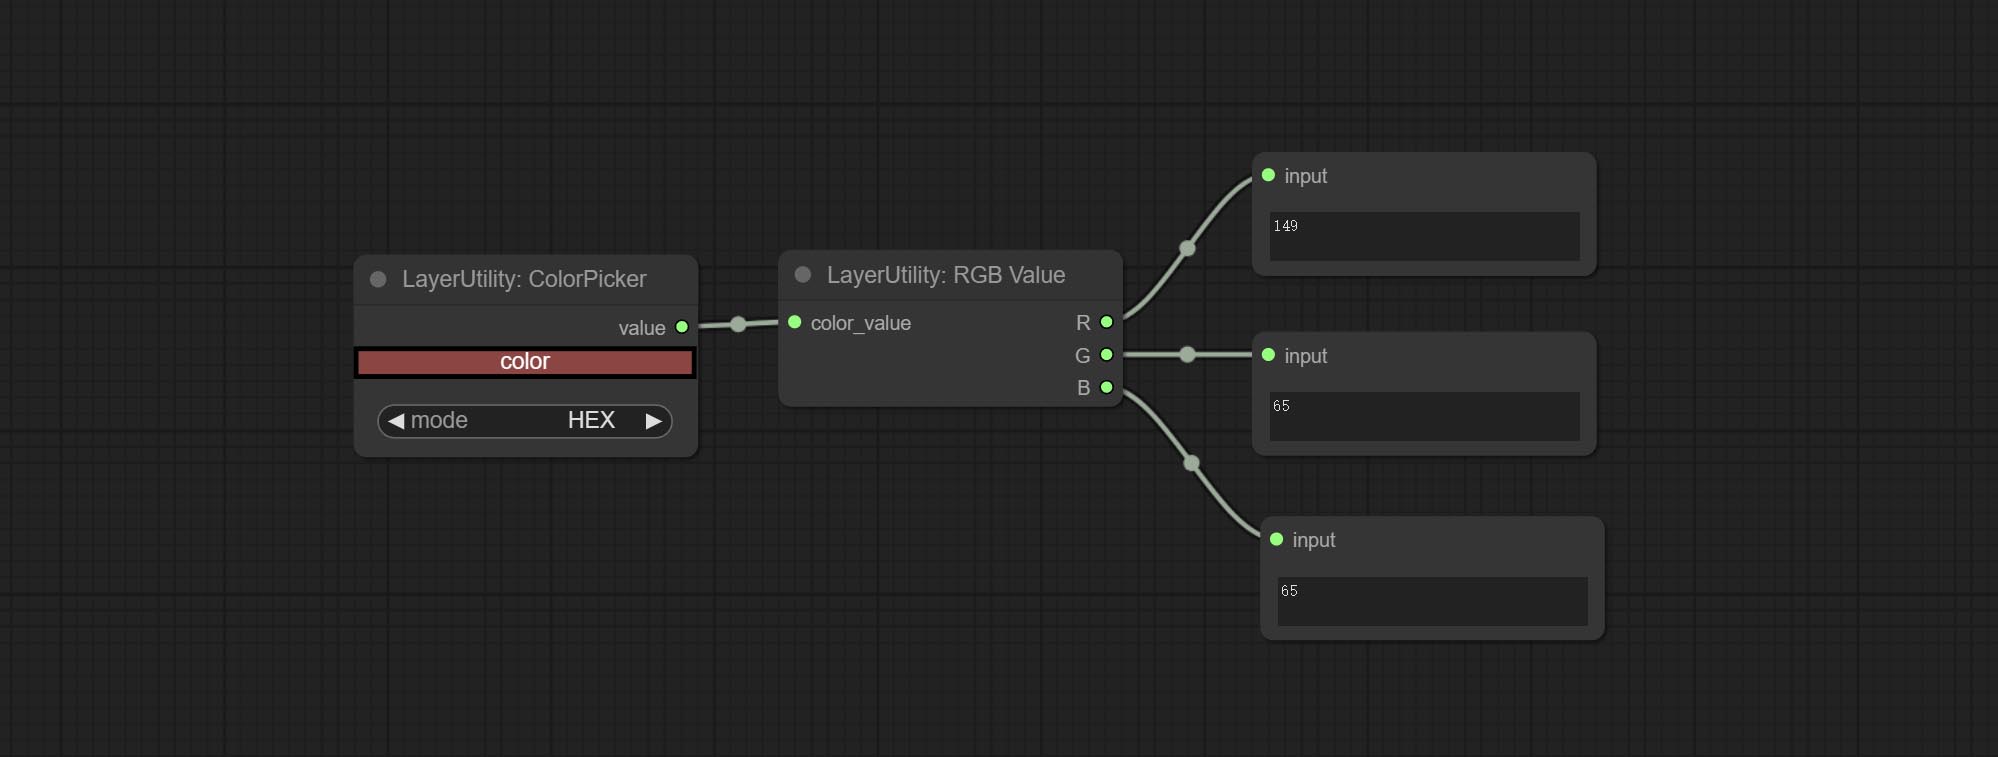
节点选项:
- color_value:支持十六进制 (HEX) 或十进制 (DEC) 颜色值,应为字符串或元组类型。强制输入其他类型会导致错误。
HSVValue
将颜色值以 H、S、V 的单独十进制数值形式输出(最大值为 255)。支持 ColorPicker 节点输出的 HEX 和 DEC 格式。
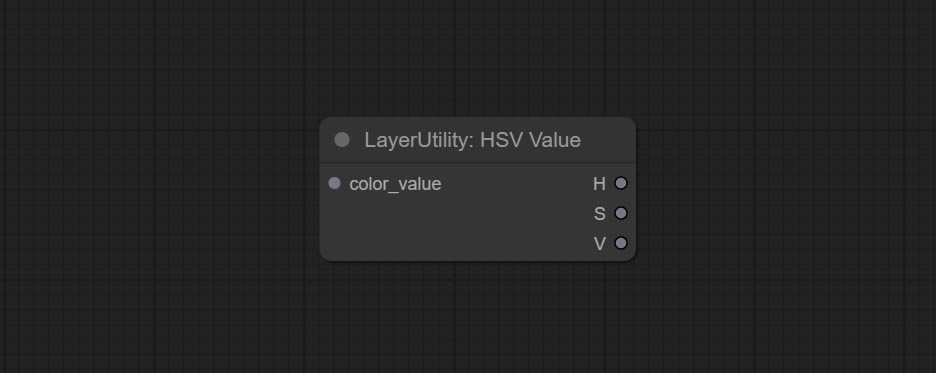
节点选项:
- color_value:支持十六进制 (HEX) 或十进制 (DEC) 颜色值,应为字符串或元组类型。强制输入其他类型会导致错误。
GrayValue
根据颜色值输出灰度值。支持输出 256 级和 100 级灰度值。

节点选项:
- color_value:支持十六进制 (HEX) 或十进制 (DEC) 颜色值,应为字符串或元组类型。强制输入其他类型会导致错误。
输出:
- gray(256_level):256 级灰度值。整数类型,范围 0~255。
- gray(100_level):100 级灰度值。整数类型,范围 0~100。
GetMainColors
获取图像的主要颜色。可以获取 5 种颜色。
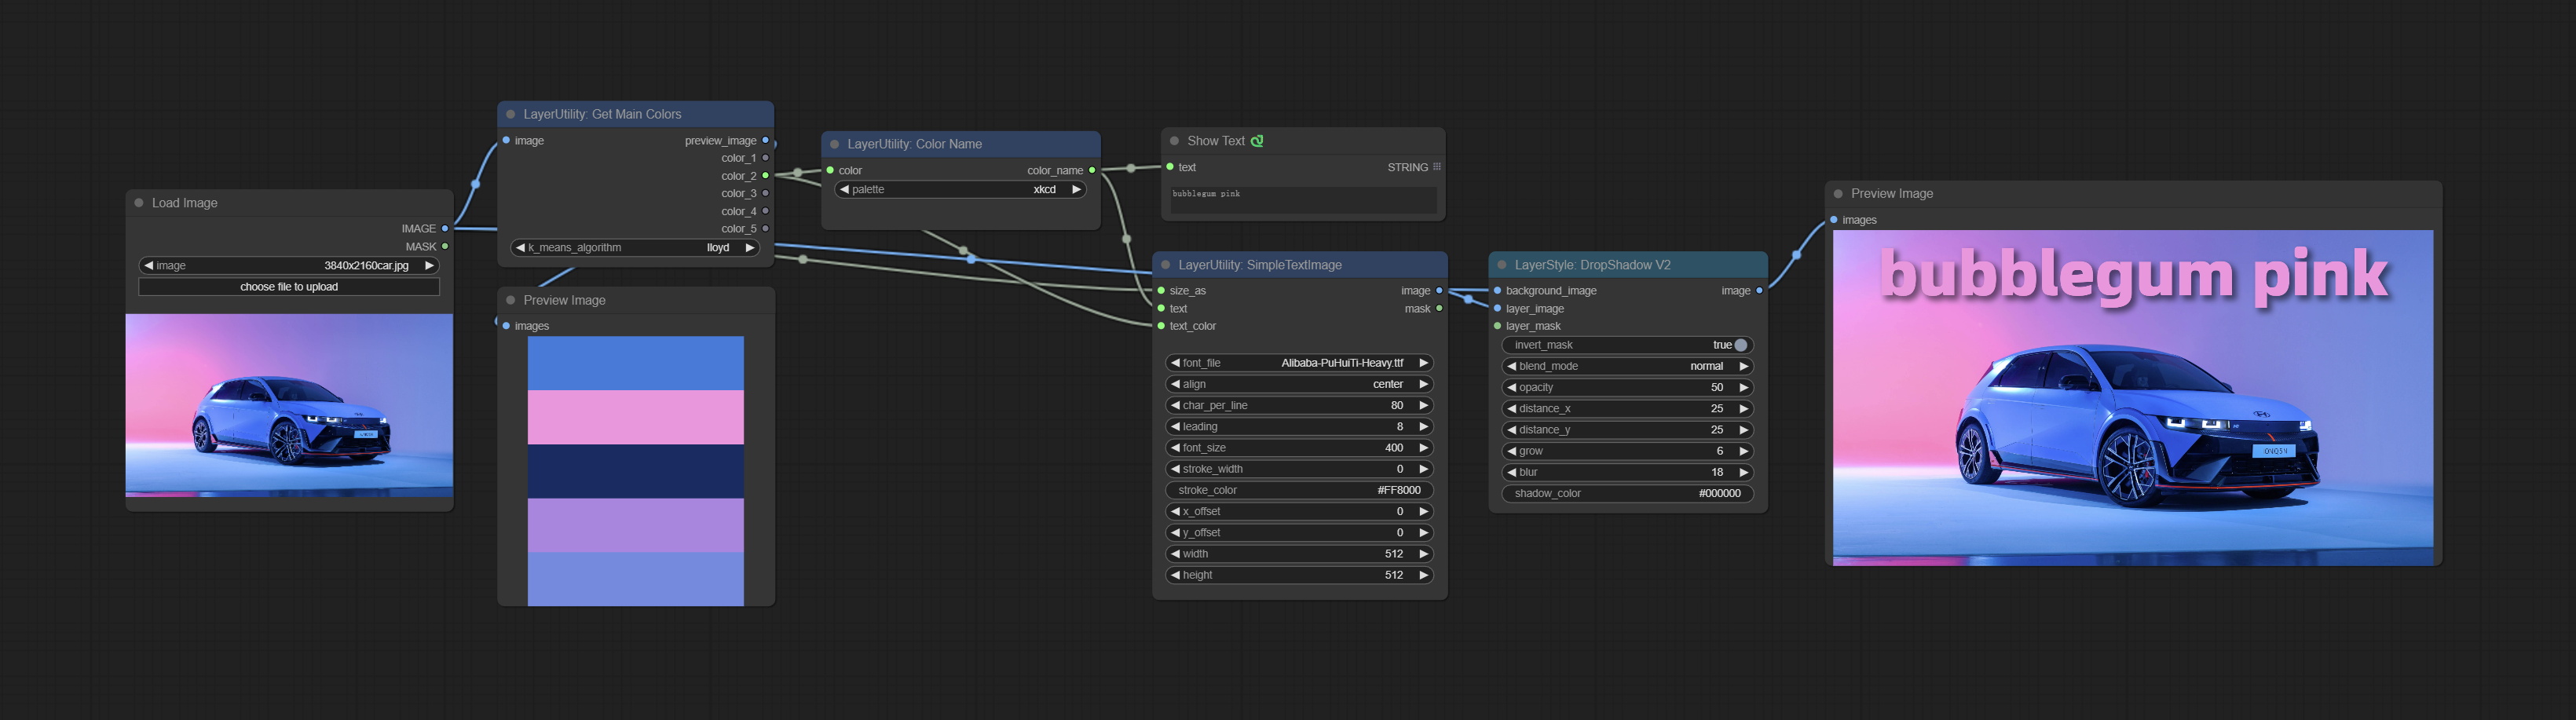
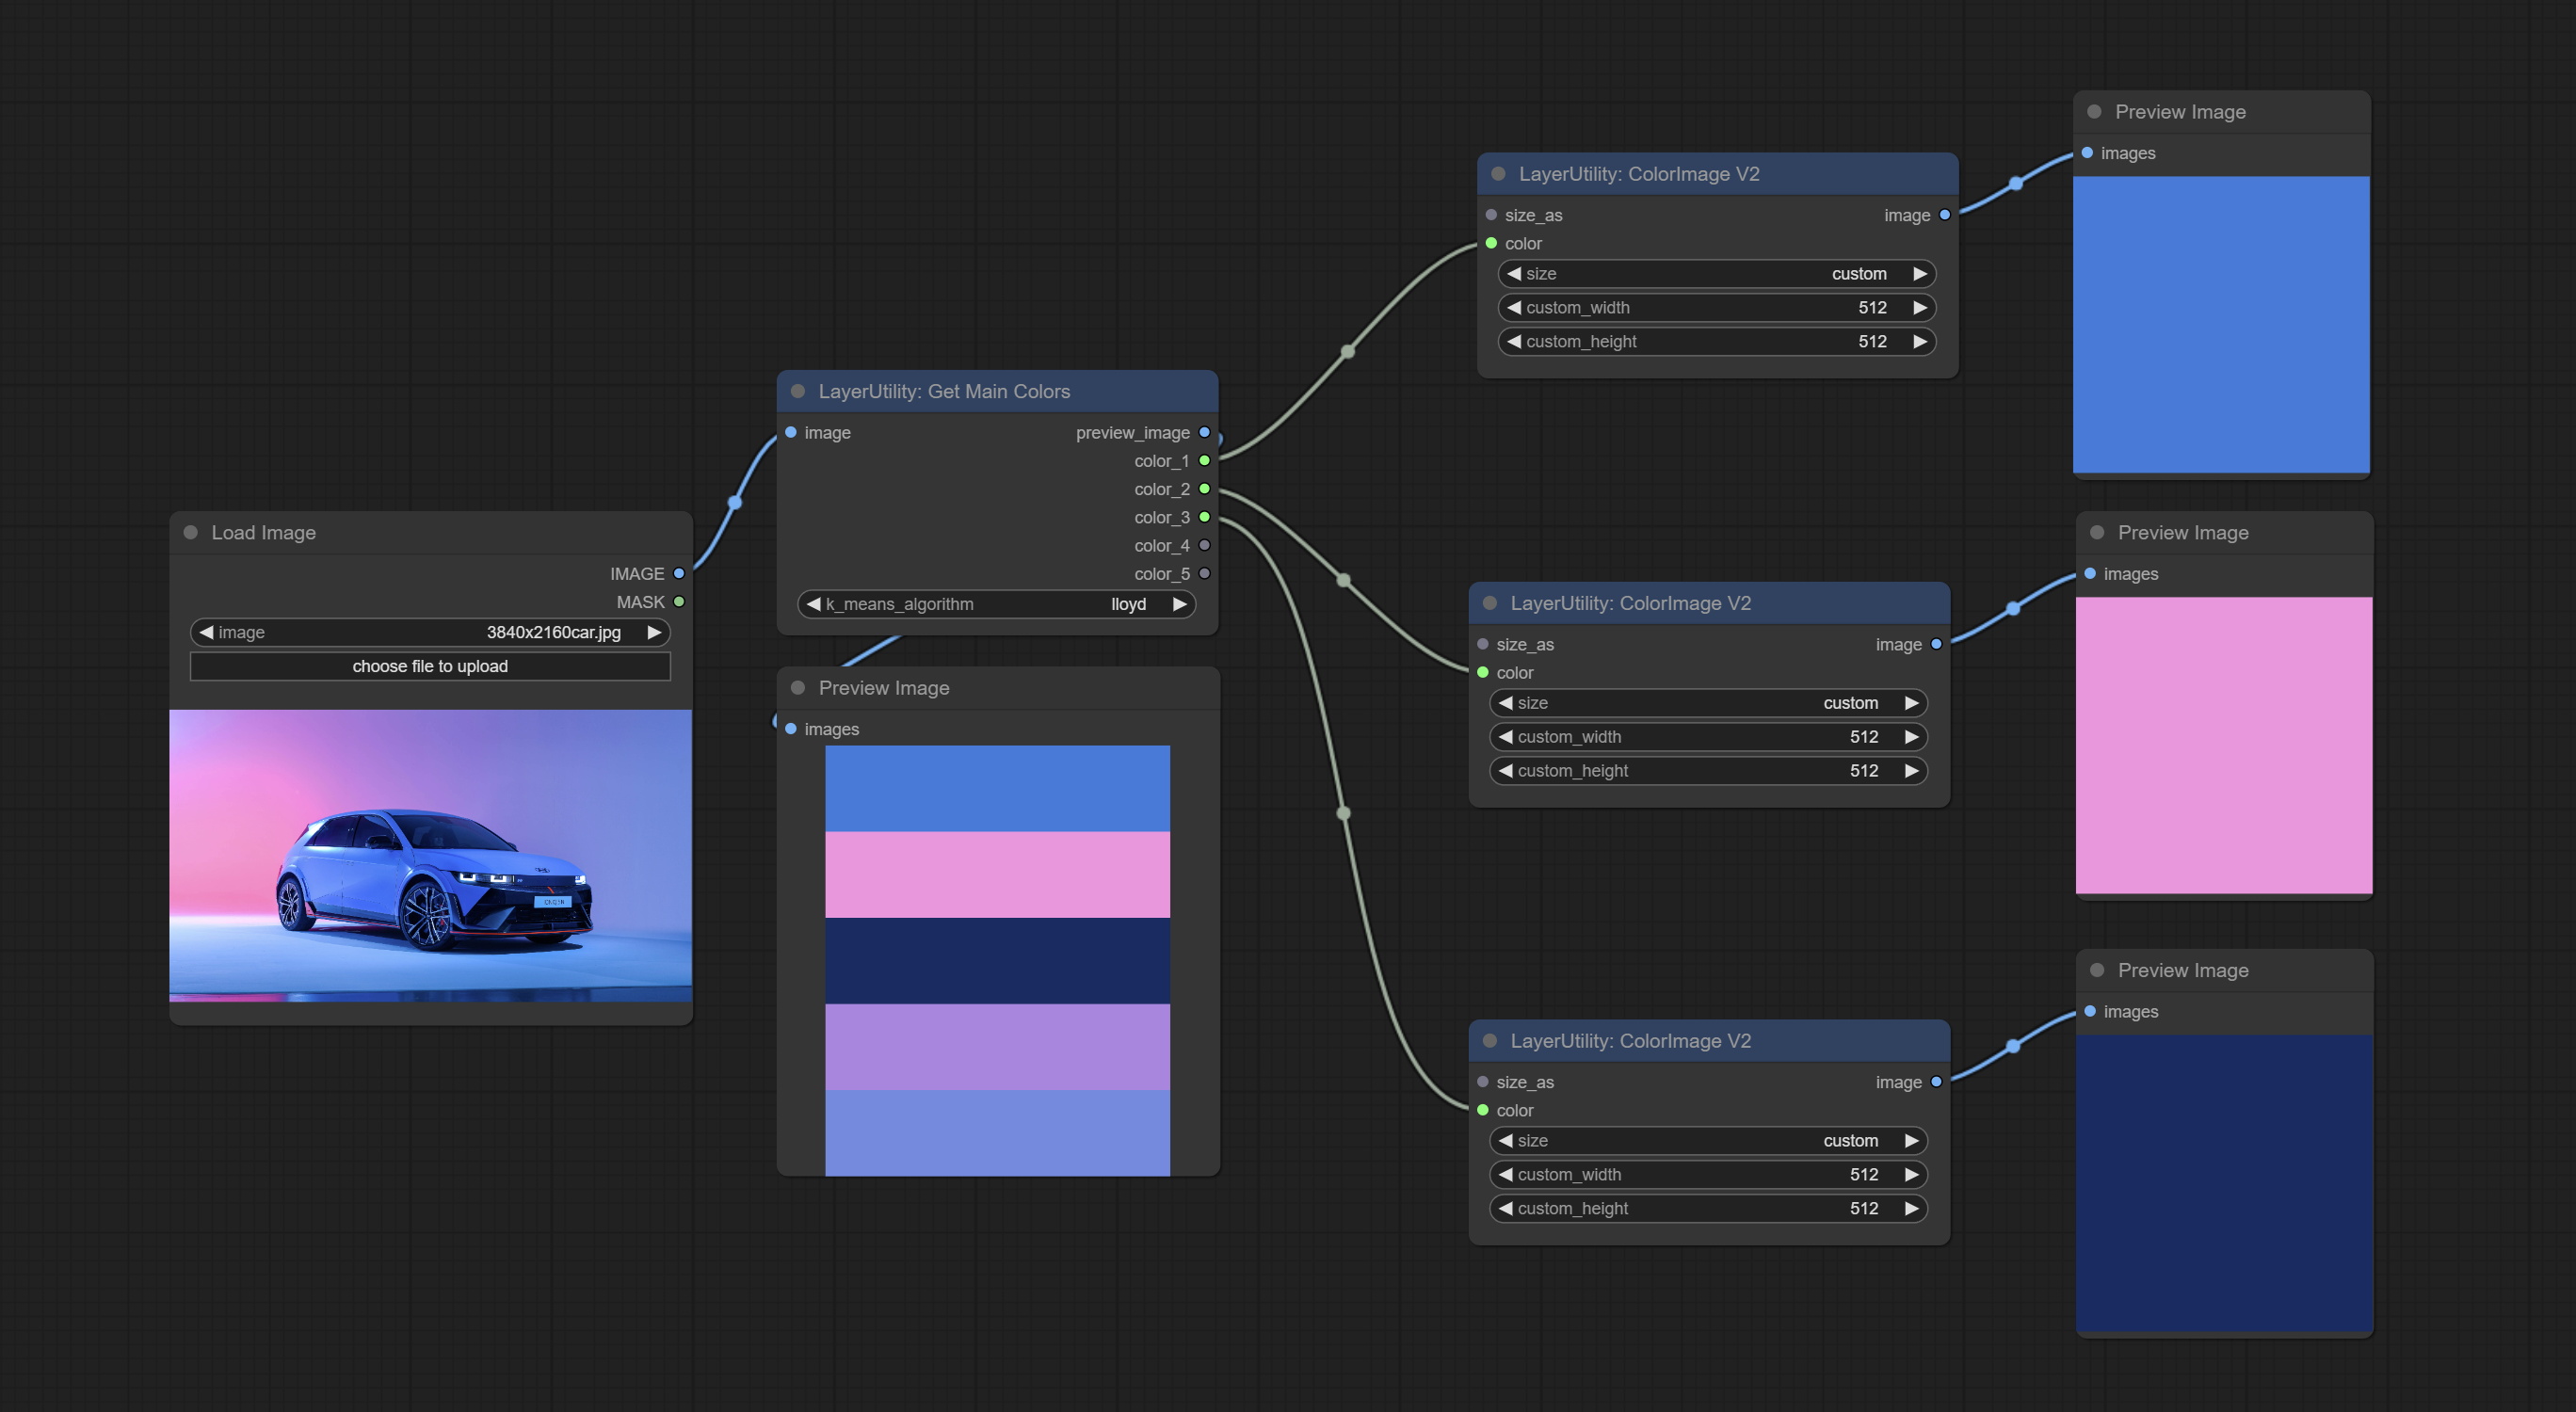
节点选项:
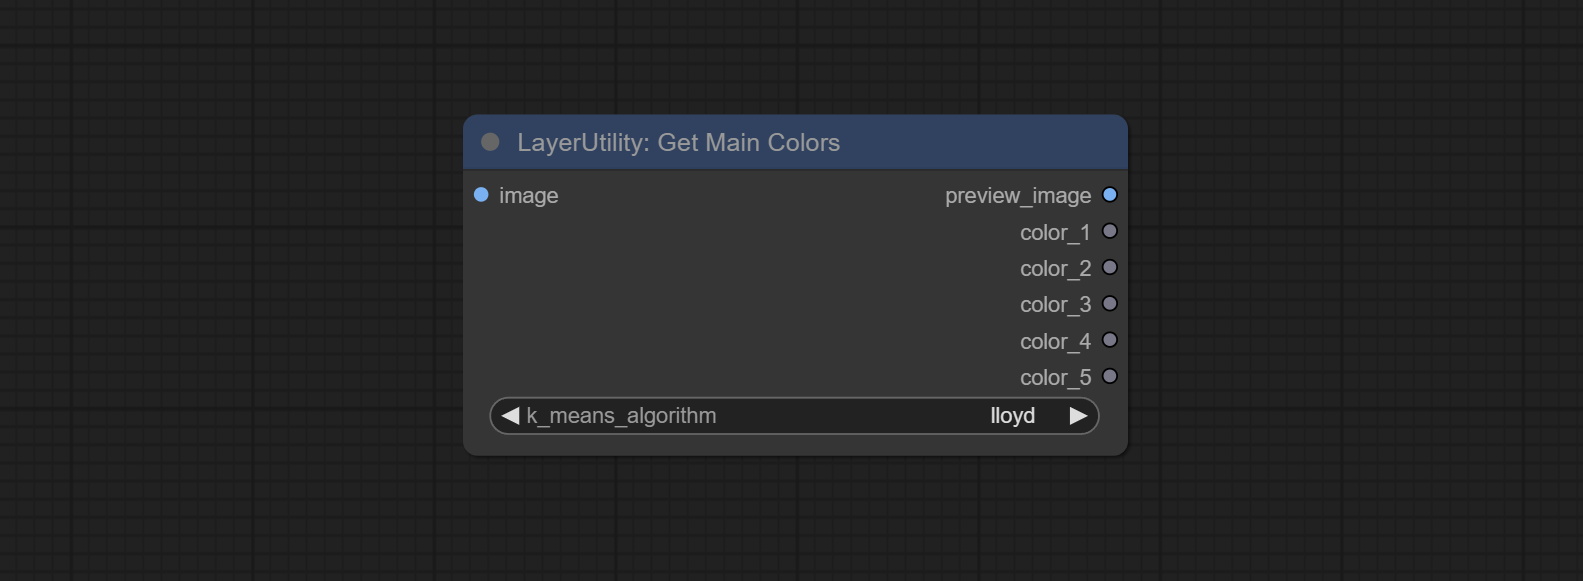
- image:图像输入。
- k_means_algorithm:K-Means 算法选项。“lloyd”是标准的 K-Means 算法,“elkan”是三角不等式算法,适用于较大的图像。
输出:
- preview_image:5 种主要颜色的预览图像。
- color_1~color_5:颜色值输出。以 HEX 格式的 RGB 字符串形式输出。
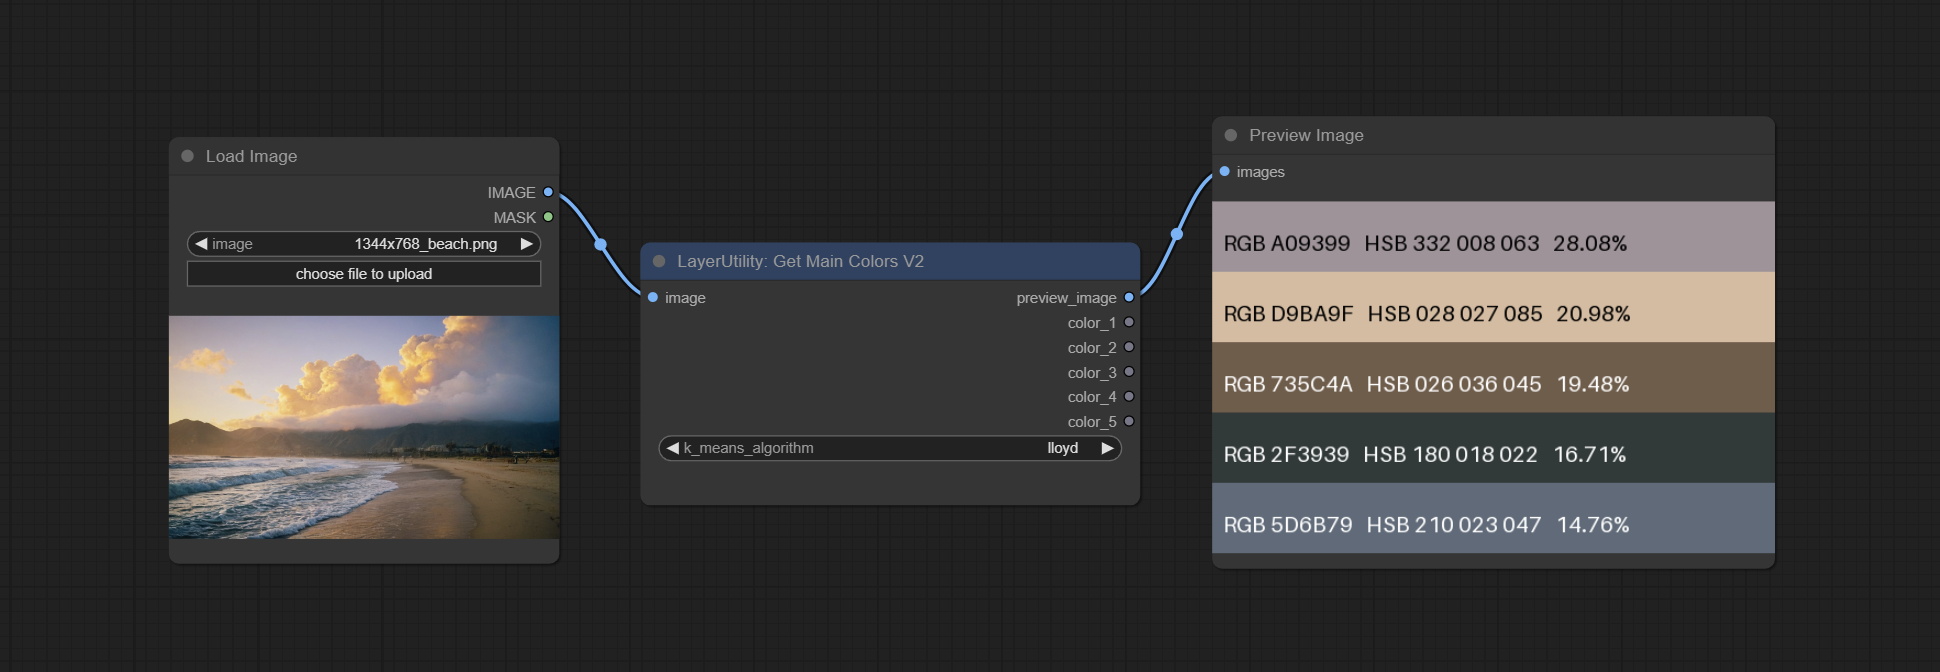
GetMainColorsV2
在 GetMainColors 节点的基础上增加按颜色面积排序的功能,并在预览图像中显示颜色值和颜色面积。
这部分代码由 @ HL 改进,感谢!
ColorName
根据颜色值,在调色板中输出最相似的颜色名称。
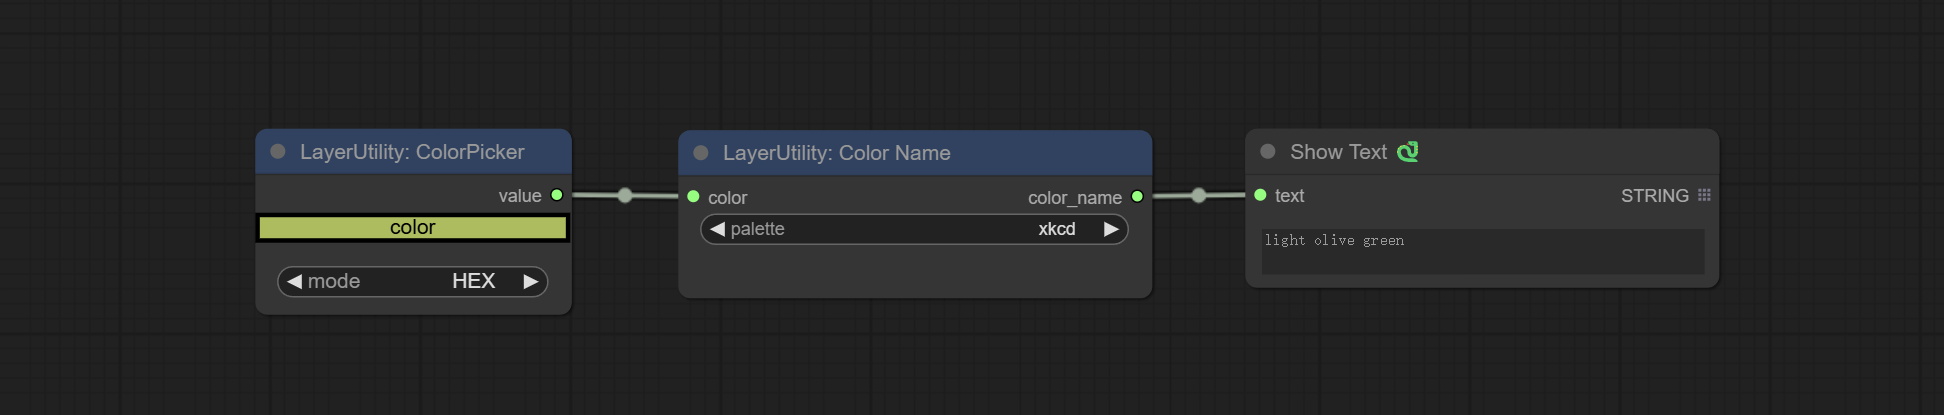
节点选项:

- color:颜色值输入,采用 HEX 格式的 RGB 字符串格式。
- palette:调色板。提供 6 种颜色映射表,包括 xkcd、wiki_color、flux_sdxl、css4、css3 和 html4。
输出:
- color_name:字符串形式的颜色名称。
NameToColor
根据颜色名称输出颜色图像和颜色值。

节点选项:
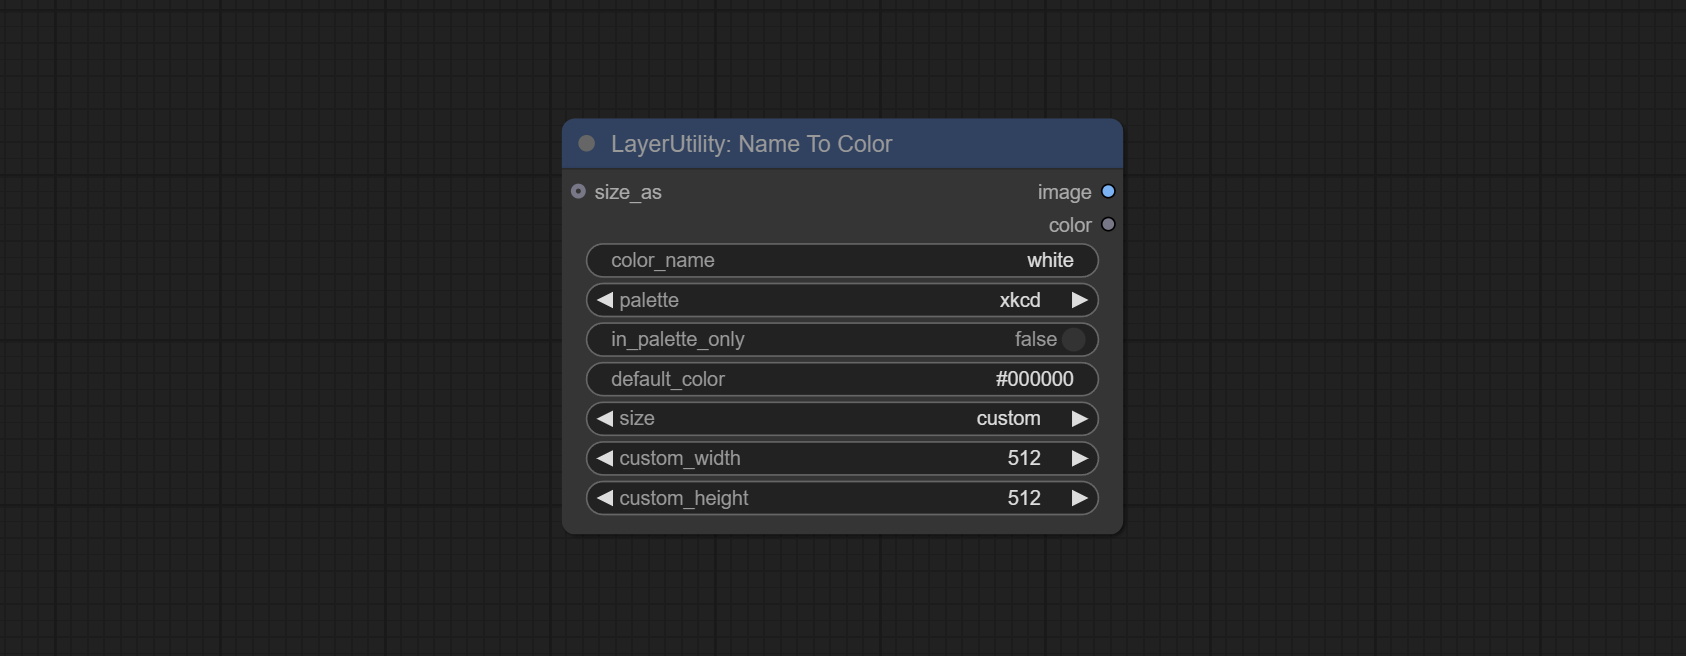
- size_as*:在此输入图像或掩码,以根据其尺寸生成图像。请注意,此输入优先于其他尺寸设置。
- color_name:要描述的颜色名称。
- palette:调色板。提供 6 种颜色映射表,包括 xkcd、wiki_color、flux_sdxl、css4、css3 和 html4。
- in_palette_only:设置为仅从调色板中输出颜色。如果设置为 True,则仅在当前调色板中搜索。如果没有匹配的名称,则输出 default_color。 如果设置为 False,则搜索所有调色板。如果在所有调色板中都没有匹配的名称,则输出名称最接近的颜色。
- default_color:默认颜色。如果没有找到匹配的名称,则输出该颜色。
- size**:预设尺寸。用户可以自定义预设尺寸。如果有 size_as 输入,则此选项将被忽略。
- custom_width:图像宽度。当尺寸设置为“custom”时有效。如果有 size_as 输入,则此选项将被忽略。
- custom_height:图像高度。当尺寸设置为“custom”时有效。如果有 size_as 输入,则此选项将被忽略。
*仅限于输入图像和掩码。强制集成其他类型的输入会导致节点错误。
**预设尺寸定义在 custom_size.ini 文件中,该文件位于插件根目录下,默认名为 custom_size.ini.example。首次使用时,需将文件后缀改为 .ini。用文本编辑软件打开。每行代表一个尺寸,第一个值为宽度,第二个值为高度,中间用小写的“x”分隔。为避免错误,请勿输入额外字符。
输出:
- image:输出的颜色图像。
- color:颜色值输出,采用 HEX 格式的 RGB 字符串格式。
ExtendCanvas
扩展画布
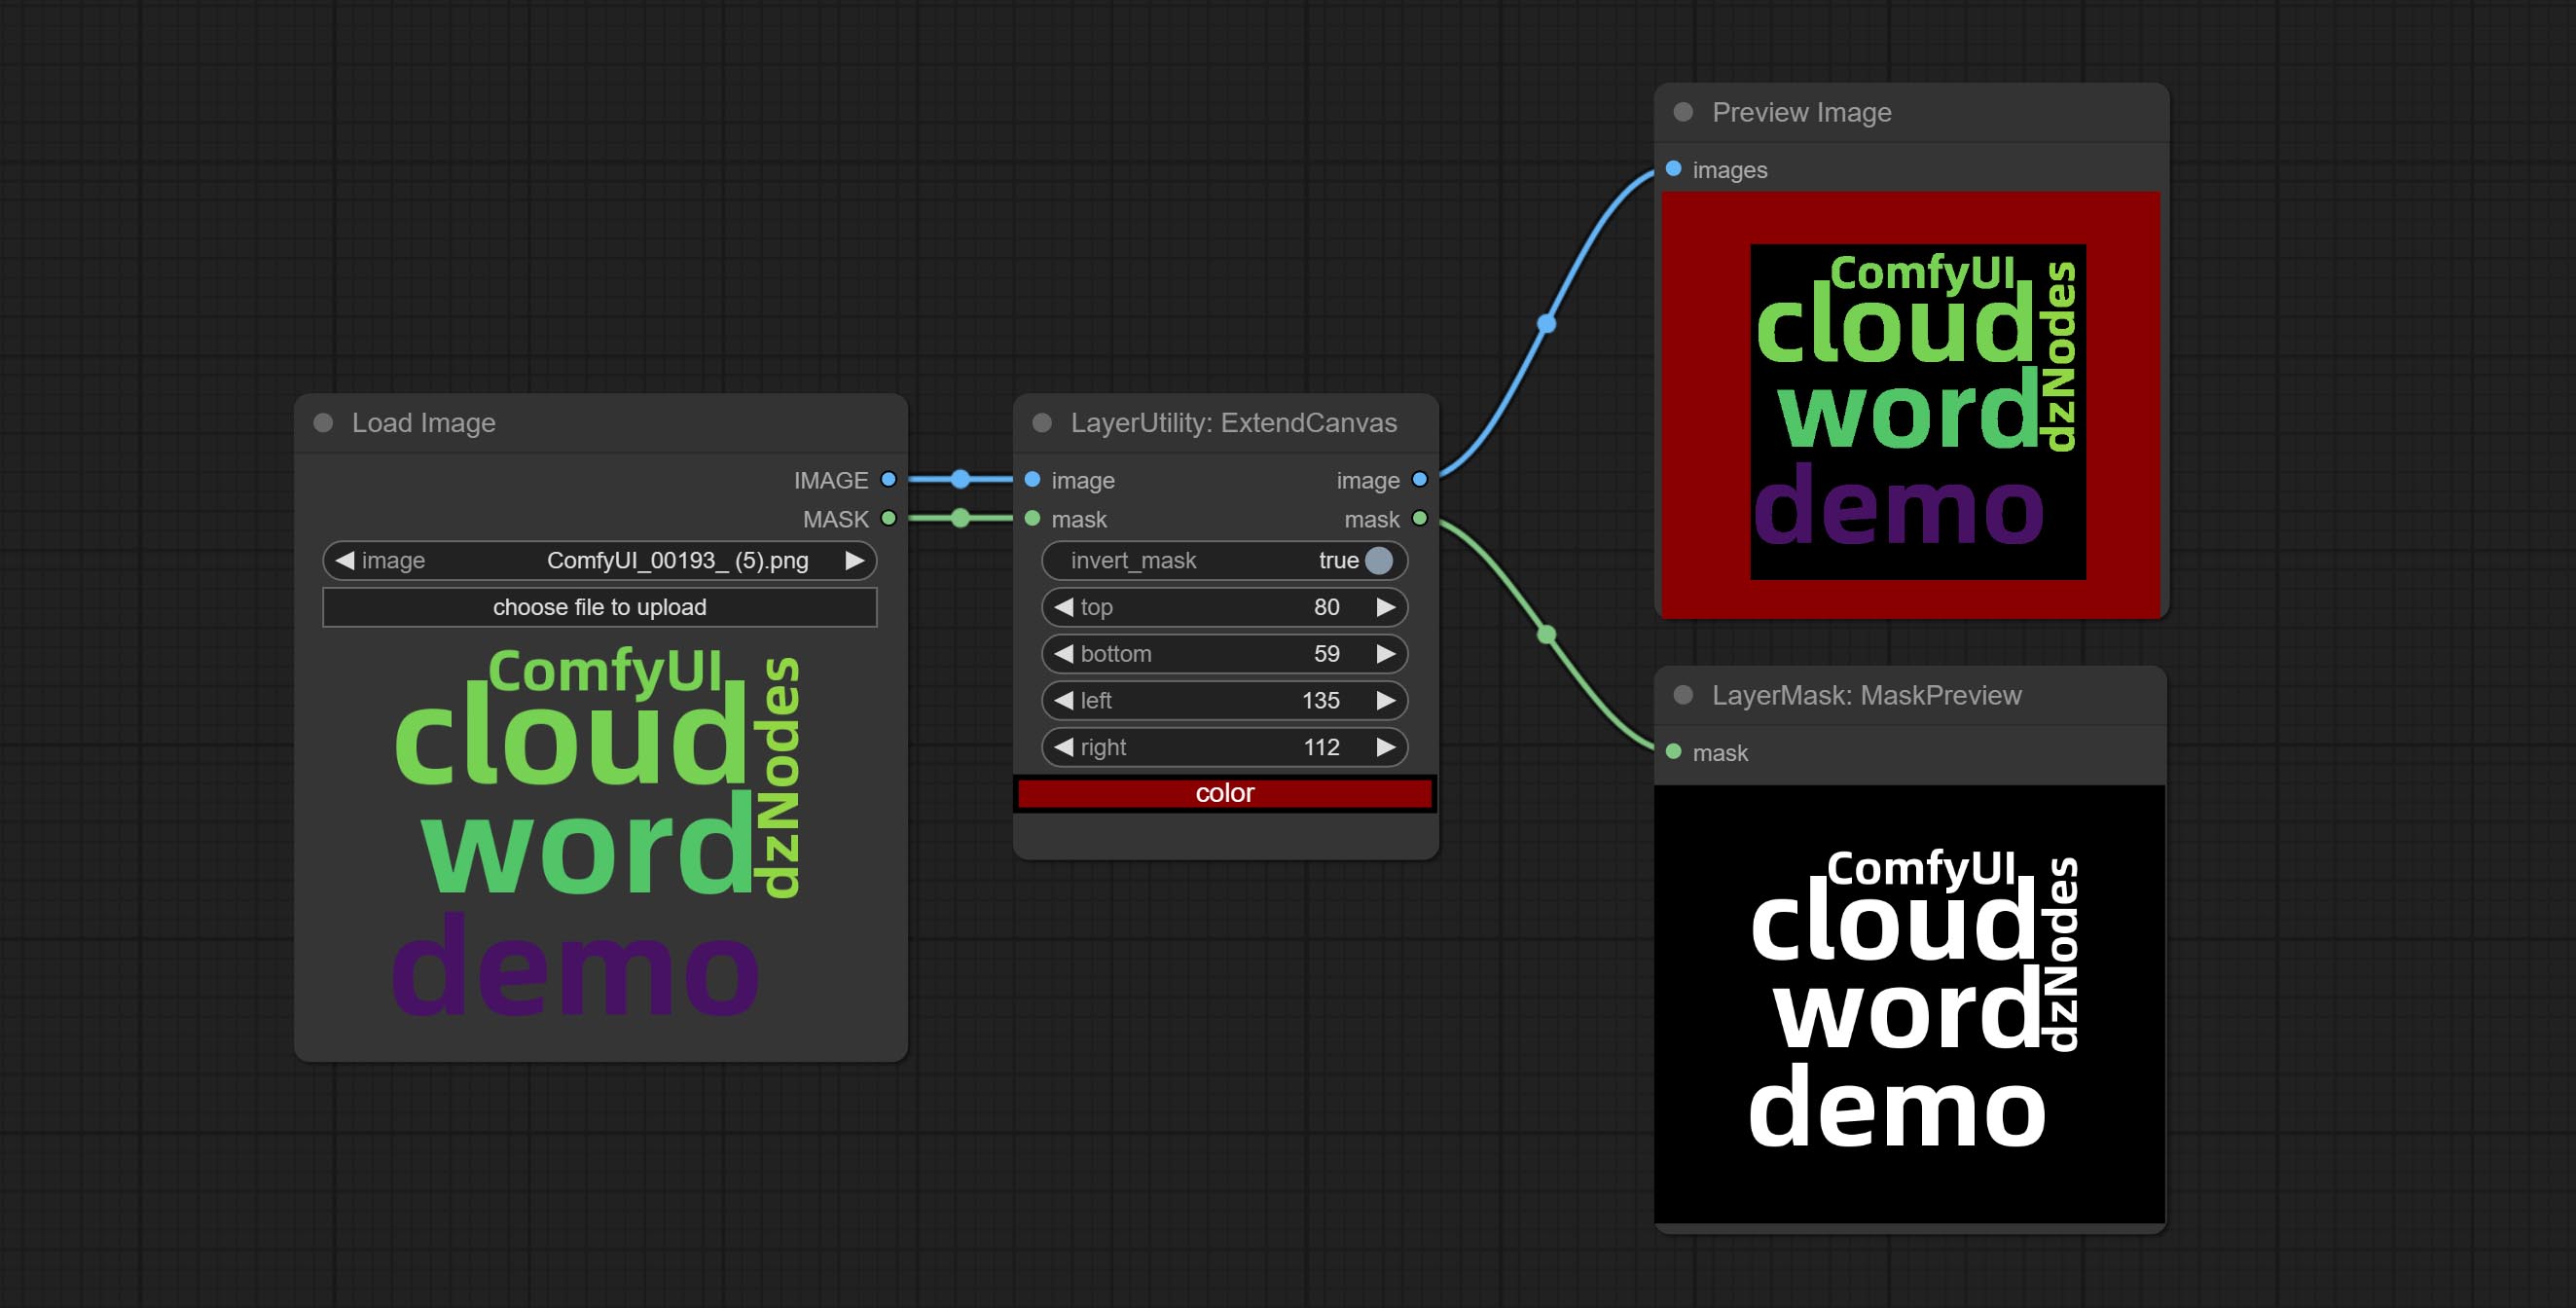
节点选项:
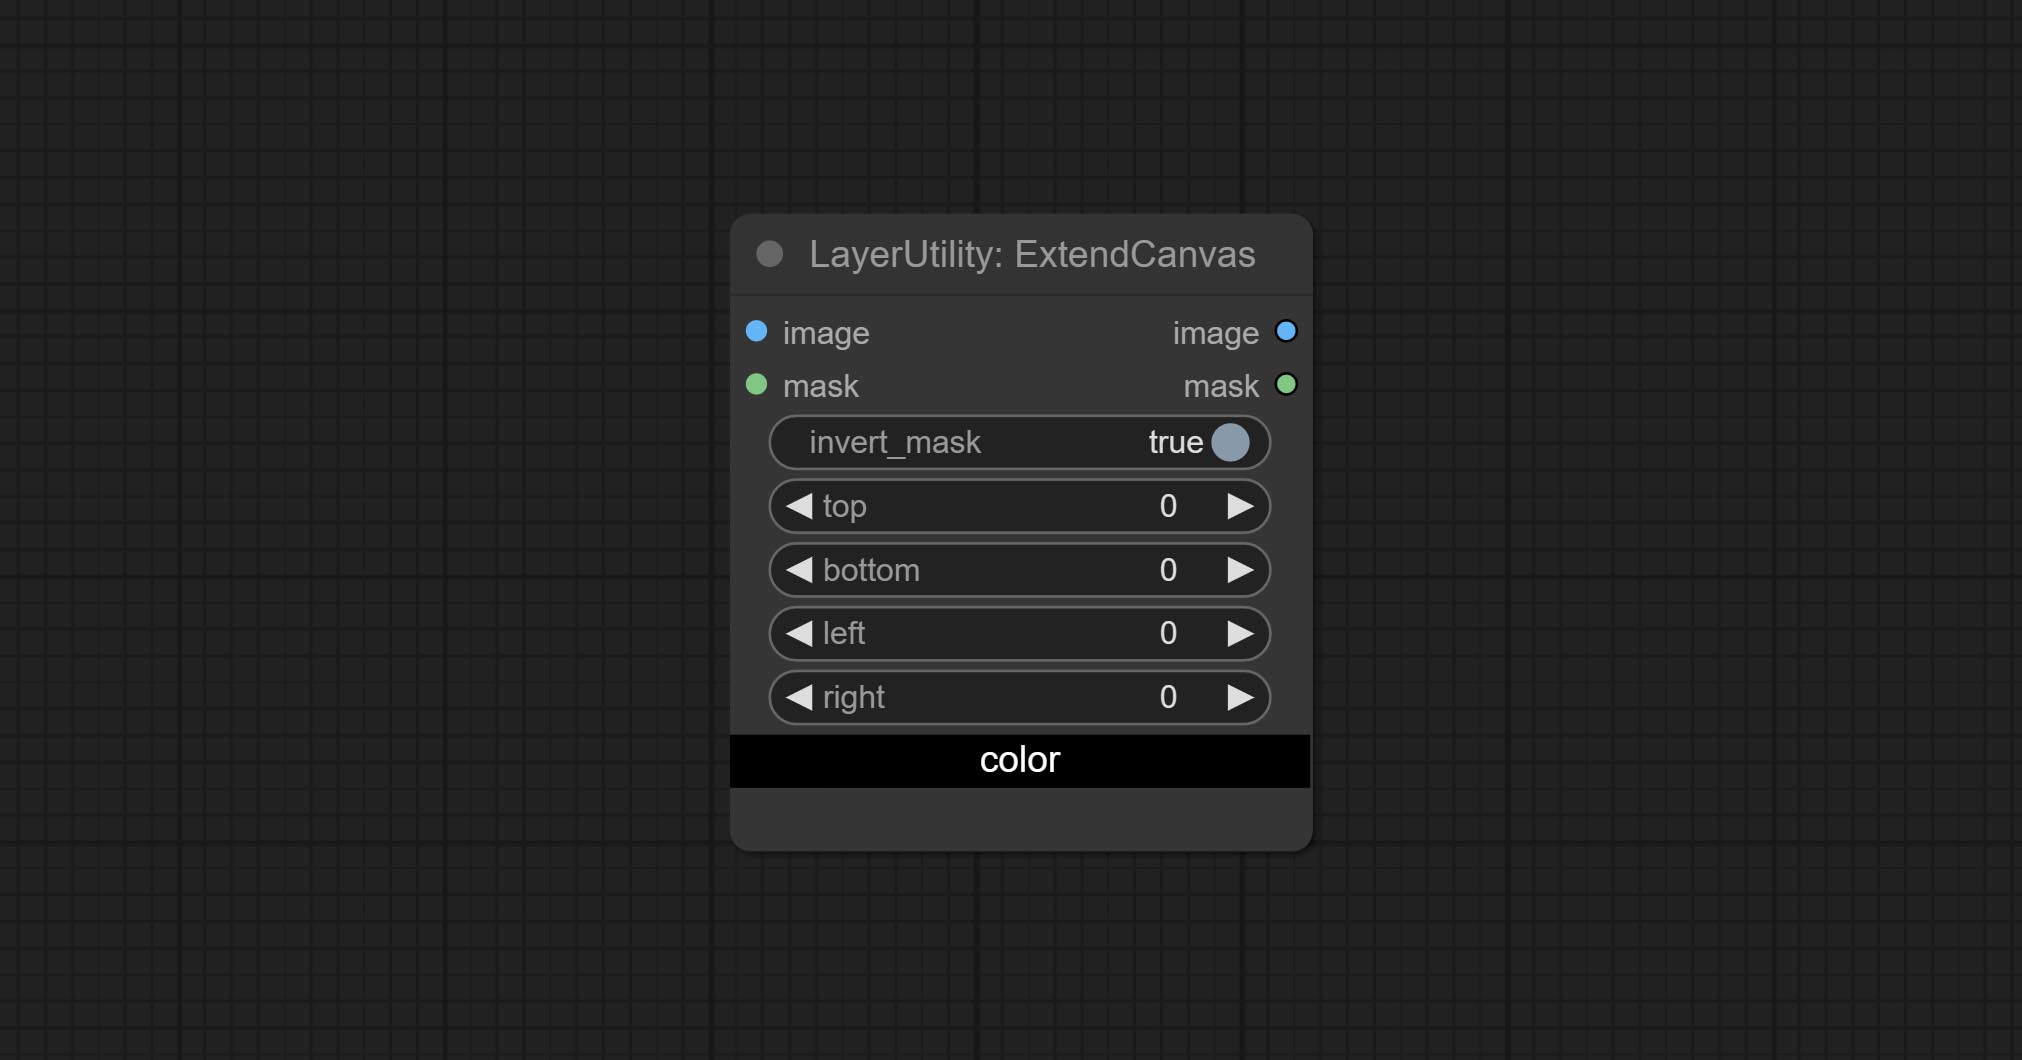
- invert_mask:是否反转掩码。
- top:顶部扩展值。
- bottom:底部扩展值。
- left:左侧扩展值。
- right:右侧扩展值。
- color;画布颜色。
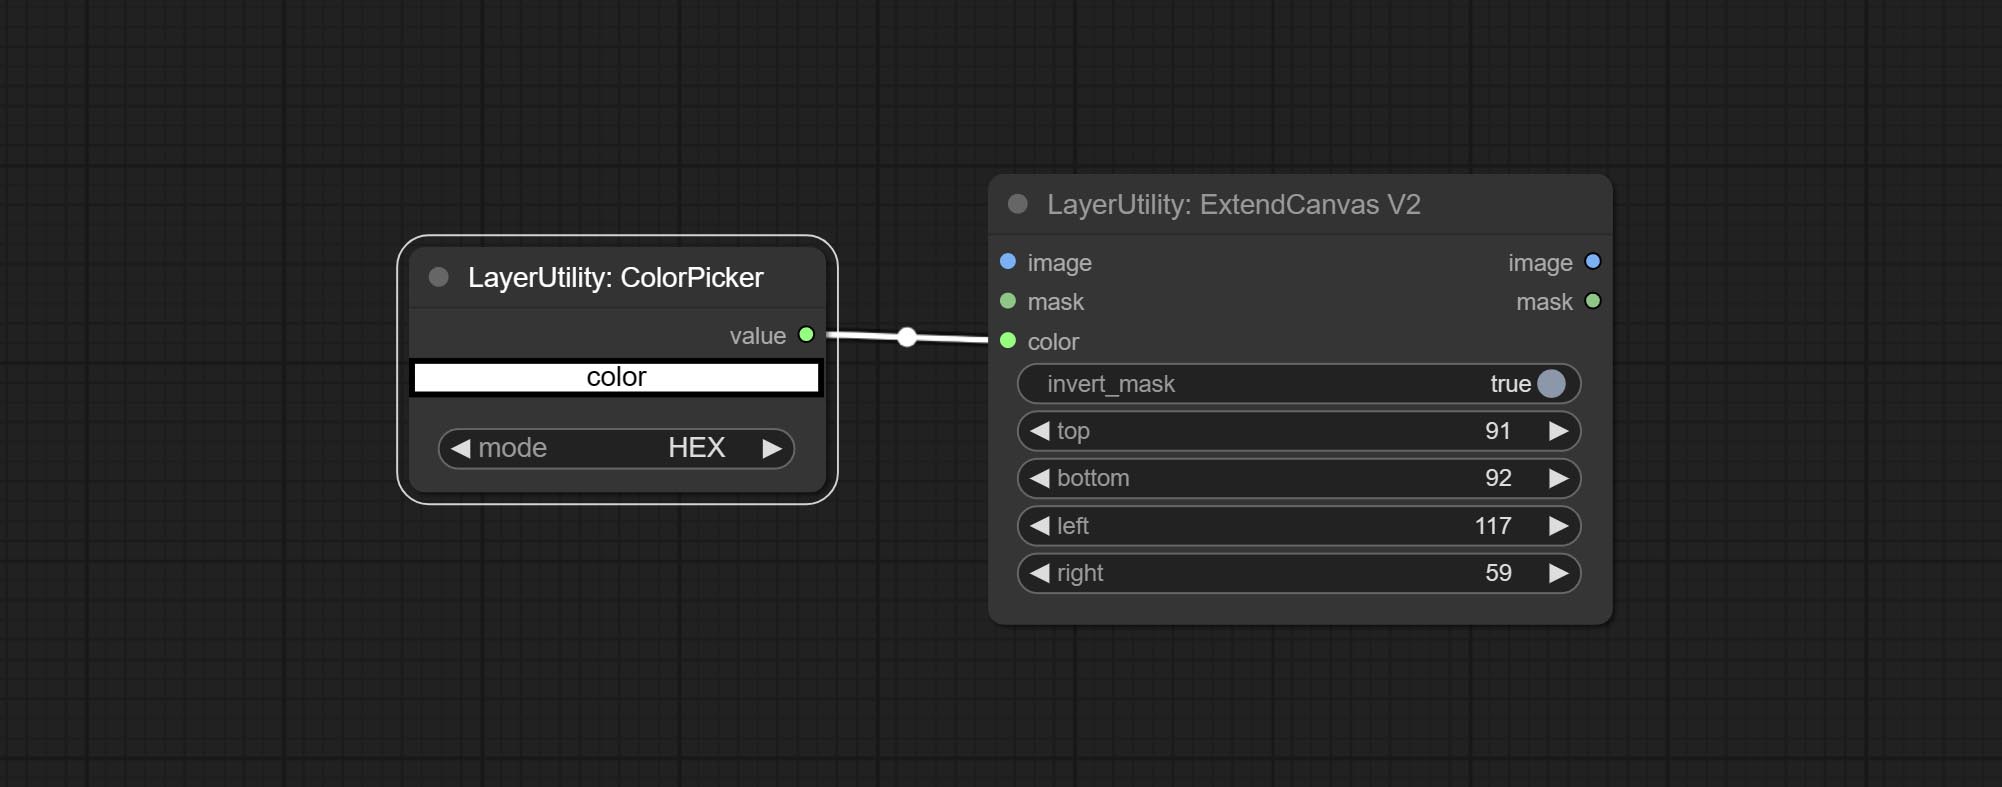
ExtendCanvasV2
ExtendCanvas 的 V2 升级版。
在 ExtendCanvas 的基础上,将颜色修改为字符串类型,并支持外部 ColorPicker 输入,同时支持负值输入,这意味着图像会被裁剪。
XY 到 Percent
将绝对坐标转换为百分比坐标。
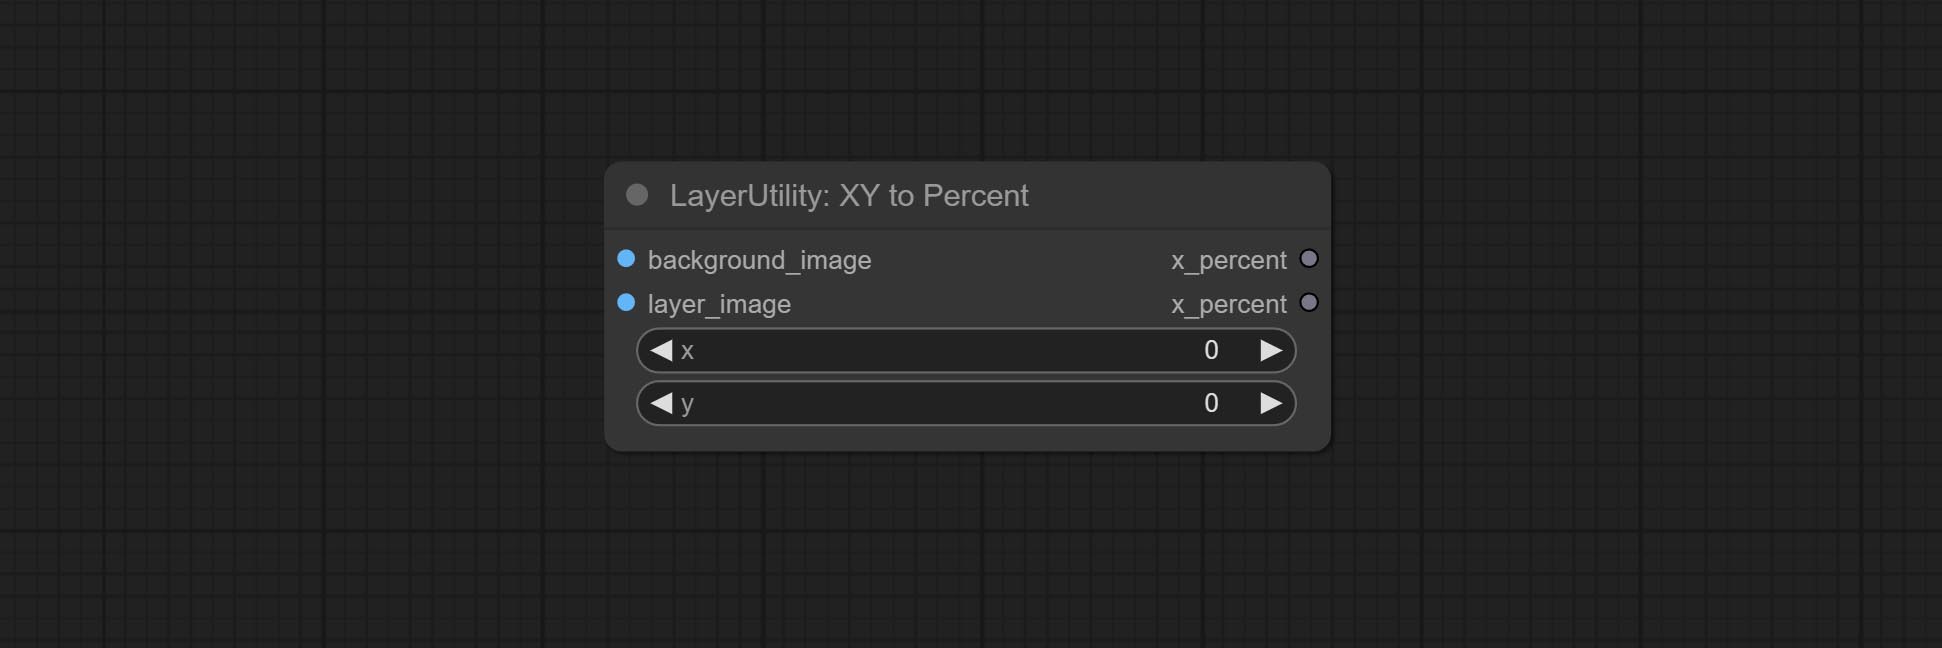
节点选项:
- x:X 值。
- y:Y 值。
LayerImageTransform
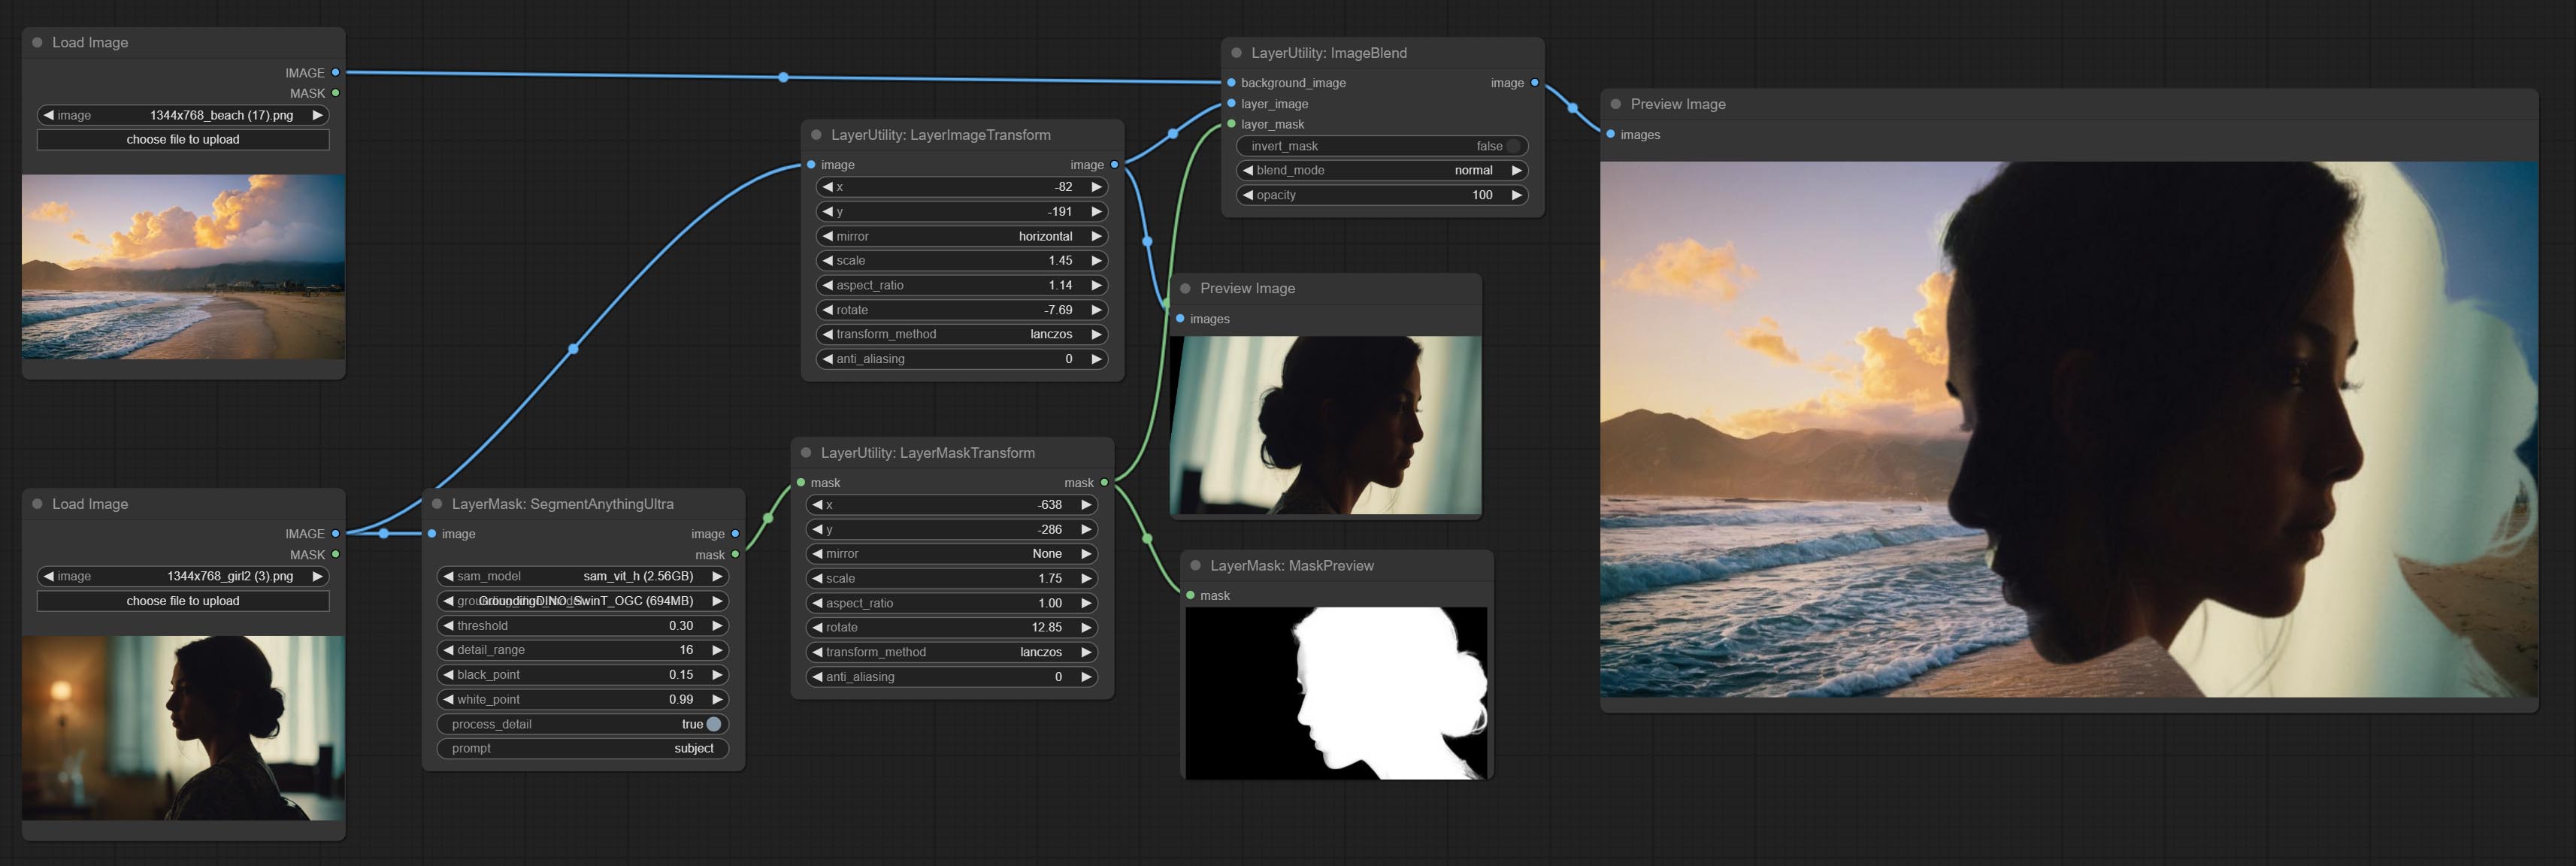
该节点用于单独变换图层图像,可以在不改变图像整体大小的情况下调整大小、旋转、宽高比以及镜像翻转。
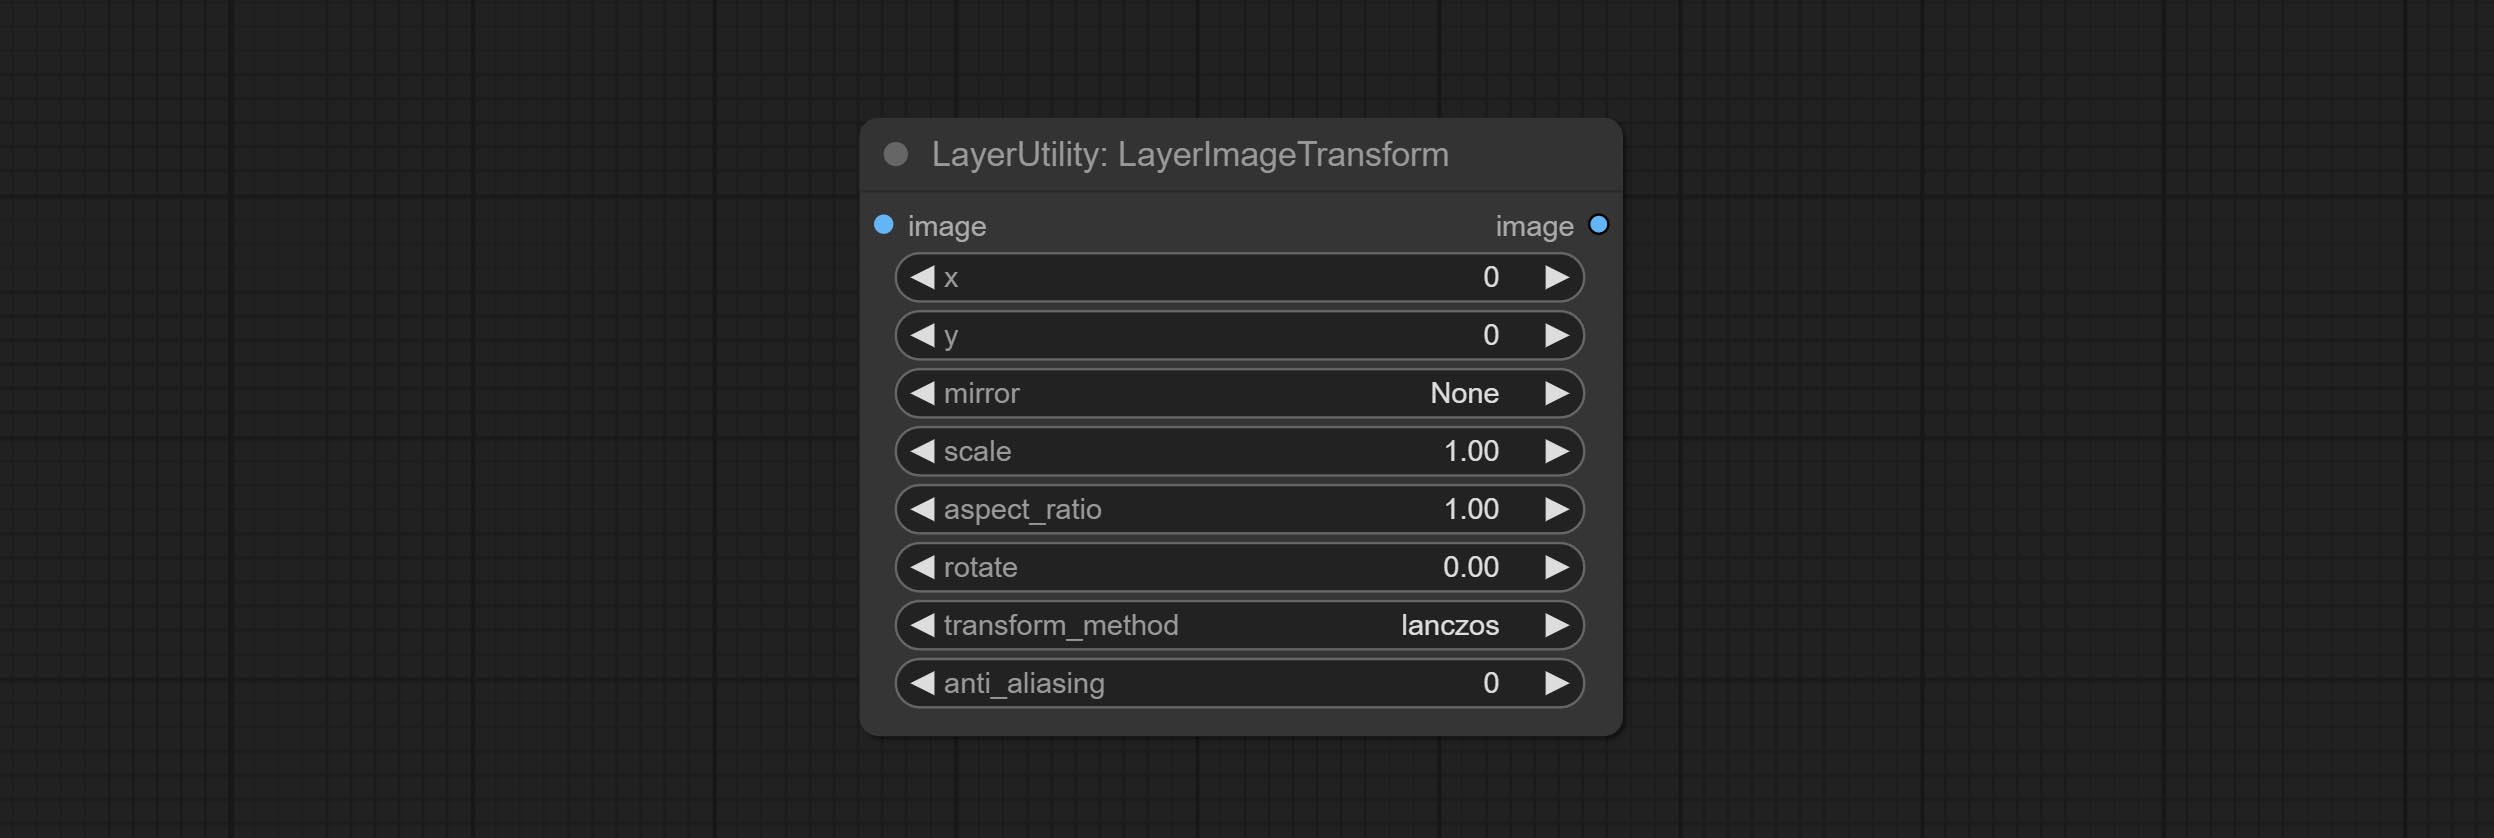
节点选项:
- x:X 值。
- y:Y 值。
- mirror:镜像翻转。提供水平翻转和垂直翻转两种模式。
- scale:图层放大倍数,1.0 表示原始大小。
- aspect_ratio:图层宽高比。1.0 为原始比例,大于 1.0 表示拉伸,小于 1.0 表示压缩。
- rotate:图层旋转角度。
- 图层放大和旋转的采样方法,包括 lanczos、bicubic、hamming、bilinear、box 和 nearest。不同的采样方法会影响合成图像的质量和处理时间。
- anti_aliasing:抗锯齿设置,范围 0 到 16,数值越大,锯齿越不明显。过高的数值会显著降低节点的处理速度。
LayerMaskTransform
与 LayerImageTransform 节点类似,此节点用于单独变换图层蒙版,可以在不改变蒙版尺寸的情况下进行缩放、旋转、更改宽高比以及镜像翻转。
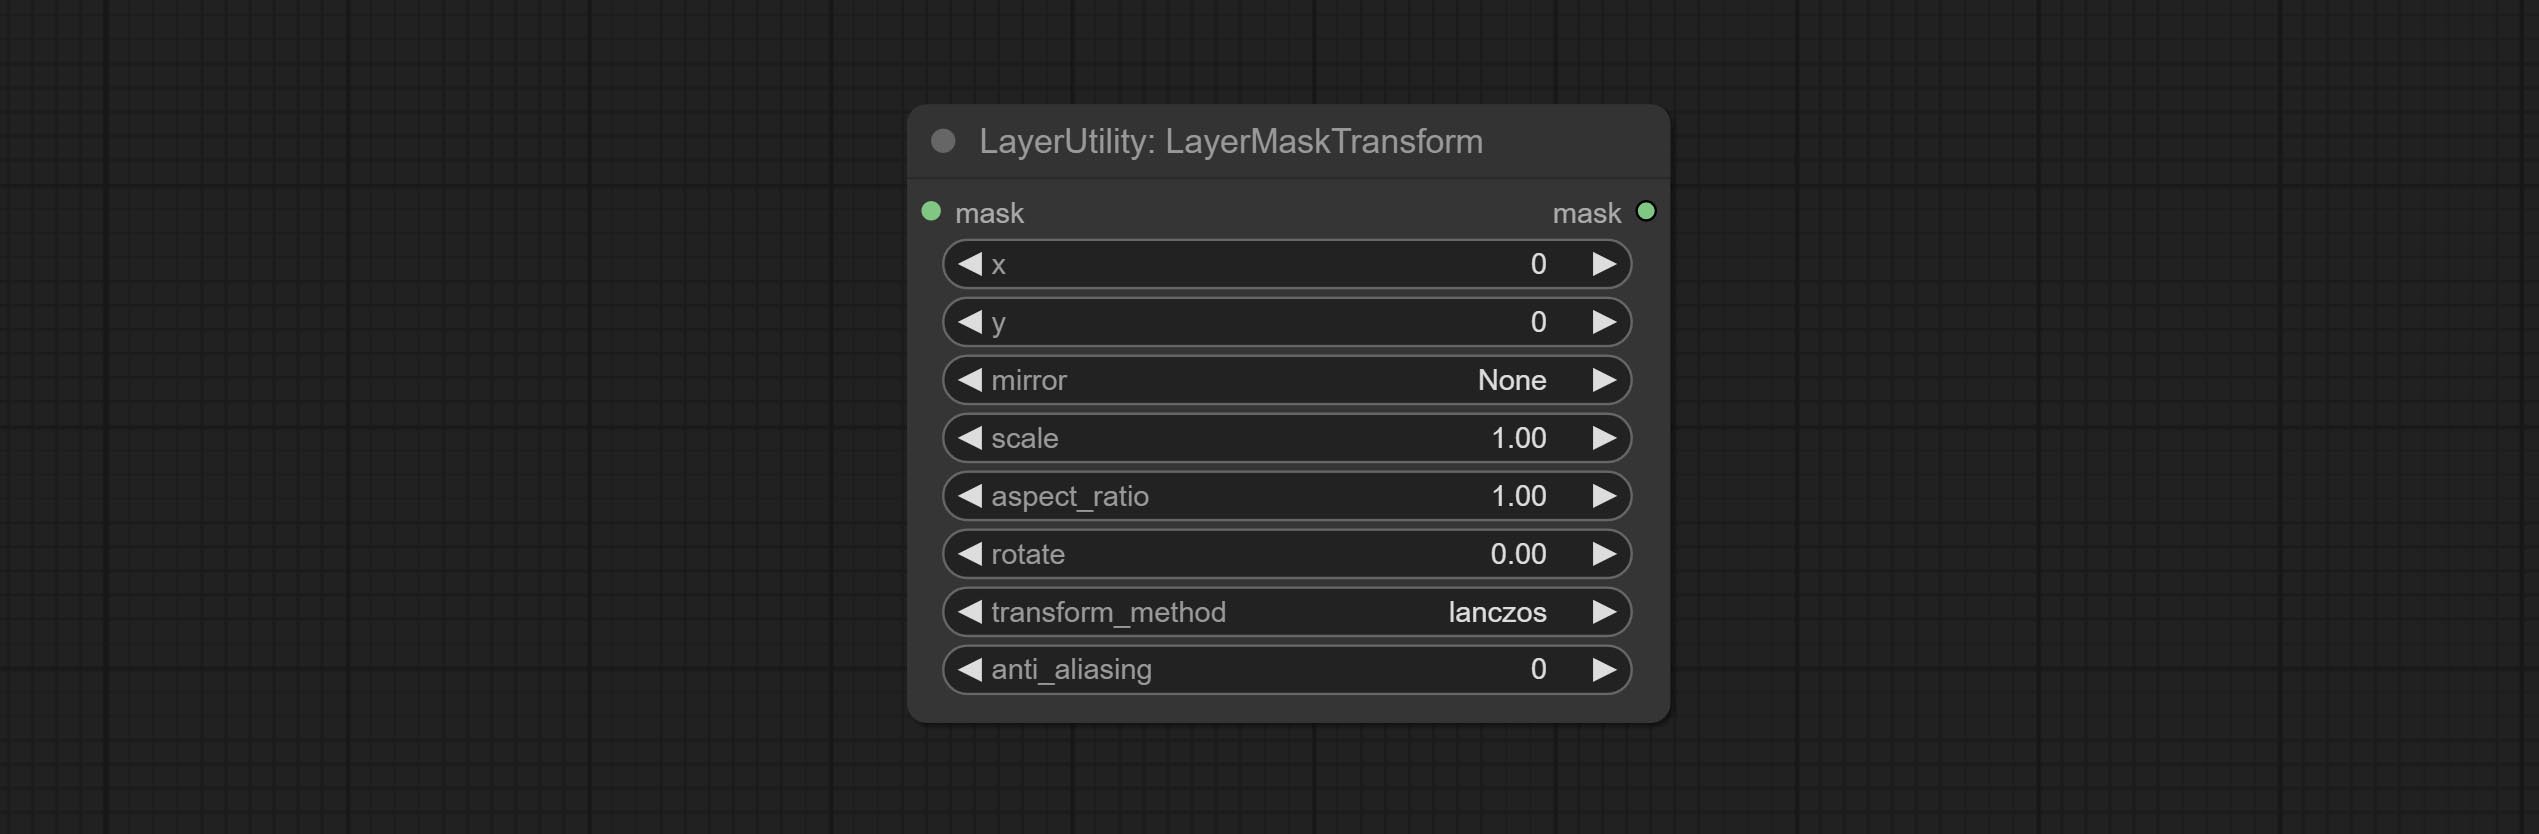
节点选项:
- x:X 轴值。
- y:Y 轴值。
- mirror:镜像翻转。提供水平翻转和垂直翻转两种模式。
- scale:图层放大倍数,1.0 表示原始大小。
- aspect_ratio:图层宽高比。1.0 为原始比例,大于该值表示拉伸,小于该值表示压缩。
- rotate:图层旋转角度。
- 图层放大和旋转的采样方法,包括 lanczos、bicubic、hamming、bilinear、box 和 nearest。不同的采样方法会影响合成图像的质量和处理时间。
- anti_aliasing:抗锯齿,取值范围为 0 到 16,数值越大,锯齿现象越不明显。但过高的值会显著降低节点的处理速度。
ColorImage
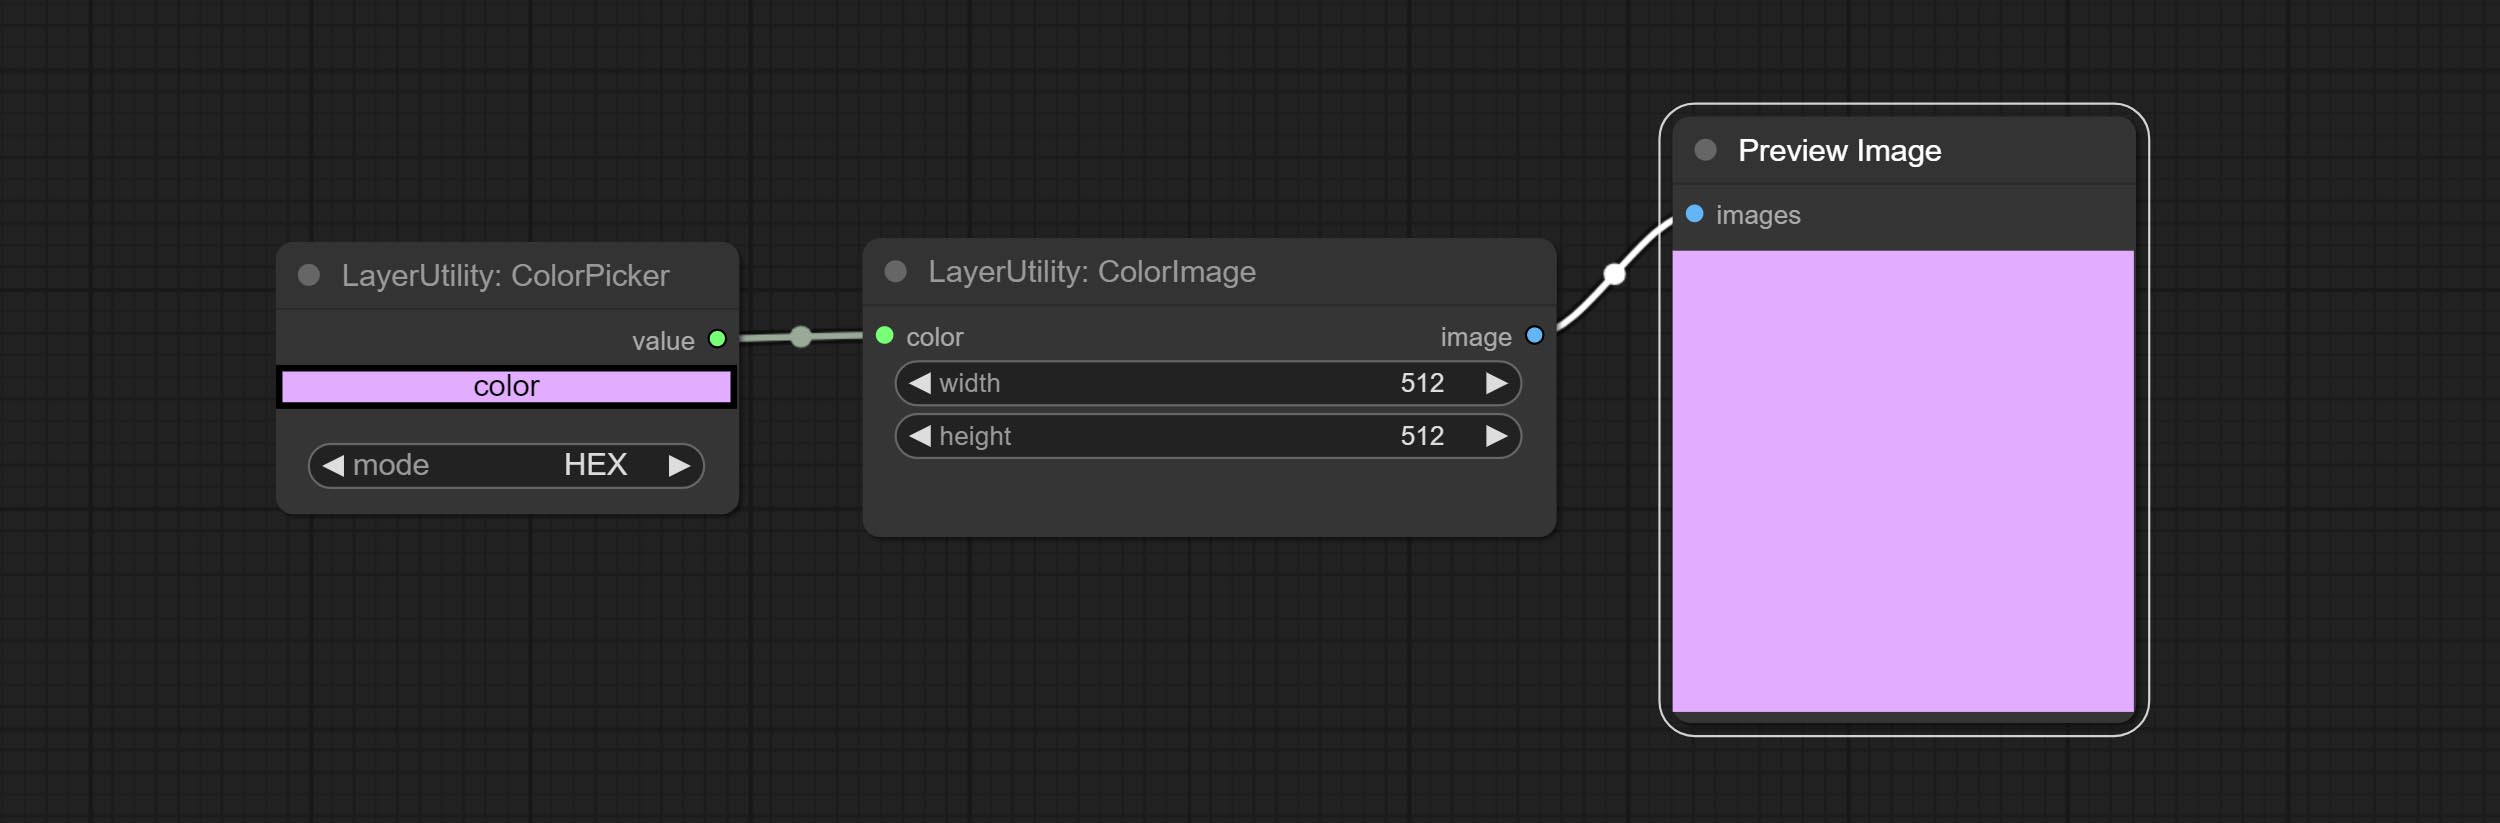
生成指定颜色和尺寸的图像。
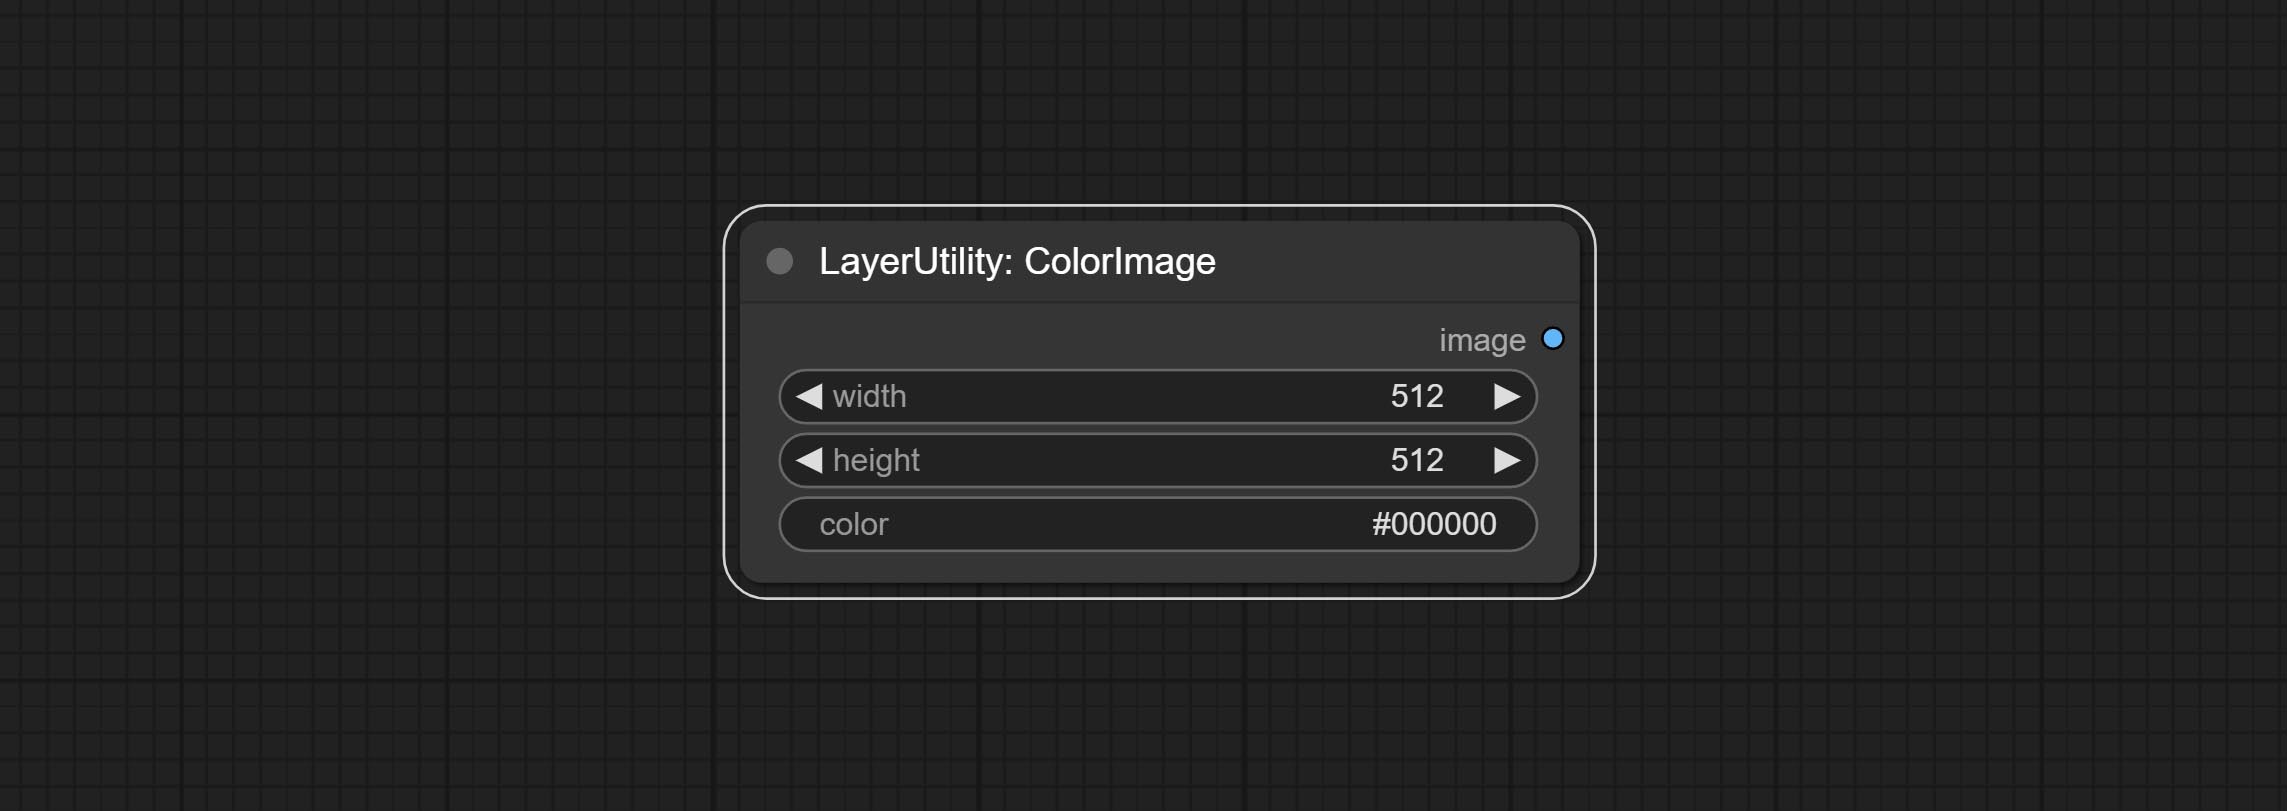
节点选项:
- width:图像宽度。
- height:图像高度。
- color4:图像颜色。
ColorImageV2
ColorImage 的升级版本 V2。
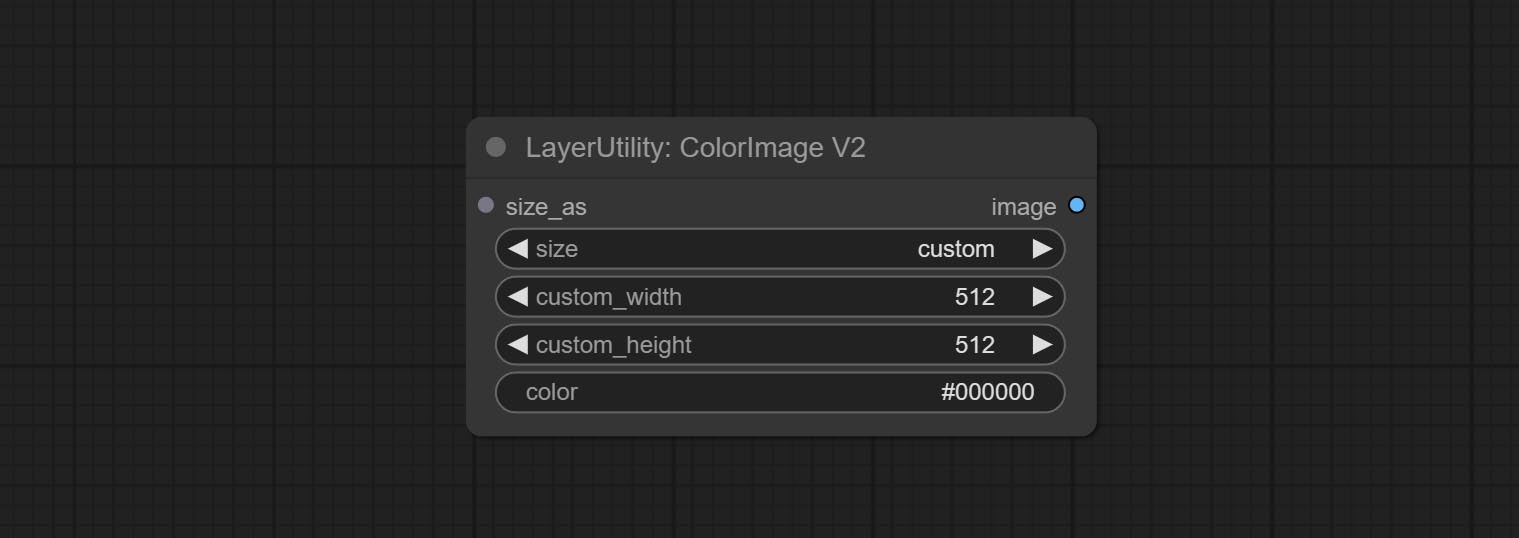
在 ColorImage 的基础上进行了以下改动:
- size_as*:在此输入图像或蒙版,以根据其尺寸生成图像。请注意,此输入优先于其他尺寸设置。
- size**:预设尺寸。用户可以自定义预设。如果已输入 size_as,则此选项将被忽略。
- custom_width:图像宽度。仅当 size 设置为“custom”时有效。如果已输入 size_as,则此选项将被忽略。
- custom_height:图像高度。仅当 size 设置为“custom”时有效。如果已输入 size_as,则此选项将被忽略。
*仅限于输入图像和蒙版。强行集成其他类型的输入会导致节点报错。
**预设尺寸定义在 custom_size.ini 文件中,该文件位于插件根目录下,默认名为 custom_size.ini.example。首次使用时,需将文件后缀改为 .ini。用文本编辑软件打开,每行代表一个尺寸,第一个值为宽度,第二个值为高度,中间用小写的“x”分隔。为避免错误,请勿输入额外字符。
GradientImage
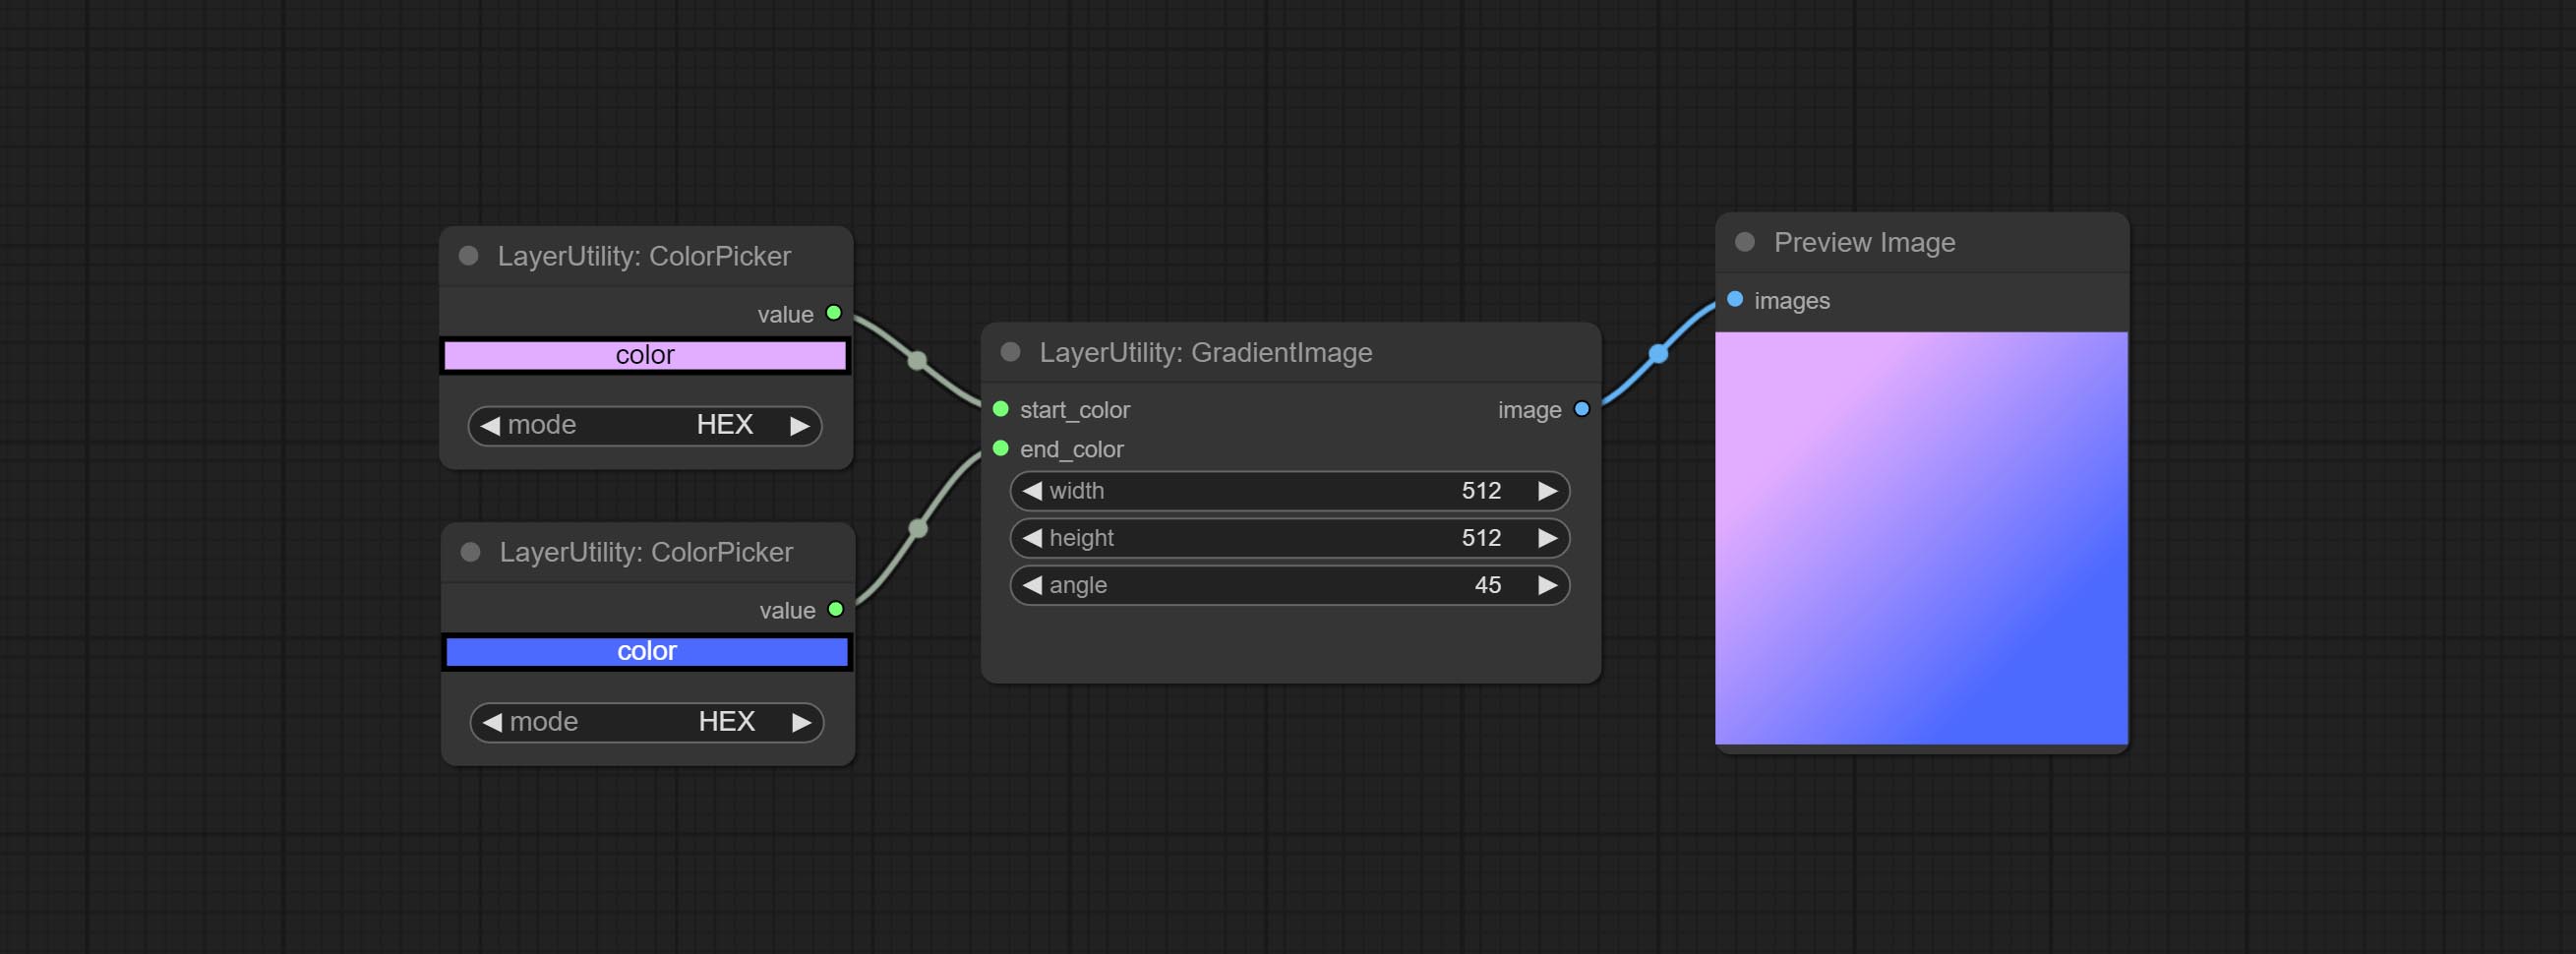
生成具有指定尺寸和颜色渐变的图像。

节点选项:
- width:图像宽度。
- height:图像高度。
- angle:渐变角度。
- start_color4:起始颜色。
- end_color4:结束颜色。
GradientImageV2
GradientImage 的升级版本 V2。
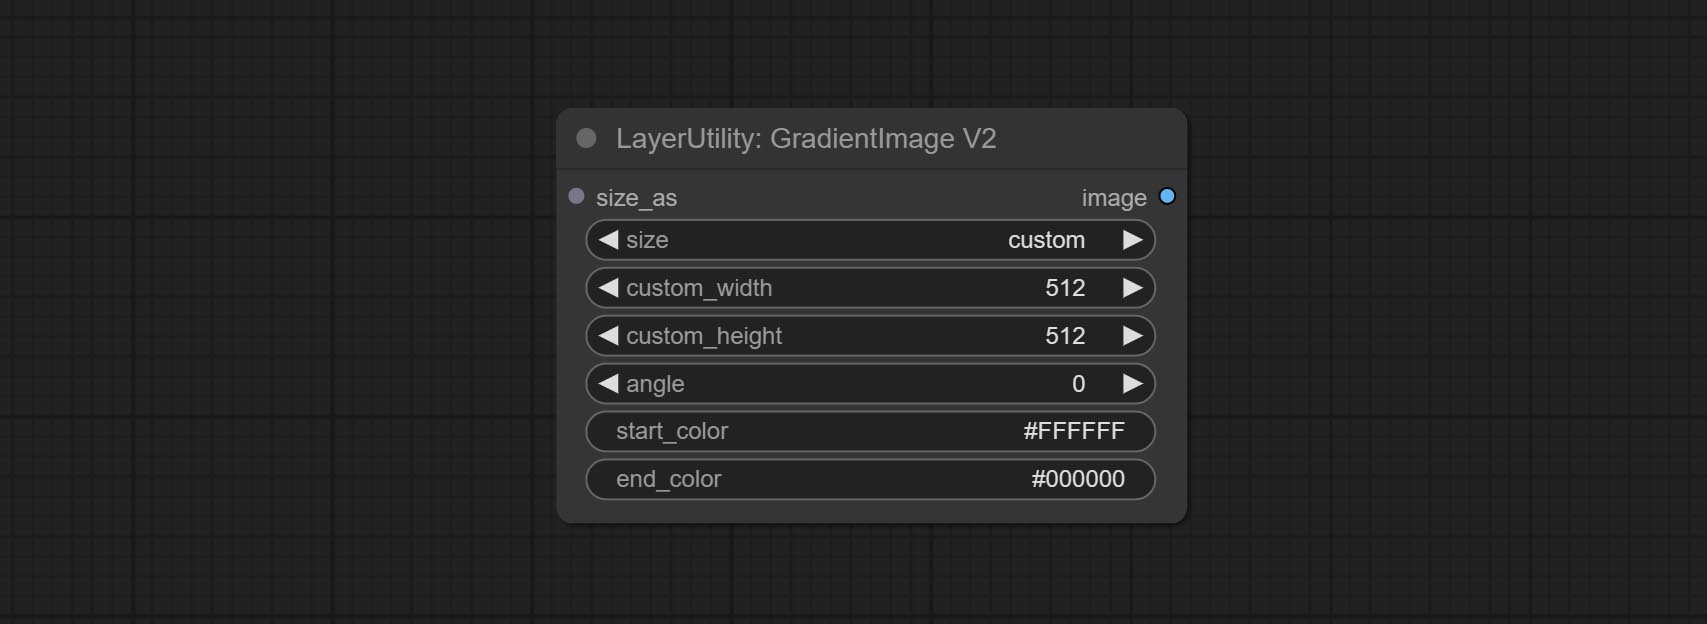
在 GradientImage 的基础上进行了以下改动:
- size_as*:在此输入图像或蒙版,以根据其尺寸生成图像。请注意,此输入优先于其他尺寸设置。
- size**:预设尺寸。用户可以自定义预设。如果已输入 size_as,则此选项将被忽略。
- custom_width:图像宽度。仅当 size 设置为“custom”时有效。如果已输入 size_as,则此选项将被忽略。
- custom_height:图像高度。仅当 size 设置为“custom”时有效。如果已输入 size_as,则此选项将被忽略。
*仅限于输入图像和蒙版。强行集成其他类型的输入会导致节点报错。
**预设尺寸定义在 custom_size.ini 文件中,该文件位于插件根目录下,默认名为 custom_size.ini.example。首次使用时,需将文件后缀改为 .ini。用文本编辑软件打开,每行代表一个尺寸,第一个值为宽度,第二个值为高度,中间用小写的“x”分隔。为避免错误,请勿输入额外字符。
圆角矩形
生成圆角矩形和遮罩。
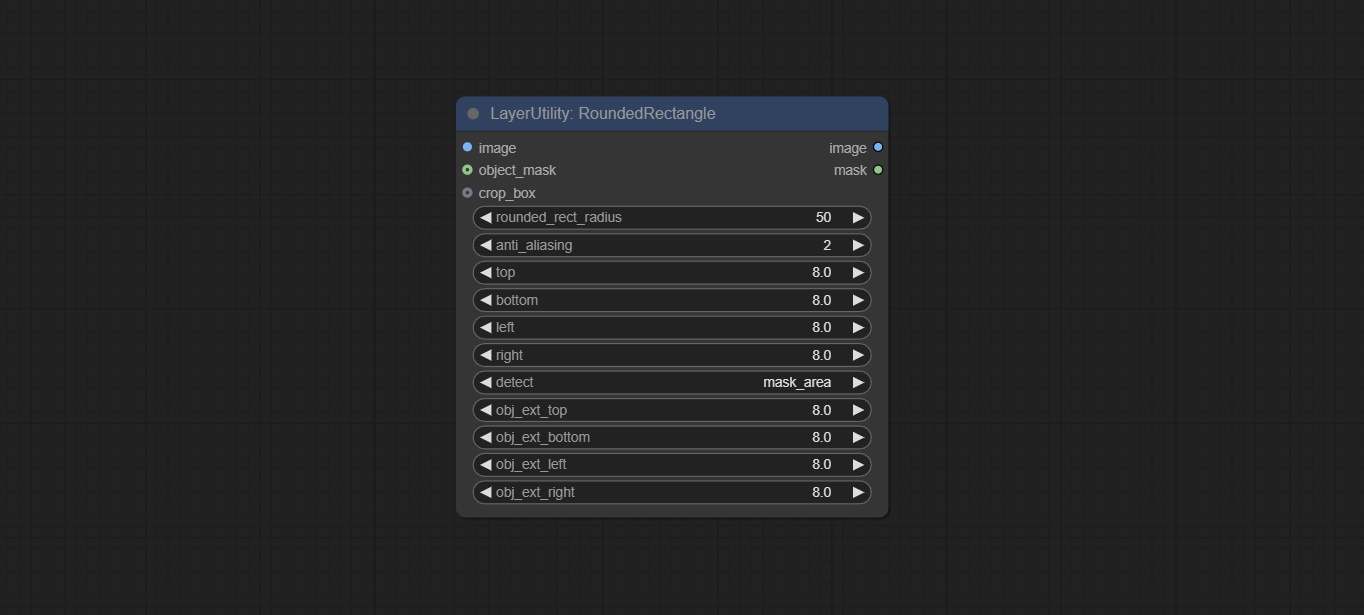
节点选项:
- image:待处理的图像。
- object_mask:可选输入。该遮罩可用于生成圆角矩形区域。如果已提供
crop-box输入,则此选项将被忽略。 - crop_box:可选输入。可通过裁剪区域生成一个圆角矩形区域。
- rounded_rect_radius:圆角半径。取值范围为0-100,数值越大,圆角越明显。
- anti_aliasing:抗锯齿效果,取值范围为0-16,数值越大,锯齿现象越不明显。但过高的值会显著降低节点的处理速度。
- top:圆角矩形顶部边距,以图像高度的百分比表示,允许使用负值。如果已提供 crop_box 或 object_mask 输入,则此选项将被忽略。
- bottom:圆角矩形底部边距,以图像高度的百分比表示,允许使用负值。如果已提供 crop_box 或 object_mask 输入,则此选项将被忽略。
- left:圆角矩形左侧边距,以图像宽度的百分比表示,允许使用负值。如果已提供 crop_box 或 object_mask 输入,则此选项将被忽略。
- right:圆角矩形右侧边距,以图像宽度的百分比表示,允许使用负值。如果已提供 crop_box 或 object_mask 输入,则此选项将被忽略。
- detect:当输入 object_mask 时,用于检测遮罩区域的方法。
min_bounding_rect表示最小外接矩形(块状),max_inscribed_rect表示最大内接矩形(块状),mask-area表示用于遮罩像素的有效区域。 - obj_ext_top:当输入 object_mask 或 crop-box 时,圆角矩形区域顶部向外扩展,以区域高度的百分比表示,允许使用负值。
- obj_ext_bottom:当输入 object_mask 或 crop-box 时,圆角矩形区域底部向外扩展,以区域高度的百分比表示,允许使用负值。
- obj_ext_left:当输入 object_mask 或 crop-box 时,圆角矩形区域左侧向外扩展,以区域宽度的百分比表示,允许使用负值。
- obj_ext_right:当输入 object_mask 或 crop-box 时,圆角矩形区域右侧向外扩展,以区域宽度的百分比表示,允许使用负值。
简单文本图像
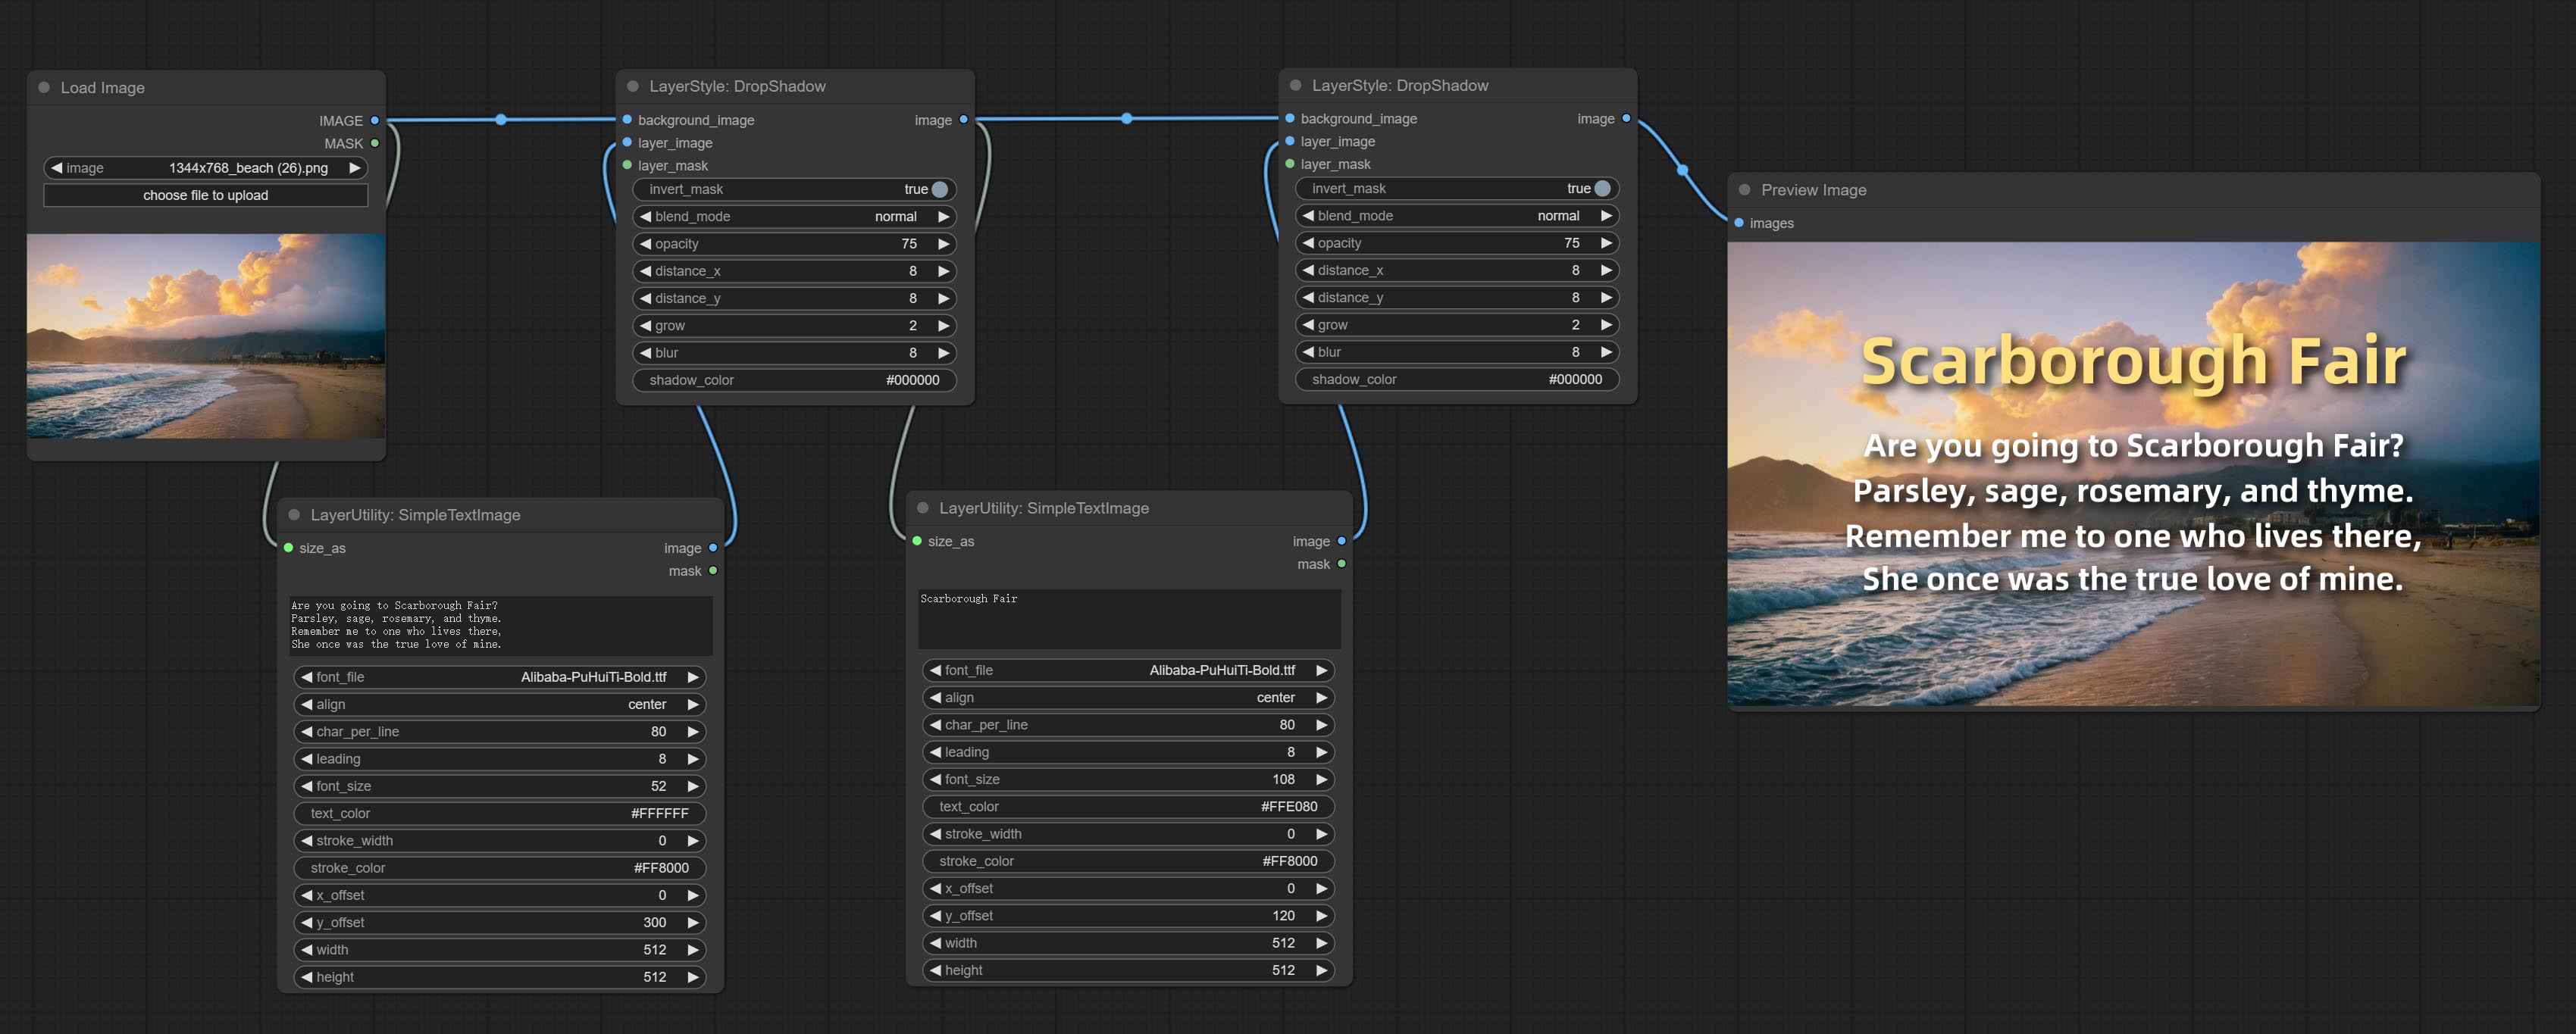
根据文本生成简单的排版图像和遮罩。该节点参考了 ZHO-ZHO-ZHO/ComfyUI-Text_Image-Composite 的部分功能和代码,感谢原作者。
节点选项:
- size_as*:此处的输入图像或遮罩将按照其尺寸生成输出图像和遮罩。此输入优先于下方的宽度和高度设置。
- font_file**:此处列出字体文件夹中可用的字体文件,所选字体将用于生成图像。
- align:对齐方式选项。共有三种:居中、左对齐和右对齐。
- char_per_line:每行字符数,超出部分将自动换行。
- leading:行间距。
- font_size:字体大小。
- text_color:文本颜色。
- stroke_width:描边宽度。
- stroke_color:描边颜色。
- x_offset:文本位置的水平偏移量。
- y_offset:文本位置的垂直偏移量。
- width:图像宽度。如果已提供 size_as 输入,则此设置将被忽略。
- height:图像高度。如果已提供 size_as 输入,则此设置将被忽略。
*仅限于输入图像和遮罩。强制集成其他类型的输入会导致节点报错。
**字体文件夹在 resource_dir.ini 中定义,该文件位于插件根目录下,默认名称为 resource_dir.ini.example。首次使用时,需将文件后缀改为 .ini。打开文本编辑软件,找到以“FONT_dir=”开头的行,在“=”号后输入自定义的文件夹路径名。
支持在 resource-dir.ini 中定义多个文件夹,各文件夹之间可用逗号、分号或空格分隔。
ComfyUI 初始化时,该文件夹中的所有字体文件都将被收集并显示在节点列表中。
如果 ini 文件中设置的文件夹无效,则将启用插件自带的字体文件夹。
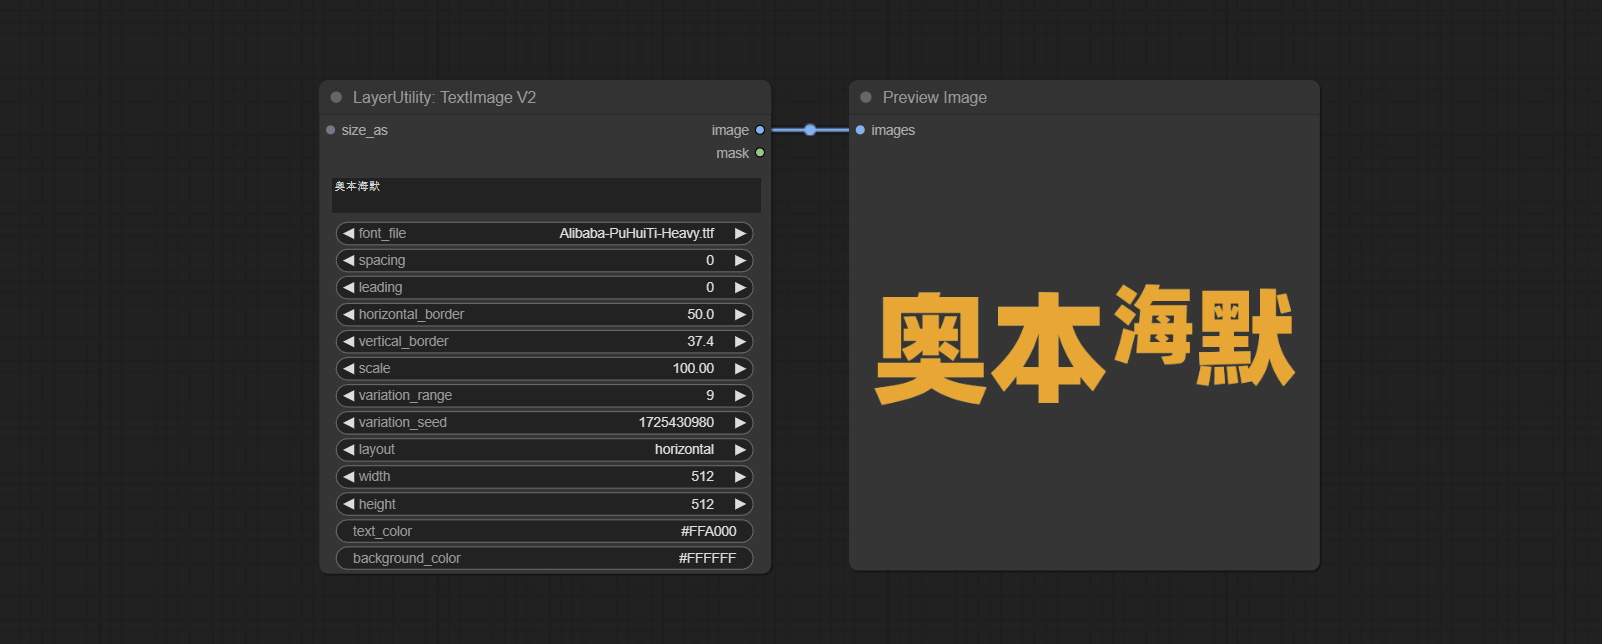
TextImage
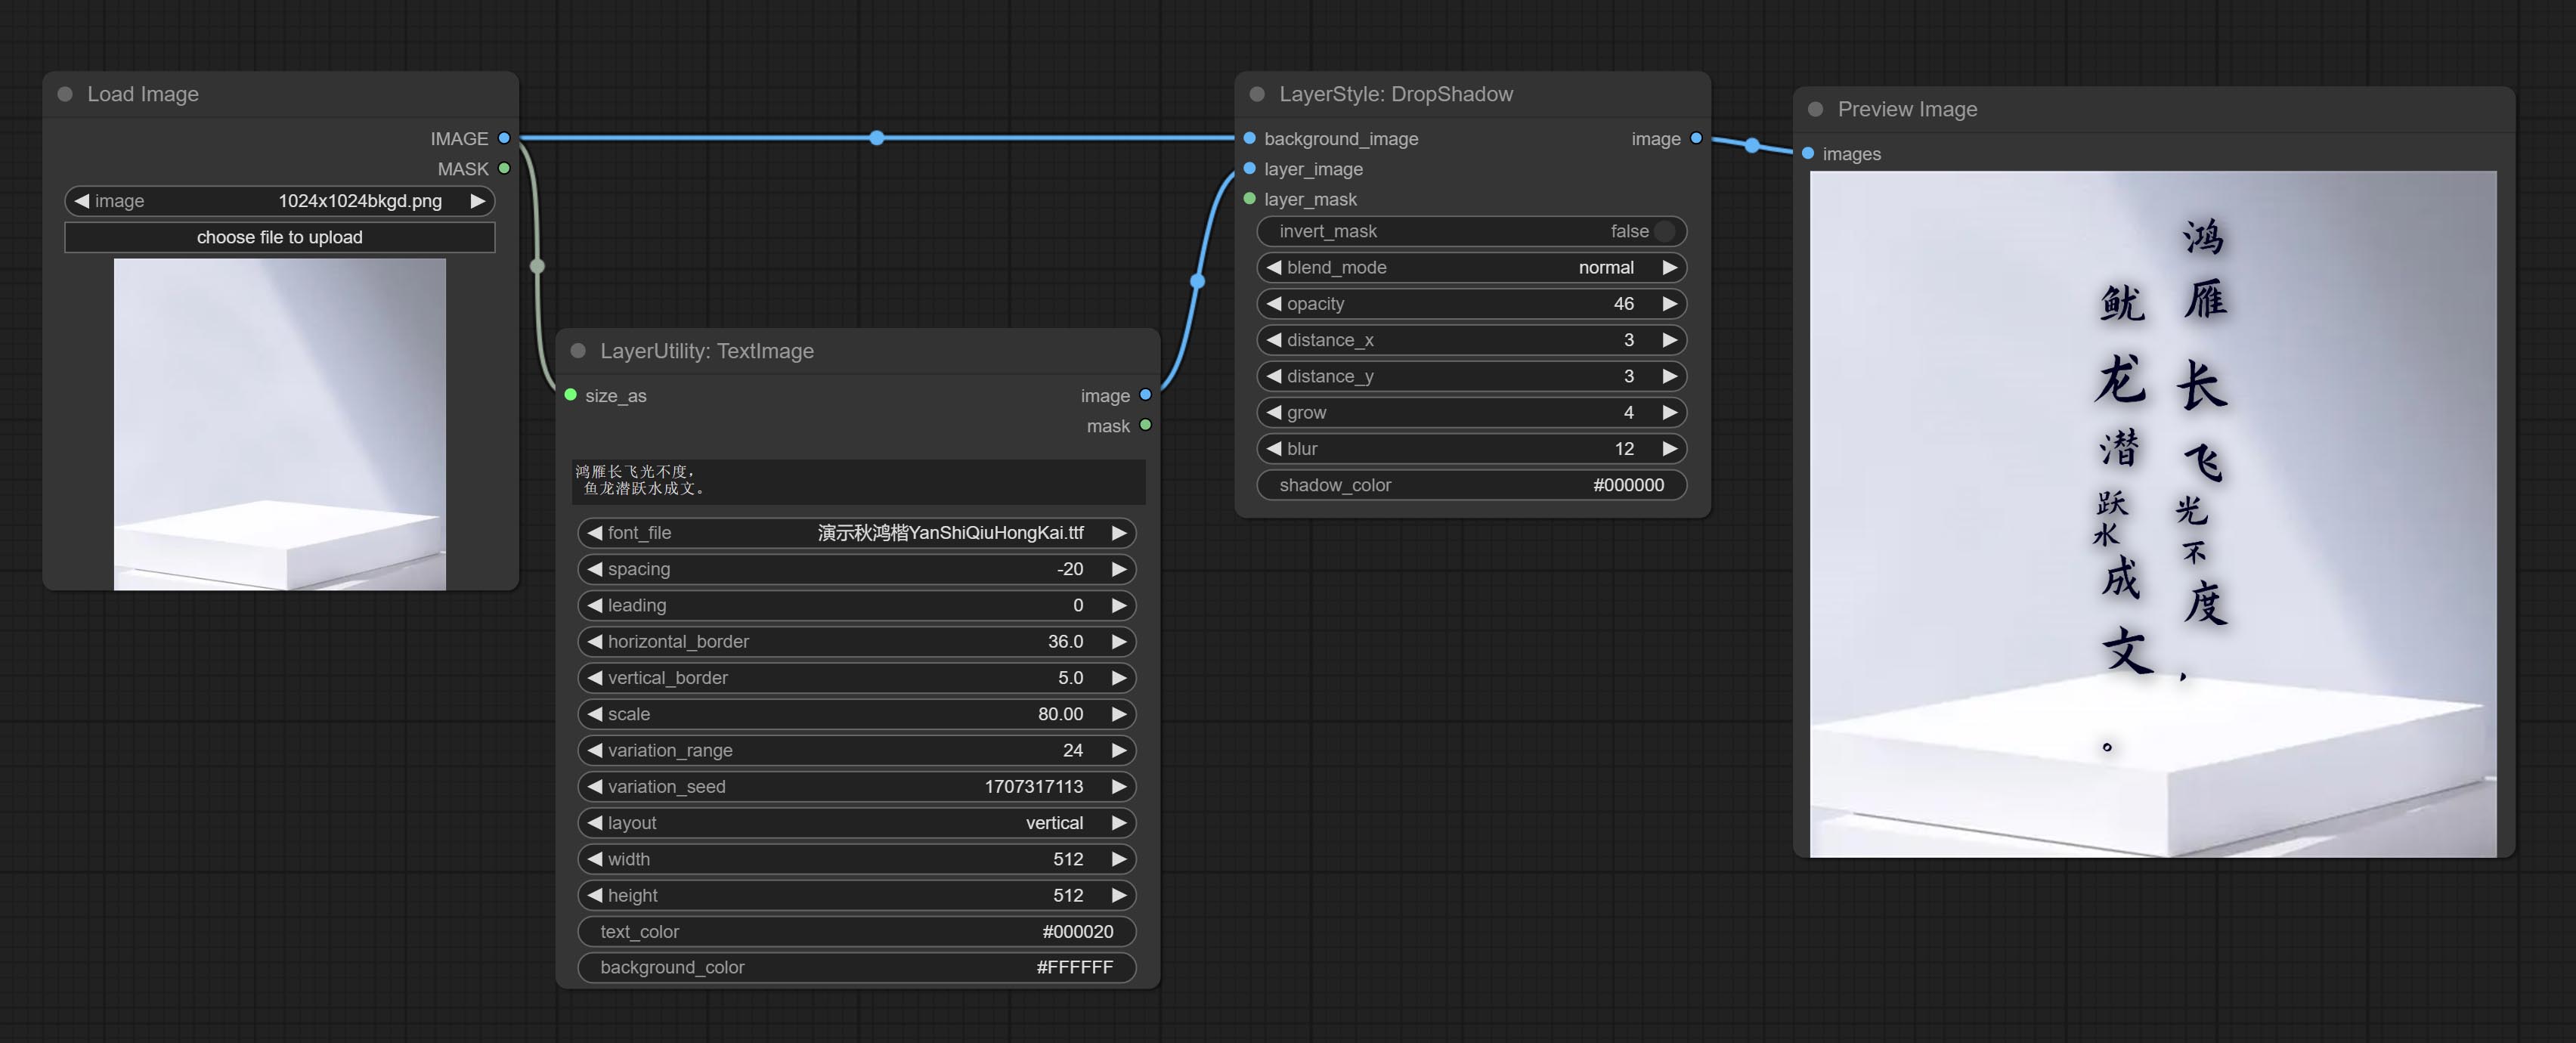
根据文本生成图像和掩码。支持调整单词和行之间的间距、水平和垂直方向的调整,还可以为每个字符设置随机变化,包括大小和位置。
节点选项:
- size_as*:此处输入的图像或掩码将根据其尺寸生成输出图像和掩码。此输入优先于下方的宽度和高度。
- font_file**:此处列出字体文件夹中可用的字体文件,所选字体文件将用于生成图像。
- spacing:单词间距。该值以像素为单位。
- leading:行间距。该值以像素为单位。
- horizontal_border:侧边距。如果文本是水平的,则为左 margin;如果是垂直的,则为右 margin。该值表示百分比,例如 50 表示起始点位于两侧的中心。
- vertical_border:上边距。该值表示百分比,例如 10 表示起始点距离顶部 10%。
- scale:文本的整体大小。文本的初始大小会根据屏幕尺寸和文本内容自动计算,默认情况下最长的行或列会适应图像的宽度或高度。在此处调整数值将整体缩放文本。该值表示百分比,例如 60 表示缩放到 60%。
- variation_range:字符随机变化的范围。当该值大于 0 时,字符会在大小和位置上发生随机变化,数值越大,变化幅度越大。
- variation_seed:随机种子。固定此值后,每次生成的单个字符变化将保持不变。
- layout:文本布局。可选择水平和垂直两种方式。
- width:图像的宽度。如果有 size_as 输入,则此设置将被忽略。
- height:图像的高度。如果有 size_as 输入,则此设置将被忽略。
- text_color:文本颜色。
- background_color4:背景颜色。
*仅限于输入图像和掩码。强制集成其他类型的输入会导致节点错误。
**字体文件夹在 resource_dir.ini 中定义,该文件位于插件根目录下,默认名称为 resource_dir.ini.example。首次使用时,需将文件后缀改为 .ini。打开文本编辑软件,找到以 "FONT_dir=" 开头的行,在 "=" 后输入自定义的文件夹路径名。resource-dir.ini 支持定义多个文件夹,用逗号、分号或空格分隔。
ComfyUI 初始化时,该文件夹中的所有字体文件会被收集并显示在节点列表中。若 ini 文件中设置的文件夹无效,则会启用插件自带的字体文件夹。
TextImageV2
此节点由 heshengtao 合并而来。该 PR 基于 TextImage 节点修改了图像文本节点的缩放方式。字体间距随缩放调整,坐标也不再以文本的左上角为基准,而是以整行文本的中心点为基准。感谢作者的贡献。
ImageChannelSplit
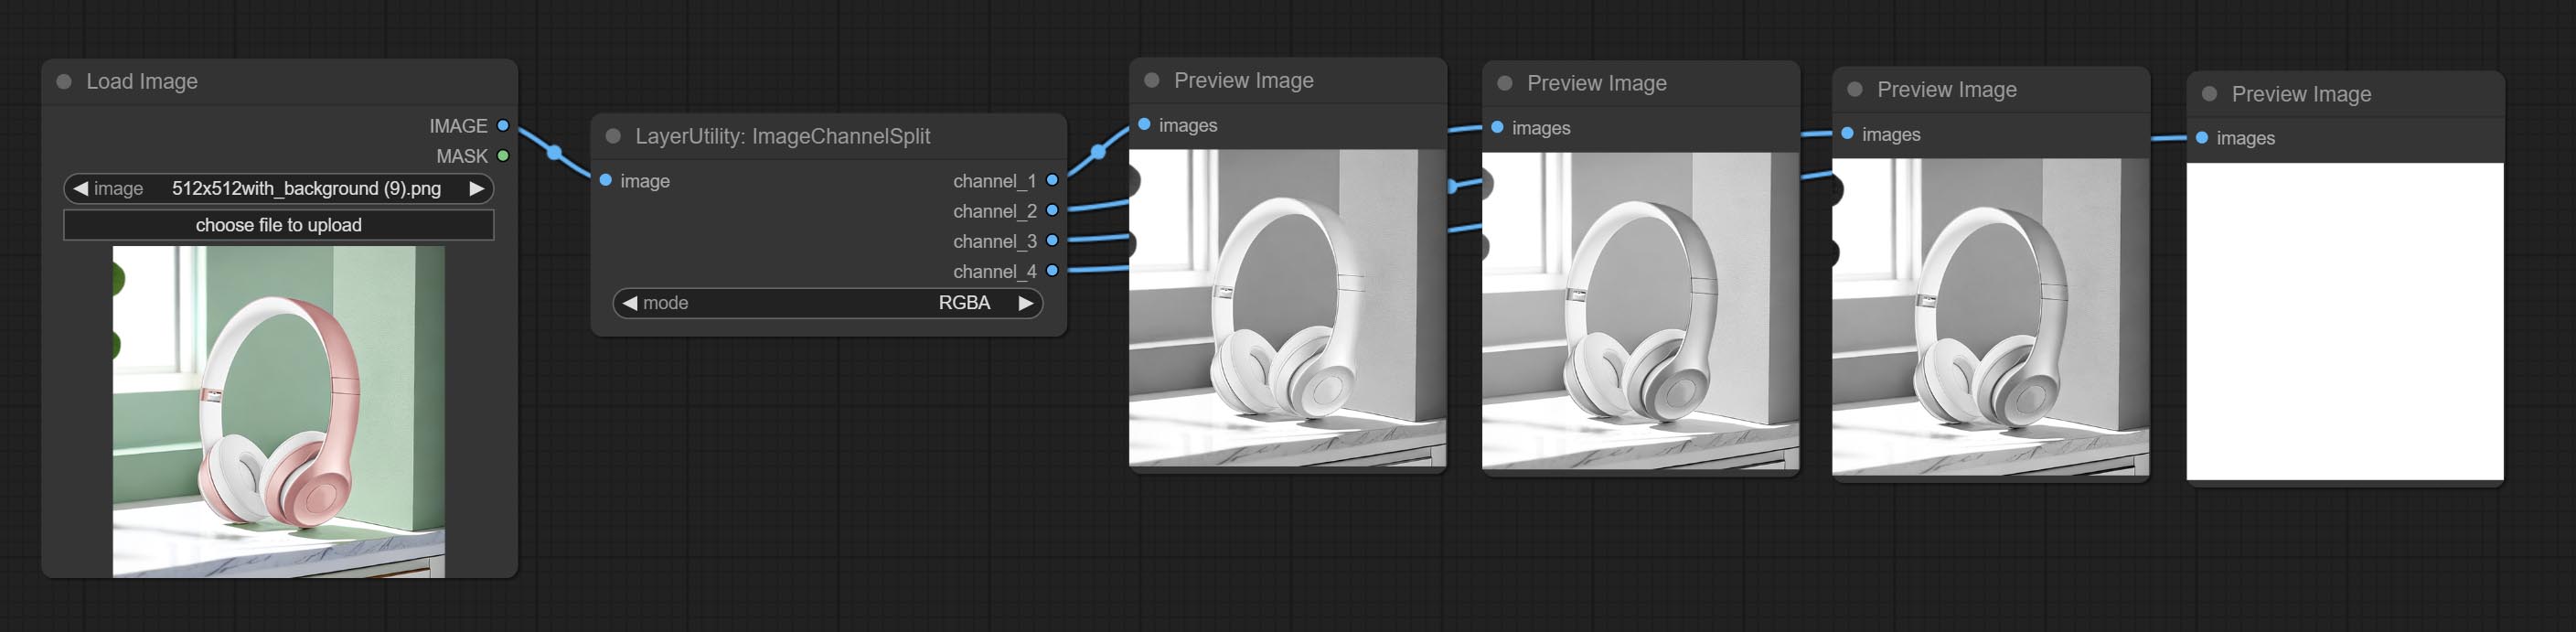
将图像通道拆分为单独的图像。
节点选项:
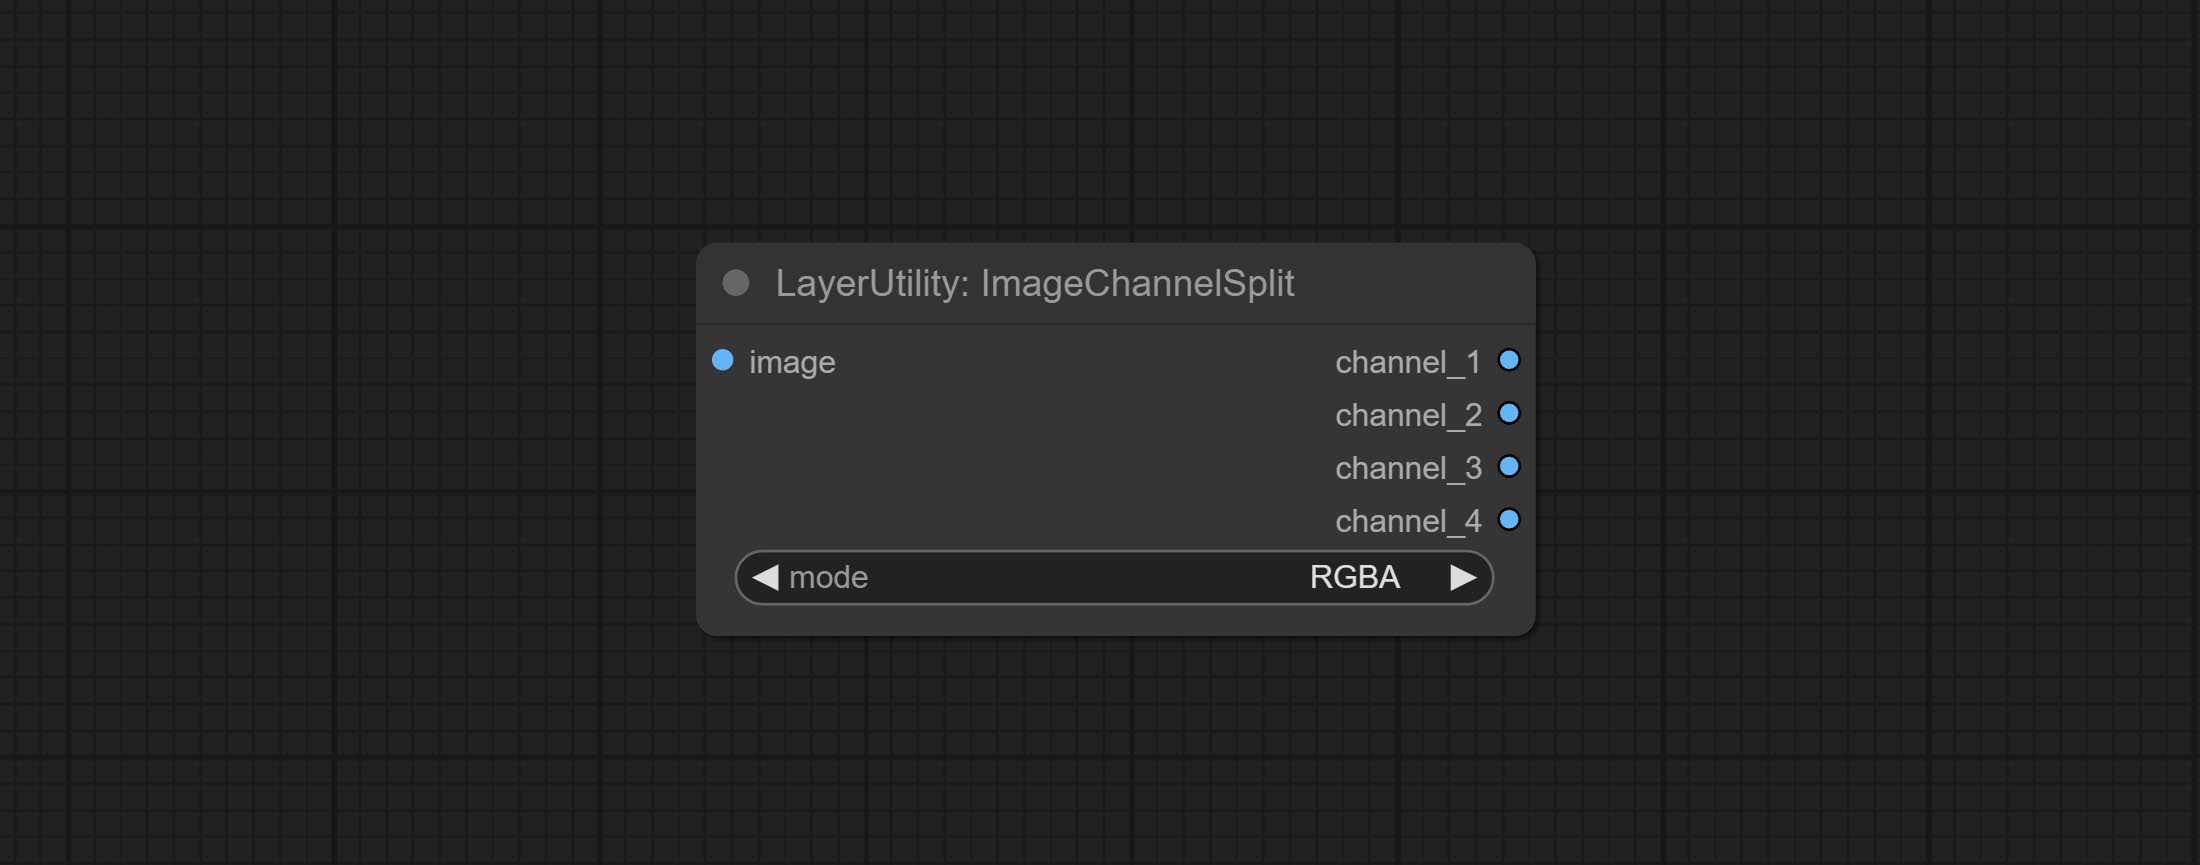
- mode:通道模式,包括 RGBA、YCbCr、LAB 和 HSV。
ImageChannelMerge
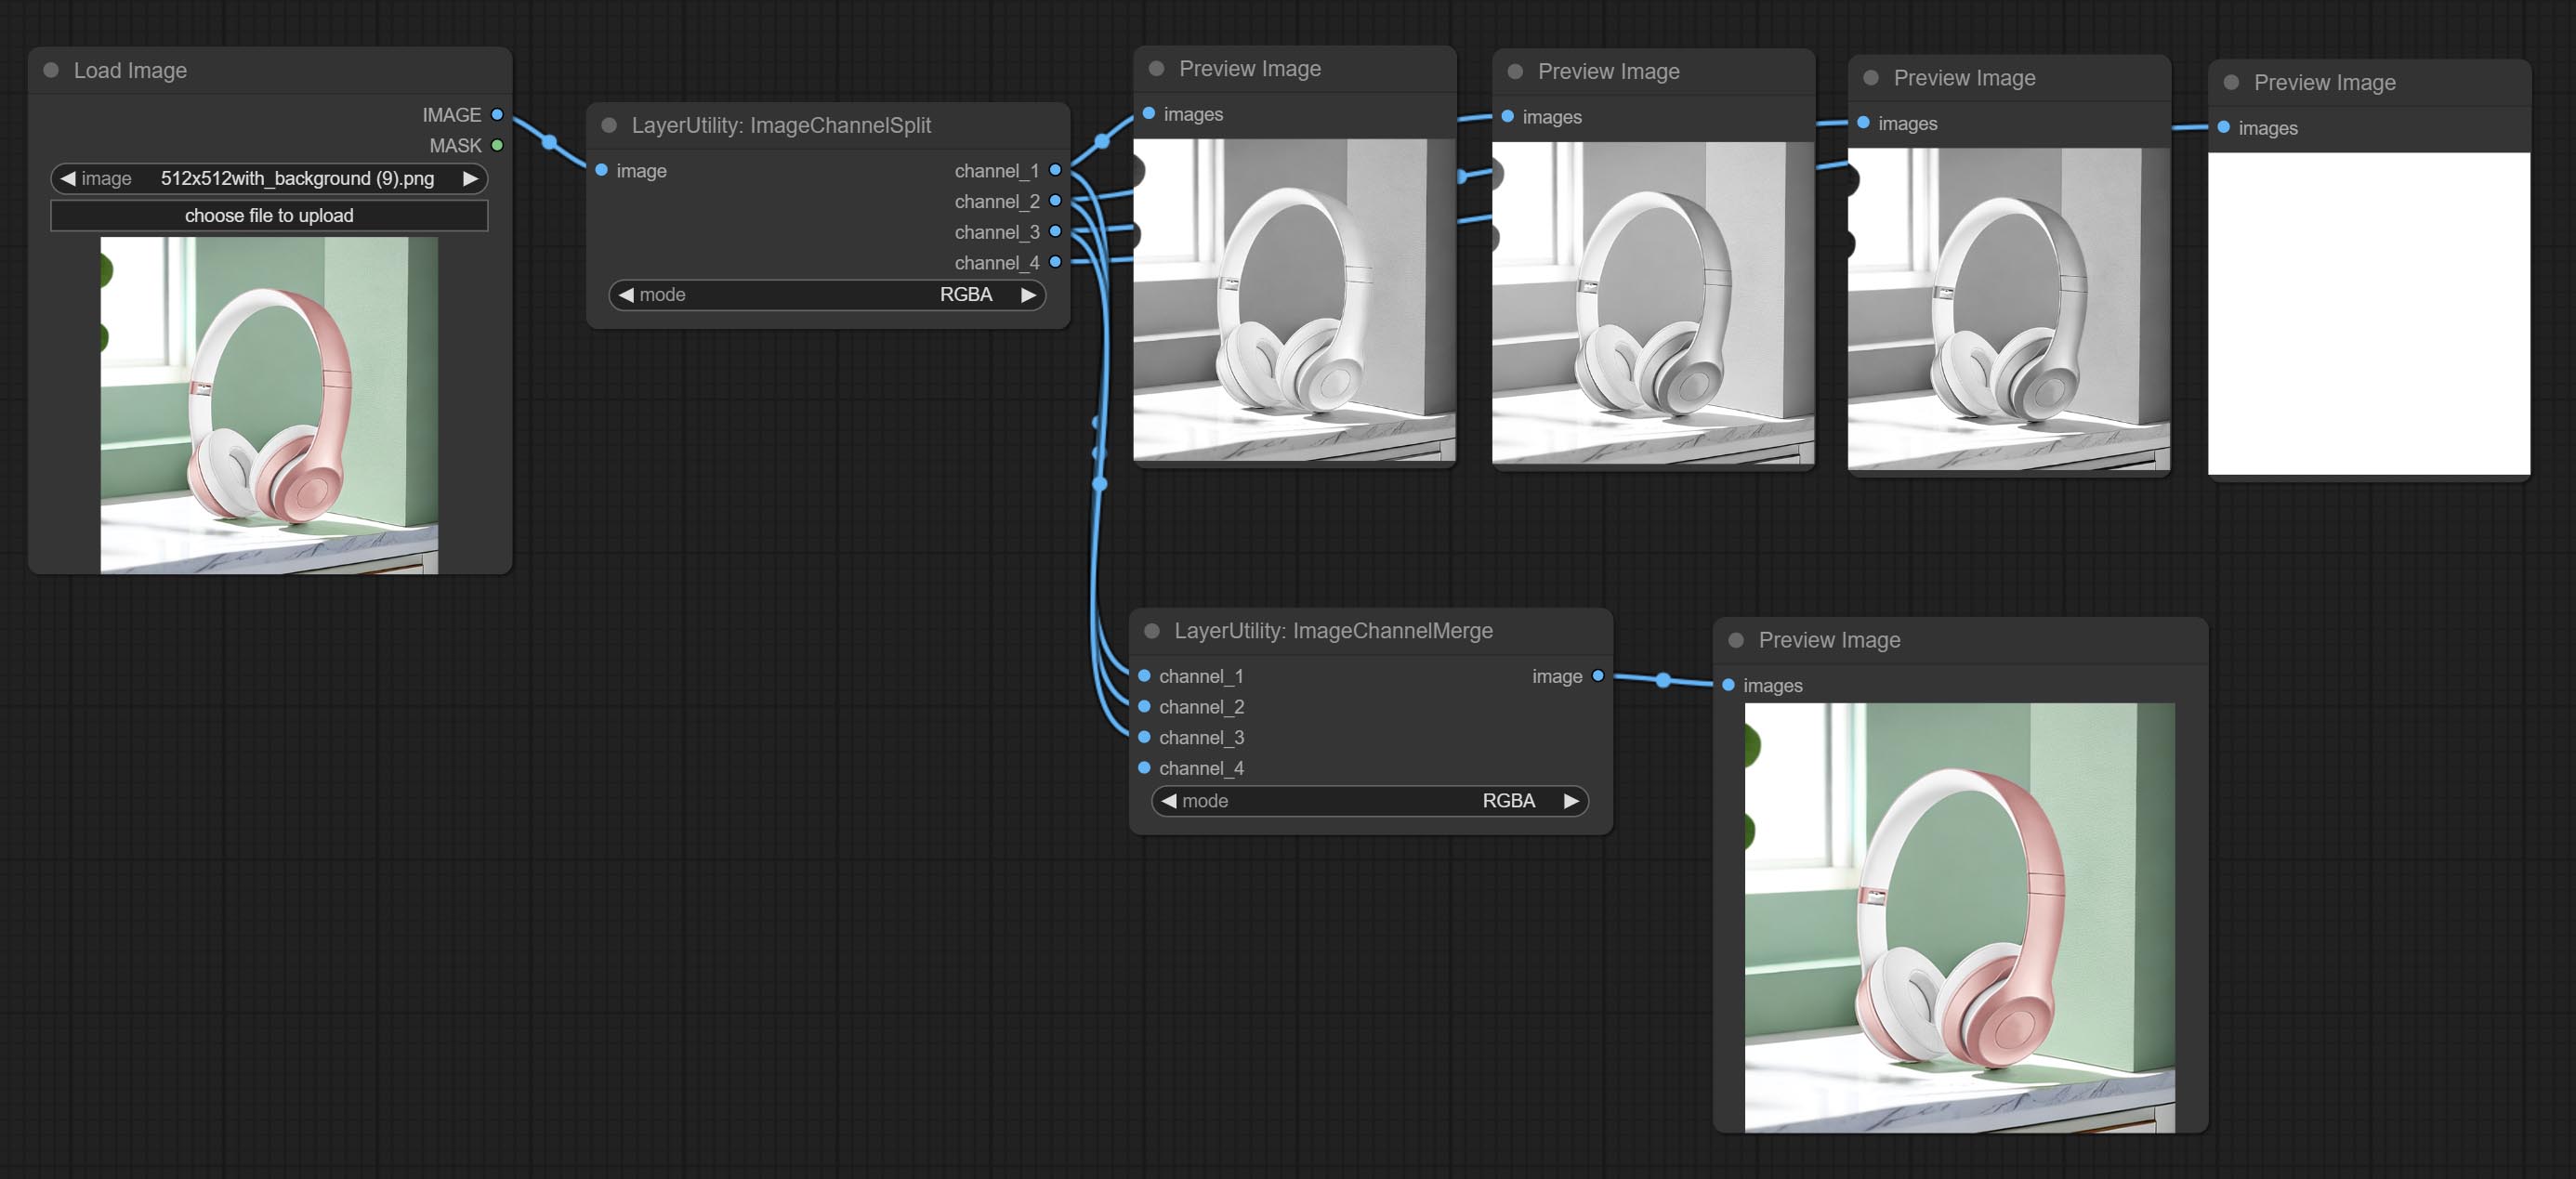
将各个通道图像合并为一张图像。
节点选项:
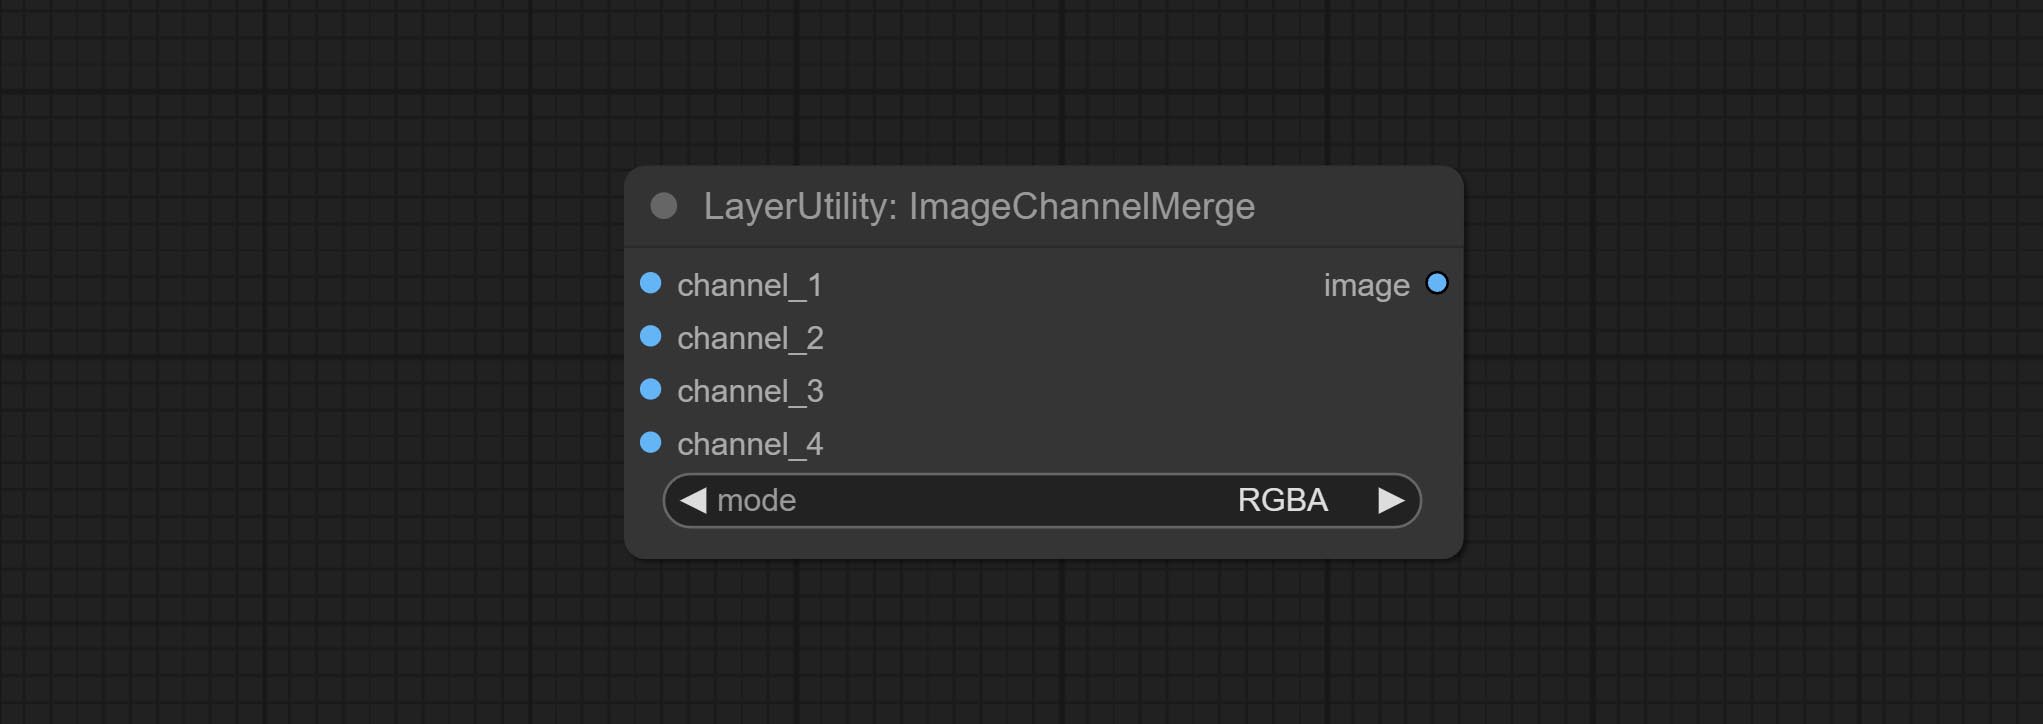
- mode:通道模式,包括 RGBA、YCbCr、LAB 和 HSV。
ImageRemoveAlpha
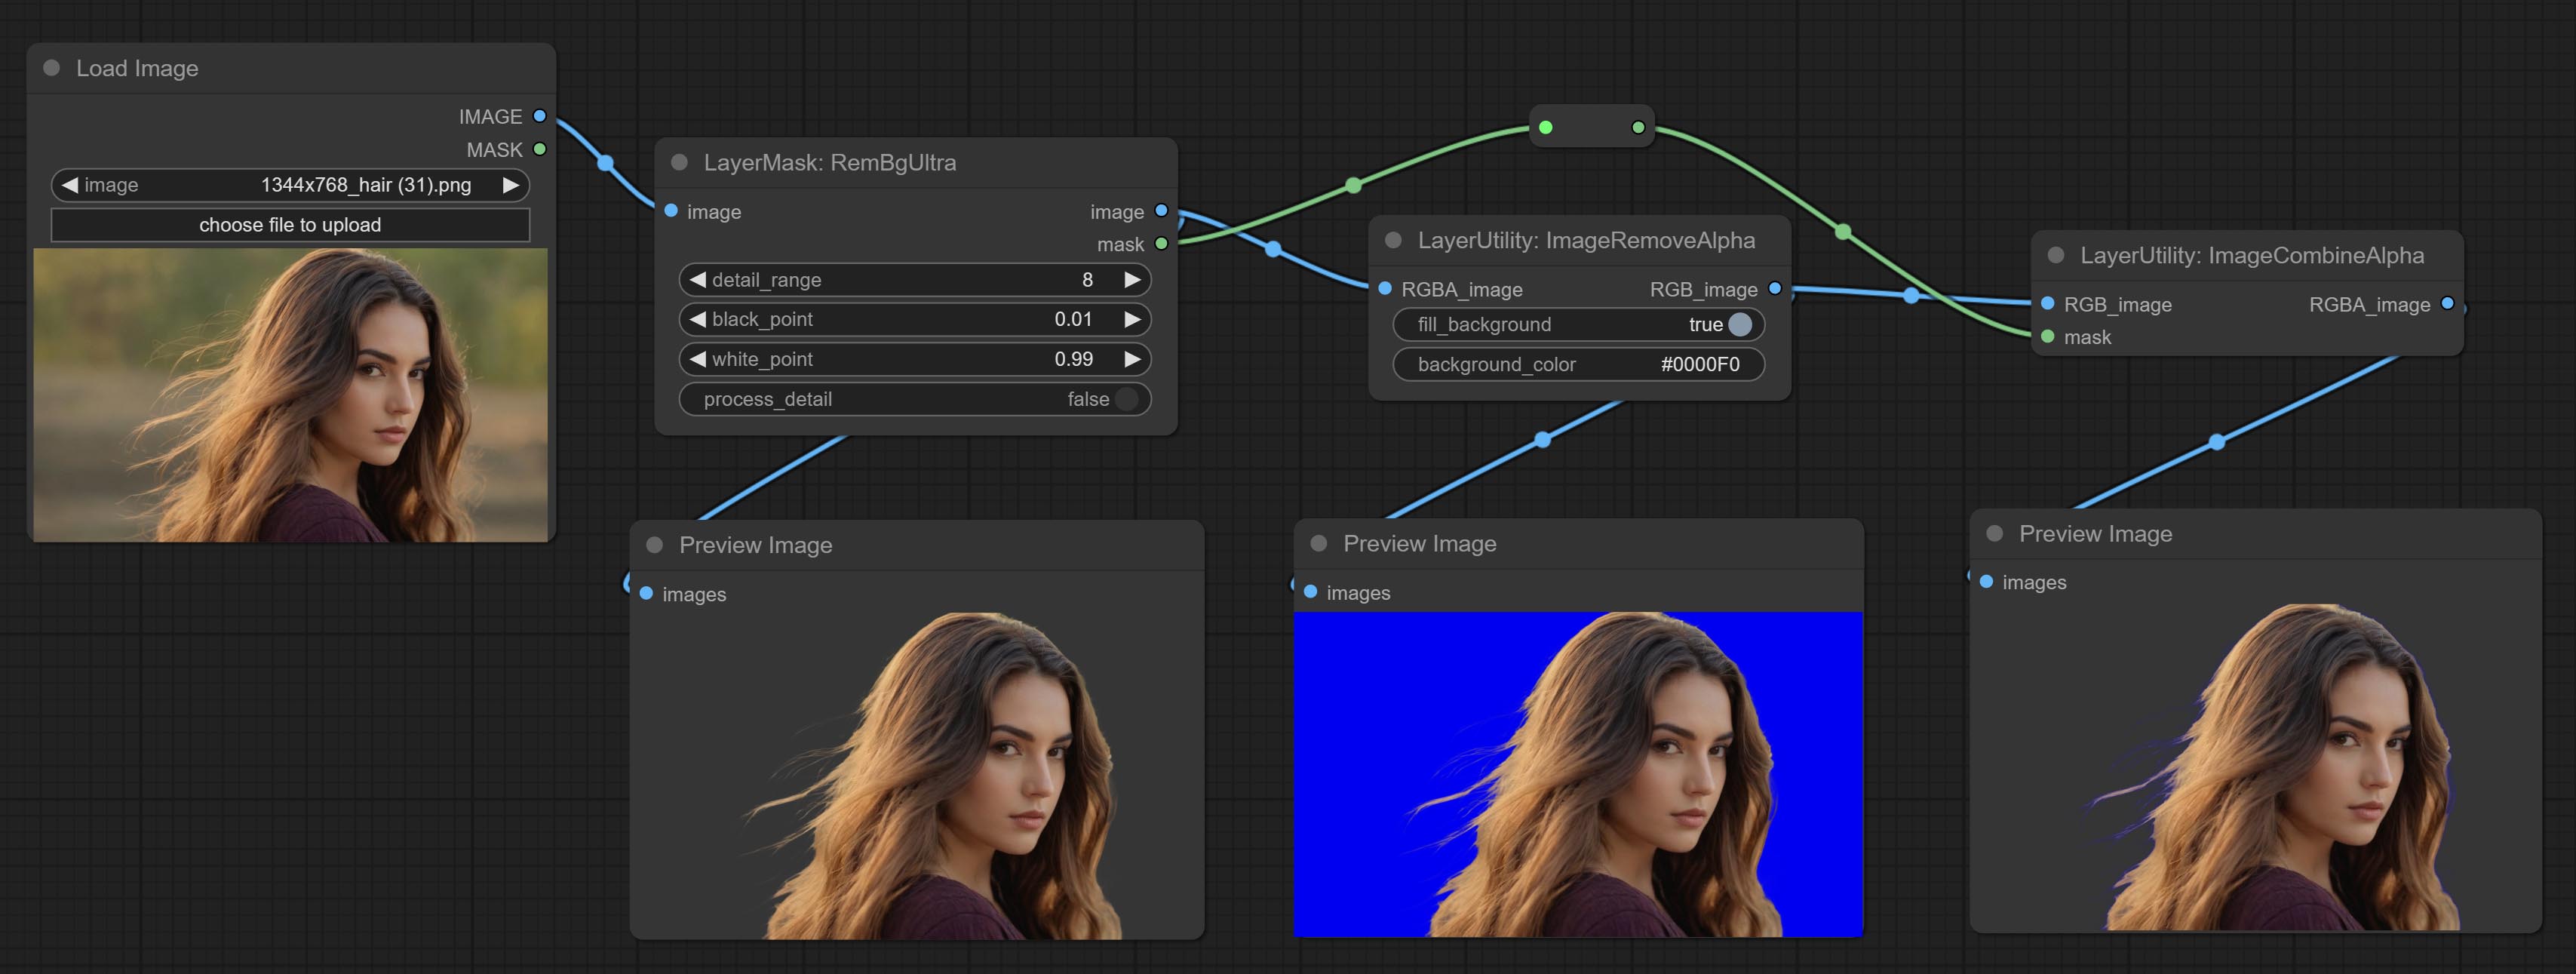
移除图像的 alpha 通道并将其转换为 RGB 模式。可以选择填充背景并设置背景颜色。
节点选项:
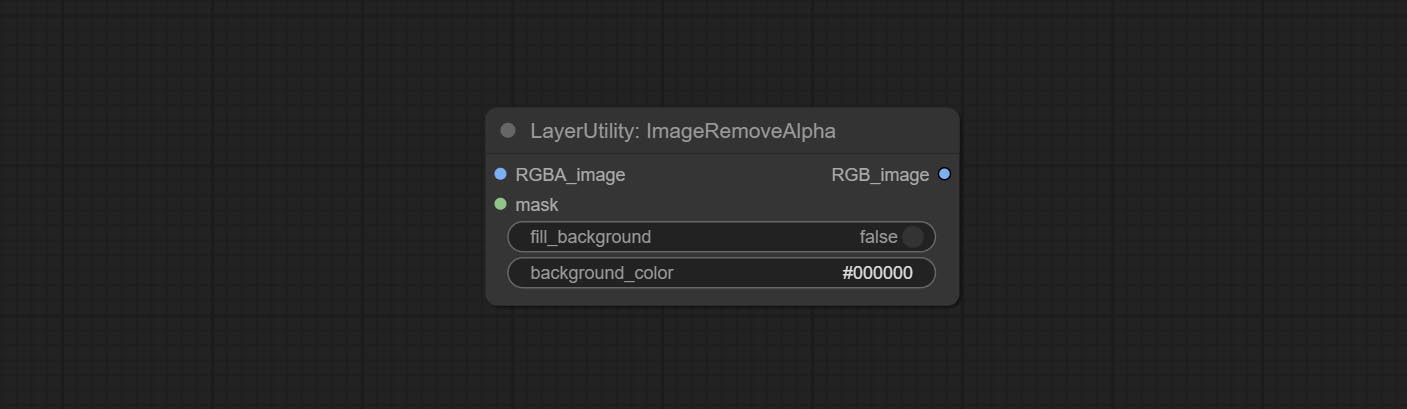
- RGBA_image:输入图像支持 RGBA 或 RGB 模式。
- mask:可选的输入掩码。如果有输入掩码,则优先使用掩码,忽略 RGBA_image 自带的 alpha 通道。
- fill_background:是否填充背景。
- background_color4:背景颜色。
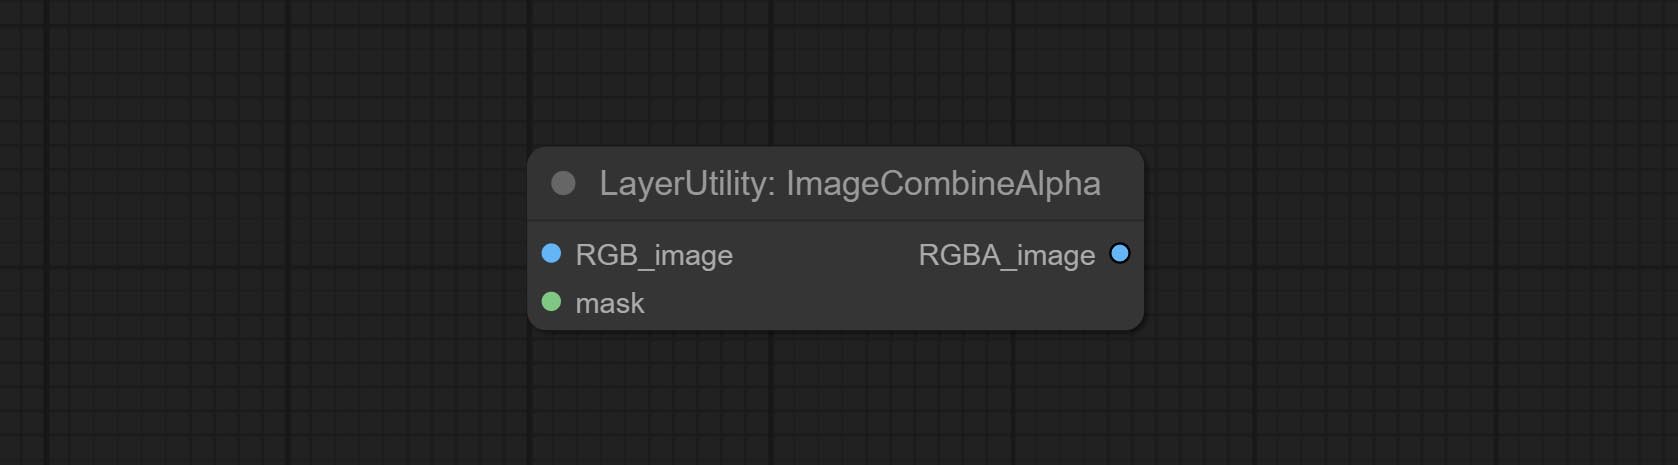
ImageCombineAlpha
将图像和掩码合并为包含 alpha 通道的 RGBA 模式图像。
HLFrequencyDetailRestore
通过低频滤波并保留高频来恢复图像细节。与 kijai 的 DetailTransfer 相比,此节点在保留细节的同时更好地融入环境。

节点选项: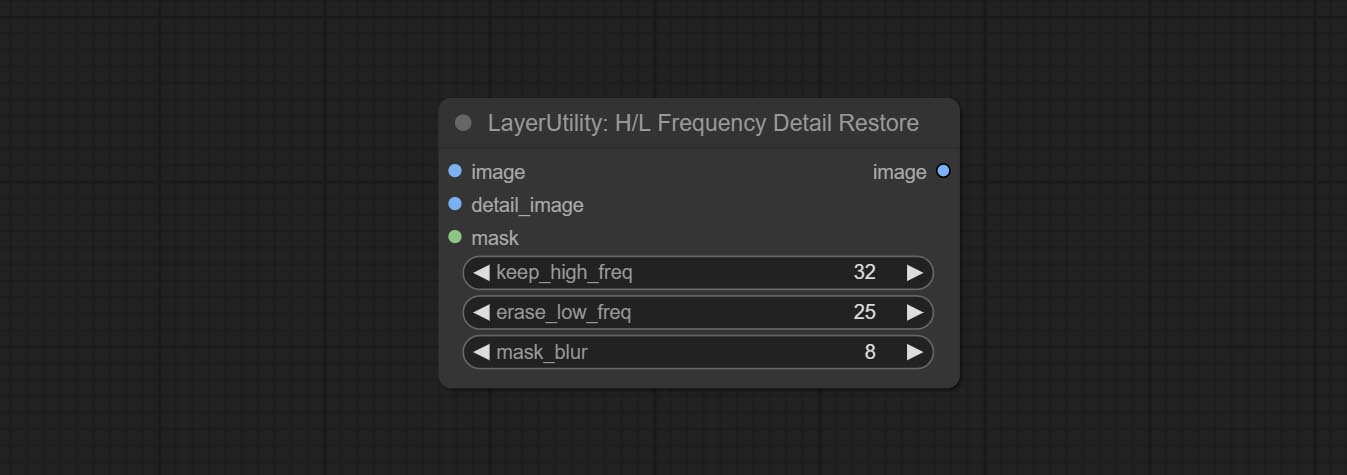
- image:背景图像输入。
- detail_image:细节图像输入。
- mask:可选输入,如果有掩码输入,则仅恢复掩码部分的细节。
- keep_high_freq:保留的高频范围。数值越大,保留的高频细节越丰富。
- erase_low_freq:擦除的低频范围。数值越大,擦除的低频范围越广。
- mask_blur:掩码边缘模糊。仅在有掩码输入时有效。
GetImageSize
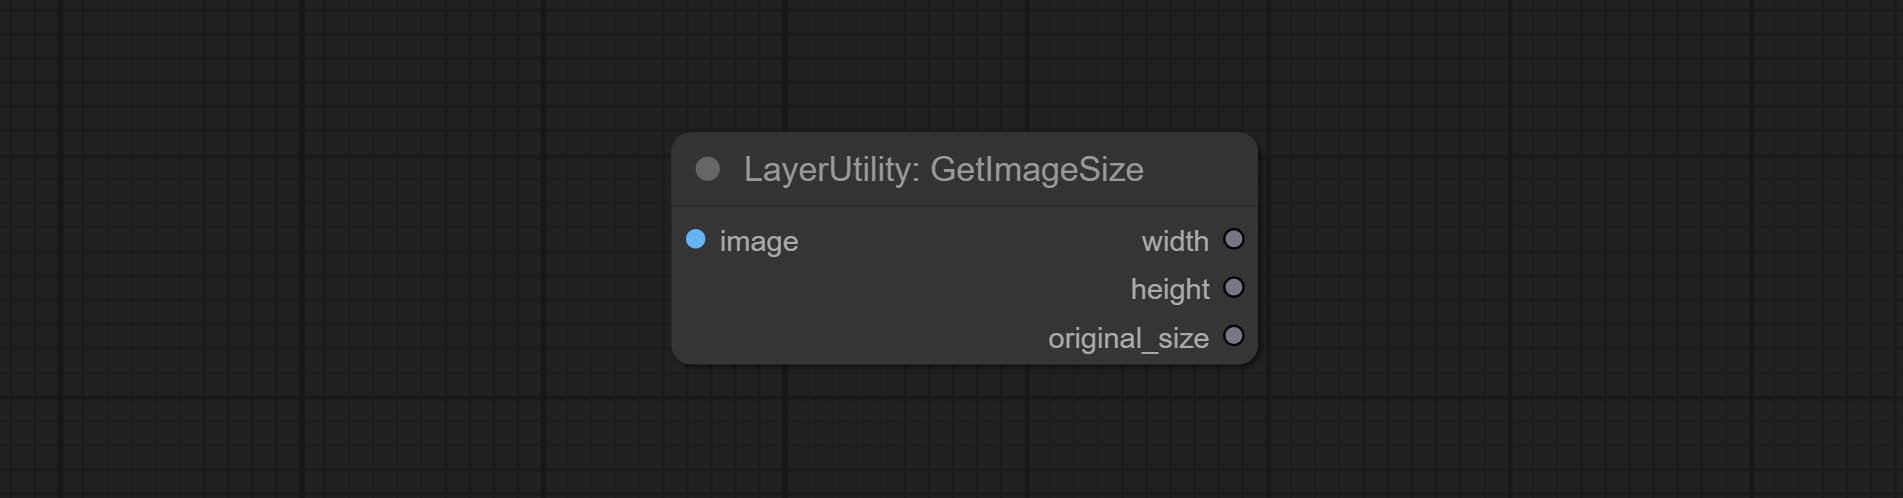
获取图像的宽度和高度。
输出:
- width:图像的宽度。
- height:图像的高度。
- original_size:图像的原始尺寸数据,用于后续节点的恢复。
AnyRerouter
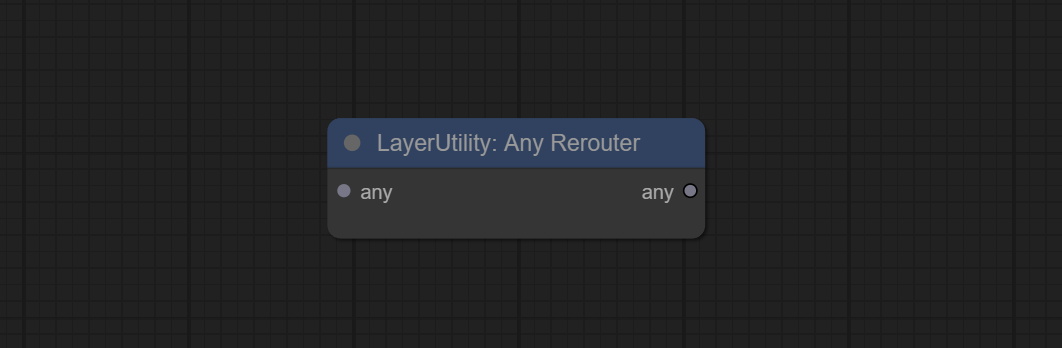
用于重新路由任何类型的数据,此节点允许任意类型的输入。
ImageHub
从多个输入图像和掩码中切换输出,支持 9 组输入。所有输入项均为可选。如果某组输入中只有图像或掩码,则缺失的部分将以 None 输出。
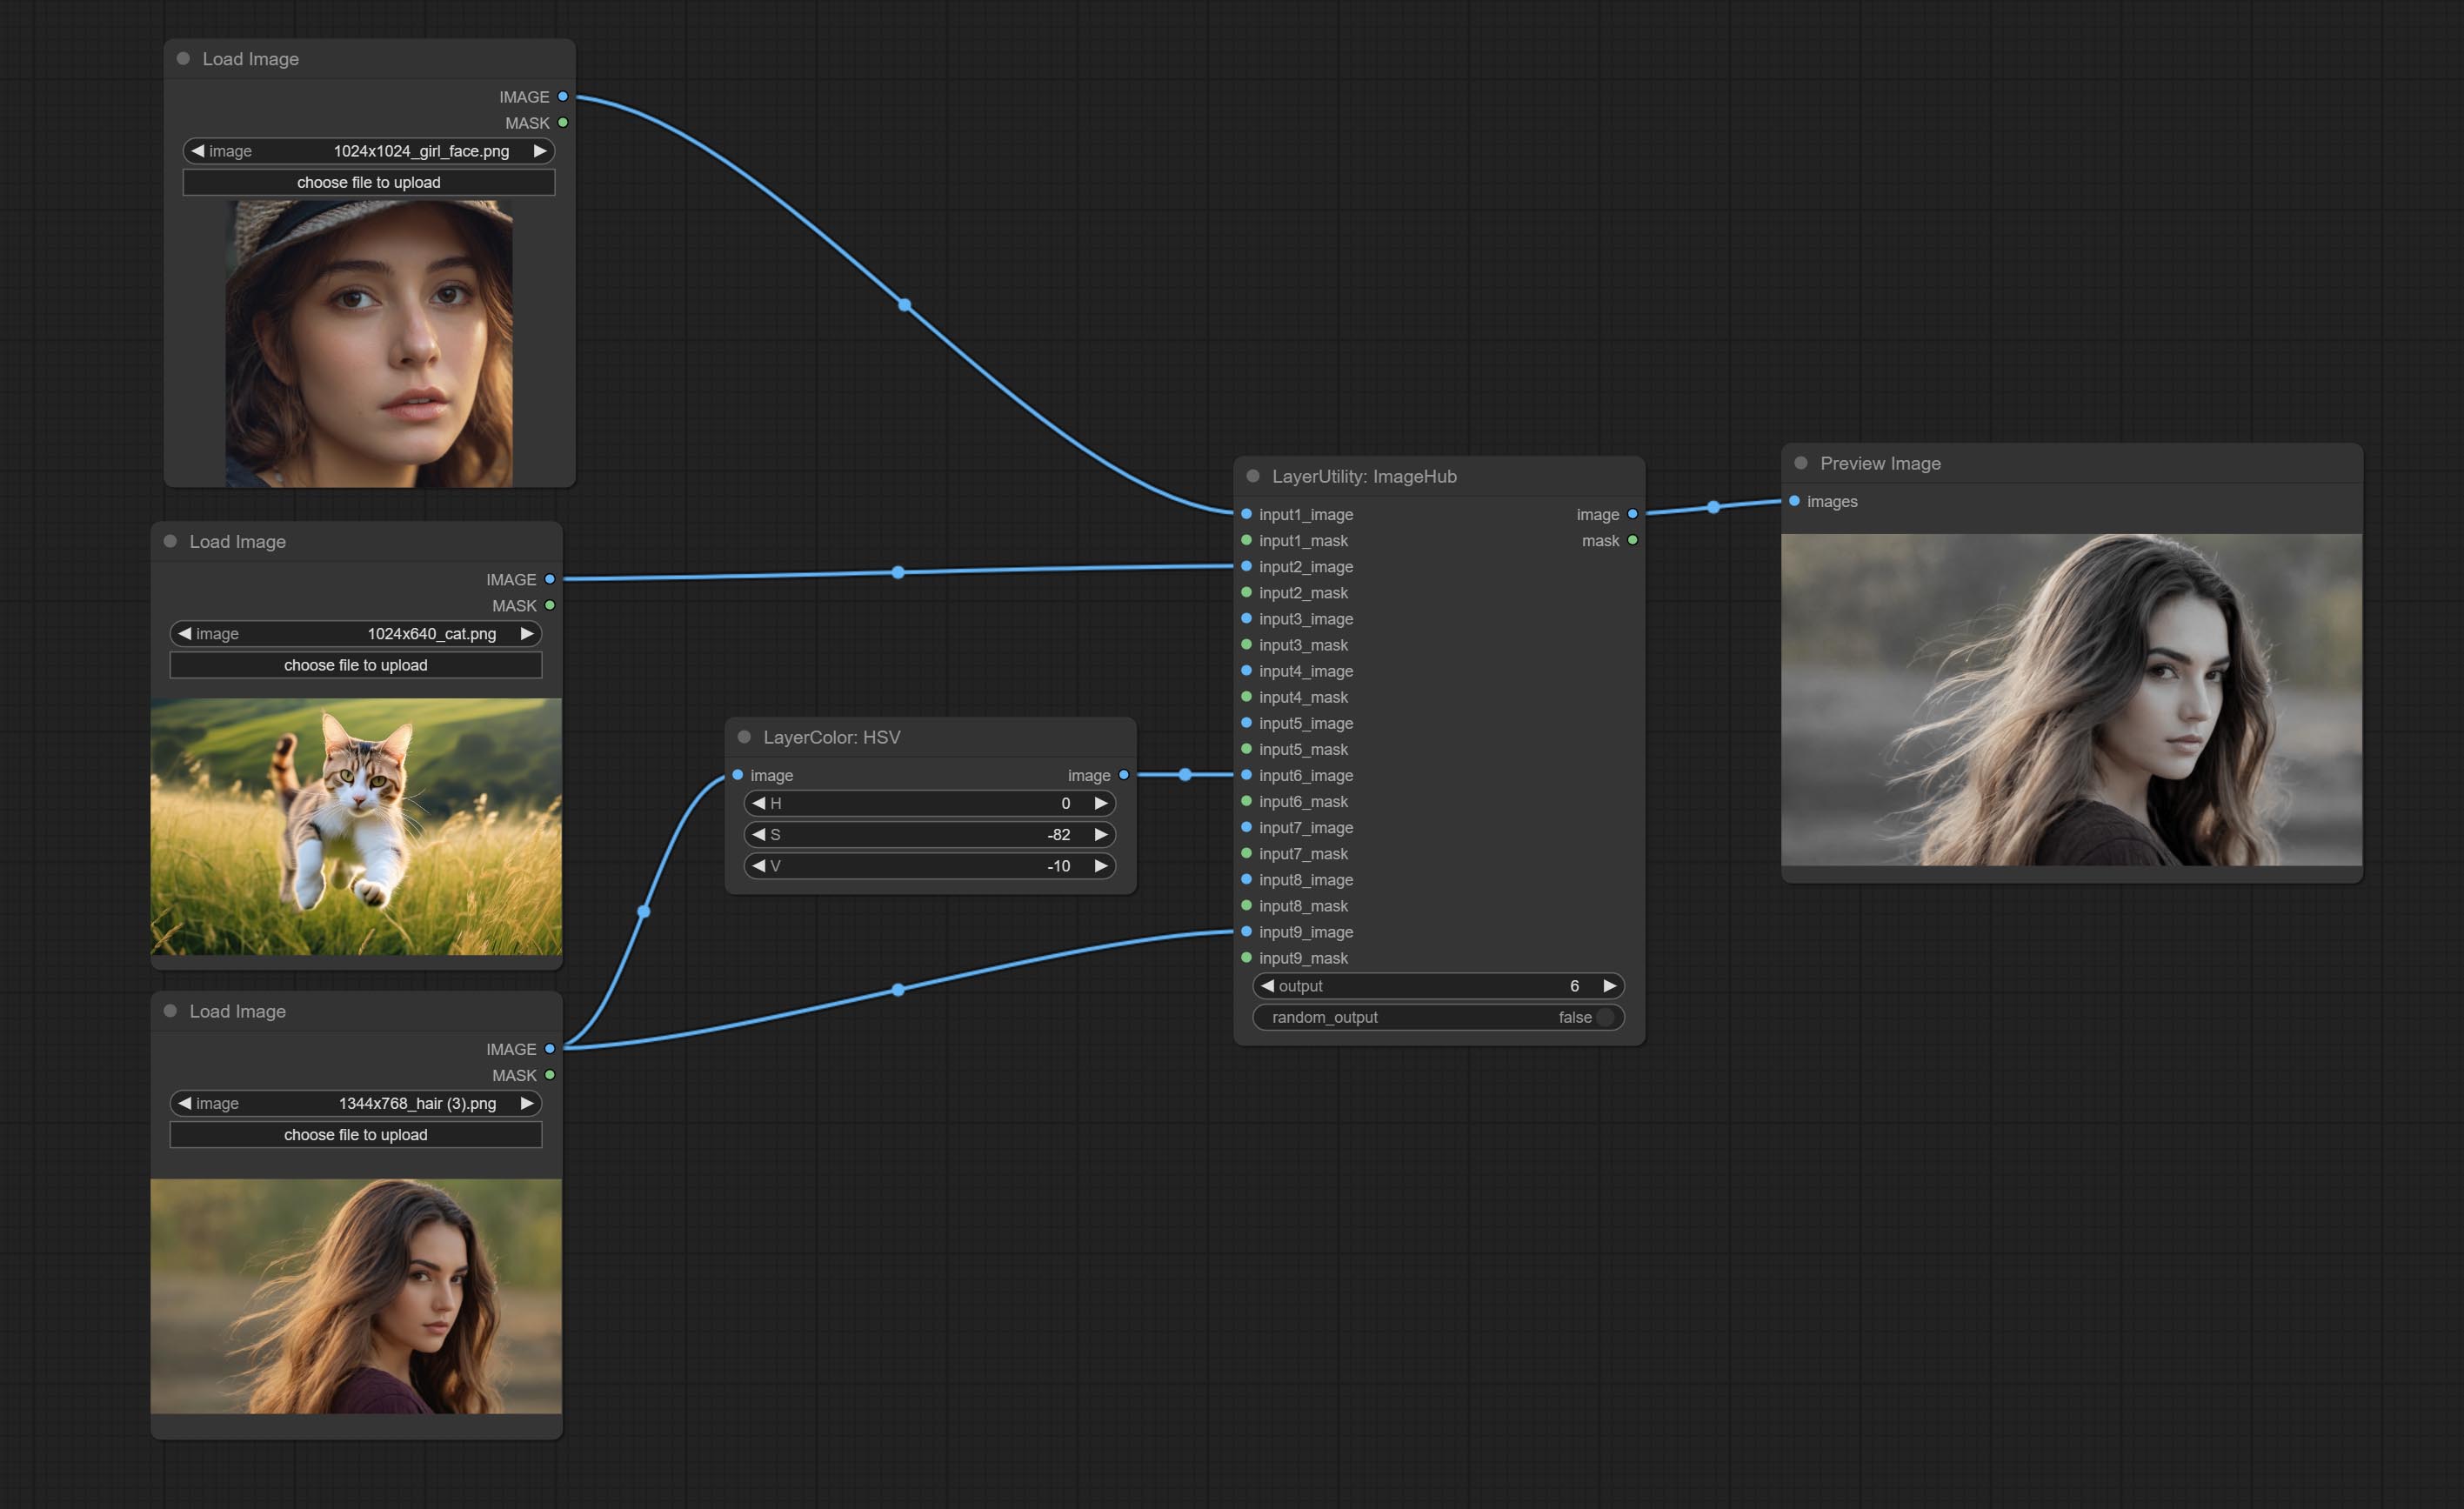
节点选项:
- output:切换输出。该值对应相应的输入组。当
random-output选项为 True 时,此设置将被忽略。 - random_output:当此选项为 True 时,
output设置将被忽略,并在所有有效输入中随机输出一组。
BatchSelector
从批量图像或掩码中提取指定的图像或掩码。
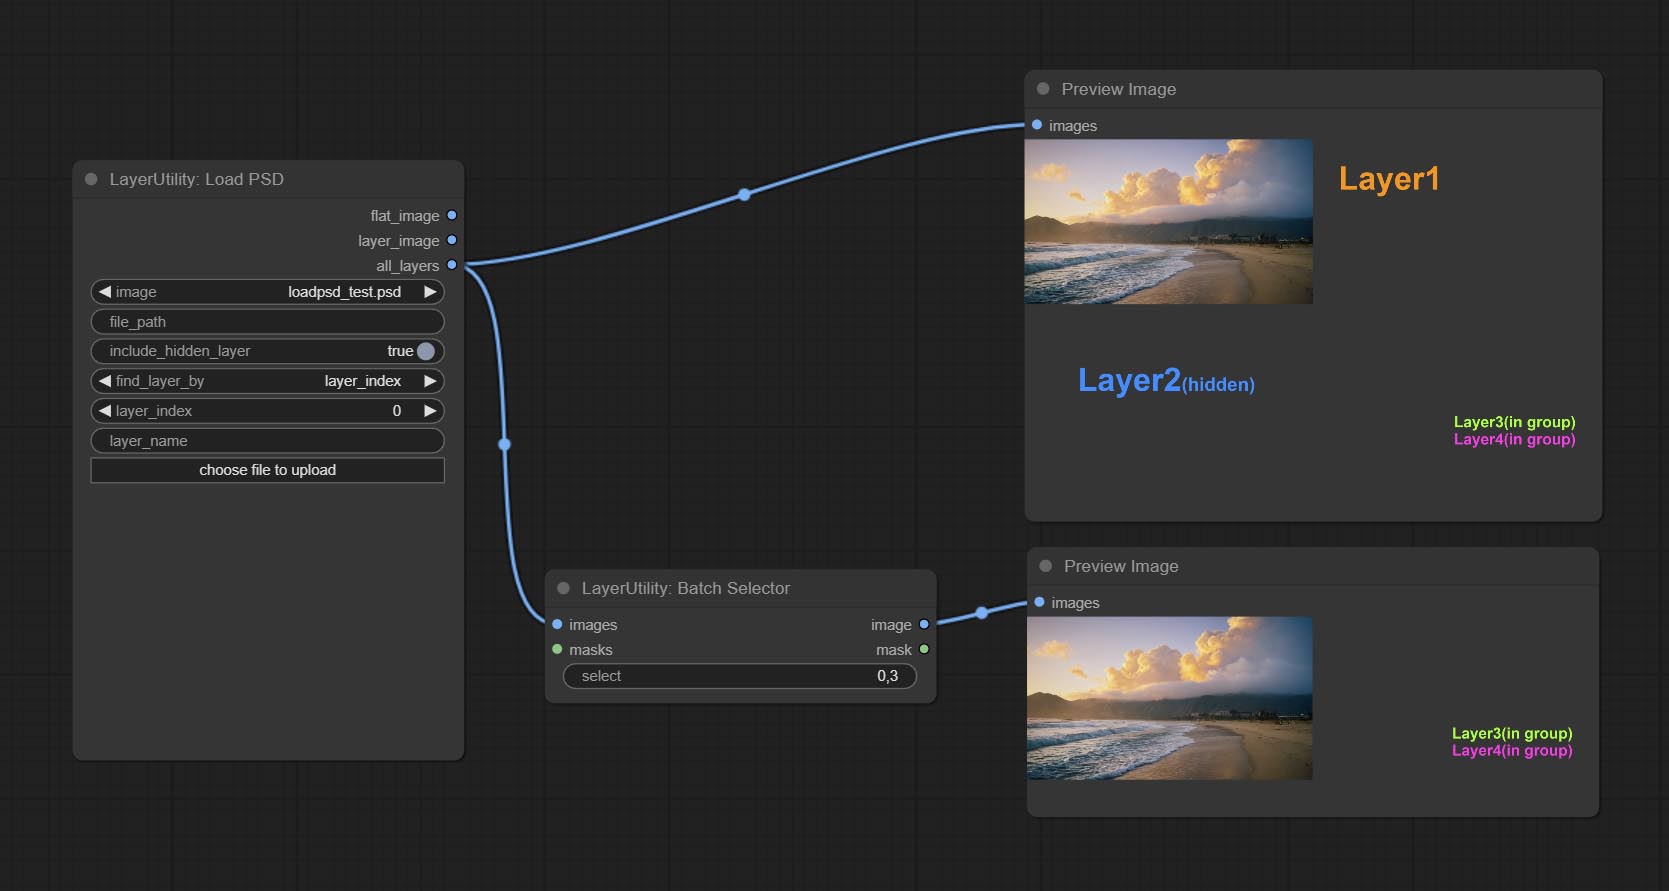
节点选项: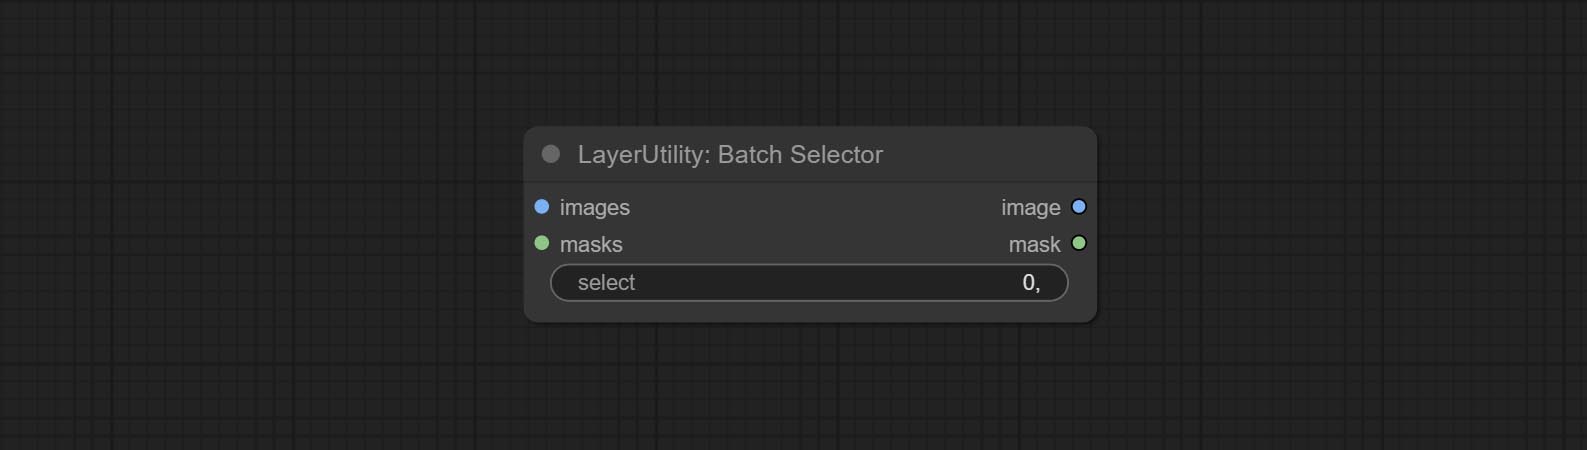
- images: 批量图像输入。此输入为可选。
- masks: 批量掩码输入。此输入为可选。
- select: 选择批次索引值处的输出图像或掩码,其中0表示第一张图像。可以输入多个值,用任何非数字字符分隔,包括但不限于逗号、句点、分号、空格或字母,甚至中文字符。 注意:如果值超过批次大小,则会输出最后一张图像。如果没有对应的输入,则会输出一张64x64的空白图像或64x64的黑色掩码。
ChoiceTextPreset
从预设文本字典中选择输出。
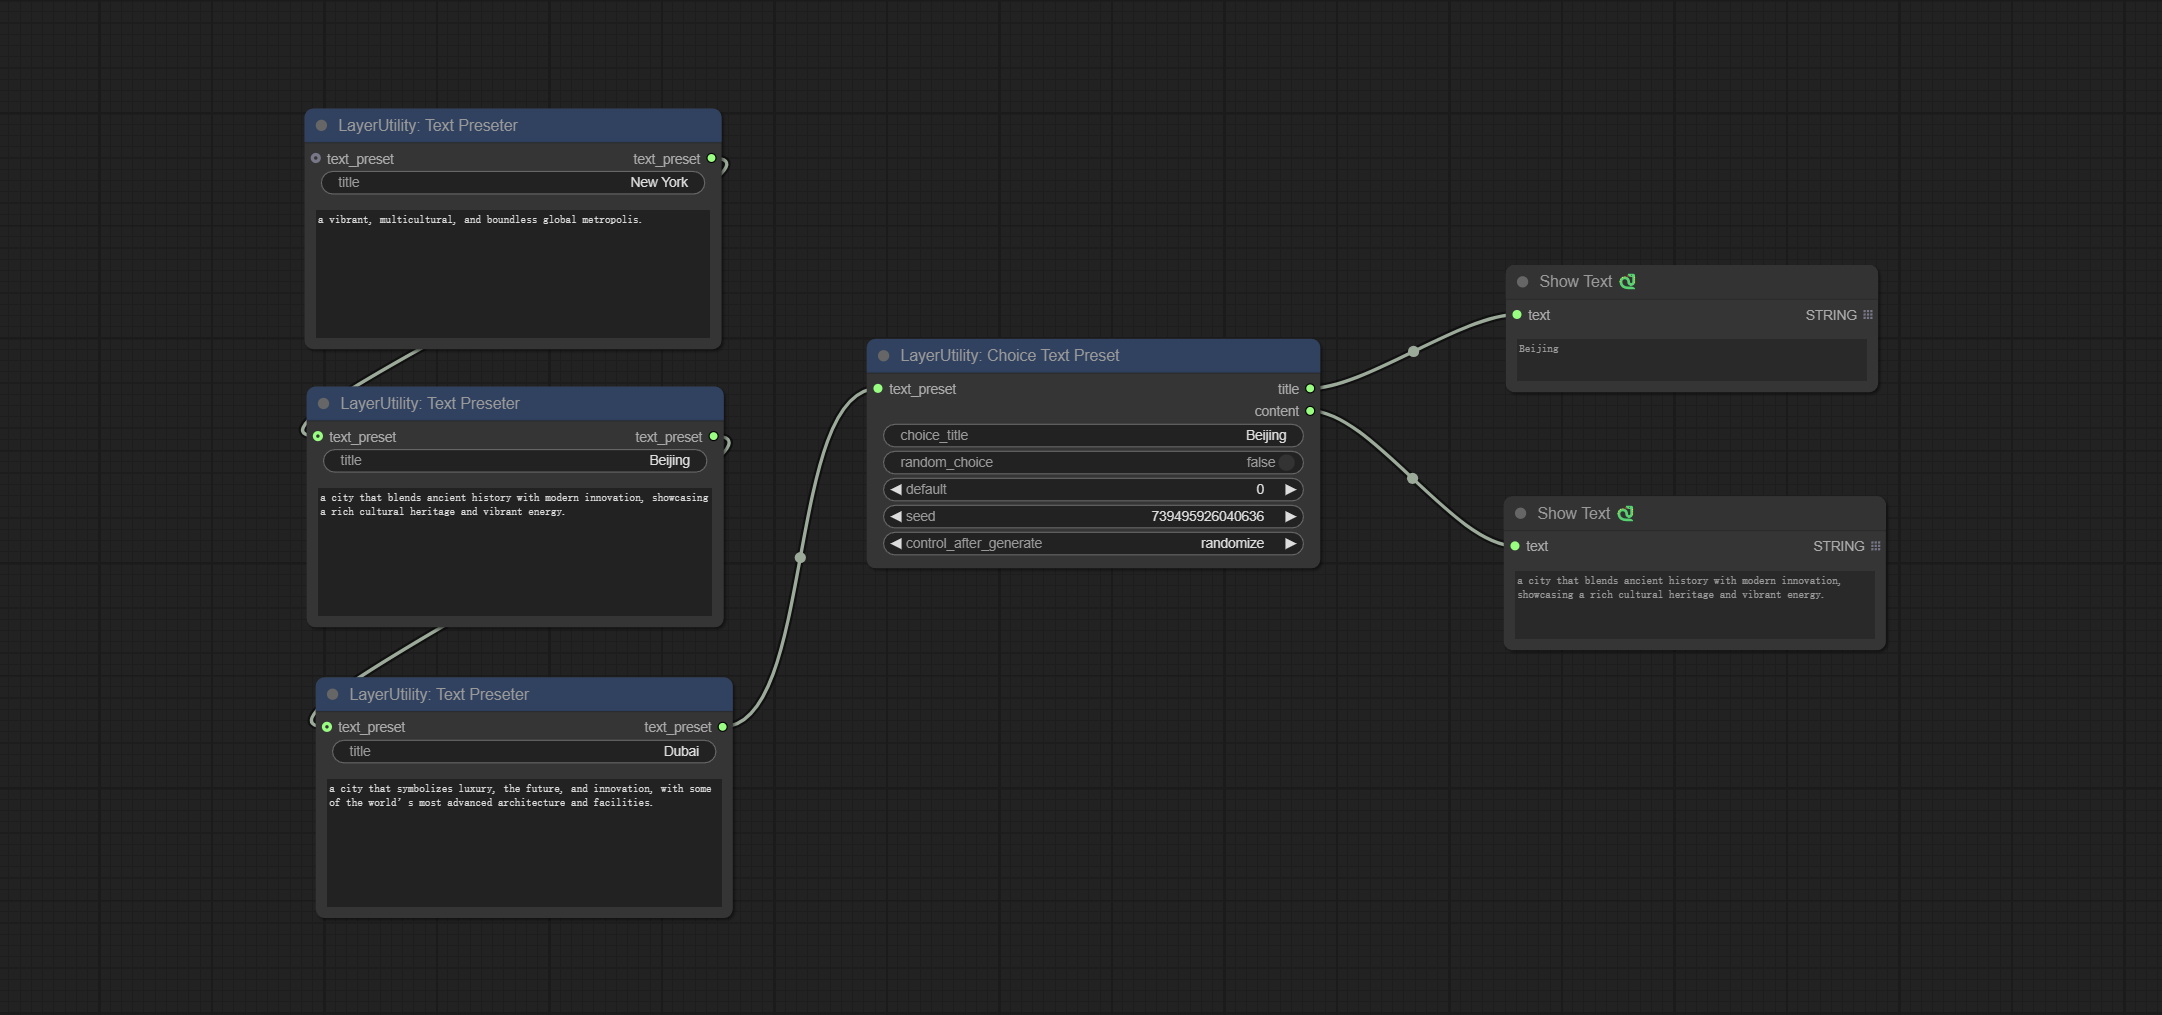
节点选项: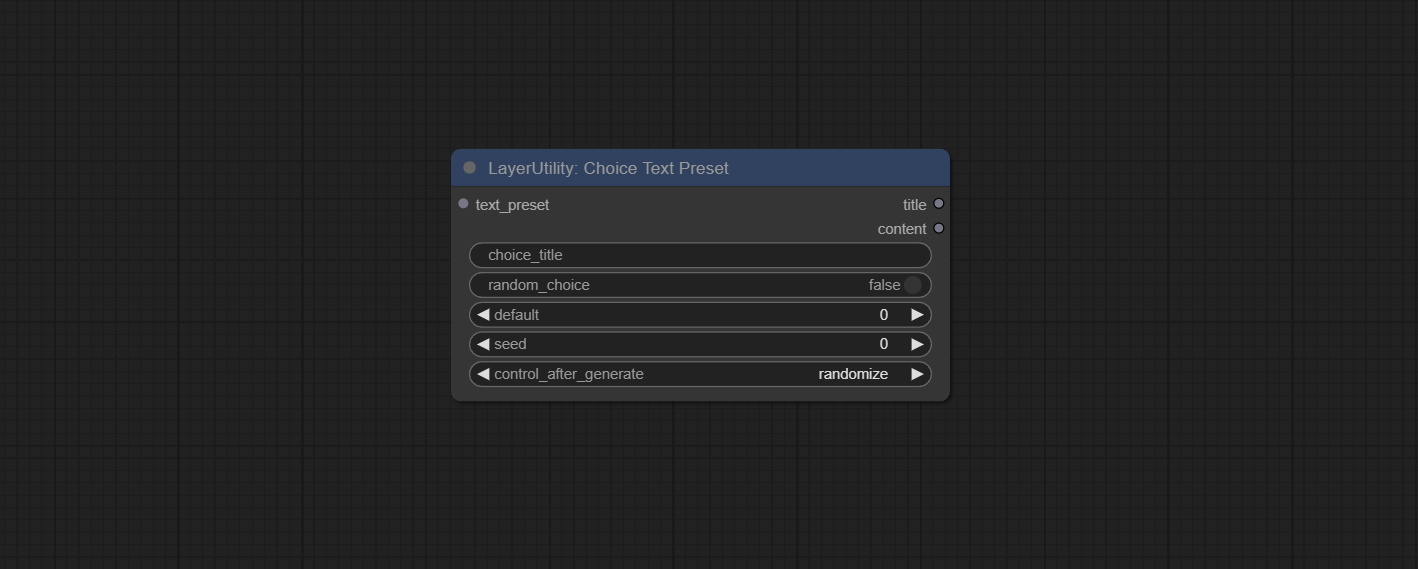
- text_preset: 预设文本。通过TextPreseter节点设置输出。
- choice_title: 选择一个预设标题以输出相应的文本内容。
- random_choice: 是否随机选择一个预设。
- default: 默认输出文本,0对应第一段,依此类推。请注意,超出预设文本段落数量会导致错误。
- seed: 用于随机选择的随机种子。
- control_after_generate: 每次运行时是否更改种子。
输出:
- title: 文本段落标题。
- content: 文本段落内容。
TextPreseter
预设文本字典,为每个节点设置一段文本,支持多个节点串联。
节点选项: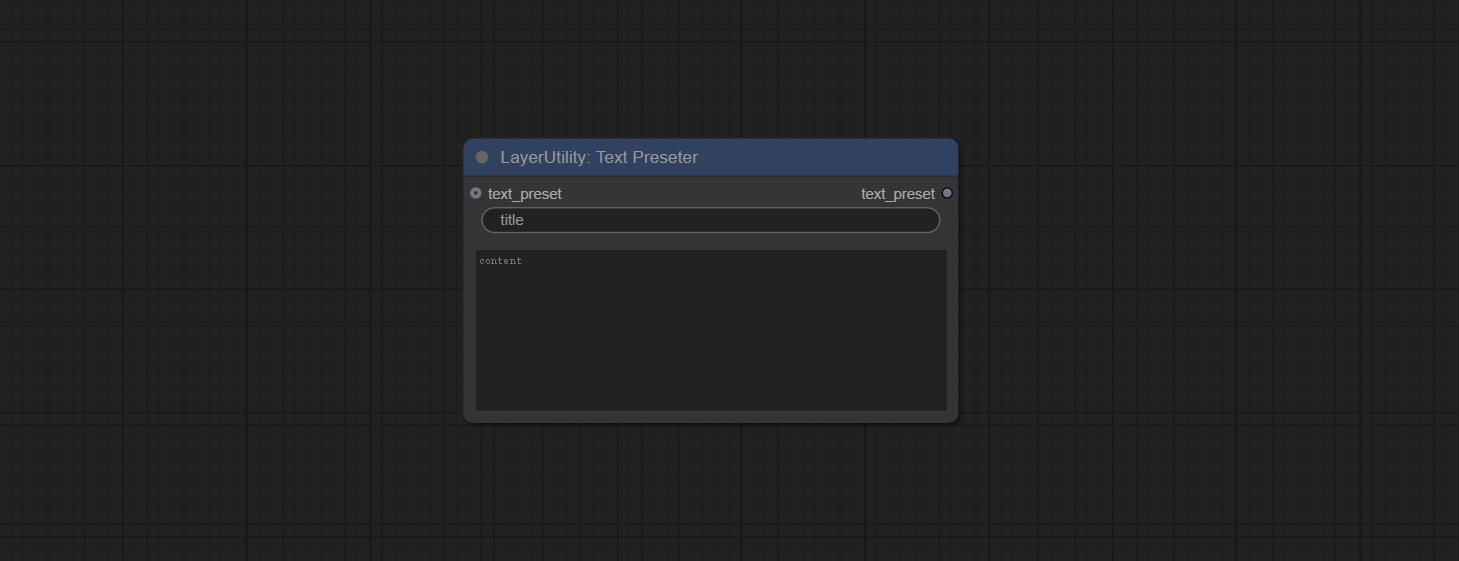
- text_preset: 预设文本输入,可选输入。可以串联多个预设文本节点。
- title: 文本段落标题。
- content: 文本段落内容。
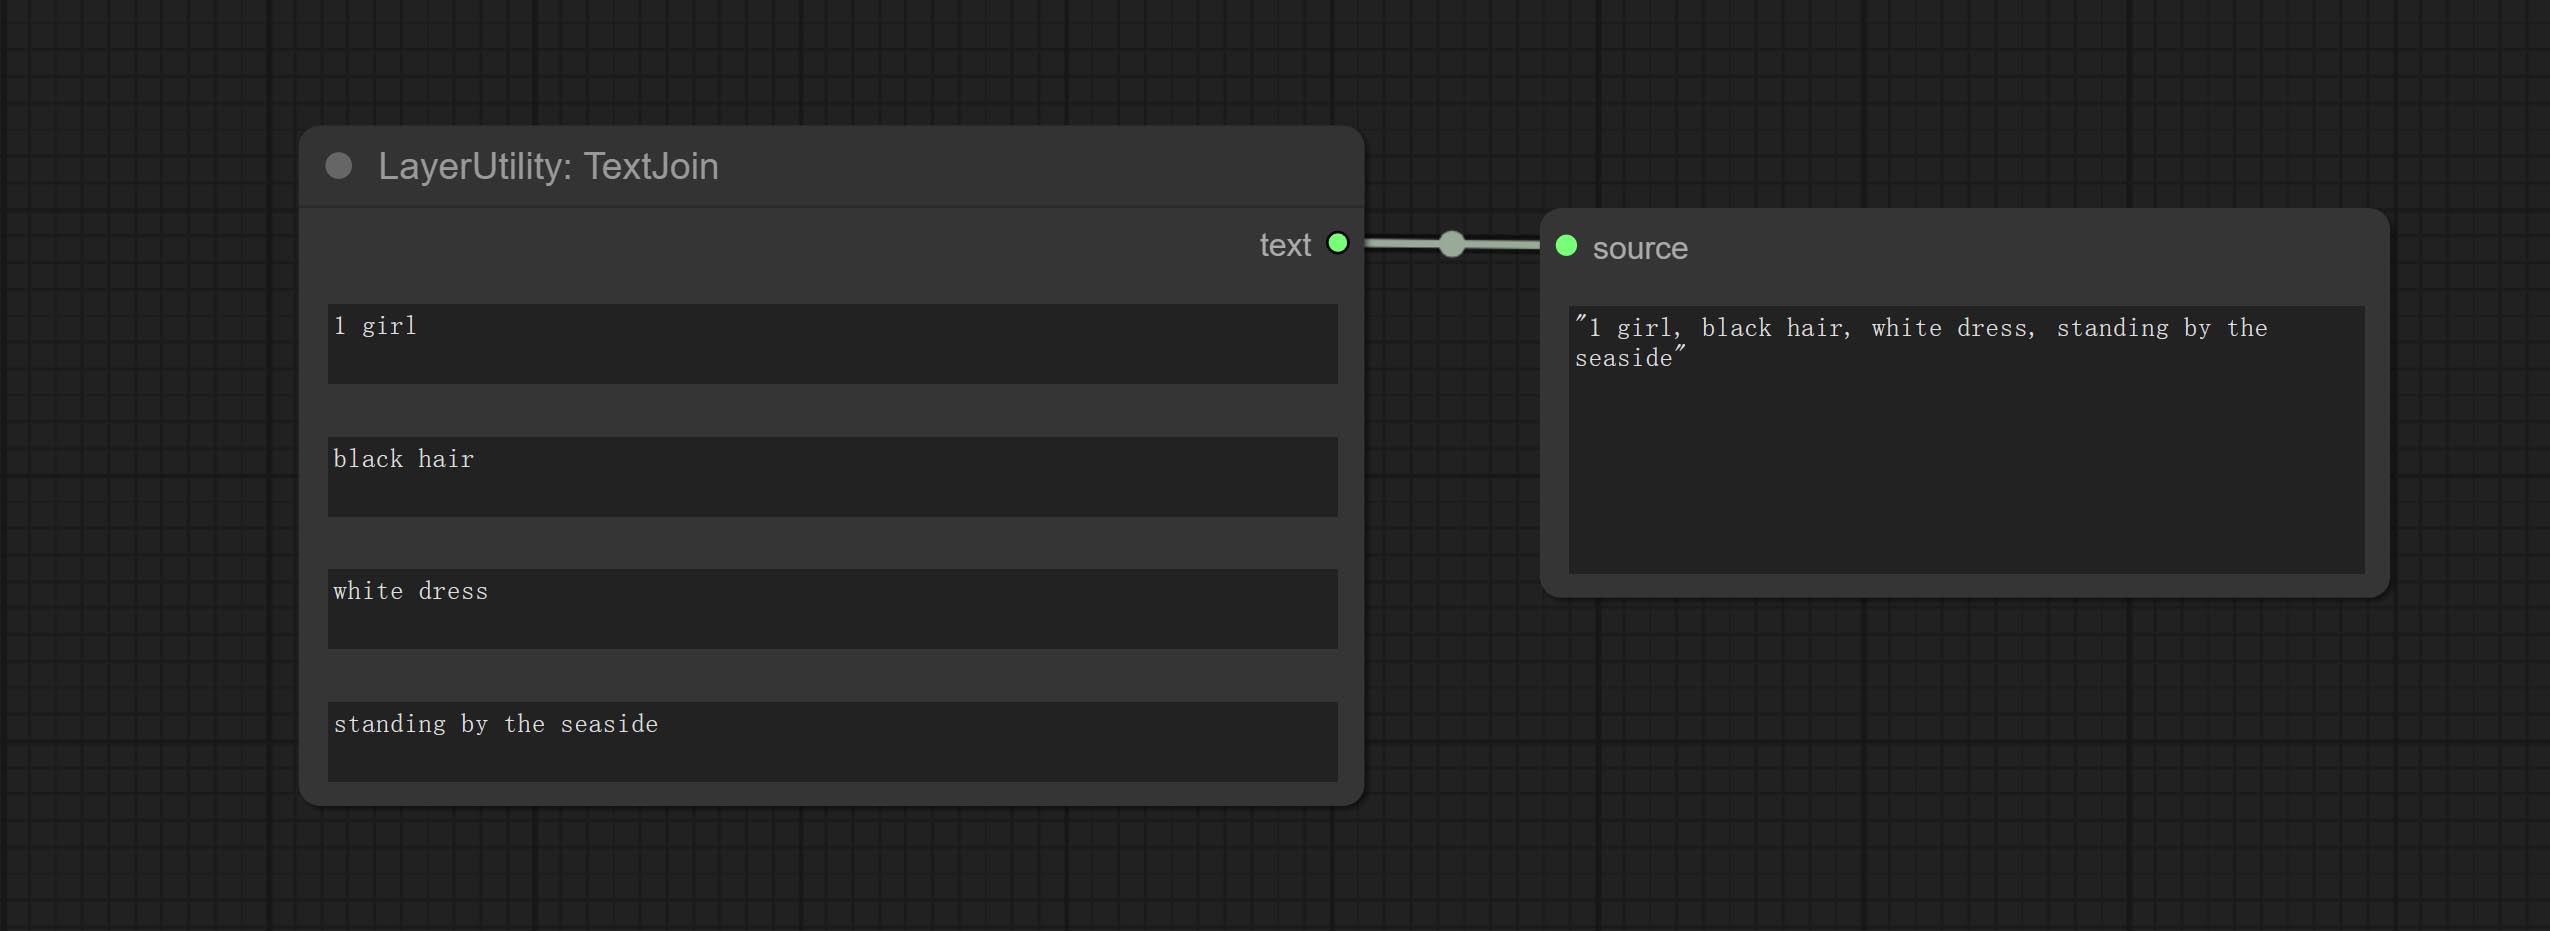
TextJoin
将多段文本合并为一段。
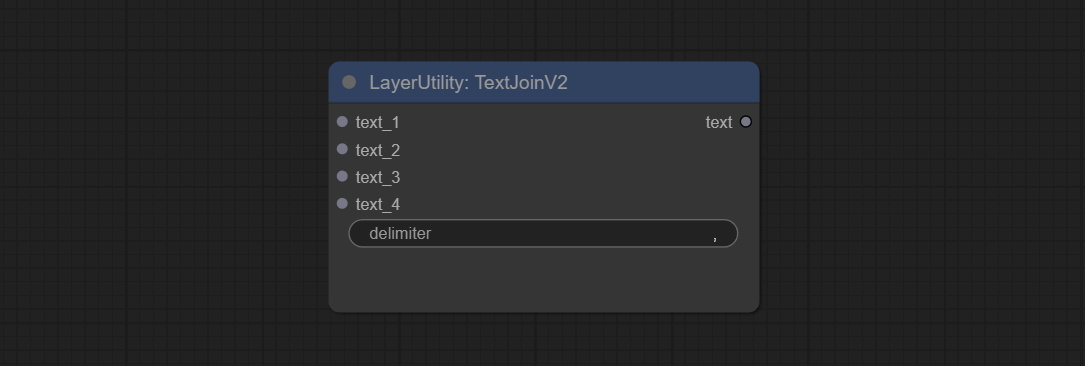
TextJoinV2
在TextJoin的基础上增加了分隔符选项。
PrintInfo

用于辅助工作流调试。运行时,连接到该节点的任何对象的属性都会打印到控制台。
该节点允许任何类型的输入。
TextBox

输出一个字符串。
String
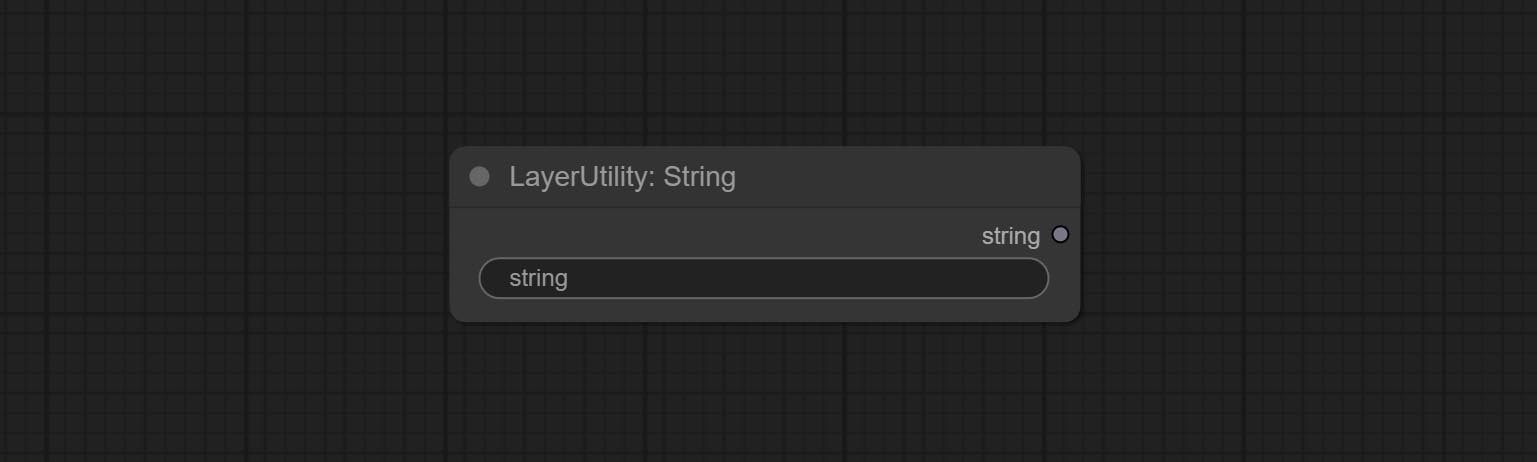
输出一个字符串。与TextBox相同。
Integer
输出一个整数值。
Float
输出一个浮点数值,精度为小数点后5位。
Boolean
输出一个布尔值。
RandomGenerator
用于在指定范围内生成随机值,输出类型包括整数、浮点数和布尔值。支持批量和列表生成,并且可以根据图像批次生成一组不同的随机数列表。
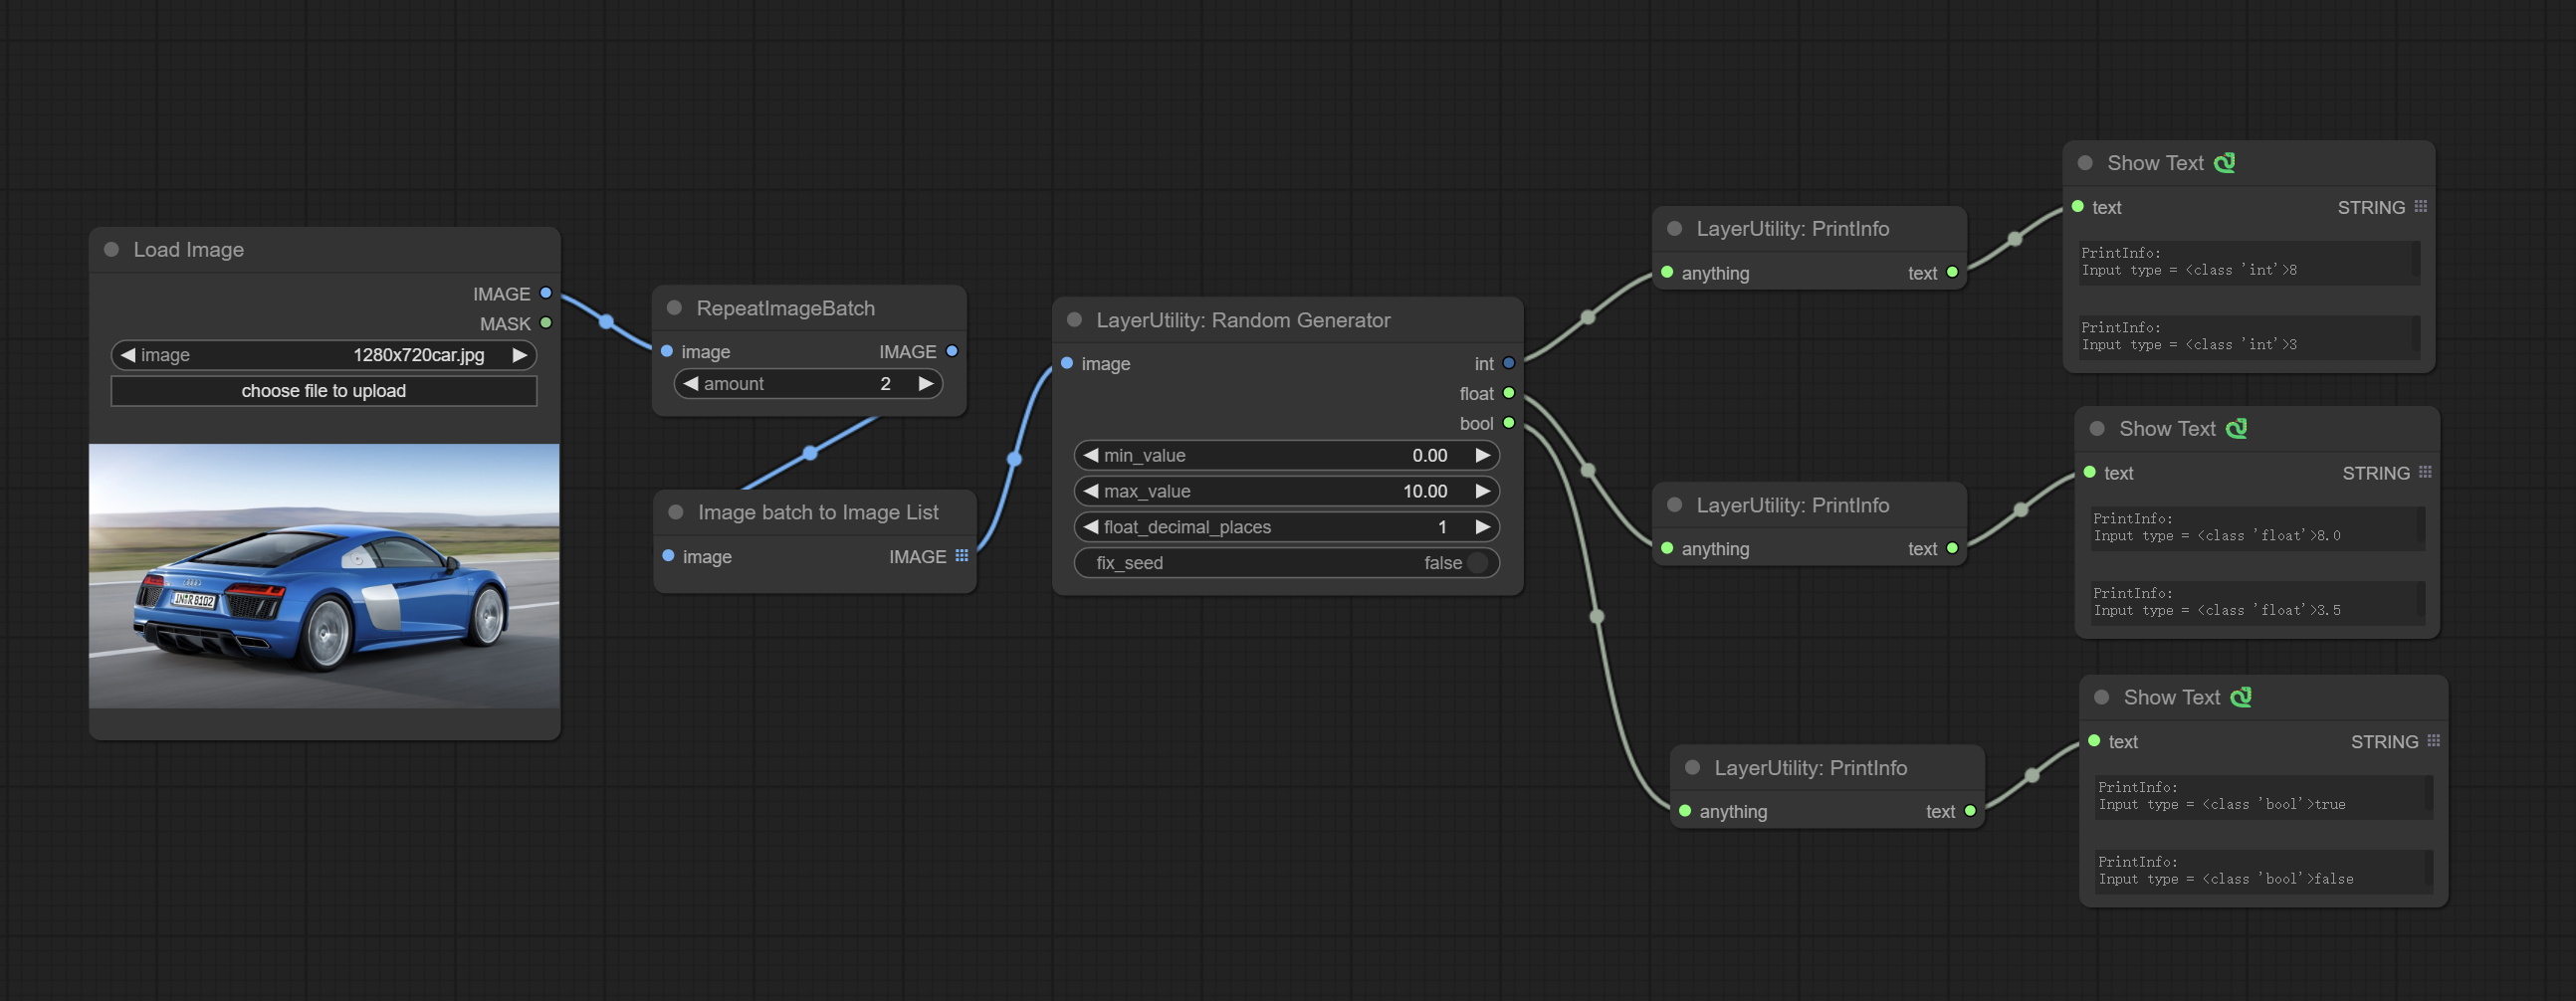
节点选项:
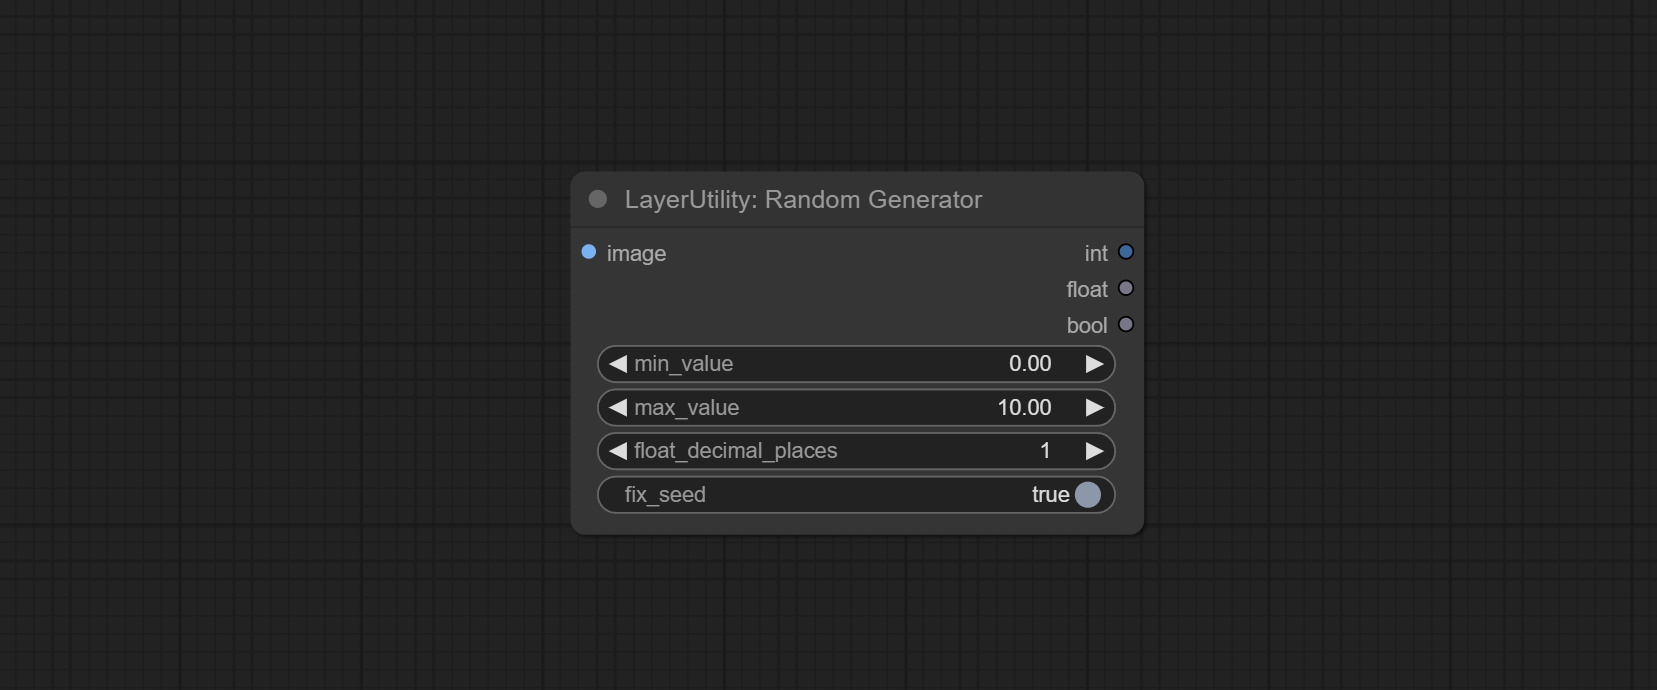
- image: 可选输入,根据图像数量按批次生成随机数列表。
- min_value: 最小值。随机数将在最小值和最大值之间随机取值。
- max_value: 最大值。随机数将在最小值和最大值之间随机取值。
- float_decimal_places: 浮点值的精度。
- fix_seed: 随机数种子是否固定。如果此选项固定,则每次生成的随机数将始终相同。
输出: int: 整数随机数。 float: 浮点随机数。 bool: 布尔随机数。
RandomGeneratorV2
在RandomGenerator的基础上,增加了最小随机范围和种子选项。
节点选项:
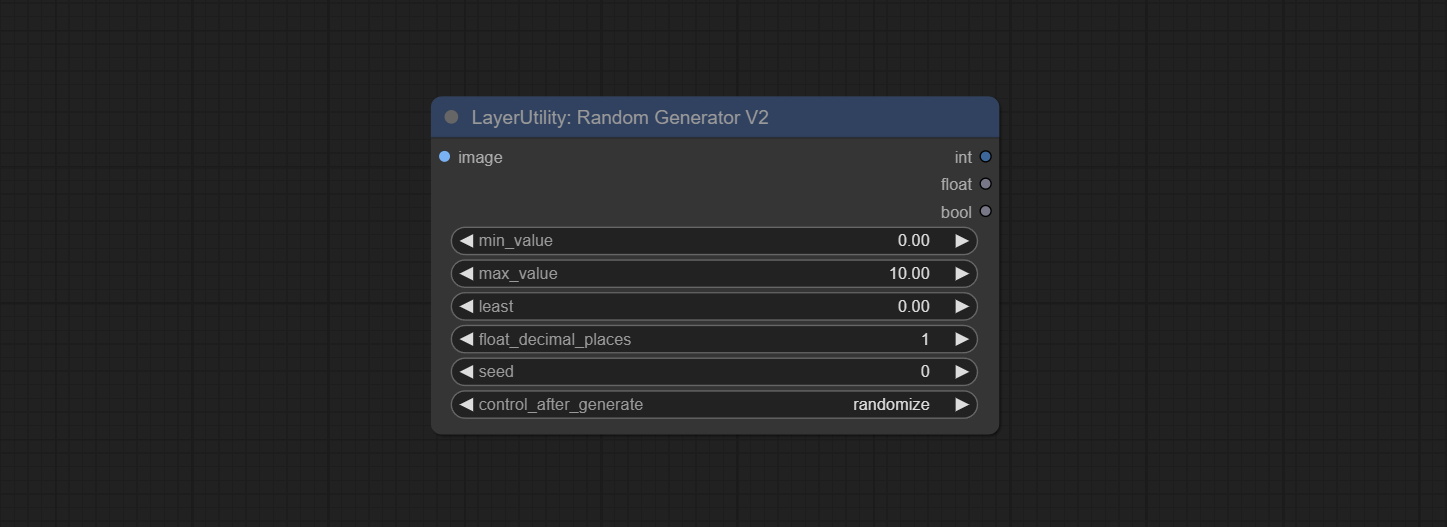
- image: 可选输入,根据图像数量按批次生成随机数列表。
- min_value: 最小值。随机数将在最小值和最大值之间随机取值。
- max_value: 最大值。随机数将在最小值和最大值之间随机取值。
- least: 最小随机范围。随机数至少会取这个值。
- float_decimal_places: 浮点值的精度。
- seed: 随机数的种子。
- control_after_generate: 种子更改选项。如果此选项固定,则每次生成的随机数将始终相同。
输出: int: 整数随机数。 float: 浮点随机数。 bool: 布尔随机数。
NumberCalculator
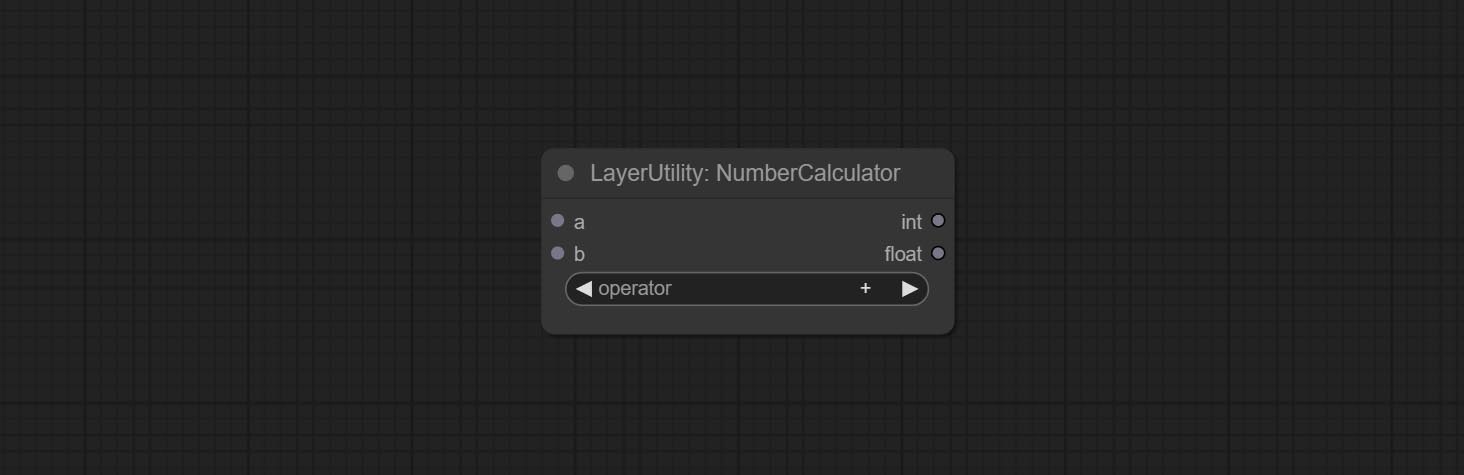
对两个数值进行数学运算,并输出整数和浮点结果*。支持的运算包括+, -, *, /, **, //, %。
* 输入仅支持布尔值、整数和浮点数,强制输入其他数据会导致错误。
NumberCalculatorV2
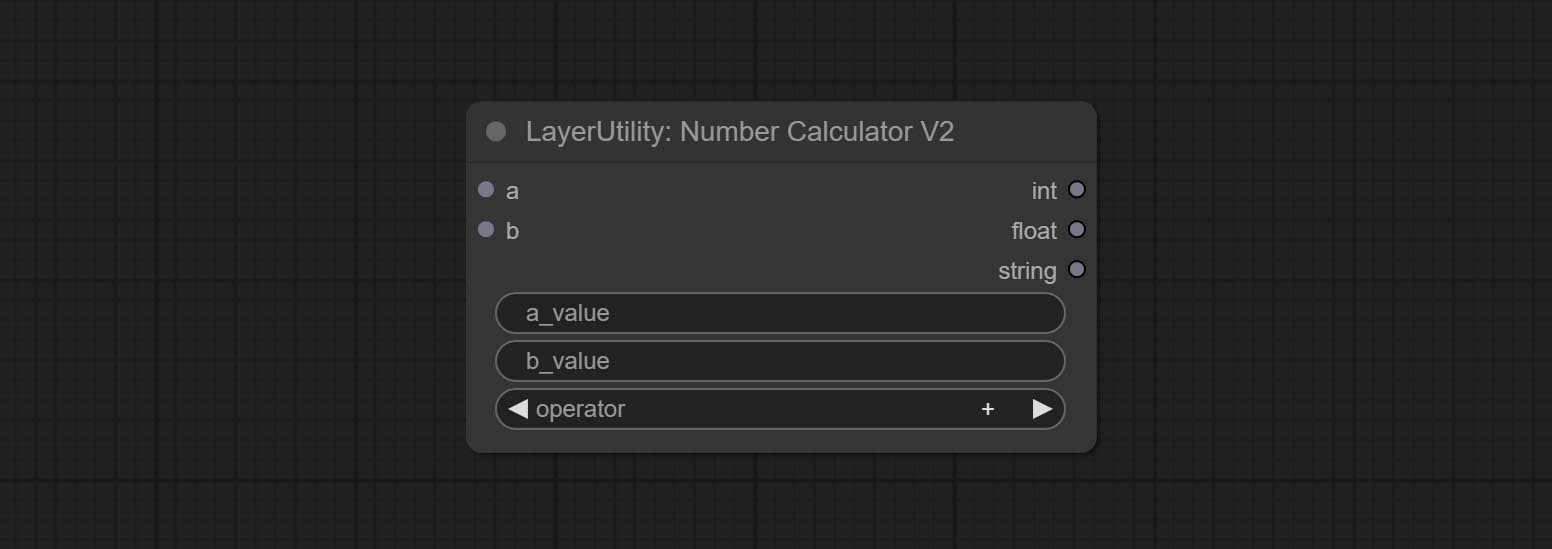
NumberCalculator的升级版增加了节点内的数值输入和平方根运算。平方根运算选项为nth_root。
注意:输入具有优先级,当有输入时,节点内的数值将无效。
BooleanOperator

对两个数值进行布尔运算并输出结果*。支持的运算包括==, !=, and, or, xor, not, min, max。
* 输入仅支持布尔值、整数和浮点数,强制输入其他数据会导致错误。其中and运算会输出较大的数值,而or运算则会输出较小的数值。
BooleanOperatorV2

Boolean Operator的升级版增加了节点内的数值输入,并新增了大于、小于、大于等于以及小于等于的判断条件。
注意:输入具有优先级,当有输入时,节点内的数值将无效。
StringCondition
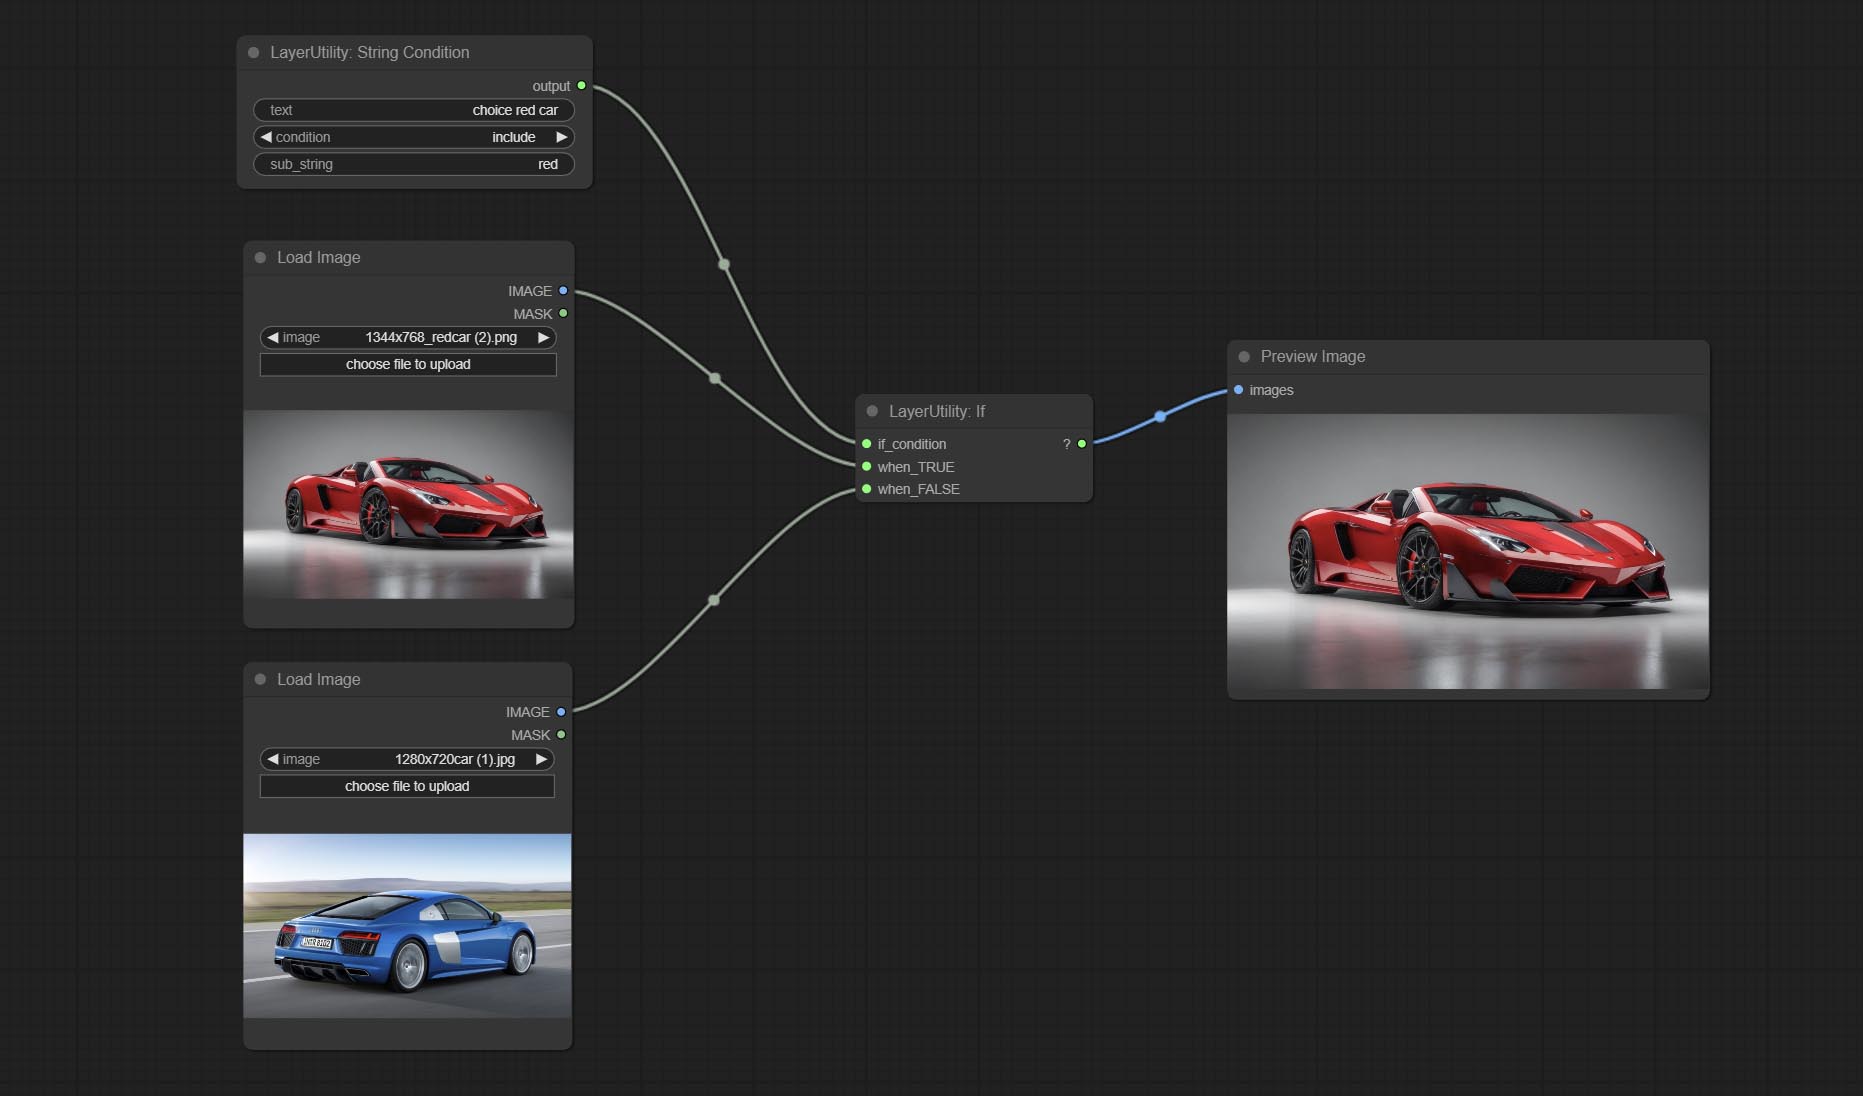
判断文本是否包含或不包含子字符串,并输出一个布尔值。
节点选项:
- text: 输入文本。
- condition: 判断条件。
include用于判断是否包含子字符串,exclude用于判断是否不包含,而equal则用于判断是否等于该子字符串。 - sub_string: 子字符串。
CheckMask
检查掩码中是否包含足够多的有效区域,并输出一个布尔值。
节点选项:
- white_point: 用于判断掩码是否有效的白点阈值。若超过此值,则视为有效。
- area_percent: 有效区域的百分比。若有效区域的比例超过此值,则输出 True。
CheckMaskV2
在 CheckMask 的基础上,新增了 method 选项,允许选择不同的检测方法。同时,将 area_percent 改为保留两位小数的浮点数,从而能够检测更小的有效区域。
节点选项: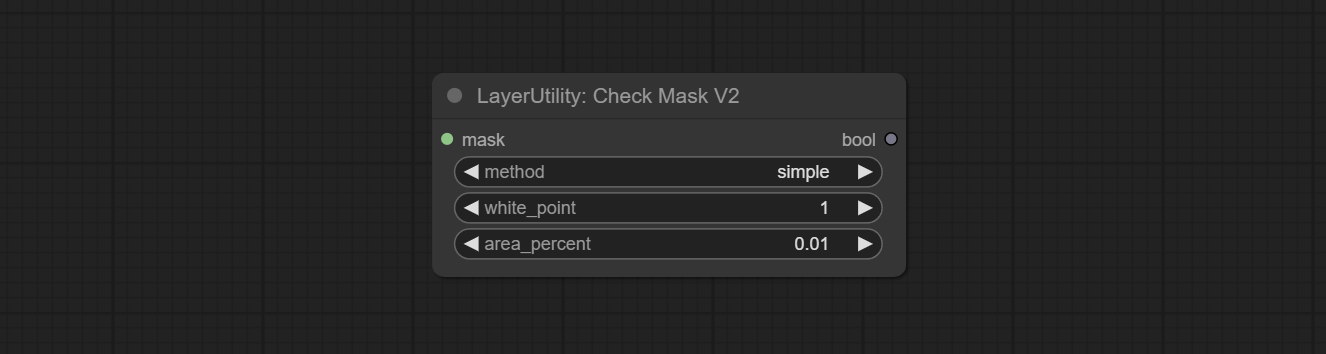
- method: 检测方法有两种,分别是
simple和detectability。简单方法仅检测掩码是否完全黑色,而 detect_percent 方法则会检测有效区域所占的比例。
If
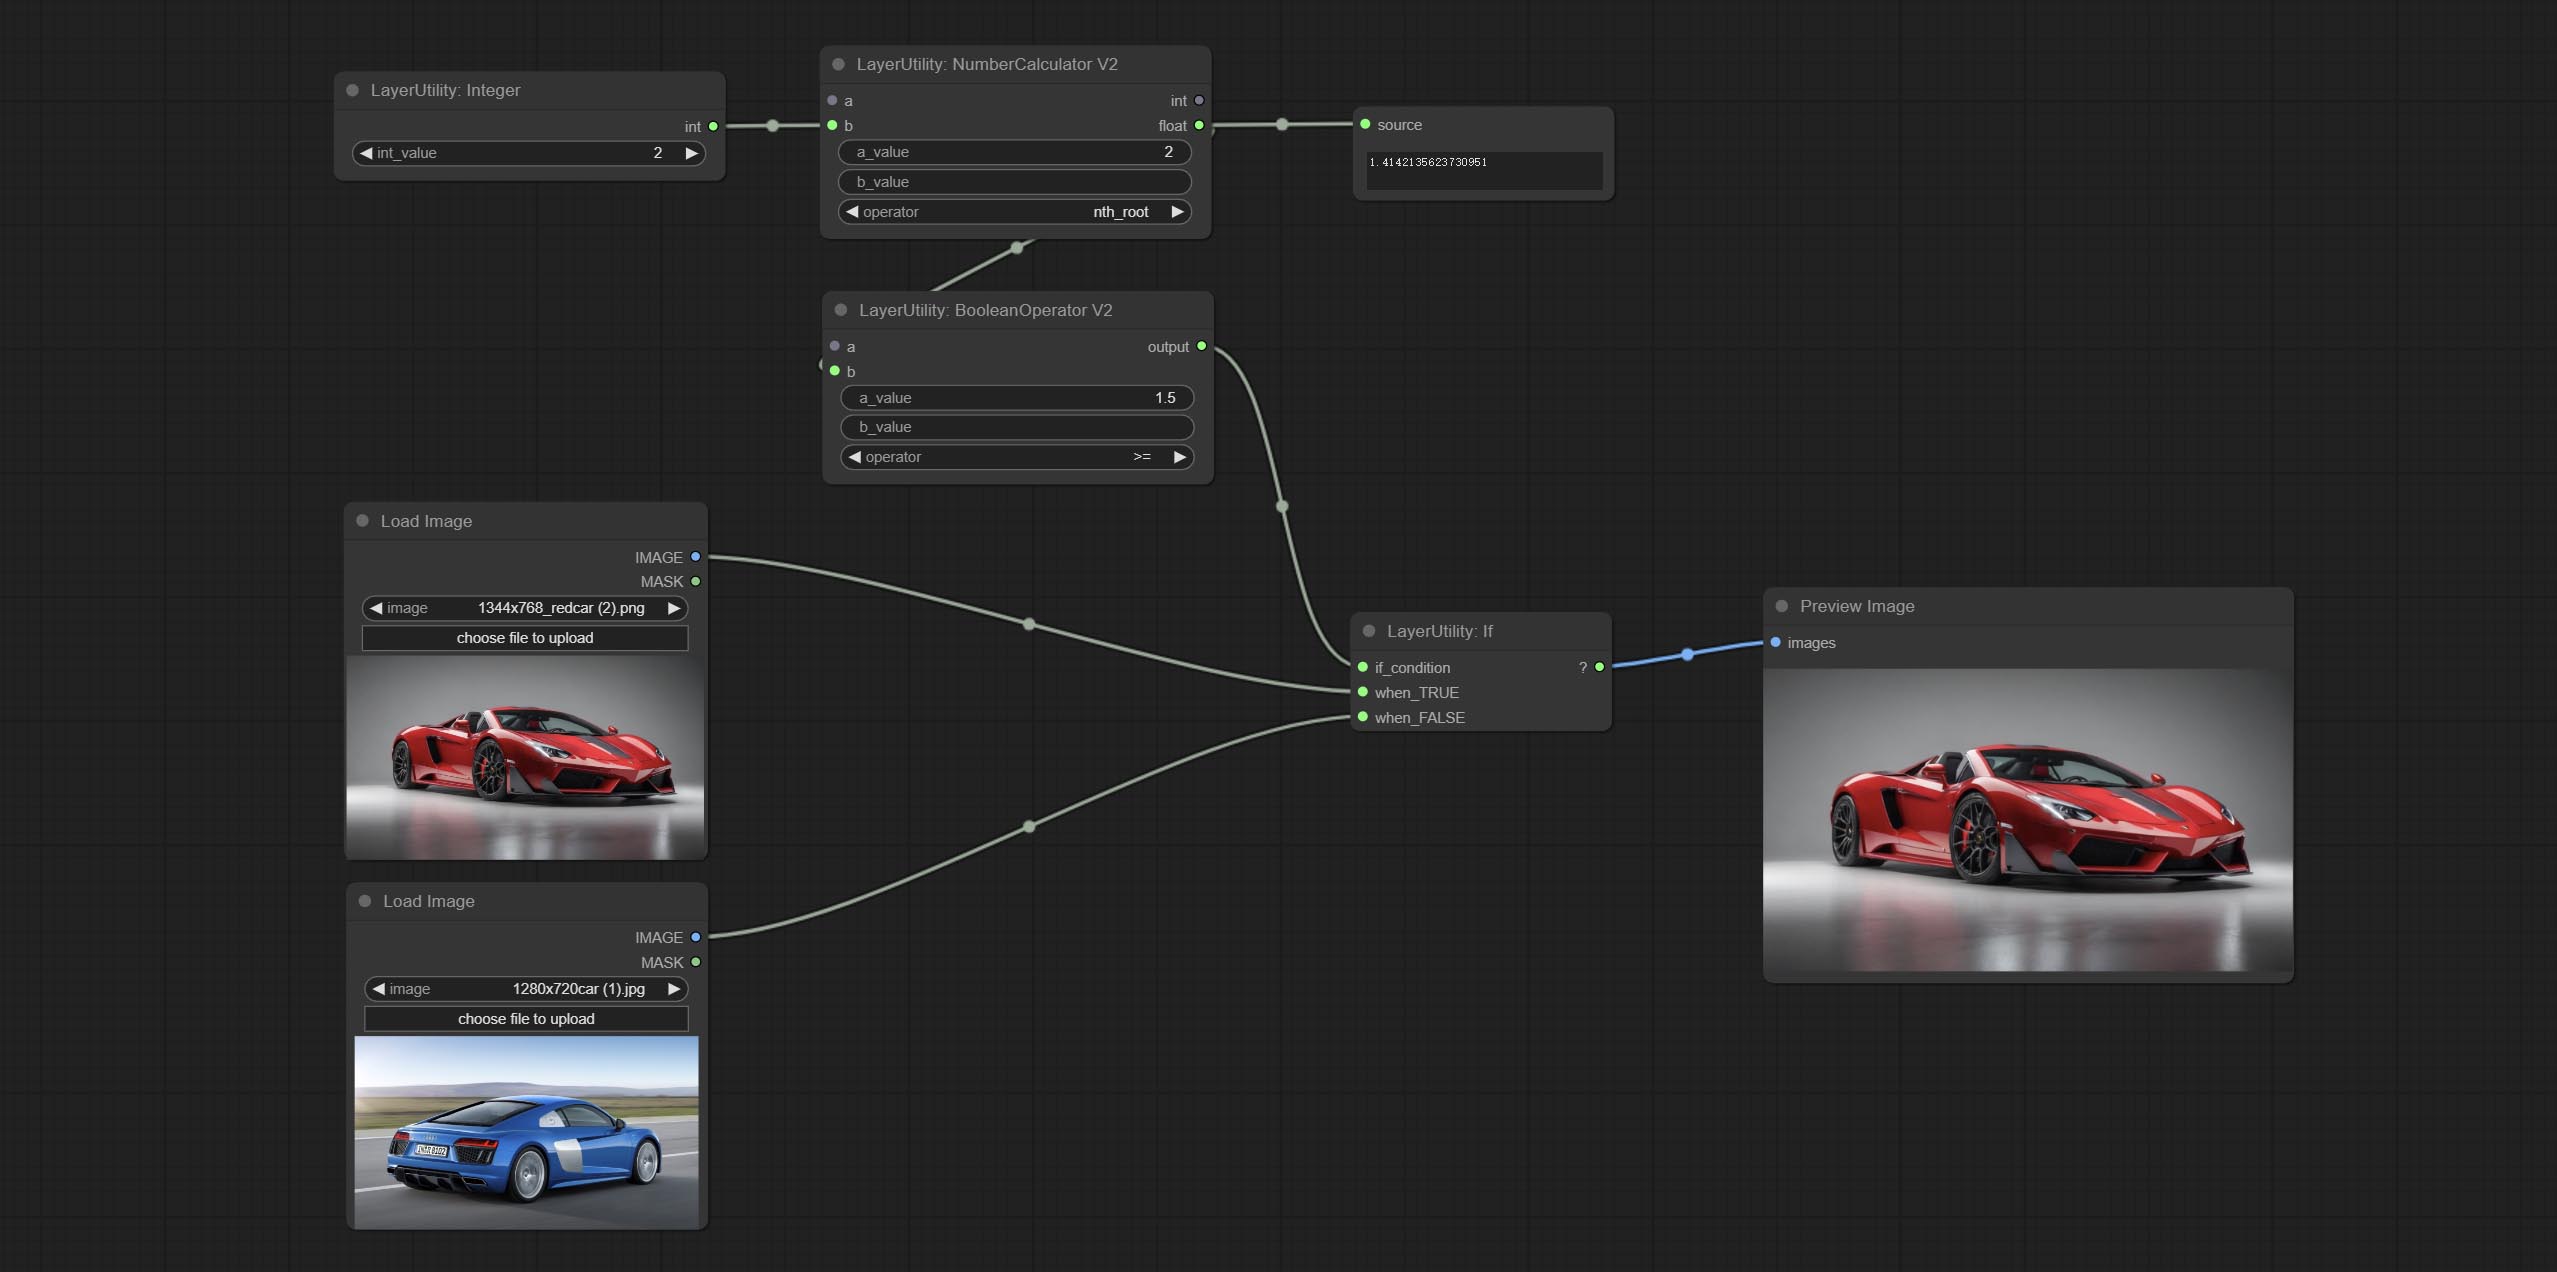
根据布尔类型的条件输入切换输出。可用于任何类型的数据切换,包括但不限于数值、字符串、图片、掩码、模型、潜在变量、管道流程等。
节点选项: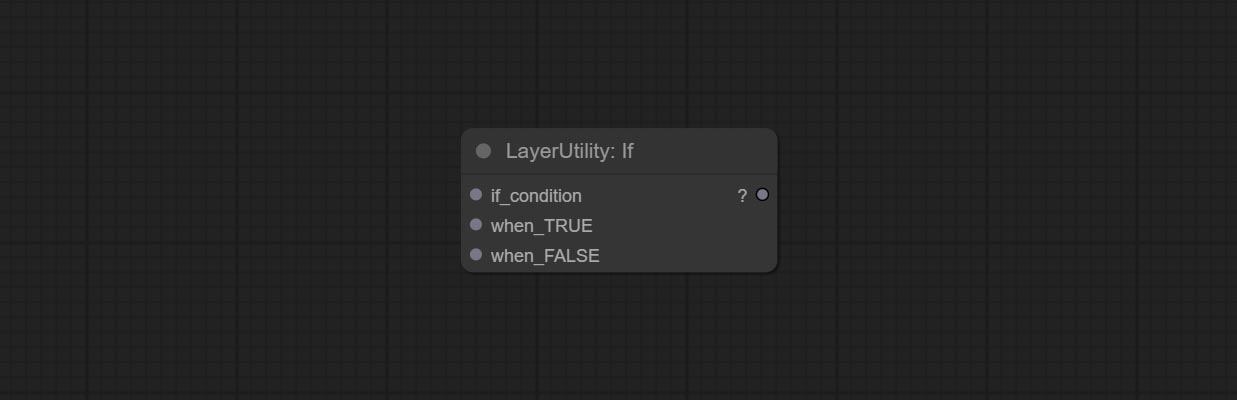
- if_condition: 条件输入。支持布尔值、整数、浮点数和字符串输入。当输入数值时,0 被判定为 False;当输入字符串时,空字符串也被判定为 False。
- when_True: 当条件为 True 时,输出此项。
- when_False: 当条件为 False 时,输出此项。
SwitchCase
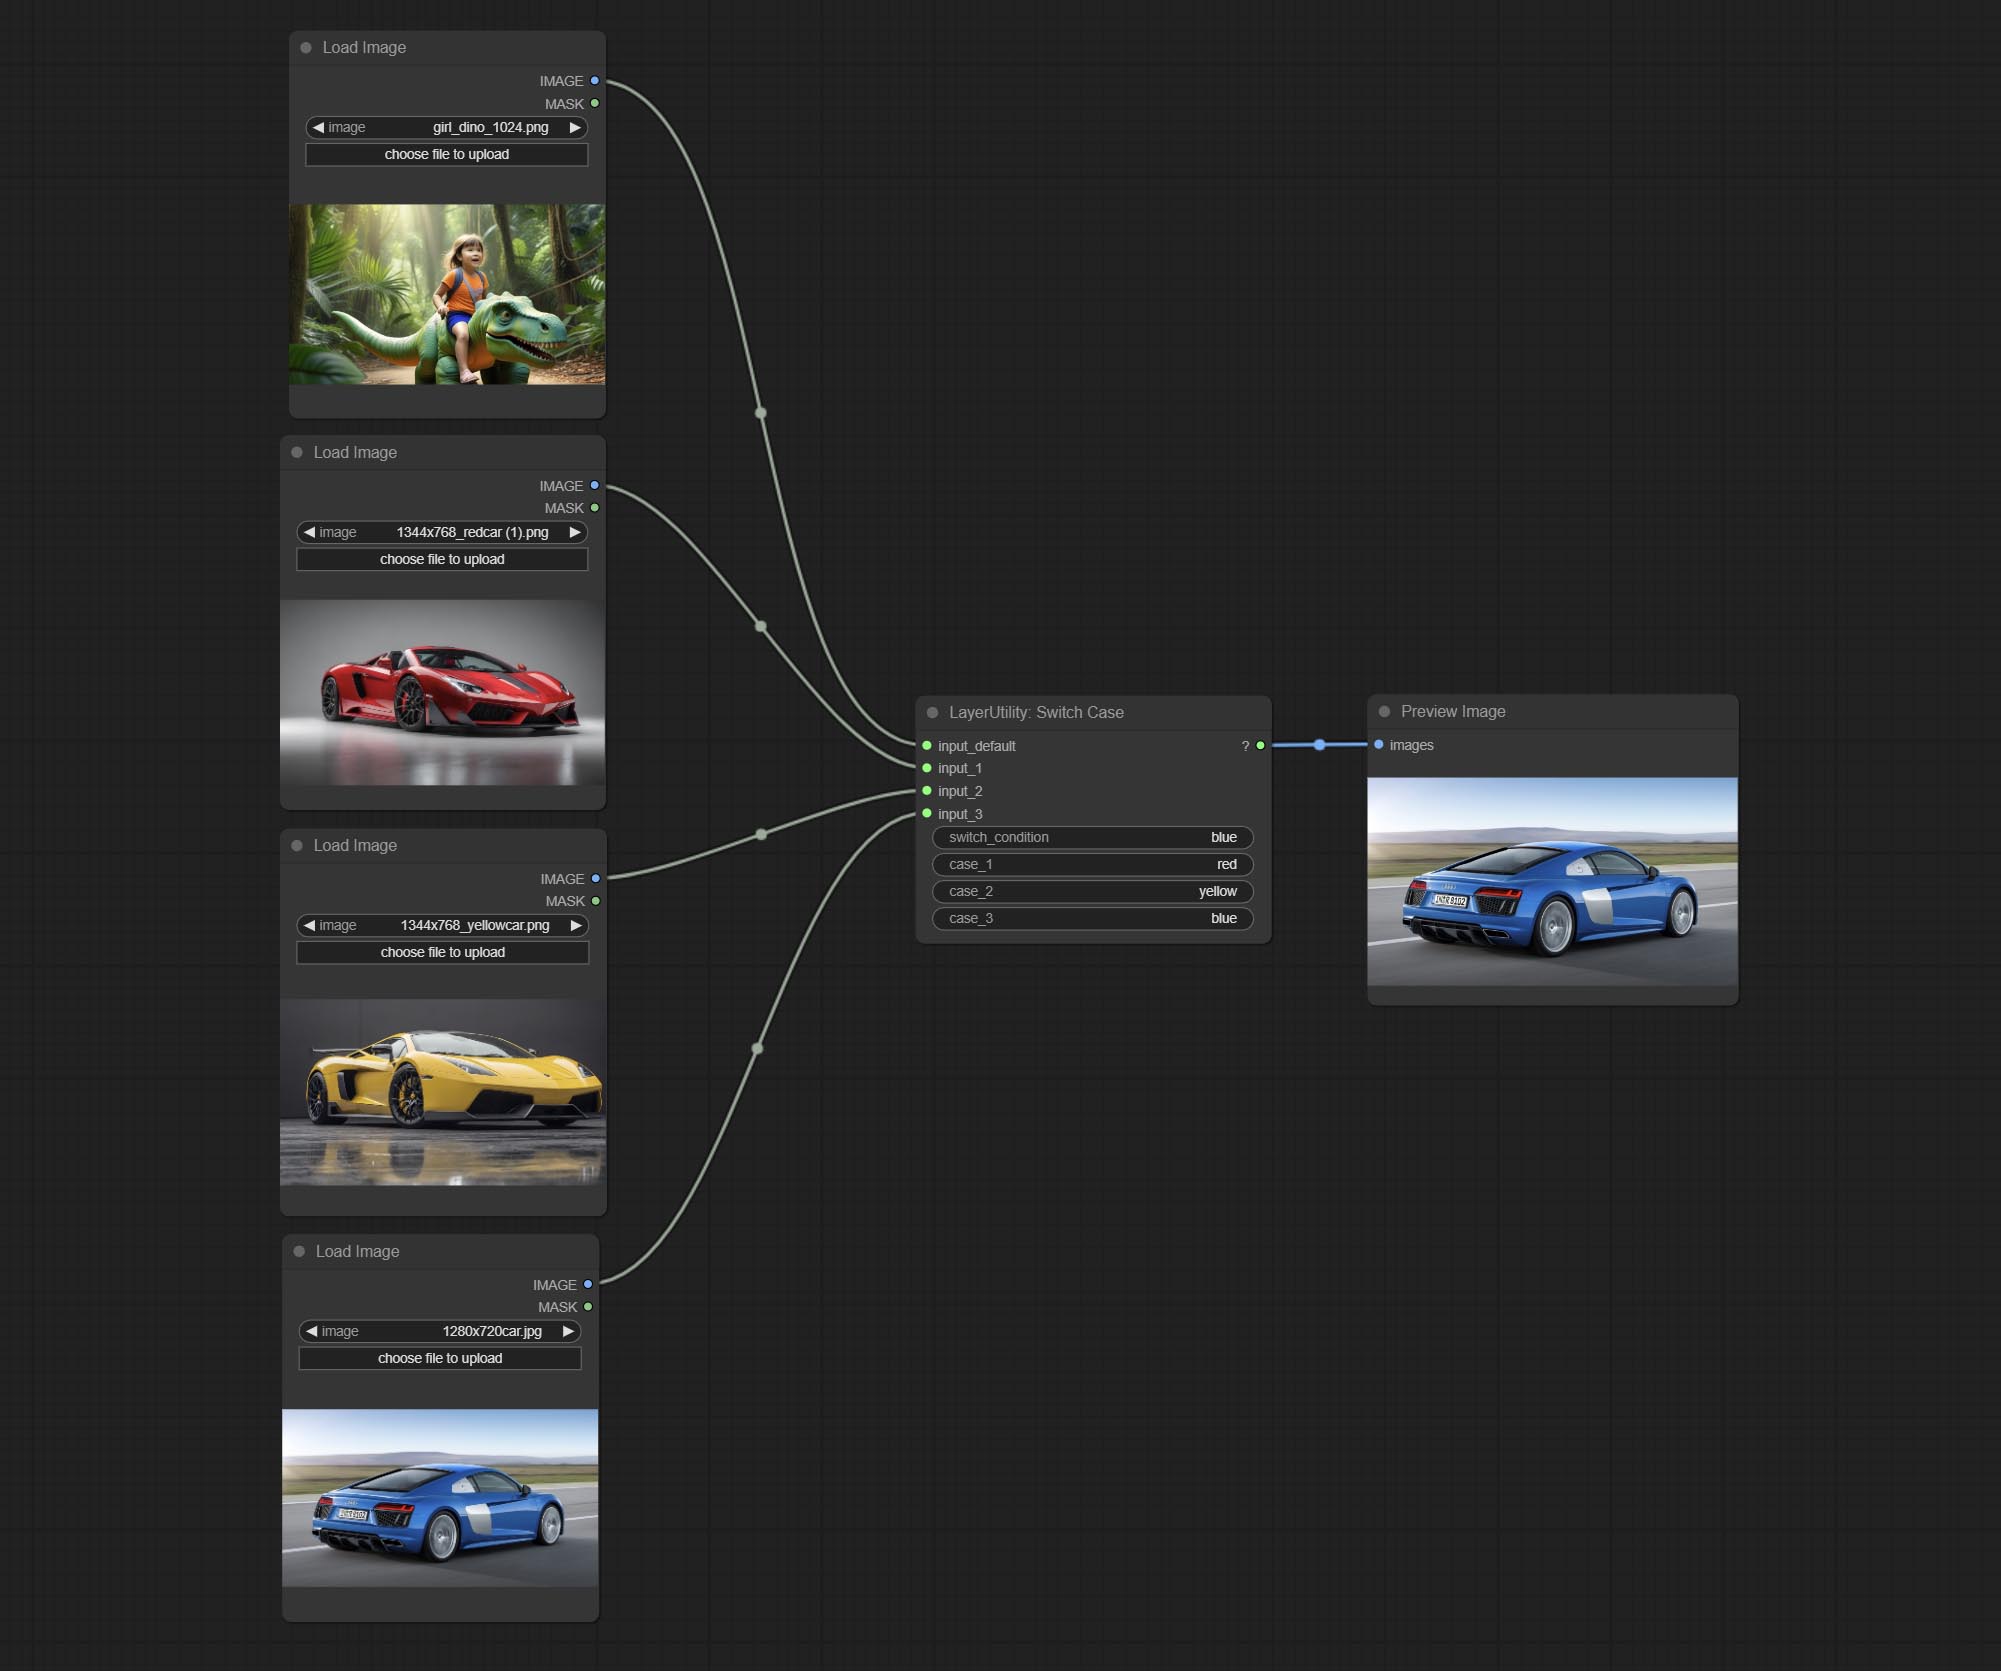
根据匹配的字符串切换输出。可用于任何类型的数据切换,包括但不限于数值、字符串、图片、掩码、模型、潜在变量、管道流程等。最多支持 3 组 case 切换。
将 case 与 switch_condition 进行比较,若相同,则输出对应的输入。若有多个相同的 case,则按顺序优先输出。若无匹配的 case,则输出默认输入。
请注意,字符串区分大小写,且中文和英文的全角与半角也需注意。
节点选项: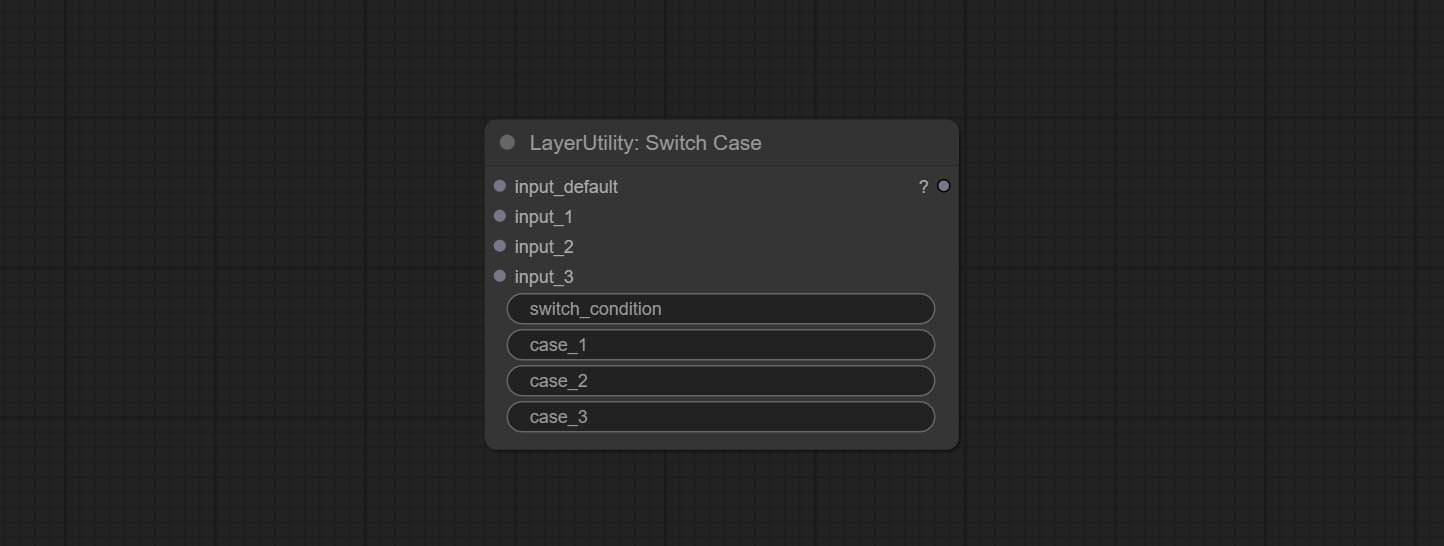
- input_default: 默认输出的输入项。此项为必填项。
- input_1: 用于匹配
case_1的输入项。此项为可选项。 - input_2: 用于匹配
case_2的输入项。此项为可选项。 - input_3: 用于匹配
case_3的输入项。此项为可选项。 - switch_condition: 用于与 case 进行判断的字符串。
- case_1: case_1 字符串。
- case_2: case_2 字符串。
- case_3: case_3 字符串。
QueueStop

停止当前队列。在此节点执行时,队列将停止运行。上述工作流图显示,如果图像大于 1 兆像素,队列将停止执行。
节点选项: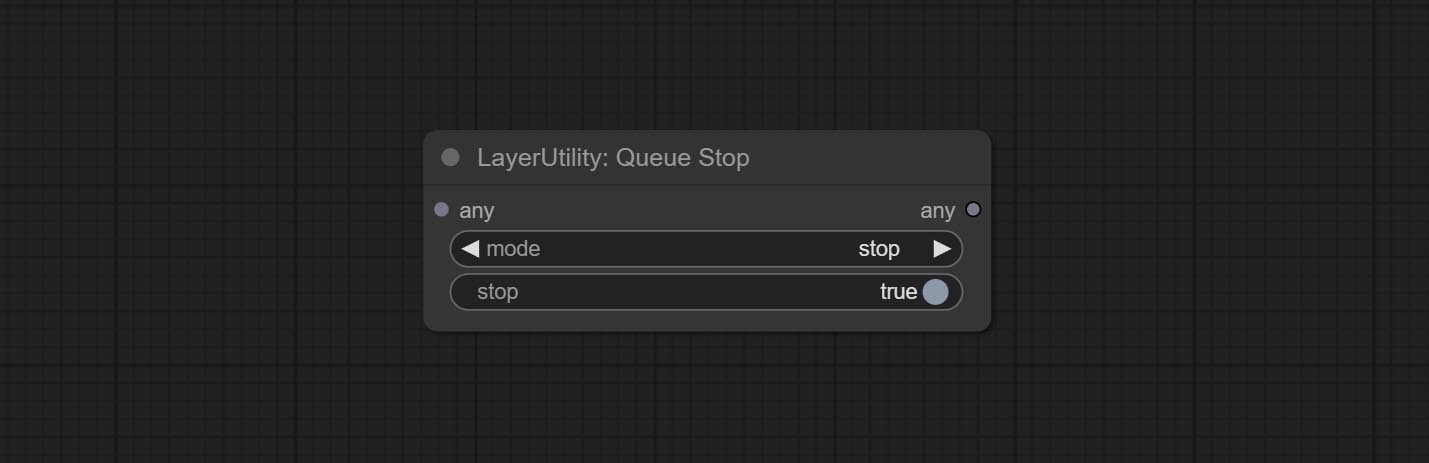
- mode: 停止模式。若选择
stop,则会根据输入条件决定是否停止;若选择continue,则忽略条件继续执行队列。 - stop: 若为真,队列将停止;若为假,队列将继续执行。
PurgeVRAM
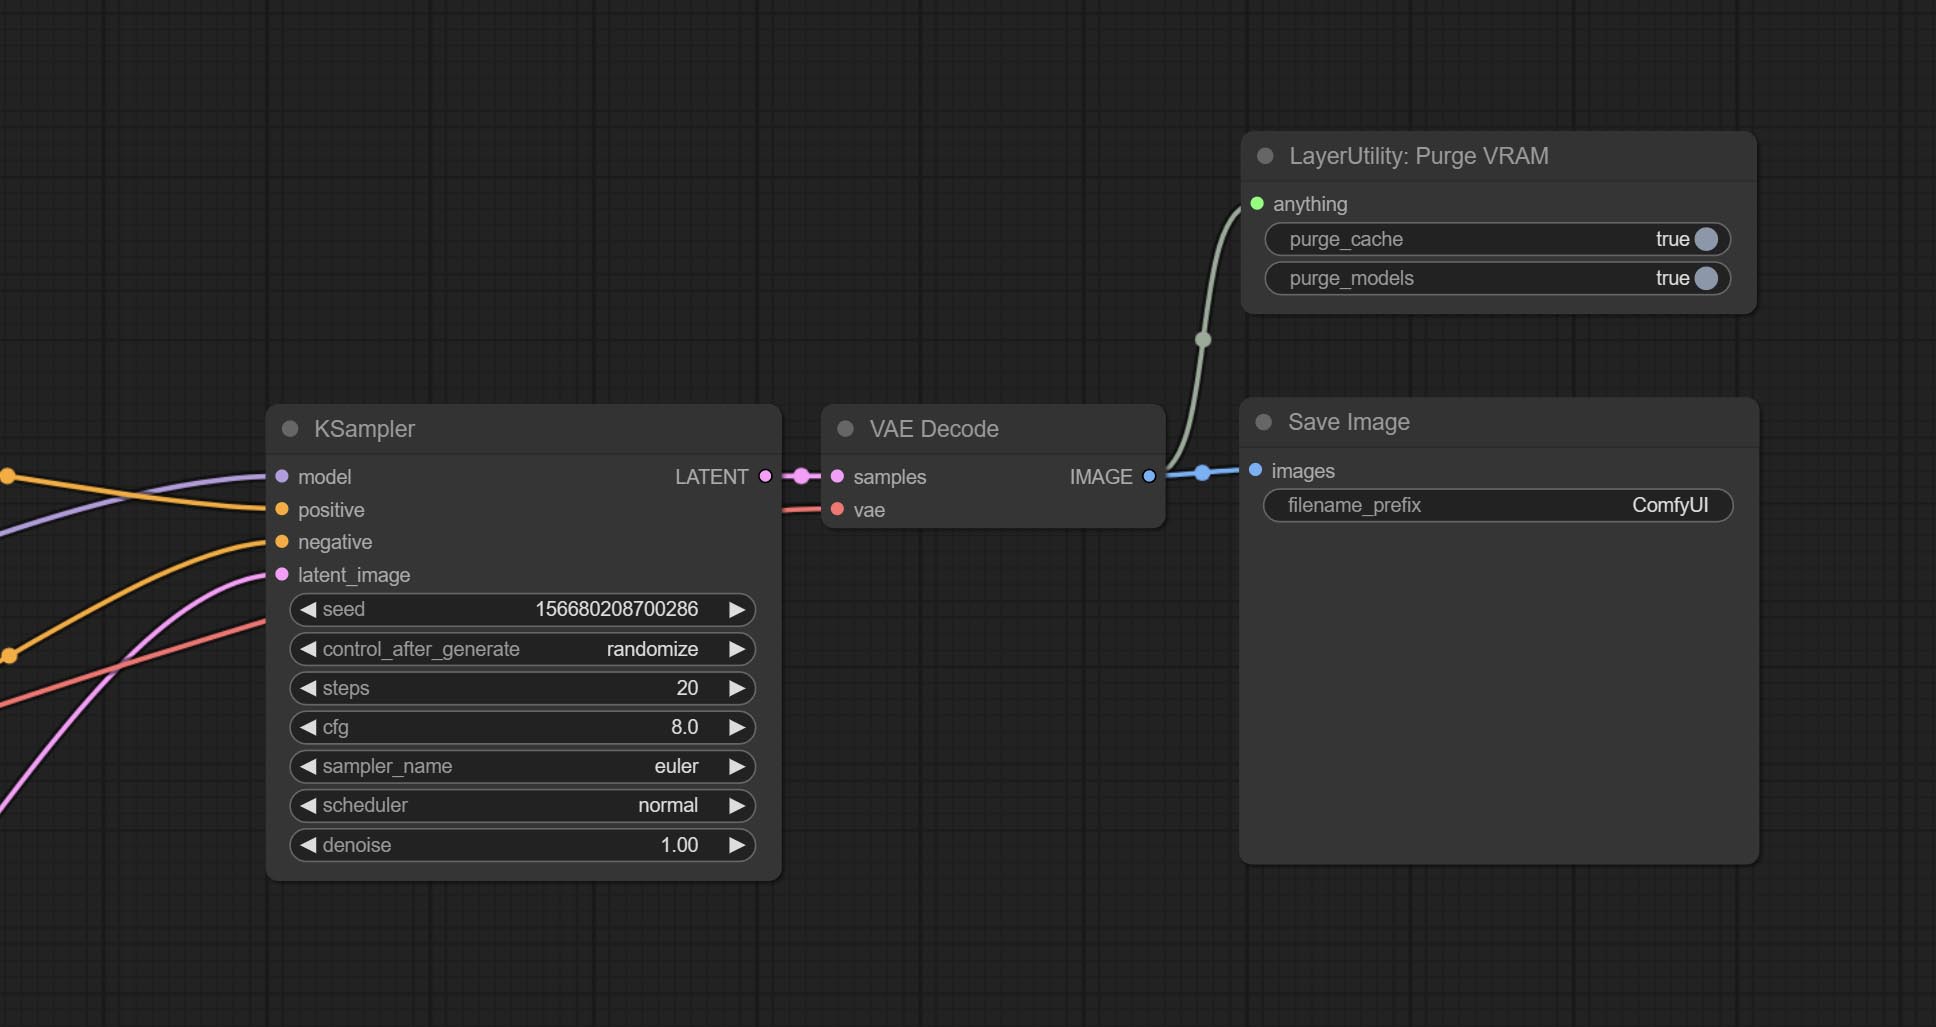
清理 GPU VRAM 和系统 RAM。可接受任何类型的输入,执行到此节点时,VRAM 及 RAM 中的垃圾对象会被清理。通常放置在推理任务完成后的节点之后,例如 VAE 解码节点。
节点选项:
- purge_cache: 清理缓存。
- purge_models: 卸载所有已加载的模型。
PurgeVRAMV2
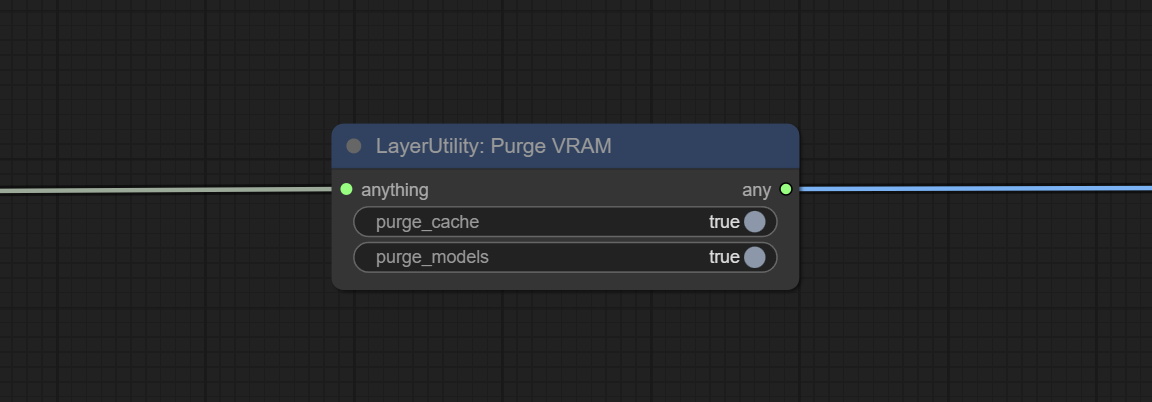
与 PurgeVRM 不同,此节点并非强制性操作,可在保持原有输出的同时处理流程中的任意输入,从而实现灵活的清理。
ImageTaggerSave
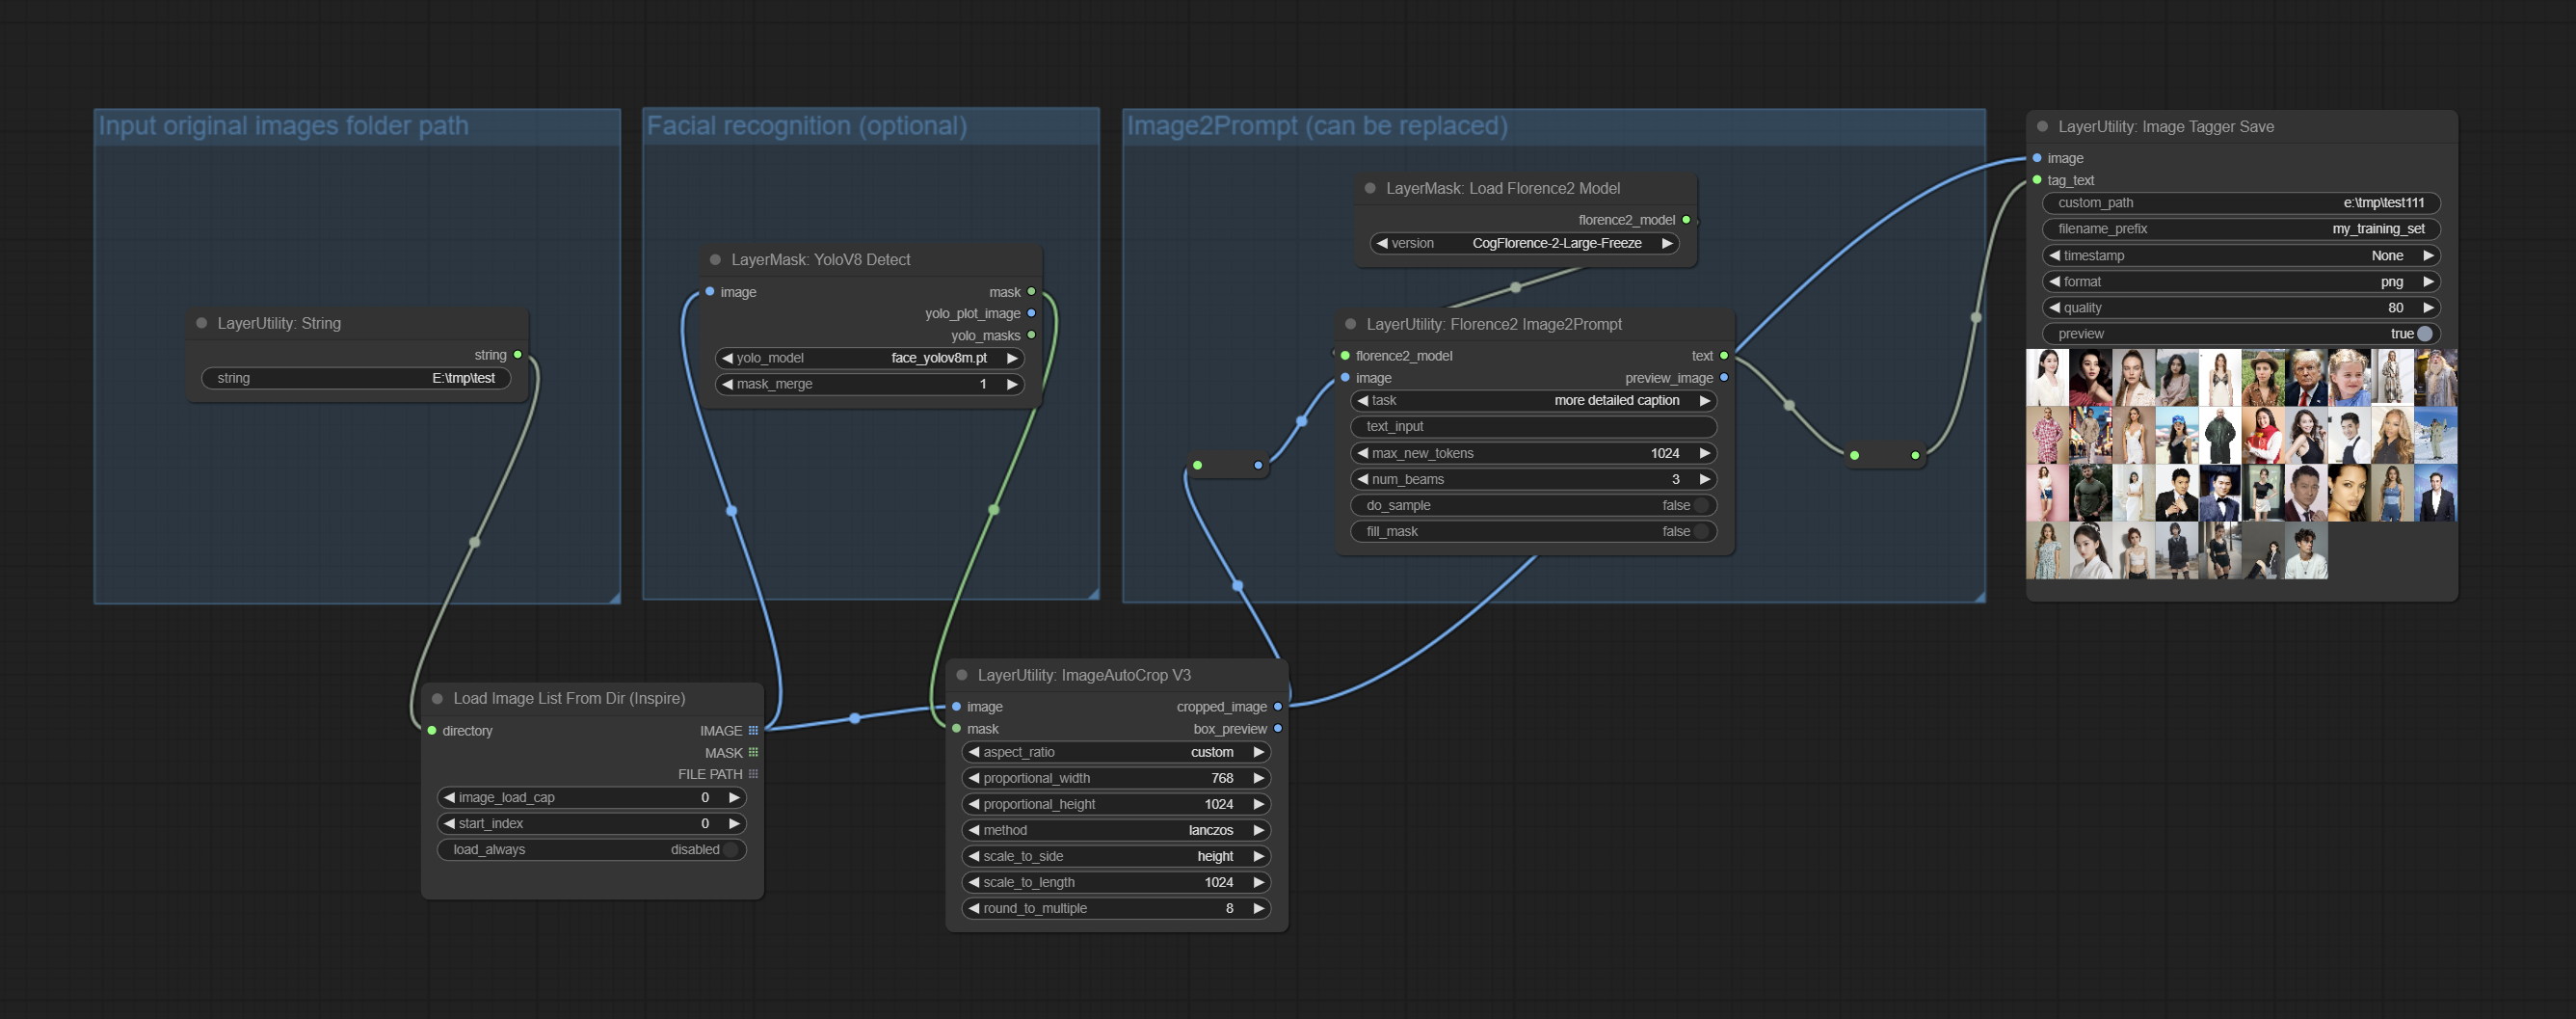
用于保存训练集图像及其文本标签的节点,其中图像文件和文本标签文件具有相同的文件名。可自定义保存图像的目录、为文件名添加时间戳、选择保存格式以及设置图像压缩率。
*工作流 image_tagger_stave.exe 位于工作流目录中。
节点选项:
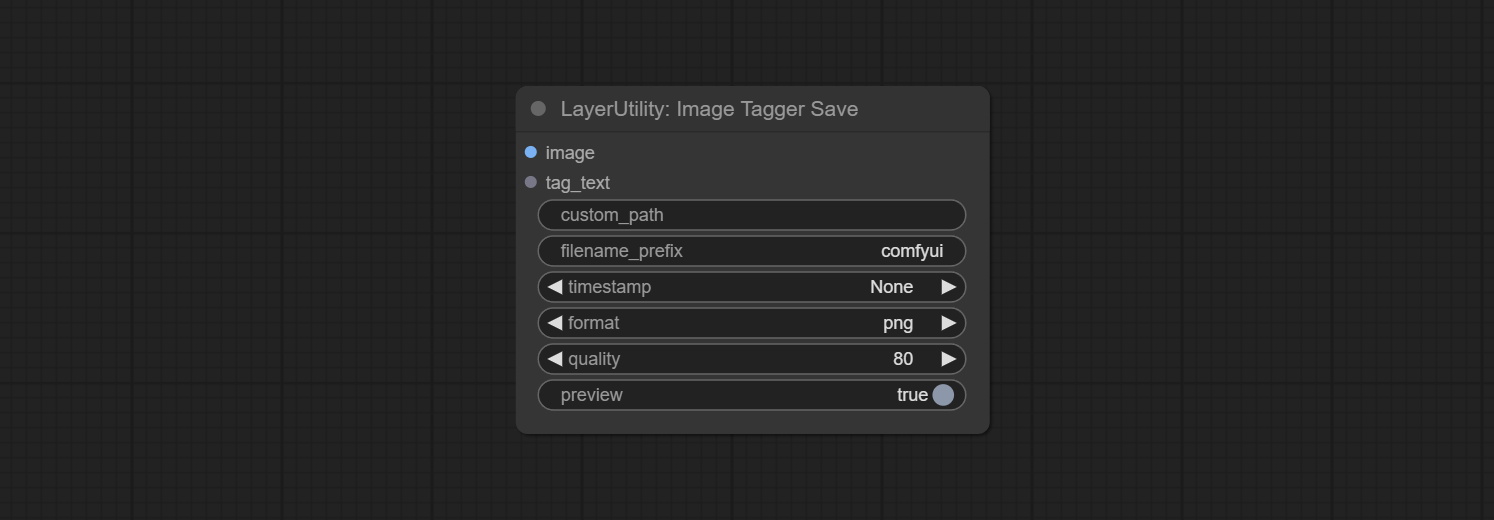
- iamge: 输入的图像。
- tag_text: 图像的文本标签。
- custom_path*: 用户自定义目录,请以正确格式输入目录名称。若为空,则保存至 ComfyUI 的默认输出目录。
- filename_prefix*: 文件名前缀。
- timestamp: 为文件名添加时间戳,可选择日期、精确到秒的时间以及精确到毫秒的时间。
- format: 图像保存格式。目前支持
png和jpg格式。需要注意的是,RGBA 模式的图片仅支持 png 格式。 - quality: 图像质量,取值范围为 10-100,数值越高,图片质量越好,但文件体积也会相应增大。
- preview: 预览开关。
* 输入%date 表示当前日期(YY-mm-dd),输入%time 表示当前时间(HH-MM-SS)。可用/表示子目录。例如,%date/name_%tiem 将把图像保存到 YY-mm-dd 文件夹中,文件名前缀为 name_HH-MM-SS。
ImageTaggerSaveV2
ImageTaggerSave 节点的升级版,可与 LoadImagesFromPath 节点配合使用,以保存文件夹中对应图像的文本标签文件,同时保持原始文件名不变。
在原有节点的基础上,新增了以下选项:
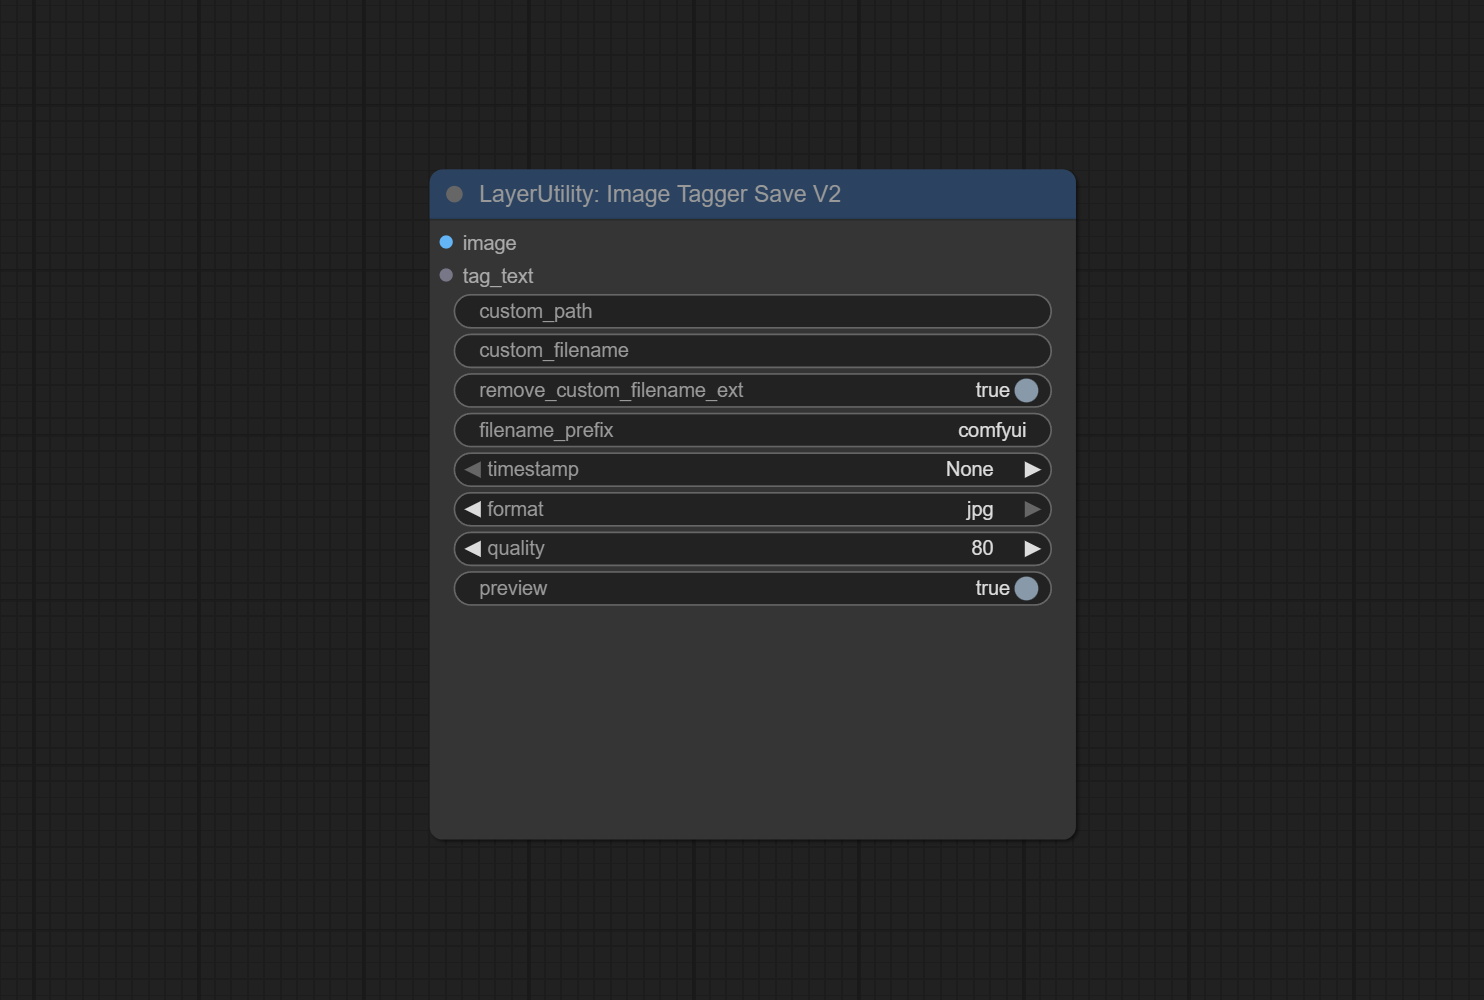
- custom_filename: 用户自定义文件名。若此处有输入,则以此作为保存文件名;否则,仍使用 filename_prefix 作为文件名前缀。
- remove_custom_filename_ext: 是否移除原始文件名中的扩展名。
从路径加载图片
从指定文件夹加载图片。
节点选项:
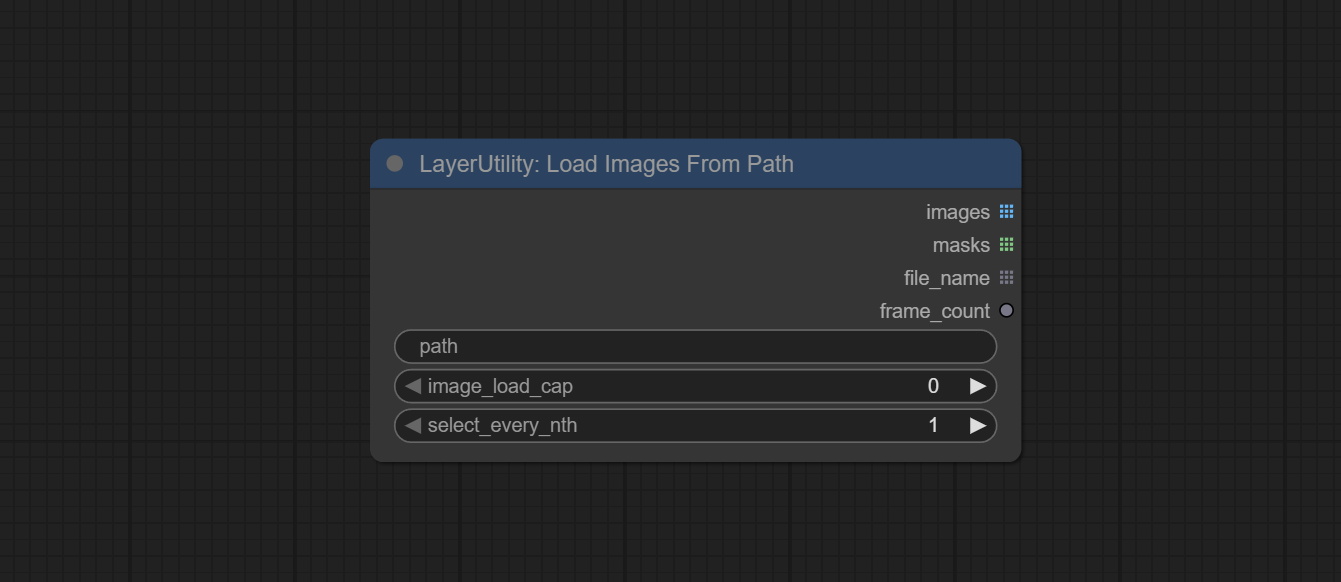
- path:文件夹路径。
- image_load_cap:输出文件的数量。默认值为0,表示读取文件夹中的所有图片文件。
- select_every_nth:每隔
select_every_nth张图片加载一张,跳过其余图片。
输出:
- images:输出的图片列表。
- masks:与图片对应的掩码列表。
- file_name:与图片对应的文件名列表。
- frame_count:图片的总数。
图片批次转列表
将一批图片转换为多个较小的批次,可选择每个小批次的最大图片数量。
节点选项:
_node.jpg)
- batch_size:每个小批次的最大图片数量。
图片列表转批次
将多个小批次的图片合并为一个大批次。
图层蒙版

Blend If蒙版
复现Photoshop图层样式中的“Blend If”功能。该节点会输出用于ImageBlend或ImageBlendAdvance节点进行图层合成的蒙版。
mask为可选输入,若在此处输入蒙版,则会对输出结果产生作用。
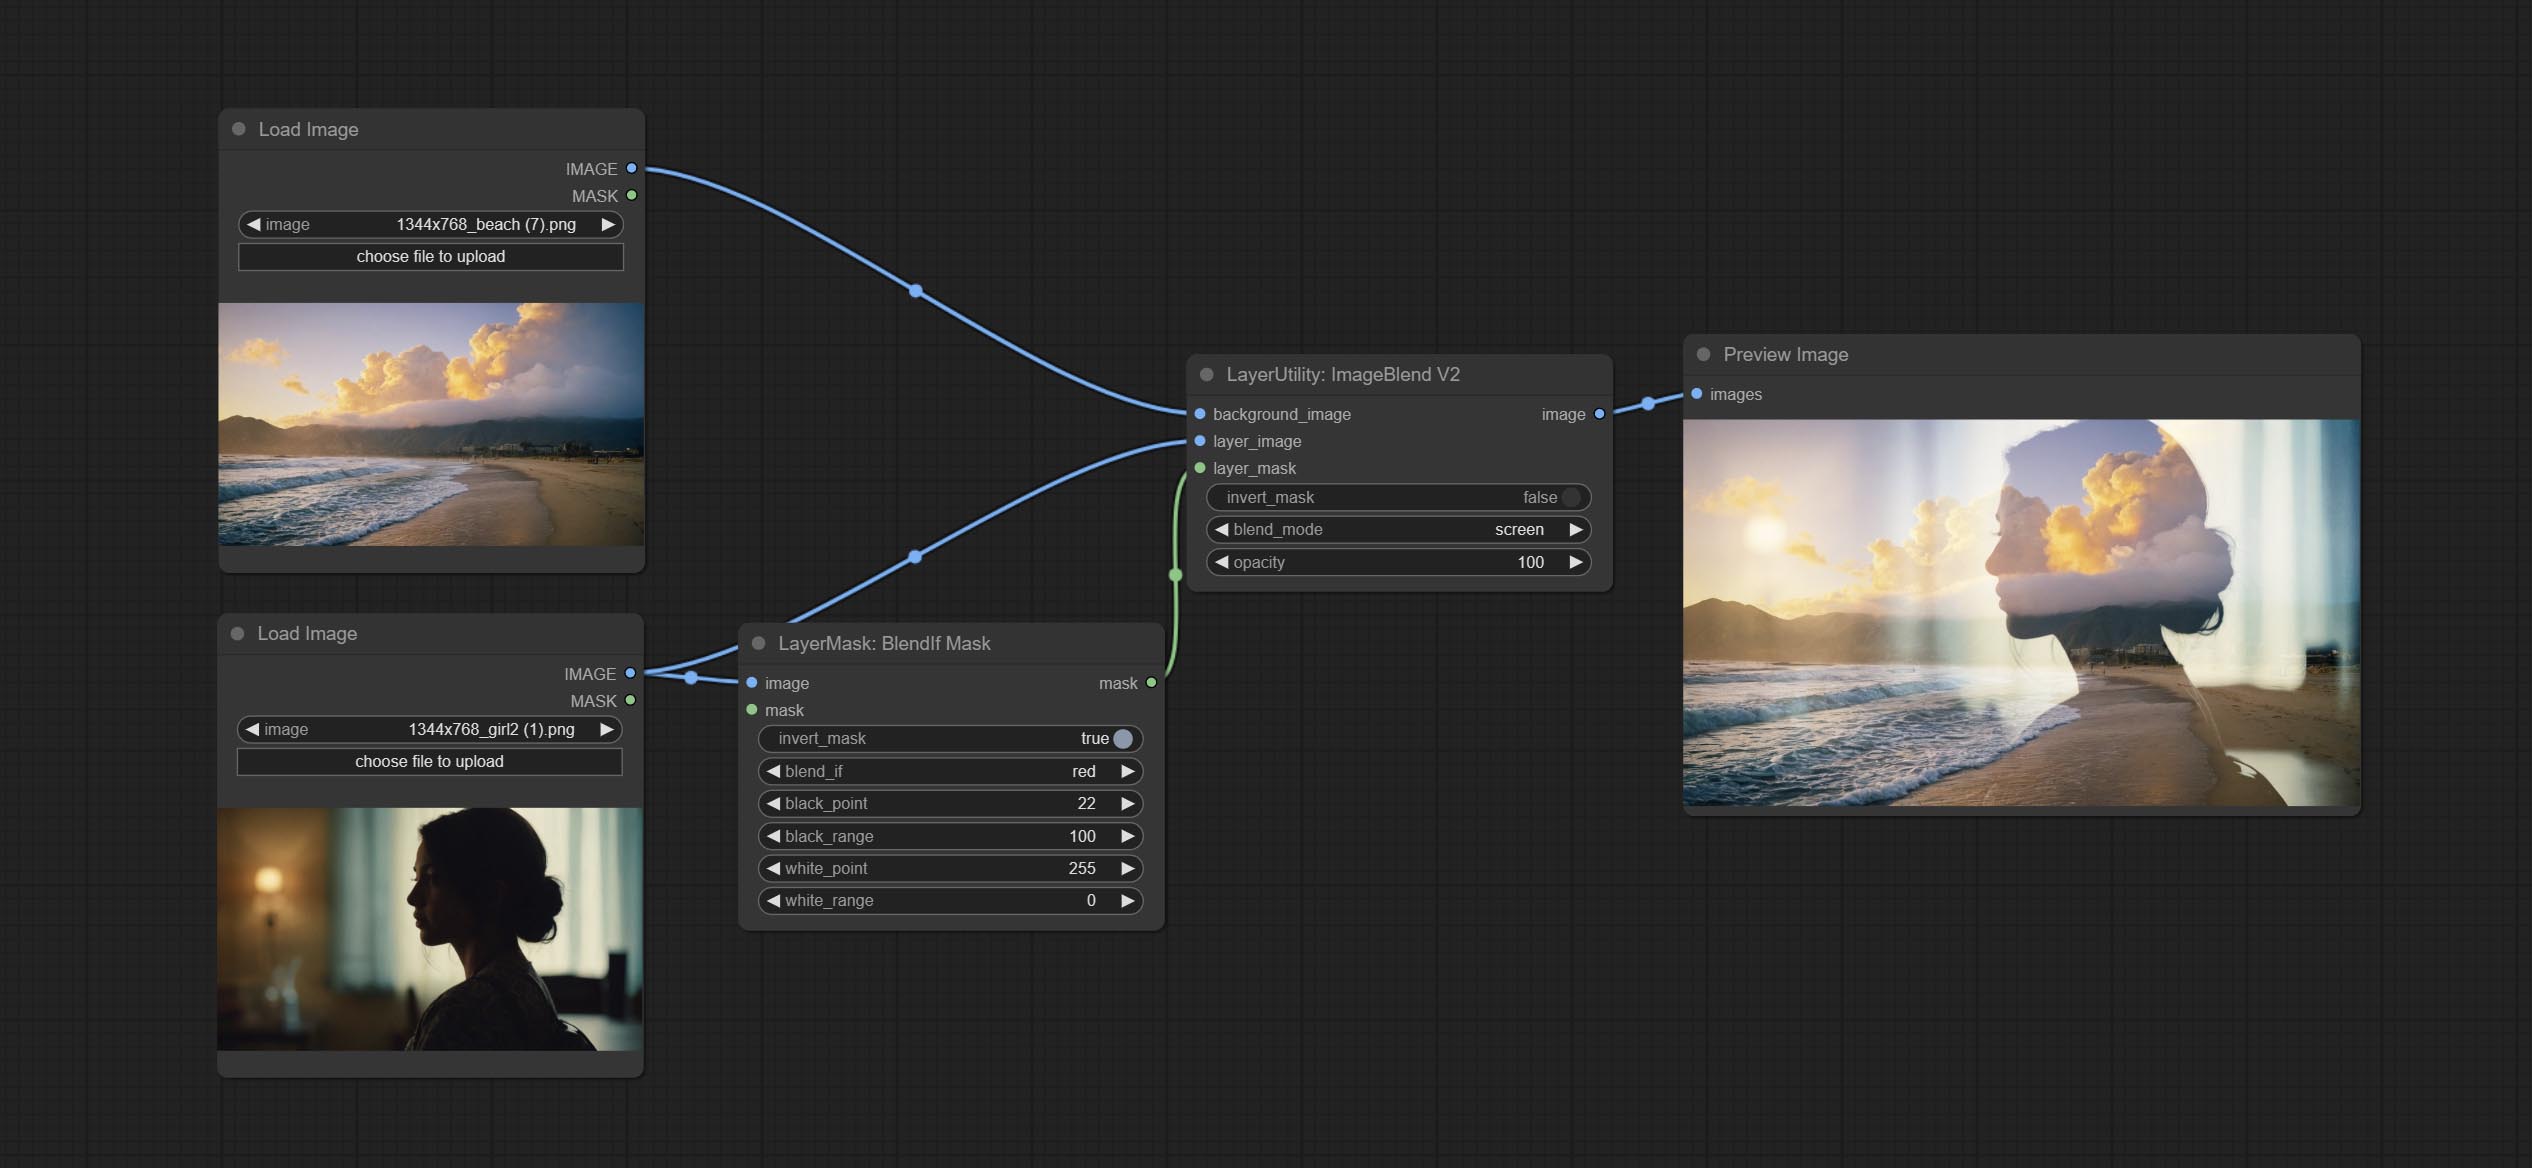
节点选项: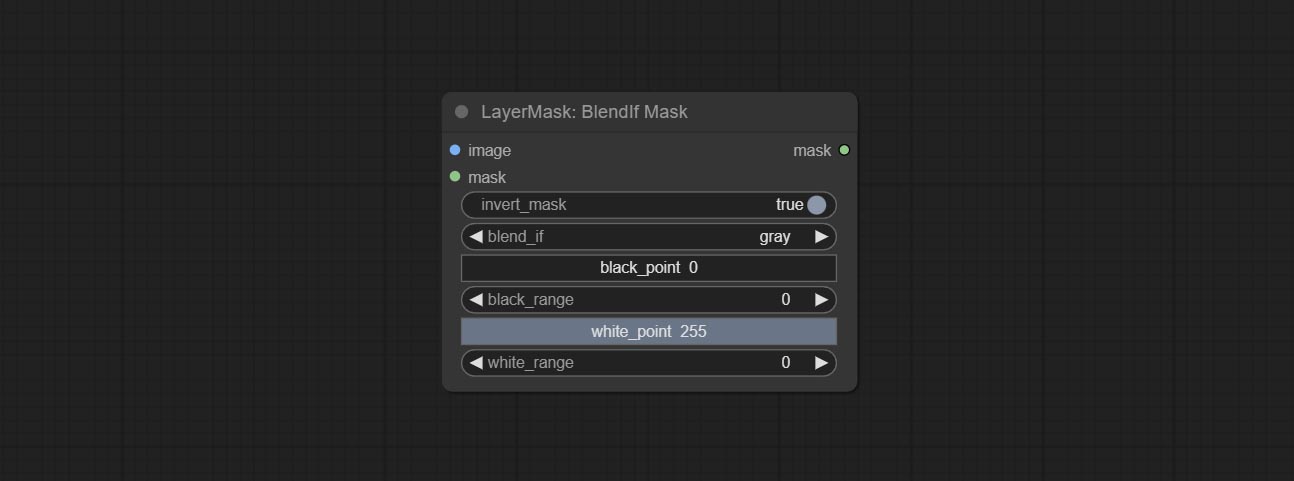
- invert_mask:是否反转蒙版。
- blend_if:Blend If的通道选择。共有四种选项:
gray、red、green和blue。 - black_point:黑点值,范围为0-255。
- black_range:暗部过渡范围。数值越大,暗部蒙版的过渡层次越丰富。
- white_point:白点值,范围为0-255。
- white_range:亮部过渡范围。数值越大,亮部蒙版的过渡层次越丰富。
蒙版框检测
检测蒙版所在区域,并输出其位置和大小。
节点选项: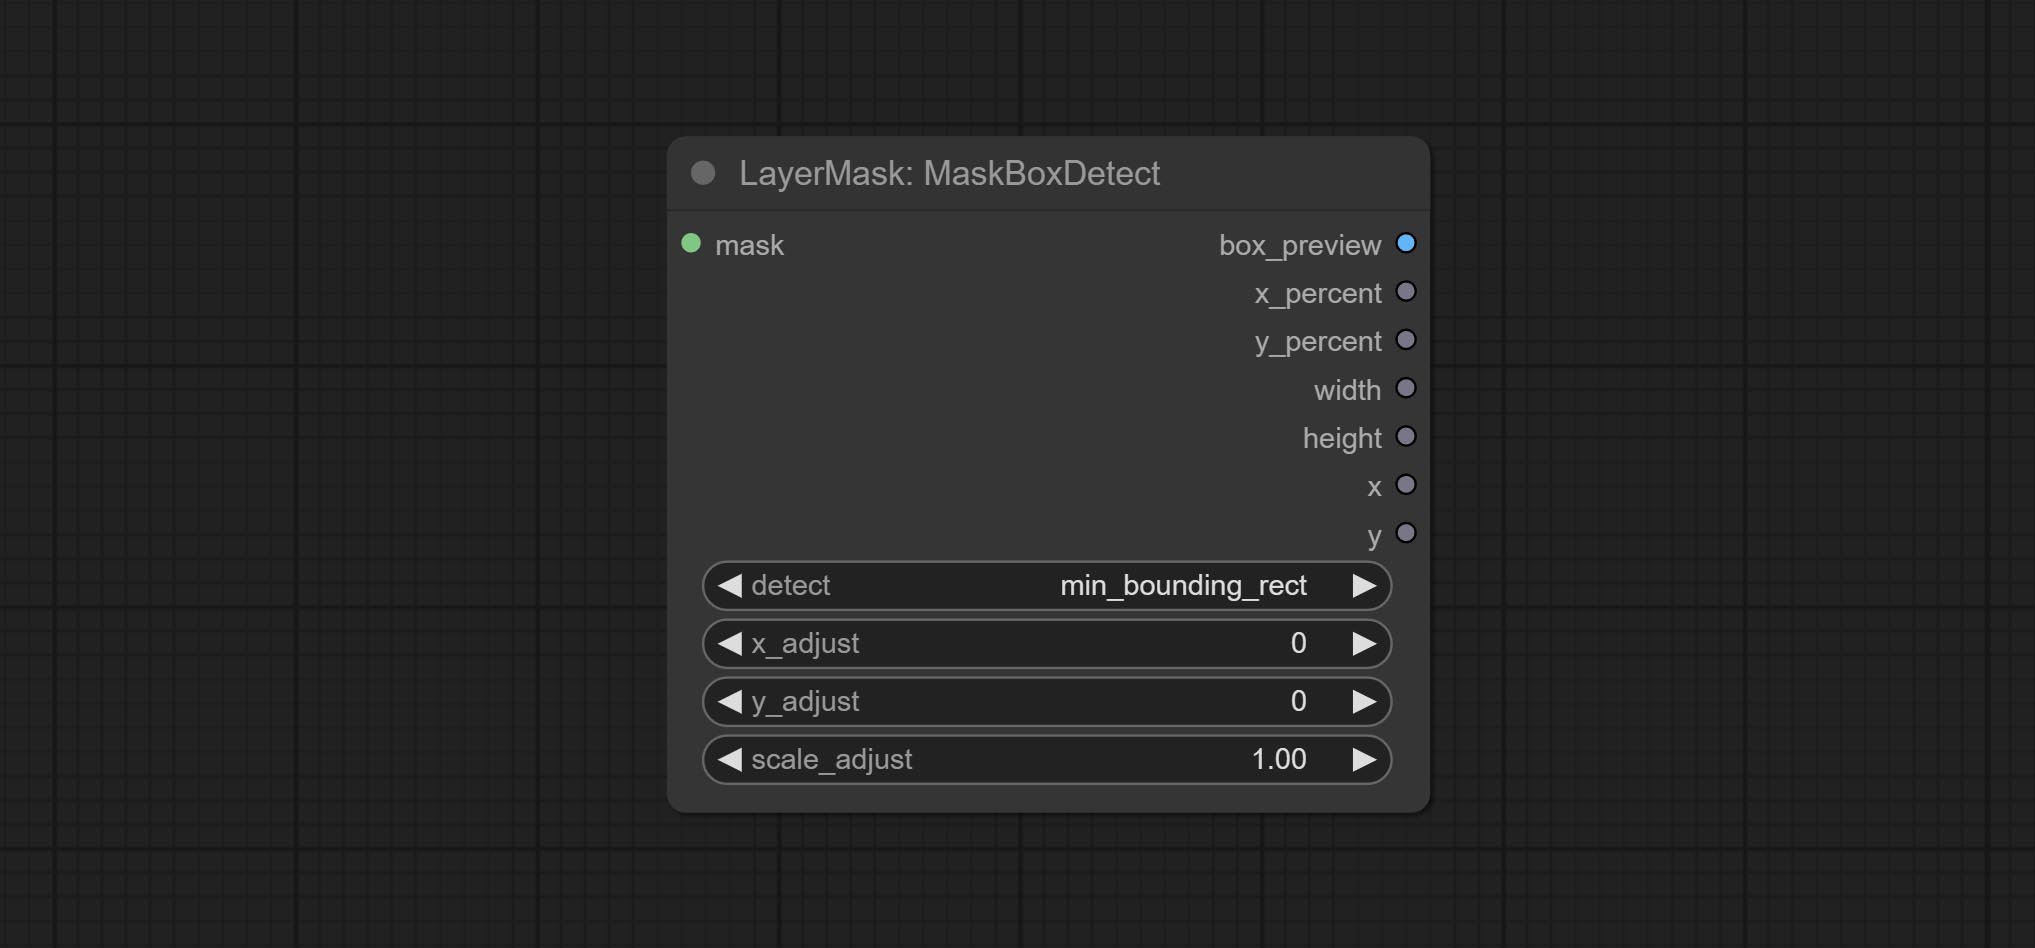
- detect:检测方法,
min_bounding_rect为最小外接矩形,max_inscribed_rect为最大内接矩形,mask-area为用于遮罩像素的有效区域。 - x_adjust:检测后的水平偏差调整。
- y_adjust:检测后的垂直偏移调整。
- scale_adjust:检测后的缩放偏移调整。
输出:
- box_preview:检测结果预览图。红色表示检测结果,绿色表示调整后的输出结果。
- x_percent:水平位置百分比输出。
- y_percent:垂直位置百分比输出。
- width:宽度。
- height:高度。
- x:左上角位置的x坐标。
- y:左上角位置的y坐标。
蒙版框扩展
生成一个BBOX蒙版以扩大范围,并将其作为Mask输出。扩展范围可以设置为正数或负数,正数表示扩张,负数表示收缩。
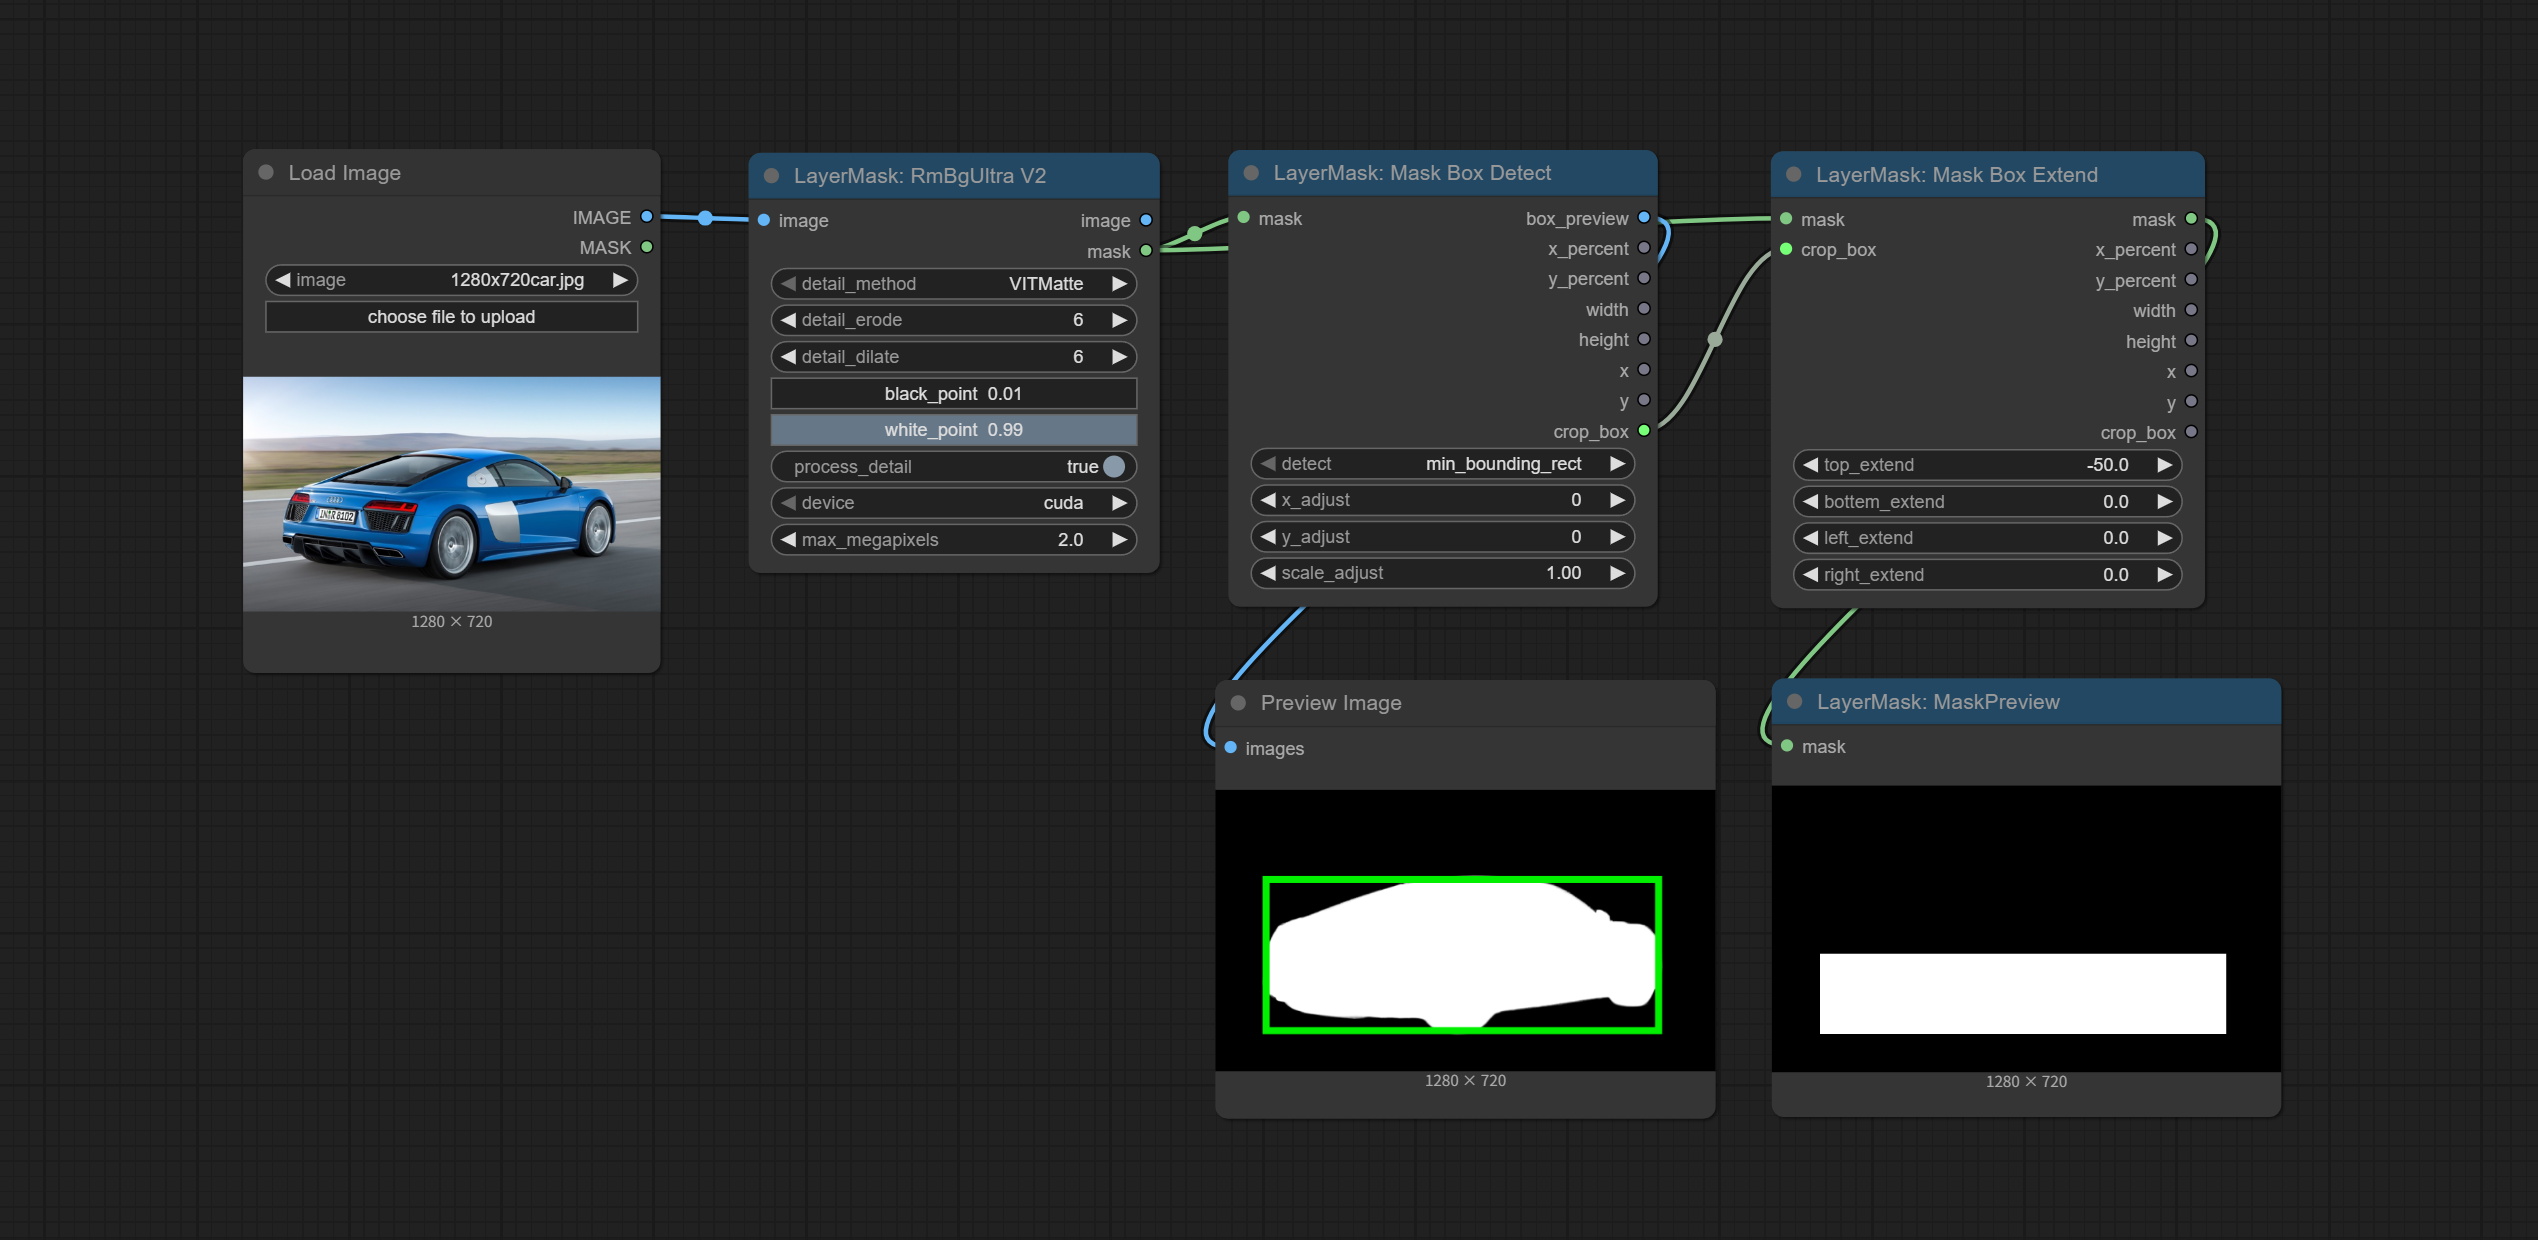
节点选项: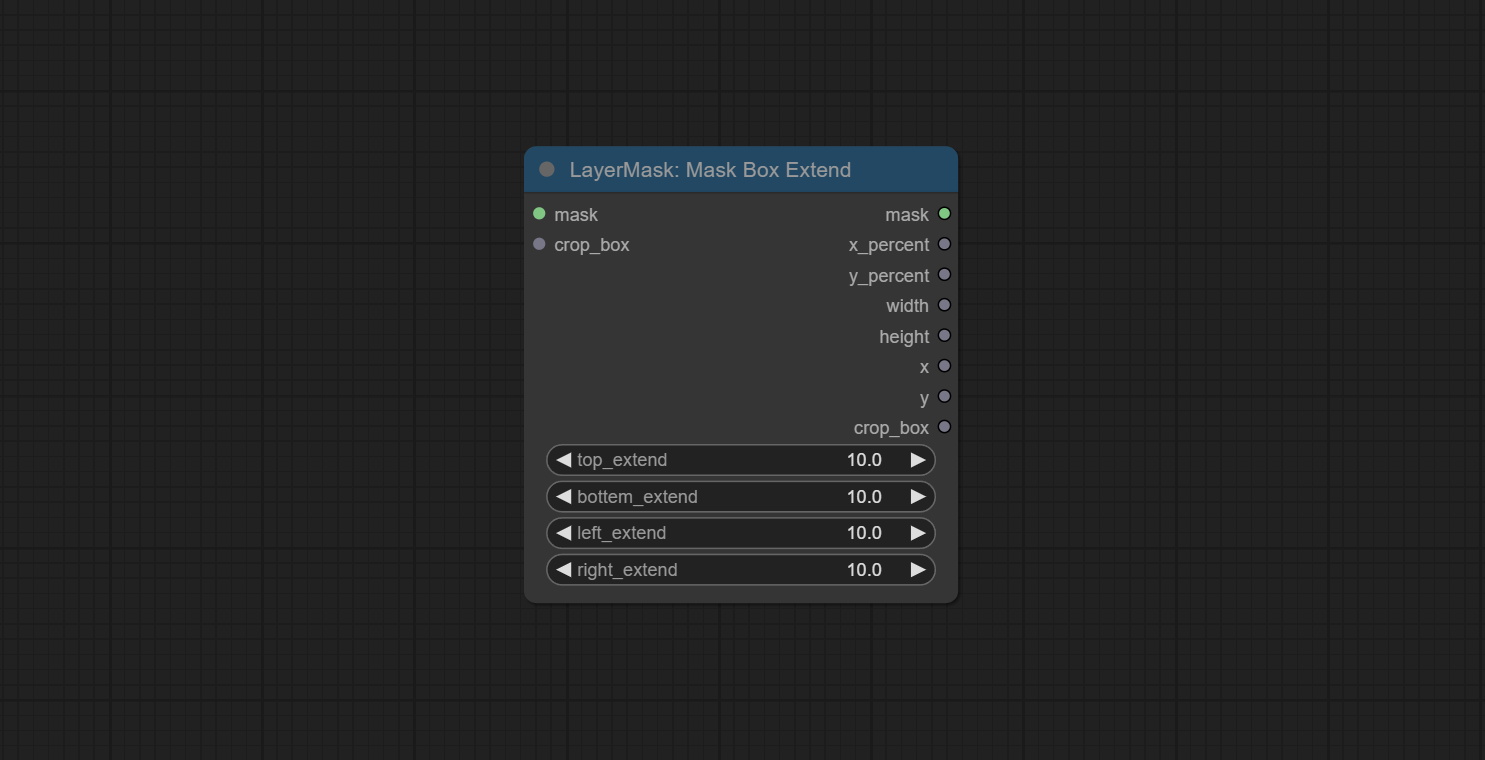
- mask:输入的蒙版。
- crop_box:由MaskBoxDetect节点输出的蒙版BBOX数据。
- top_extend:顶部扩展范围。100表示BBOX高度增加100%。
- bottom_extend:底部扩展范围。100表示BBOX高度增加100%。
- left_extend:左侧扩展范围。100表示BBOX宽度增加100%。
- right_extend:右侧扩展范围。100表示BBOX宽度增加100%。
输出:
- mask:BBOX扩展后的蒙版。
- x_percent:水平位置百分比输出。
- y_percent:垂直位置百分比输出。
- width:宽度。
- height:高度。
- x:左上角位置的x坐标。
- y:左上角位置的y坐标。
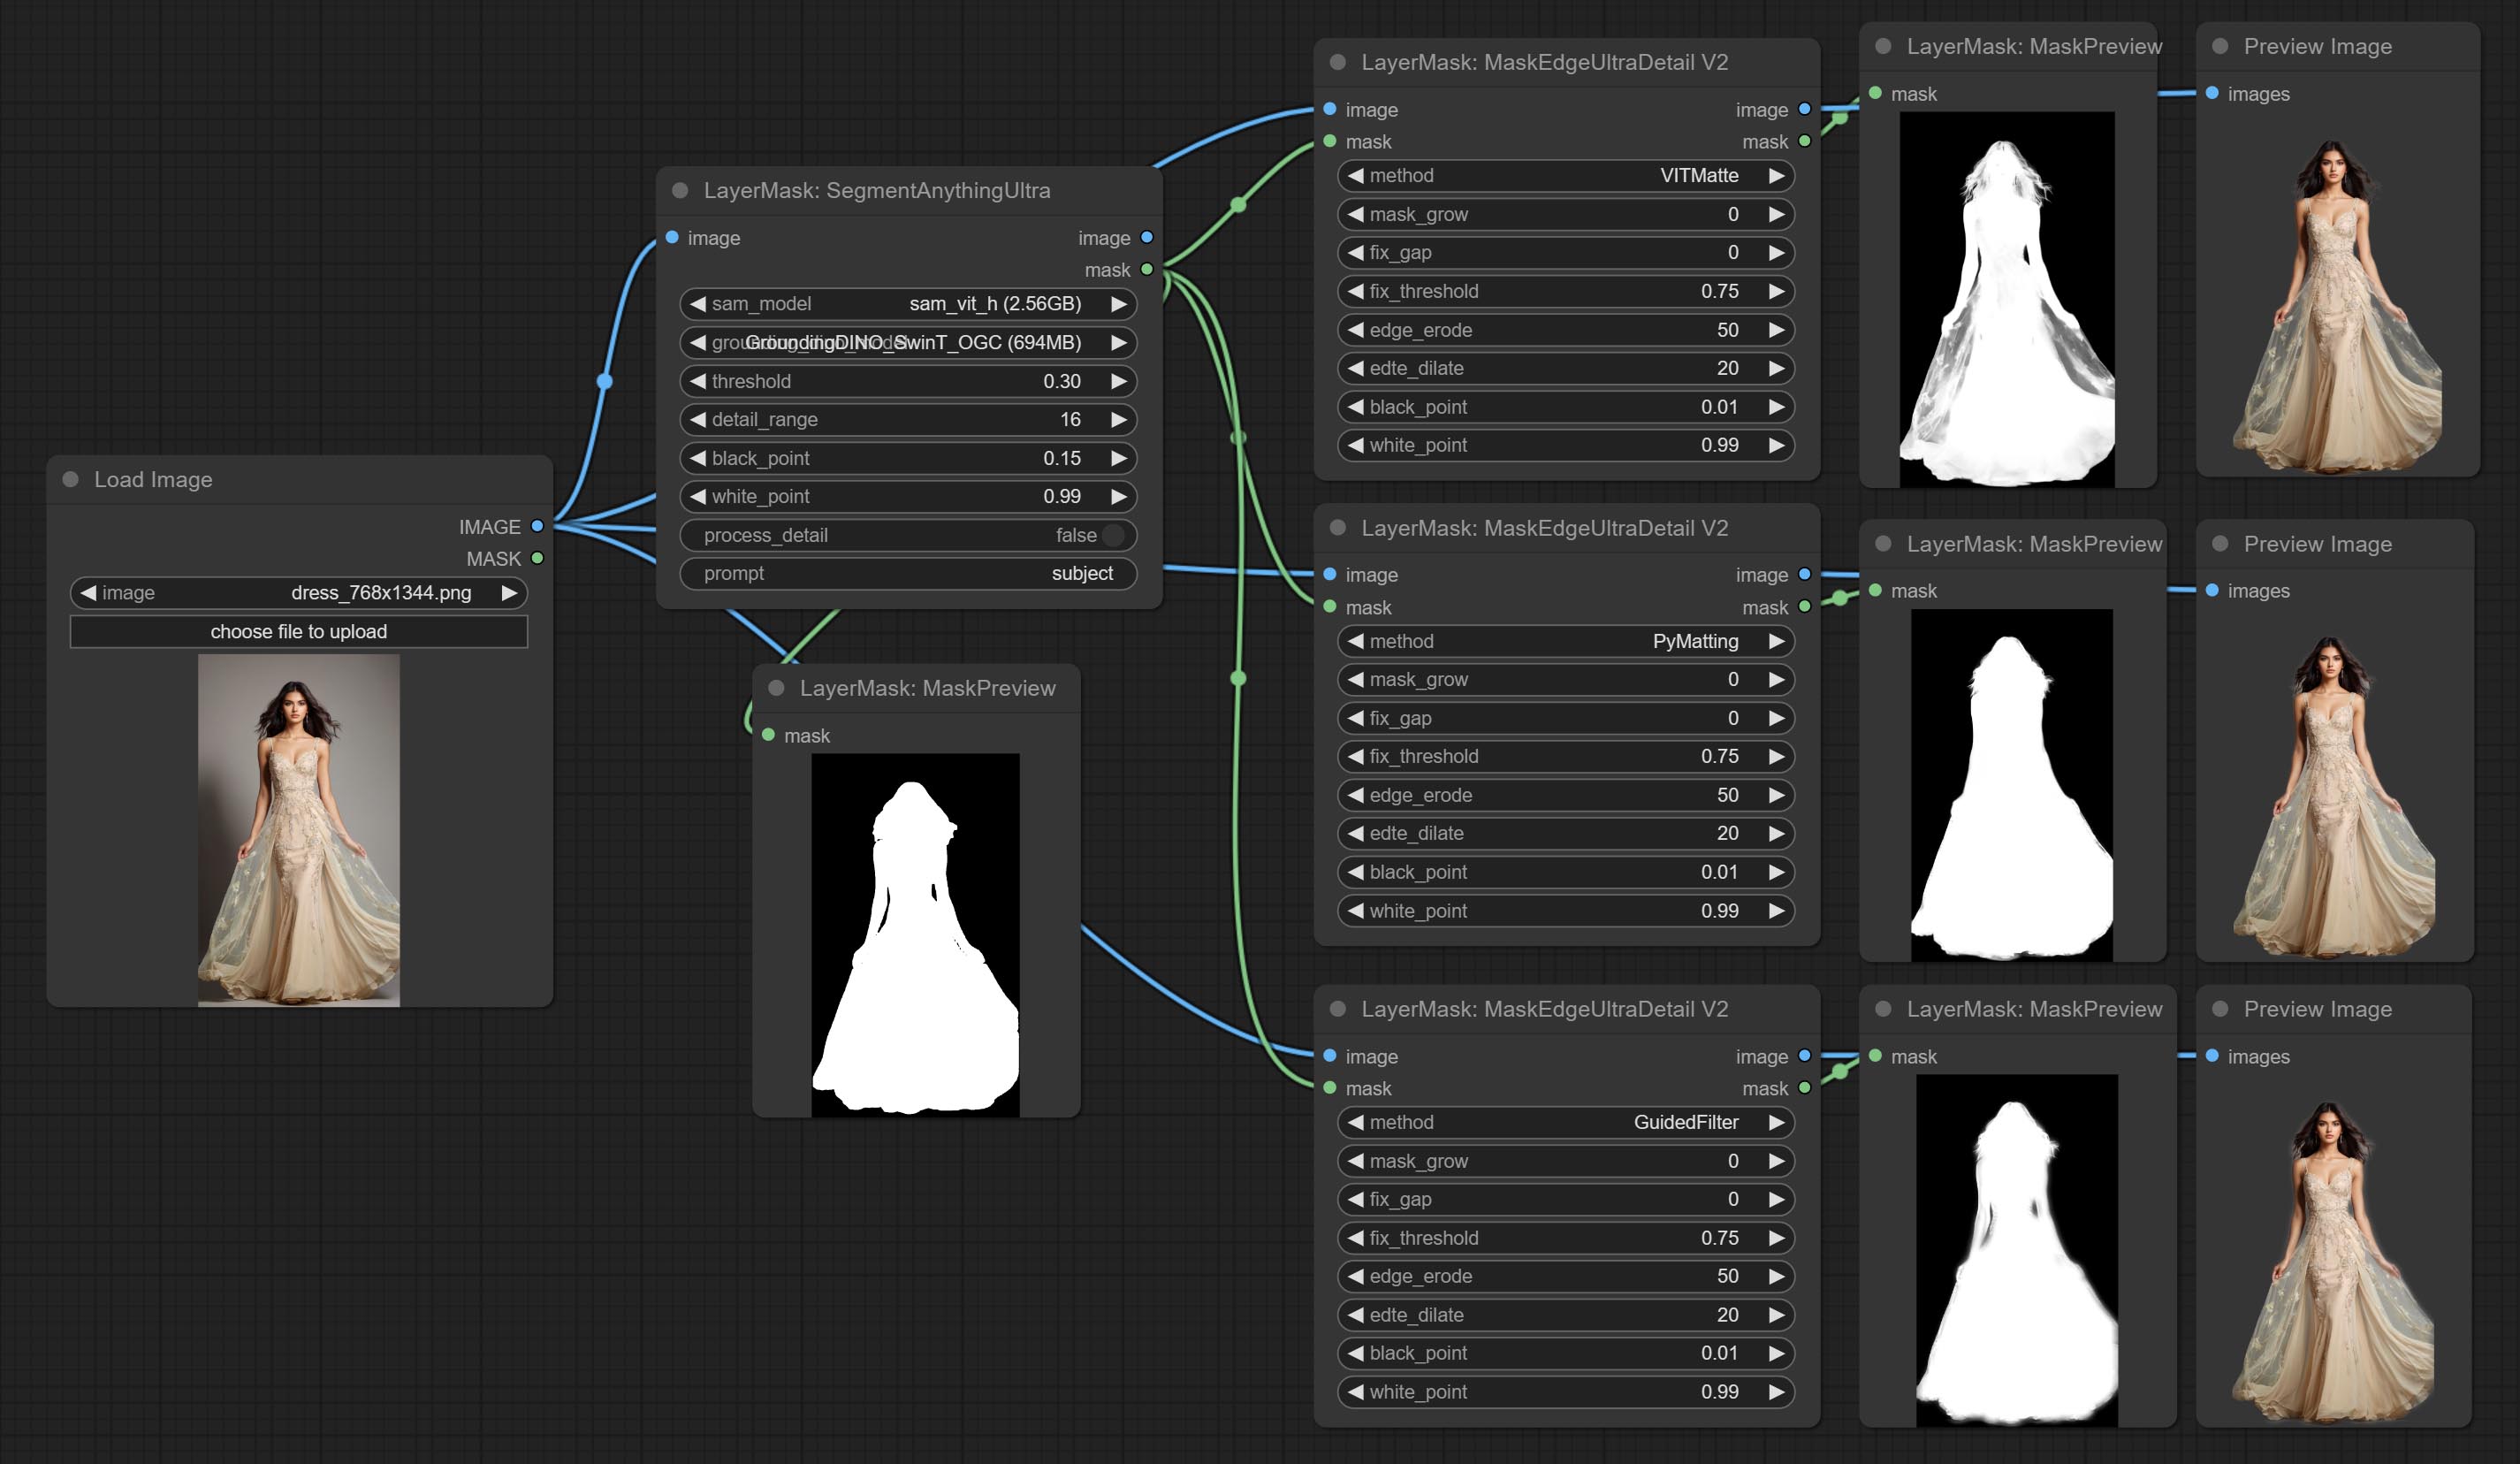
Ultra 节点
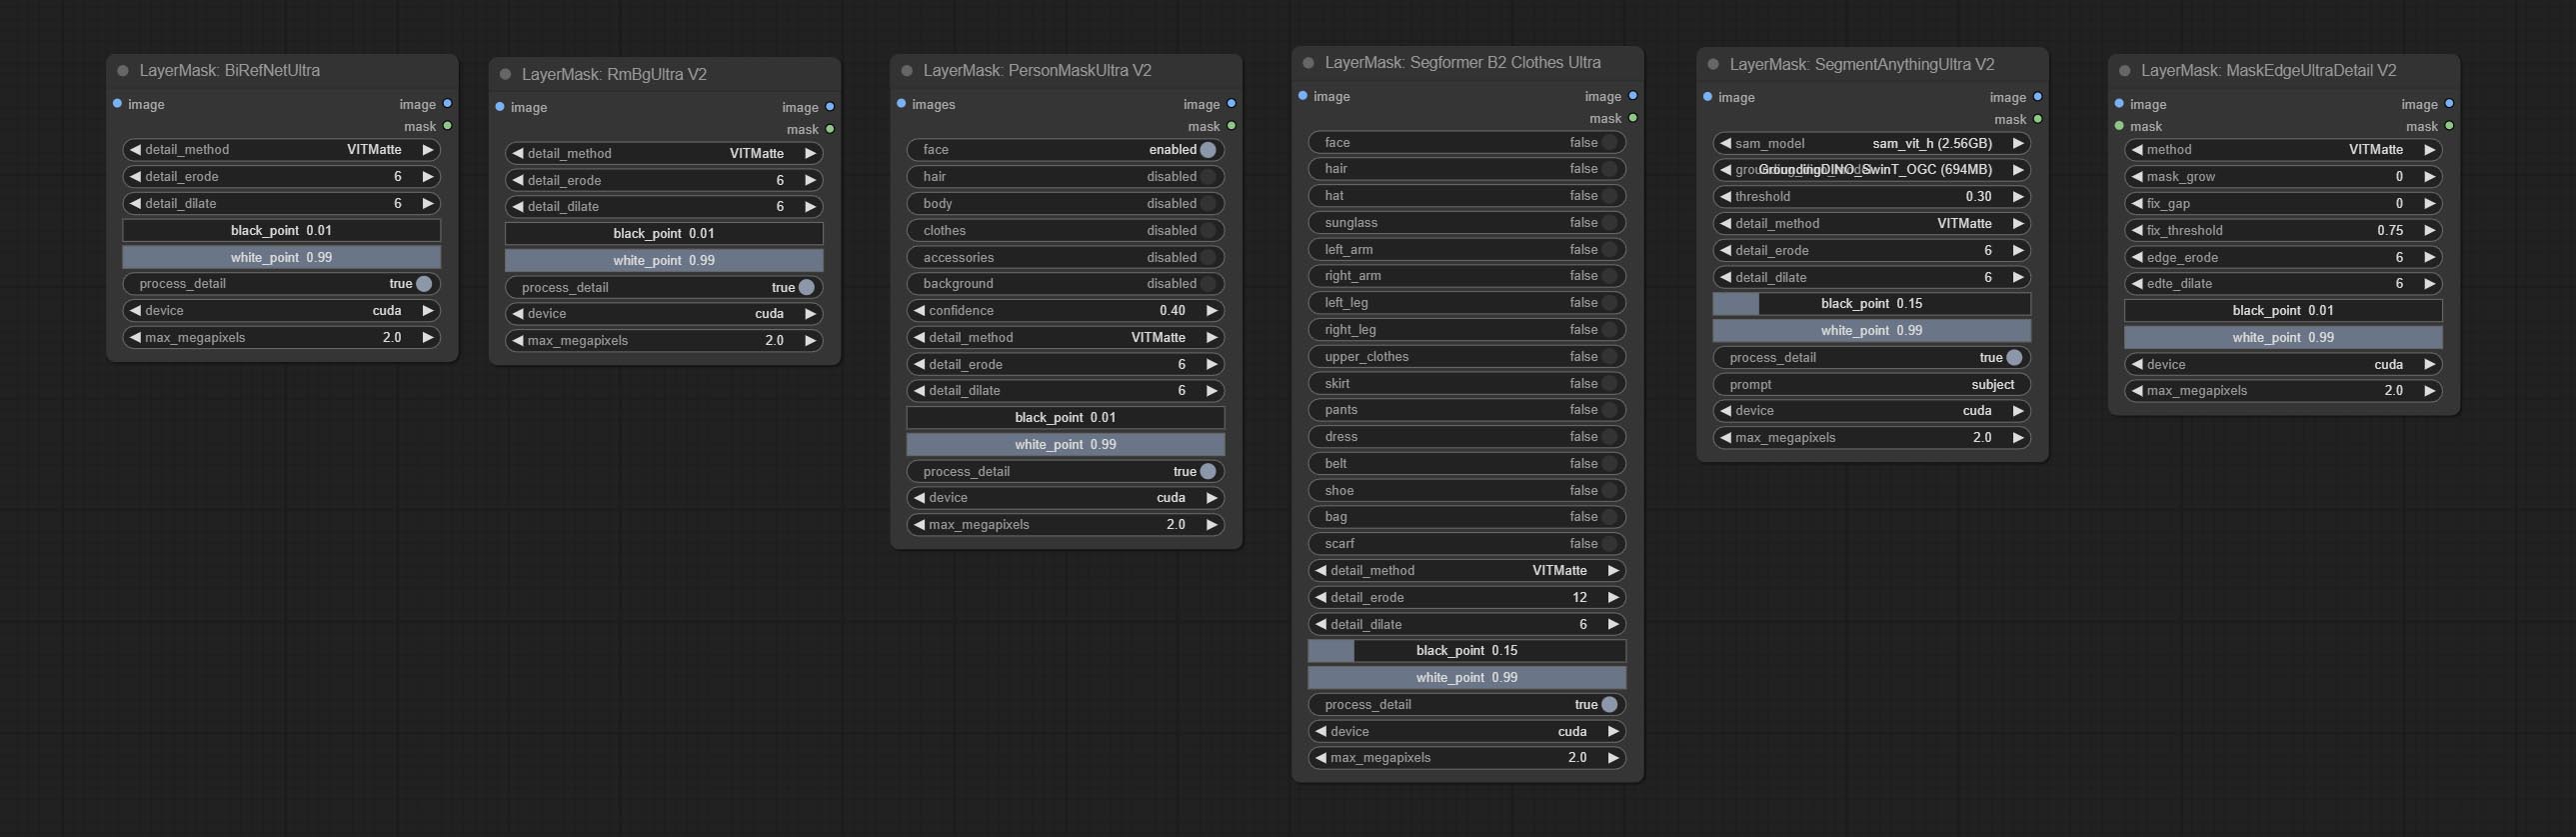
采用超精细边缘遮罩处理方法的节点,最新版本包括:SegmentAnythingUltraV2、RmBgUltraV2、BiRefNetUltra、PersonMaskUltraV2、SegformerB2ClothesUltra和MaskEdgeUltraDetailV2。
这些节点提供三种边缘处理方法:
PyMatting通过闭合形式匹配来优化蒙版边缘,适用于对蒙版Trimap进行处理。GuideFilter使用OpenCV的引导滤波器,基于颜色相似性对边缘进行羽化处理,在边缘颜色对比强烈时效果最佳。
上述两种方法的代码均来自spacepxl的Alpha Matte中的ComfyUI-Image-Filters,感谢原作者。VitMatte利用Transformer VIT模型进行高质量的边缘处理,能够保留边缘细节,甚至生成半透明的蒙版。 注意:首次运行时,需下载Vitmate模型文件并等待自动下载完成。若无法完成下载,可手动执行命令huggingface-cli download hustvl/vitmatte-small-composition-1k进行下载。 模型下载成功后,即可使用VITMatte(local)而无需联网。 VitMatte的选项:device用于设置是否使用CUDA加速Vitmate运算,速度约为CPU的5倍。max_megapixels用于设置Vitmate处理的最大图像尺寸,超出限制的图像将会被缩小。对于16G显存,建议将其设置为3。
*请将所有模型文件从BaiduNetdisk或Huggingface下载至ComfyUI/models/vitmatte文件夹。
下图为三种方法输出结果的差异示例。
RemBgUltra
移除背景。与同类背景移除节点相比,该节点具有超高的边缘细节。
此节点结合了 Spacepxl 的 ComfyUI-Image-Filters 中的 Alpha Matte 节点以及 ZHO-ZHO-ZHO 的 ComfyUI-BRIA_AI-RMBG 的功能,感谢原作者。
*请从 BRIA Background Removal v1.4 或 百度网盘 下载模型文件,并将其放置于 ComfyUI/models/rmbg/RMBG-1.4 文件夹中。该模型可用于非商业用途。

节点选项: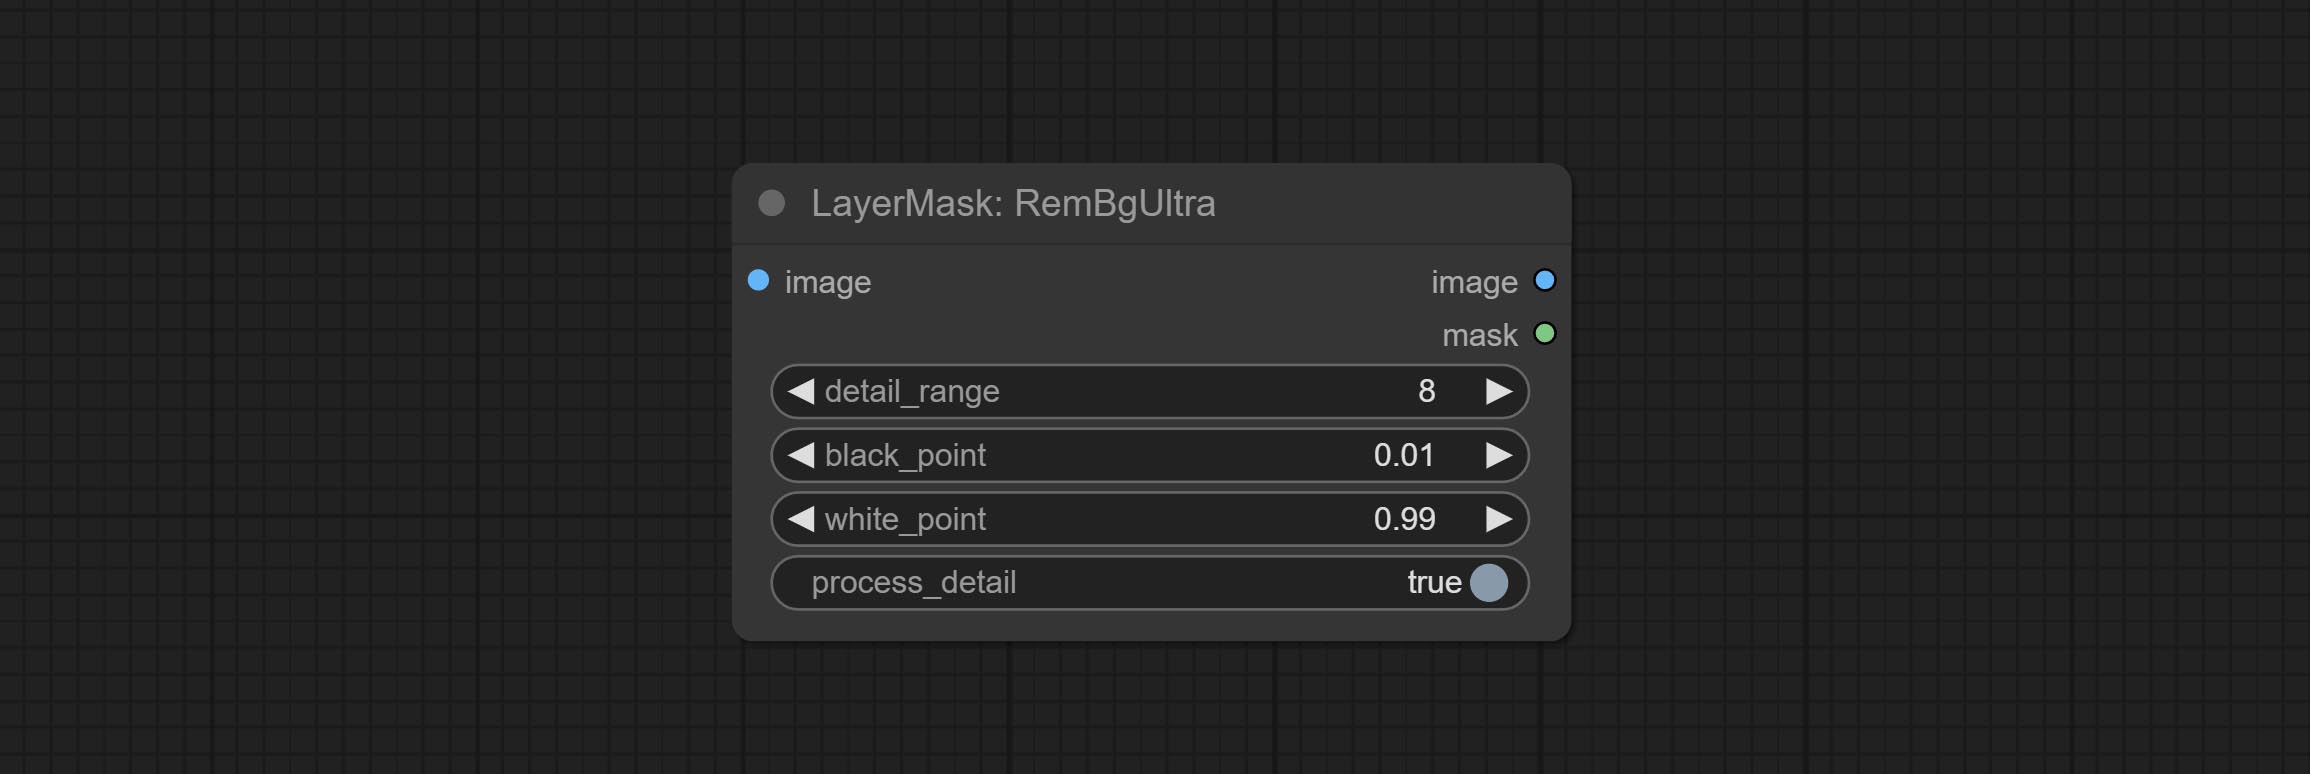
- detail_range:边缘细节范围。
- black_point:边缘黑色采样阈值。
- white_point:边缘白色采样阈值。
- process_detail:此处设置为 false 将跳过边缘处理以节省运行时间。
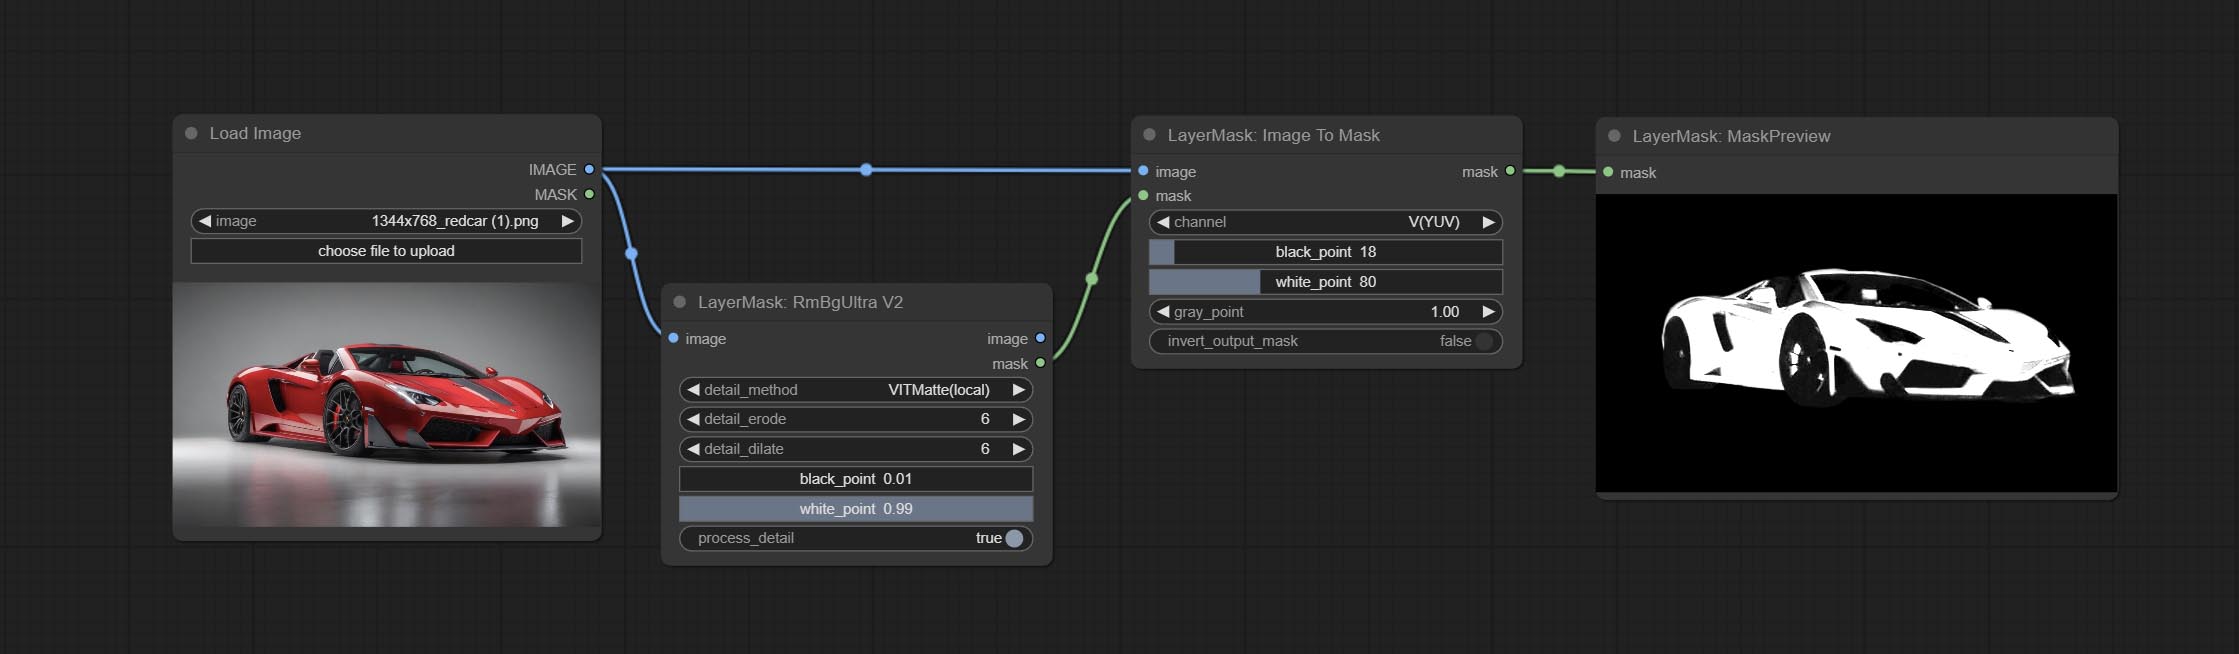
RmBgUltraV2
RemBgUltra 的 V2 升级版本新增了 VITMatte 边缘处理方法。(注:使用此方法处理超过 2K 分辨率的图像会消耗大量内存)
在 RemBgUltra 的基础上,进行了以下更改: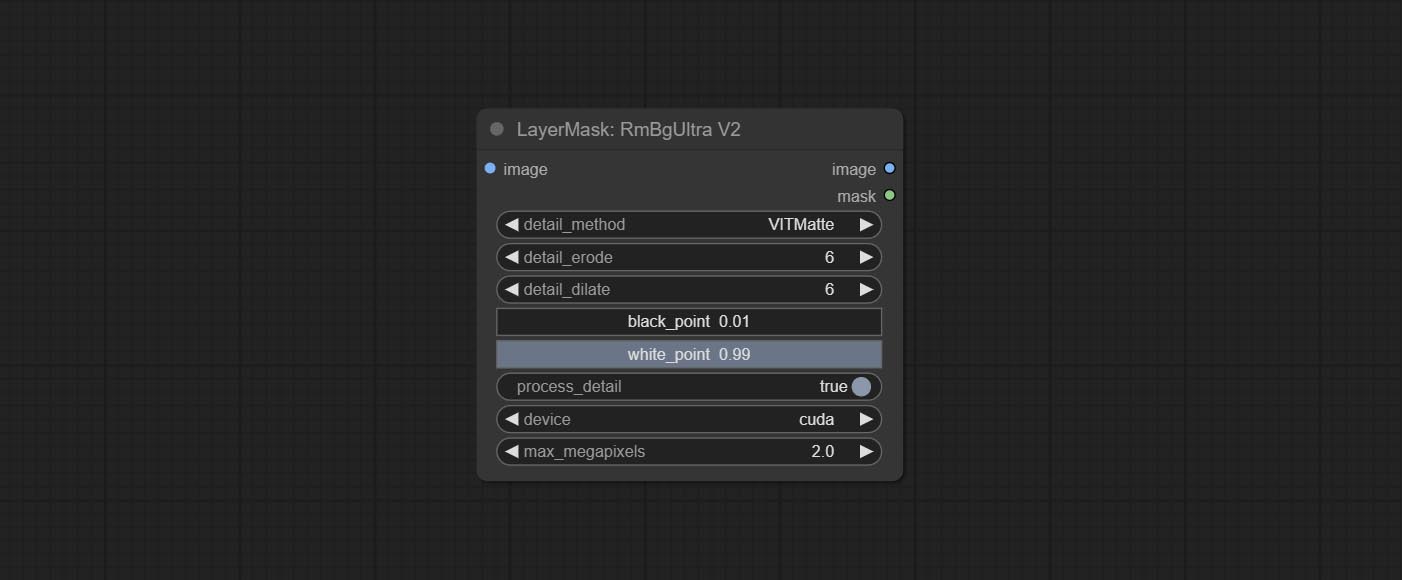
- detail_method:边缘处理方法。提供 VITMatte、VITMatte(局部)、PyMatting 和 GuidedFilter。如果首次使用 VITMatte 后已下载模型,则后续可使用 VITMatte(局部)。
- detail_erode:从边缘向内侵蚀遮罩范围。数值越大,向内修复的范围越大。
- detail_dilate:遮罩边缘向外扩张。数值越大,向外修复的范围越广。
- device:设置是否使用 CUDA 运行 VitMatte。
- max_megapixels:设置 VitMate 操作的最大尺寸。
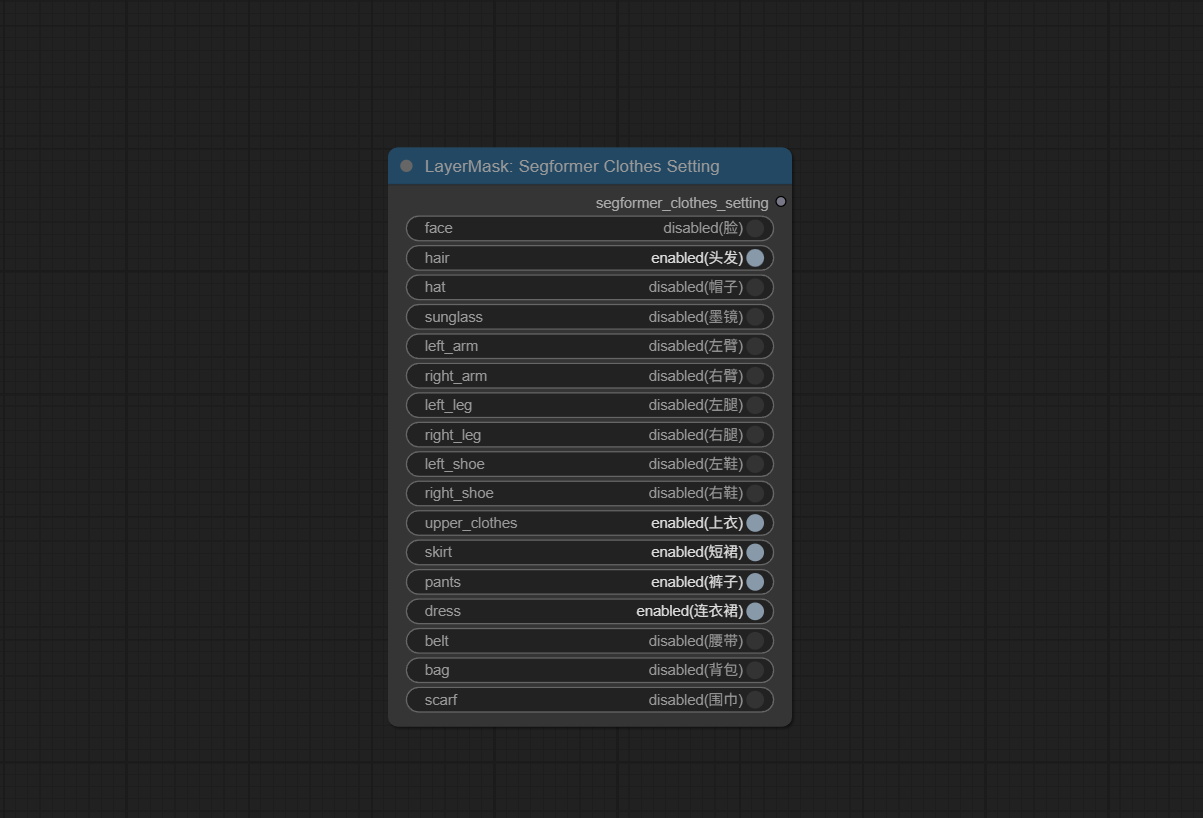
SegformerB2ClothesUltra
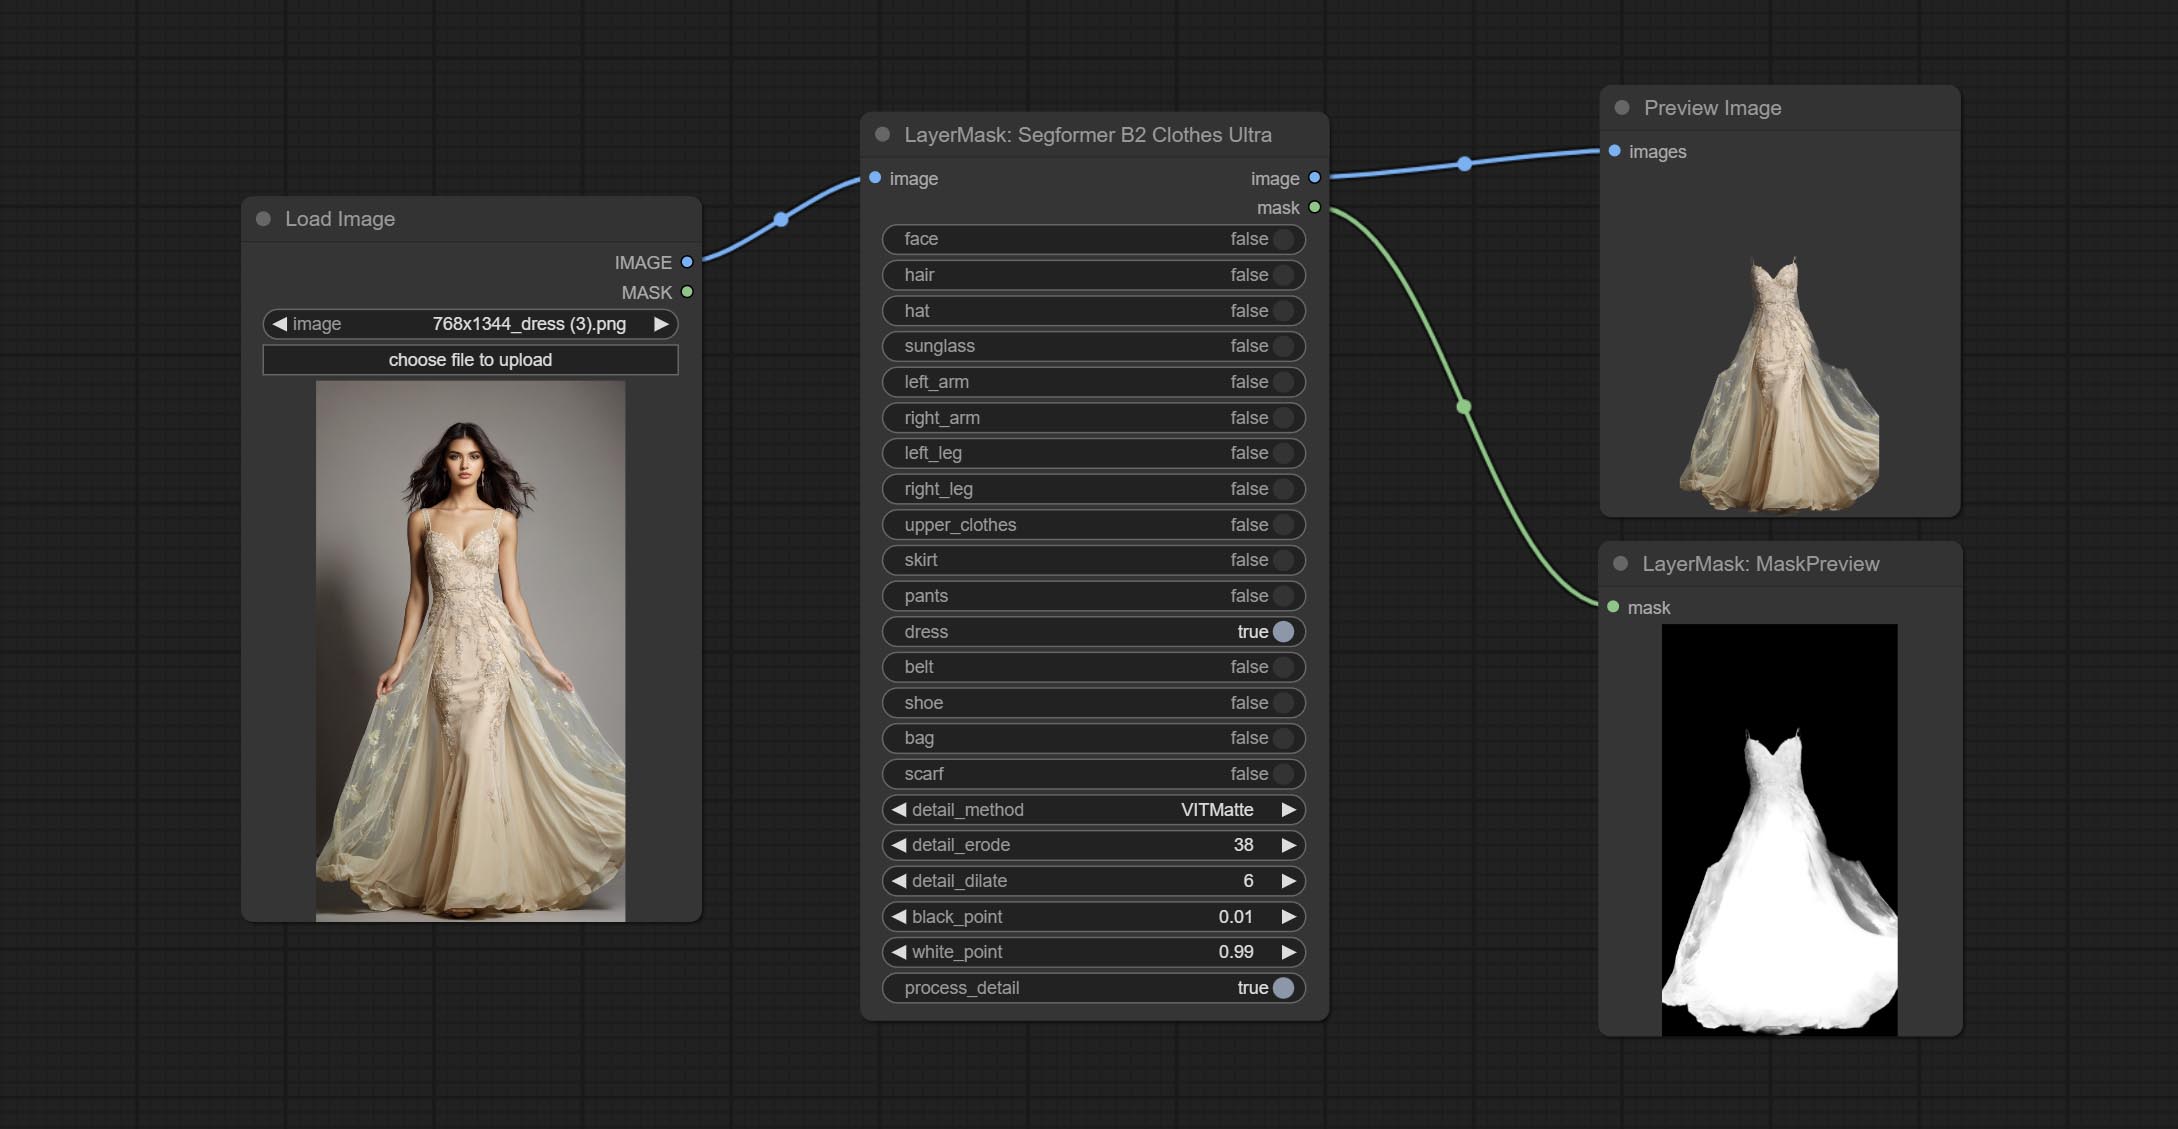
生成人物面部、头发、手臂、腿部和服装的掩码,主要用于服装分割。
模型分割代码来自StartHua,感谢原作者。
与 comfyui_segformer_b2_clothes 相比,此节点具有超高的边缘细节。(注:使用 VITMatte 方法生成边缘超过 2K 分辨率的图像会消耗大量内存)
*请从 huggingface 或 百度网盘 下载所有模型文件,并将其放置于 ComfyUI/models/segformer_b2_clothes 文件夹中。
节点选项: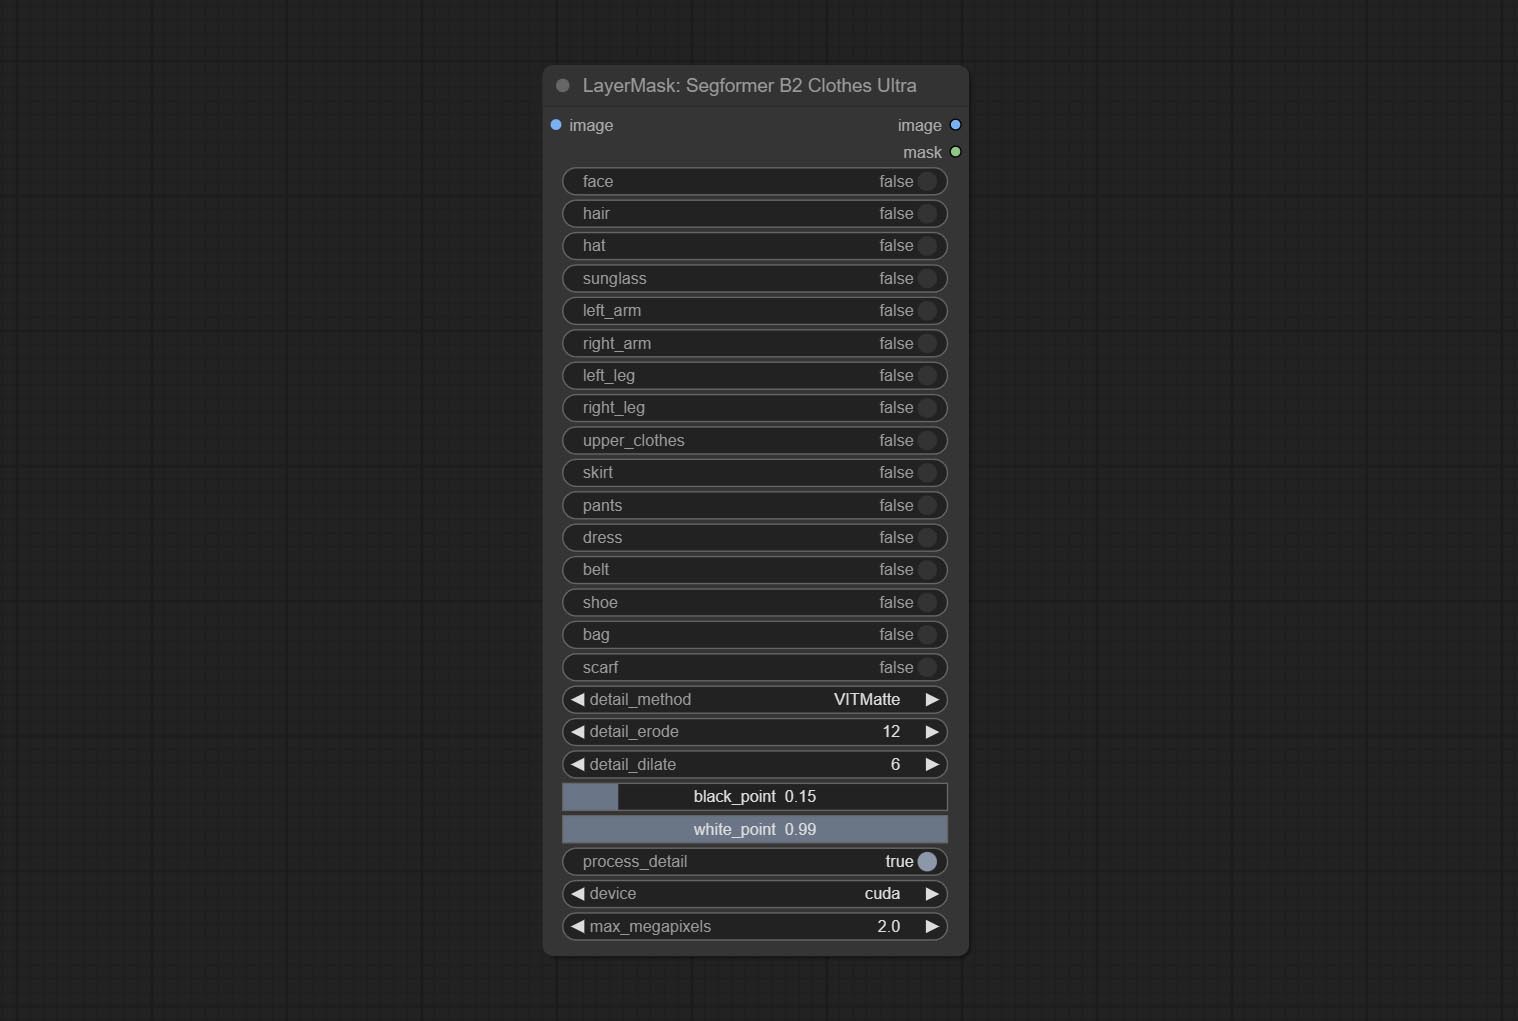
- face:面部识别开关。
- hair:头发识别开关。
- hat:帽子识别开关。
- sunglass:太阳镜识别开关。
- left_arm:左臂识别开关。
- right_arm:右臂识别开关。
- left_leg:左腿识别开关。
- right_leg:右腿识别开关。
- skirt:裙子识别开关。
- pants:裤子识别开关。
- dress:连衣裙识别开关。
- belt:腰带识别开关。
- shoe:鞋子识别开关。
- bag:包包识别开关。
- scarf:围巾识别开关。
- detail_method:边缘处理方法。提供 VITMatte、VITMatte(局部)、PyMatting 和 GuidedFilter。如果首次使用 VITMatte 后已下载模型,则后续可使用 VITMatte(局部)。
- detail_erode:从边缘向内侵蚀遮罩范围。数值越大,向内修复的范围越大。
- detail_dilate:遮罩边缘向外扩张。数值越大,向外修复的范围越广。
- black_point:边缘黑色采样阈值。
- white_point:边缘白色采样阈值。
- process_detail:此处设置为 false 将跳过边缘处理以节省运行时间。
- device:设置是否使用 CUDA 运行 VitMatte。
- max_megapixels:设置 VitMate 操作的最大尺寸。
SegformerUltraV2
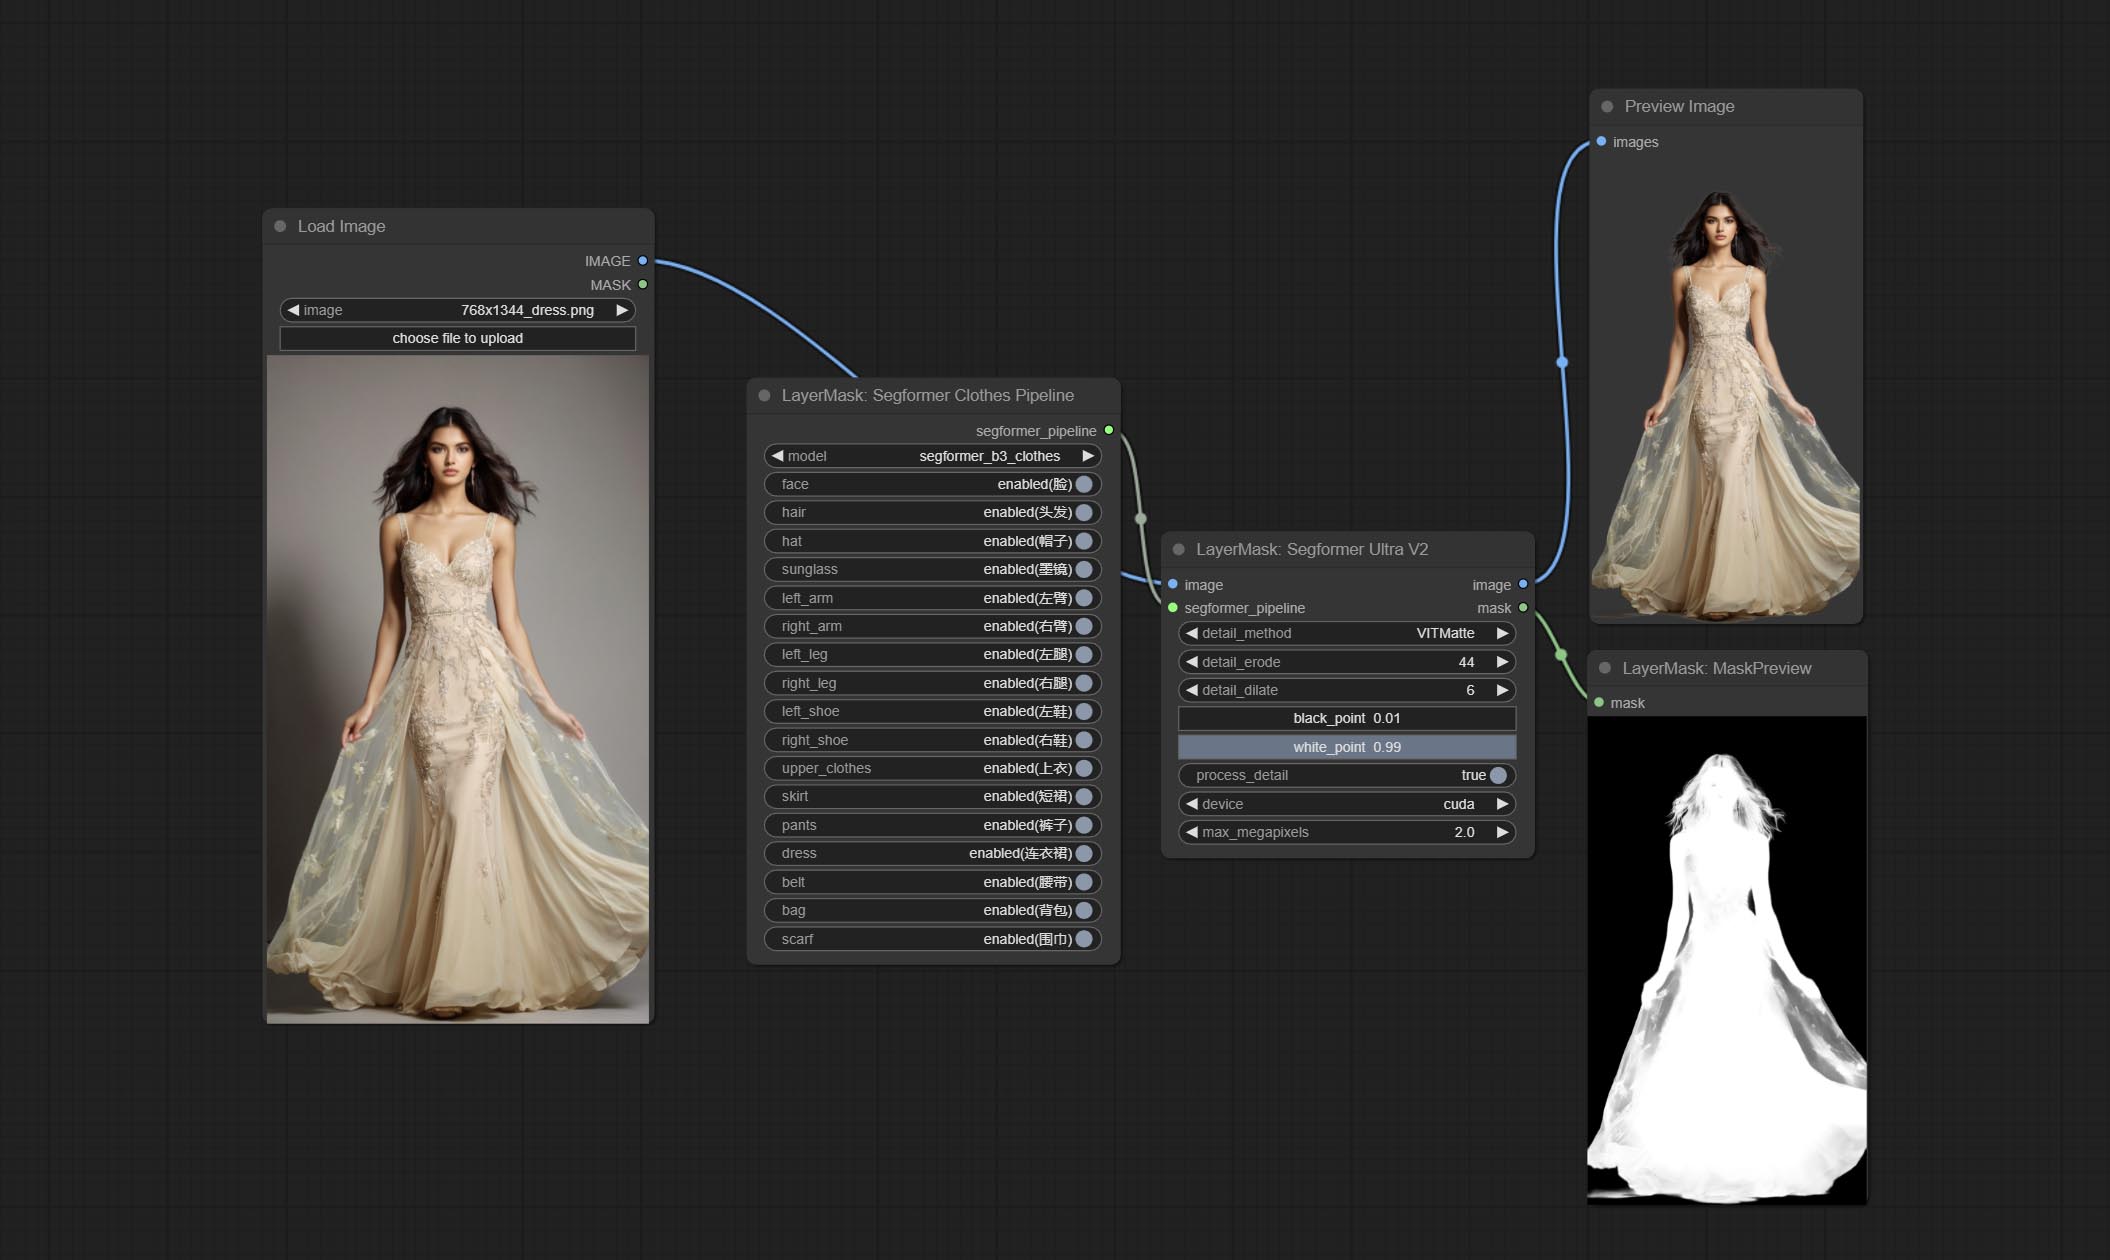
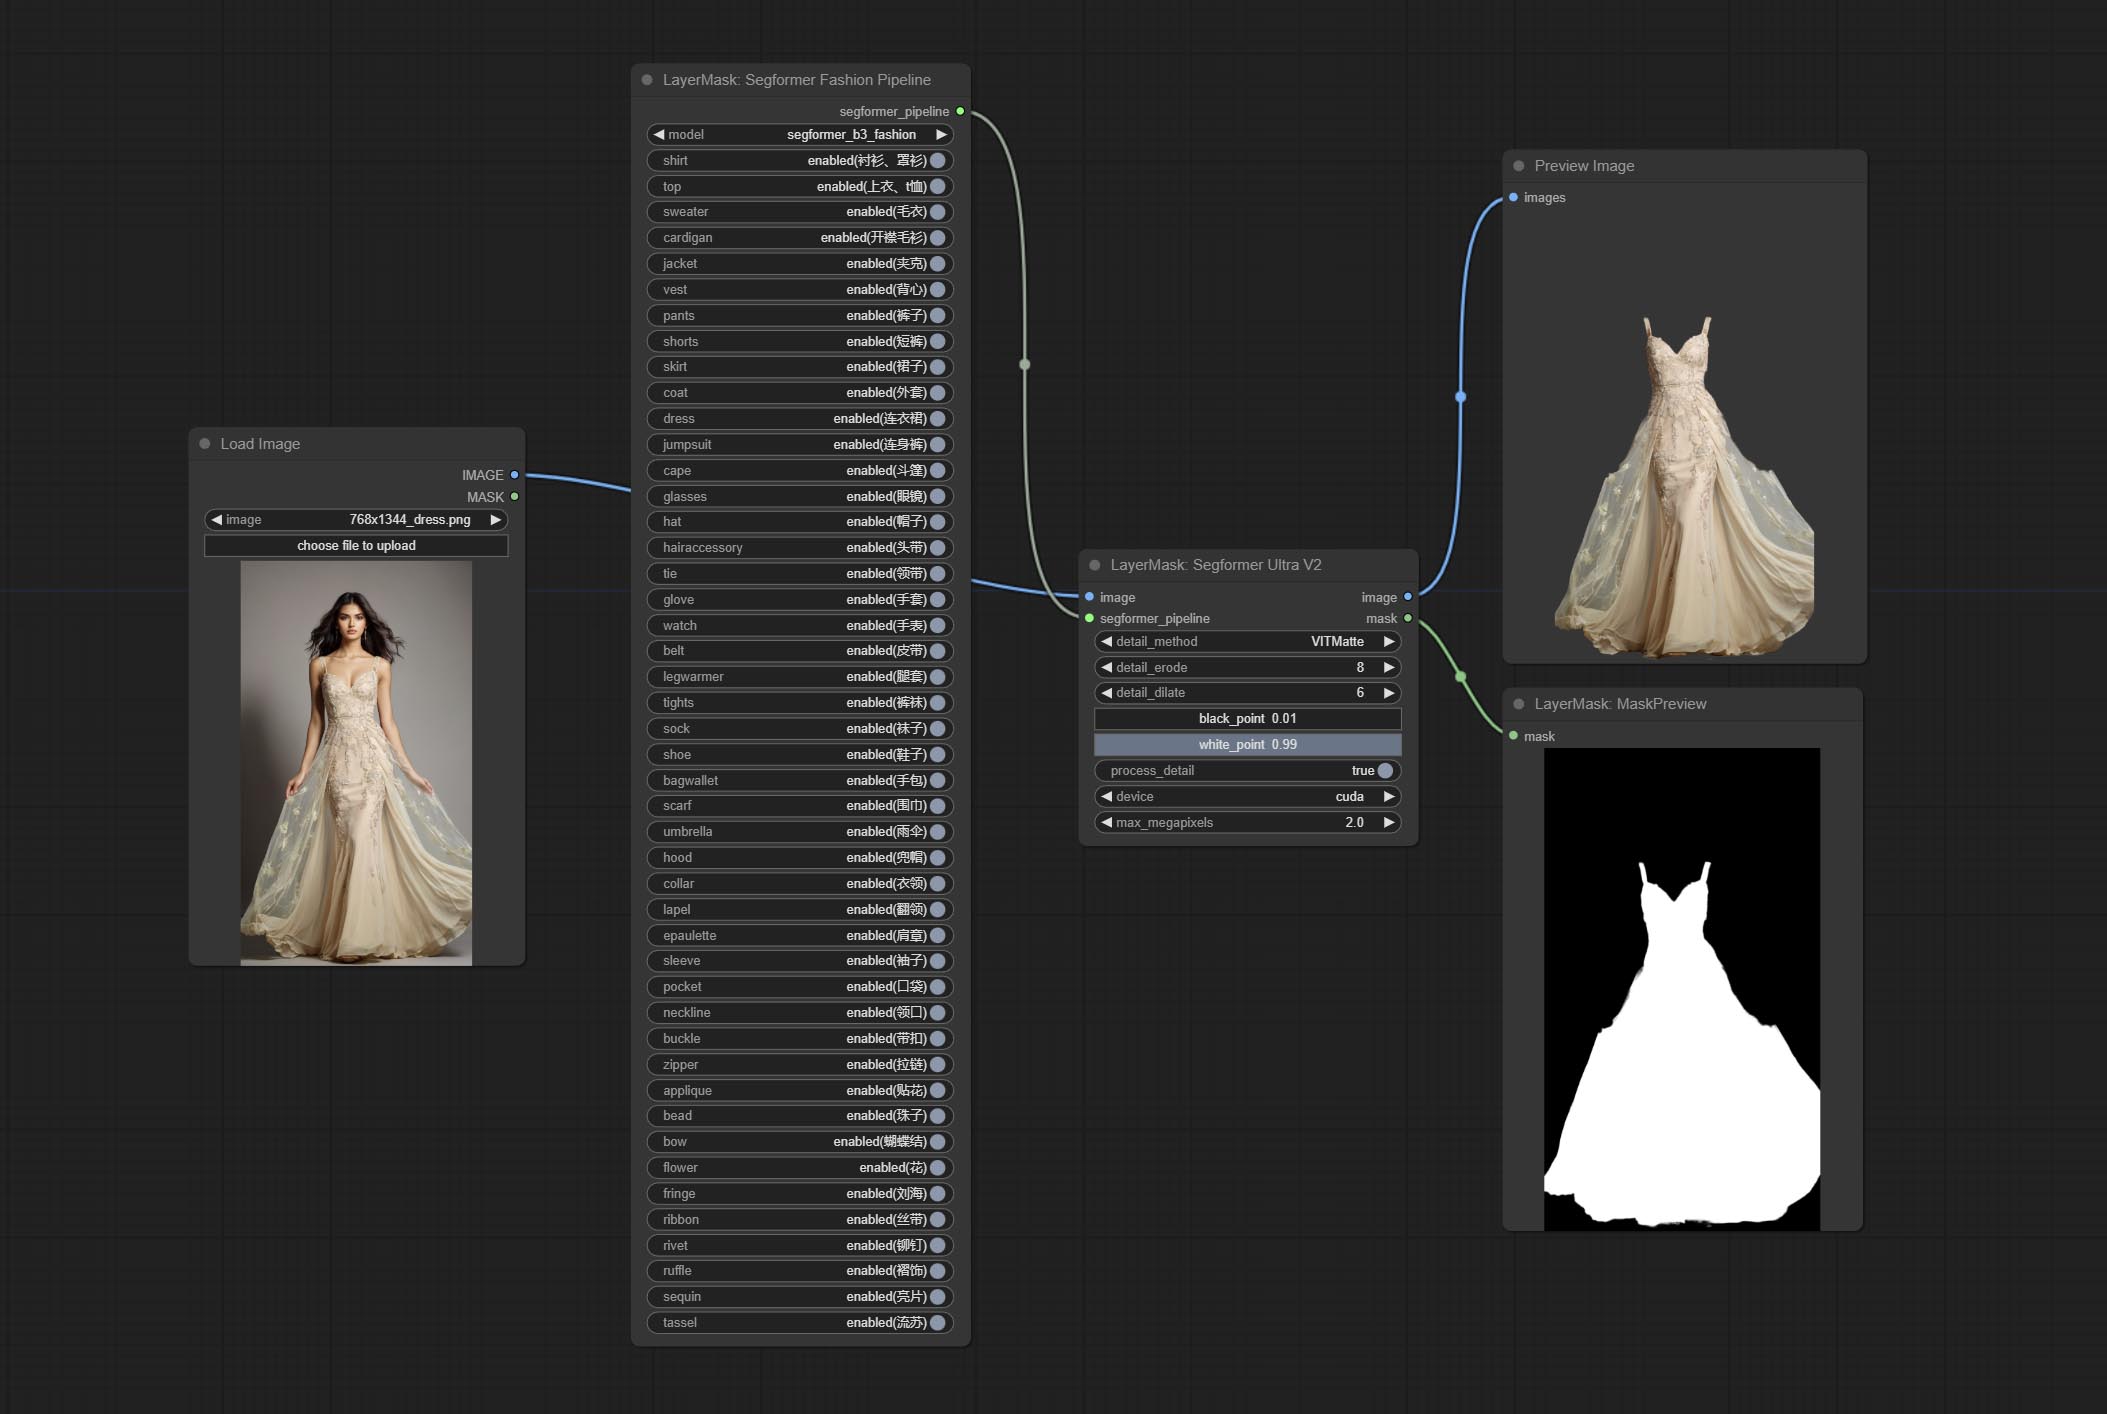
使用 segformer 模型进行服装分割,具有超高的边缘细节。目前支持 segformer b2 衣服、segformer b3 衣服和 segformer b3 时尚。
*请从 huggingface 或 百度网盘 下载模型文件,并将其放置于 ComfyUI/models/segformer_b2_clothes 文件夹中。
*请从 huggingface 或 百度网盘 下载模型文件,并将其放置于 ComfyUI/models/segformer_b3_clothes 文件夹中。
*请从 huggingface 或 百度网盘 下载模型文件,并将其放置于 ComfyUI/models/segformer_b3_fashion 文件夹中。
节点选项: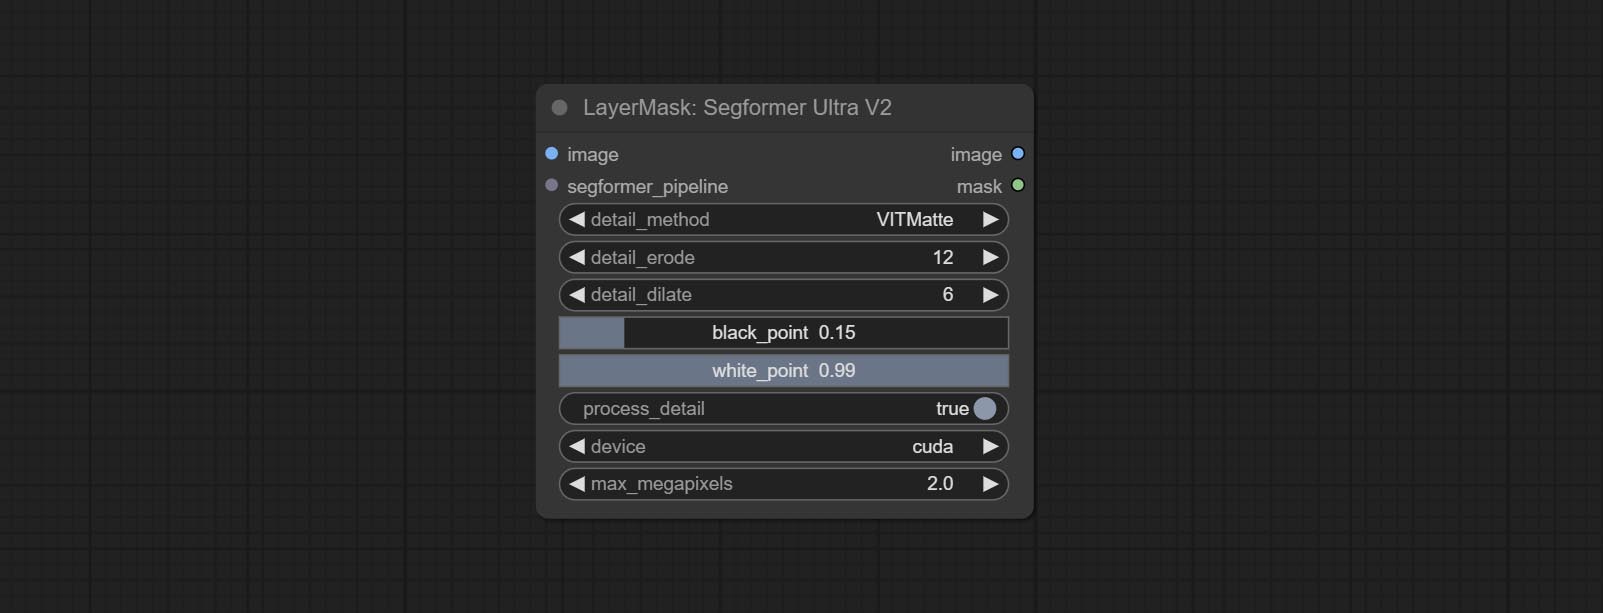
- image:输入图像。
- segformer_pipeline:Segformer 流水线输入。该流水线由 SegformerClottesPipeline 和 SegformerFashionPipeline 节点输出。
- detail_method:边缘处理方法。提供 VITMatte、VITMatte(局部)、PyMatting 和 GuidedFilter。如果首次使用 VITMatte 后已下载模型,则后续可使用 VITMatte(局部)。
- detail_erode:从边缘向内侵蚀遮罩范围。数值越大,向内修复的范围越大。
- detail_dilate:遮罩边缘向外扩张。数值越大,向外修复的范围越广。
- black_point:边缘黑色采样阈值。
- white_point:边缘白色采样阈值。
- process_detail:此处设置为 false 将跳过边缘处理以节省运行时间。
- device:设置是否使用 CUDA 运行 VitMatte。
- max_megapixels:设置 VitMate 操作的最大尺寸。
SegformerClothesPipiline
选择 segformer 服装模型,并选择分割内容。
节点选项: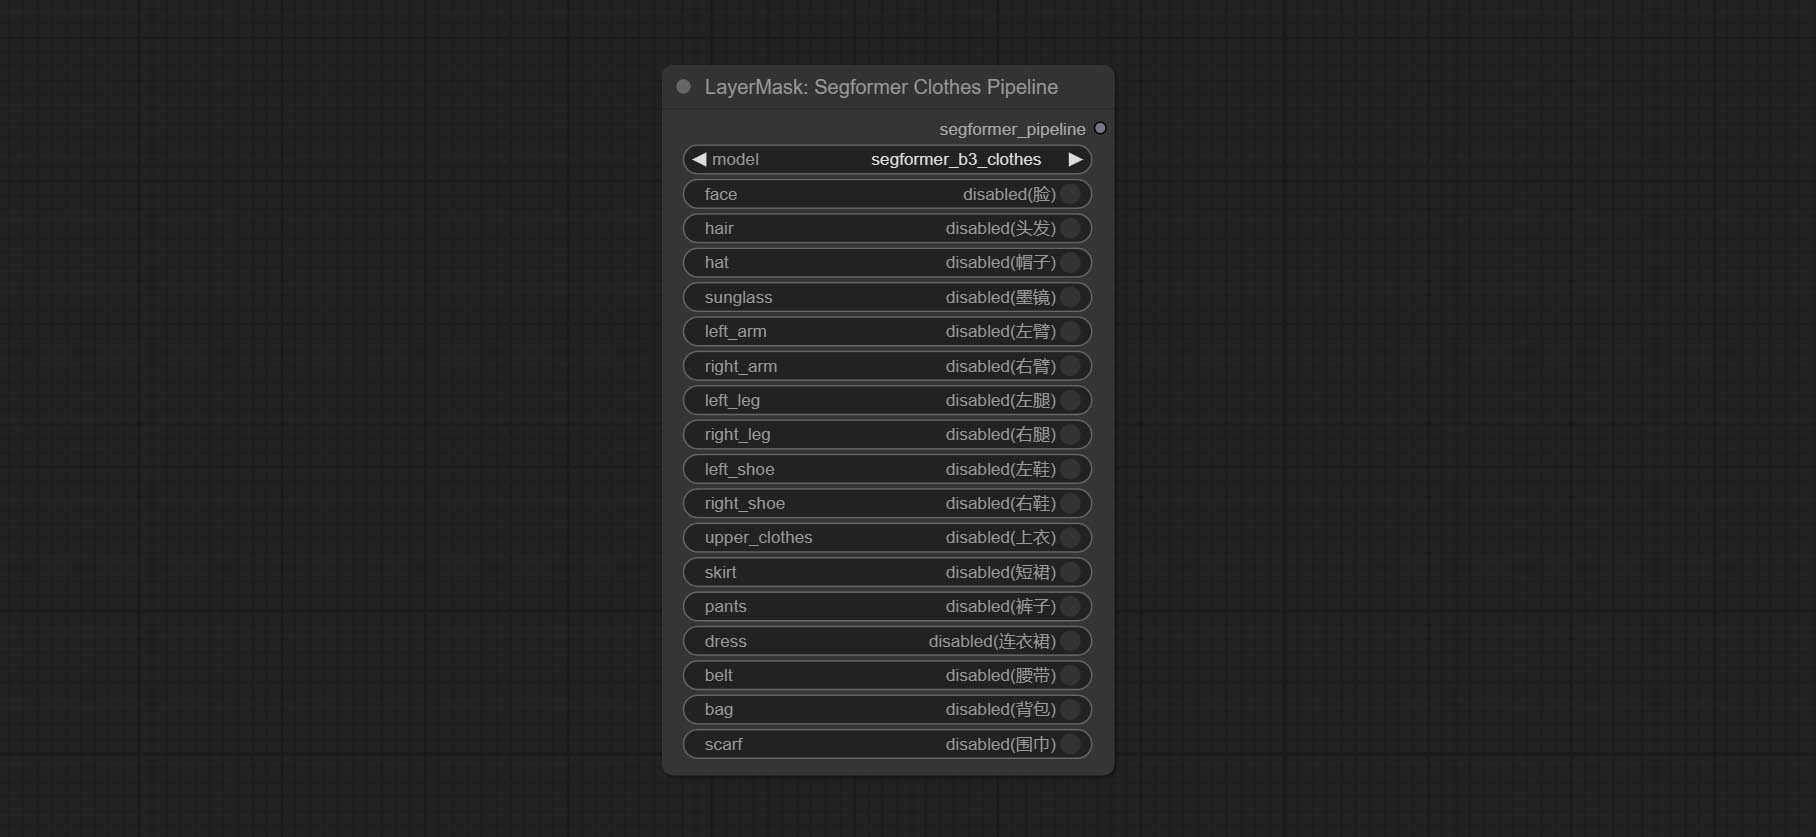
- model: 模型选择。目前有两个模型可供选择,分别是 segformer b2 服装和 segformer b3 服装。
- face: 面部识别开关。
- hair: 头发识别开关。
- hat: 帽子识别开关。
- sunglass: 太阳镜识别开关。
- left_arm: 左臂识别开关。
- right_arm: 右臂识别开关。
- left_leg: 左腿识别开关。
- right_leg: 右腿识别开关。
- left_shoe: 左鞋识别开关。
- right_shoe: 右鞋识别开关。
- skirt: 裙子识别开关。
- pants: 裤子识别开关。
- dress: 连衣裙识别开关。
- belt: 腰带识别开关。
- bag: 包识别开关。
- scarf: 围巾识别开关。
SegformerFashionPipiline
选择 segformer 时尚模型,并选择分割内容。
节点选项: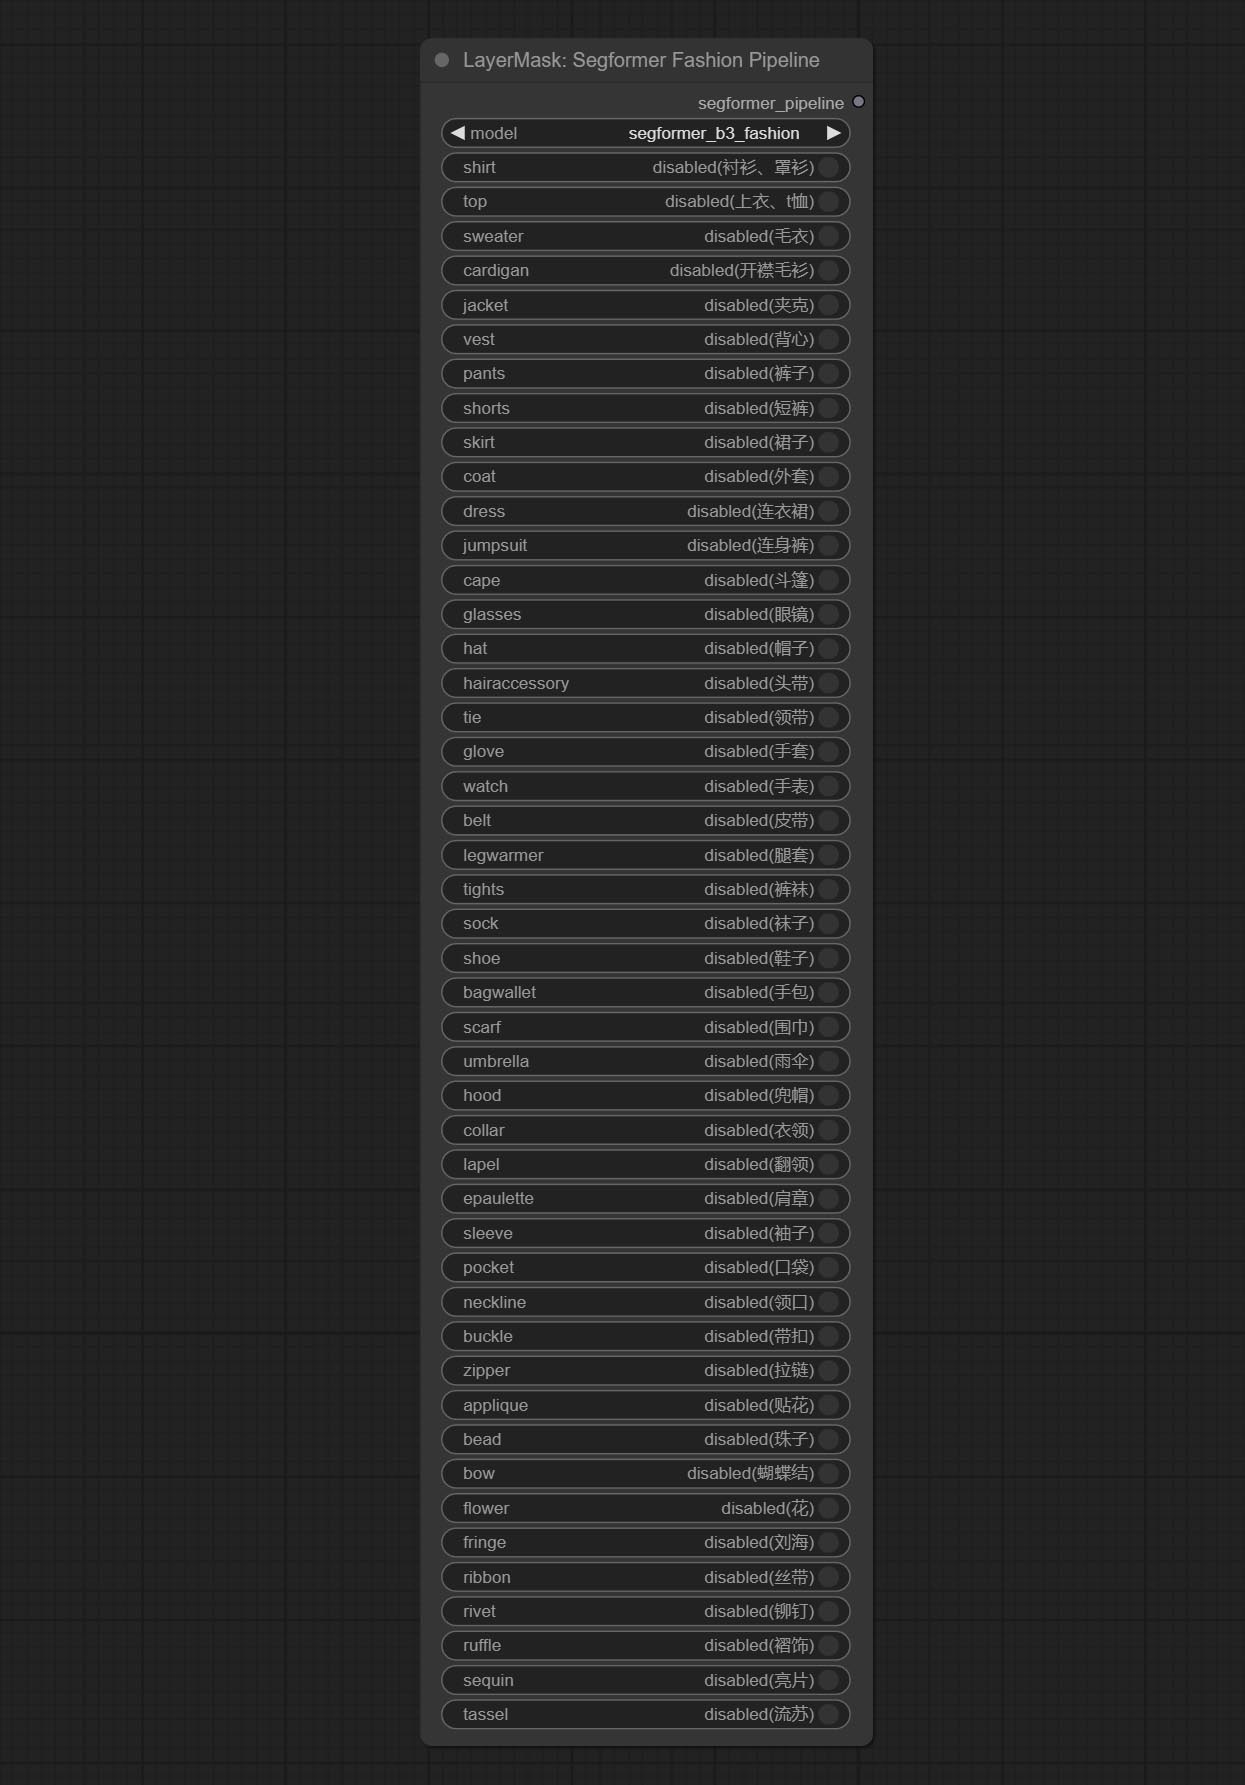
- model: 模型选择。目前只有一个模型可供选择,即 segformer b3 时尚。
- shirt: 衬衫和女式衬衫开关。
- top: 上衣、T恤、卫衣开关。
- sweater: 毛衣开关。
- cardigan: 开衫开关。
- jacket: 外套开关。
- vest: 马甲开关。
- pants: 裤子开关。
- shorts: 短裤开关。
- skirt: 裙子开关。
- coat: 外套开关。
- dress: 连衣裙开关。
- jumpsuit: 连体裤开关。
- cape: 斗篷开关。
- glasses: 眼镜开关。
- hat: 帽子开关。
- hairaccessory: 发带、头饰、发饰开关。
- tie: 领带开关。
- glove: 手套开关。
- watch: 手表开关。
- belt: 腰带开关。
- legwarmer: 护腿套开关。
- tights: 紧身裤和长筒袜开关。
- sock: 袜子开关。
- shoe: 鞋子开关。
- bagwallet: 包和钱包开关。
- scarf: 围巾开关。
- umbrella: 雨伞开关。
- hood: 防风帽开关。
- collar: 领口开关。
- lapel: 翻领开关。
- epaulette: 肩章开关。
- sleeve: 袖子开关。
- pocket: 口袋开关。
- neckline: 领口开关。
- buckle: 扣件开关。
- zipper: 拉链开关。
- applique: 贴花开关。
- bead: 珠饰开关。
- bow: 蝴蝶结开关。
- flower: 花朵开关。
- fringe: 流苏开关。
- ribbon: 丝带开关。
- rivet: 铆钉开关。
- ruffle: 褶边开关。
- sequin: 亮片开关。
- tassel: 流苏开关。
SegformerUltraV3
在 SegformerUltraV2 的基础上,进行了修改,将模型和设置分开加载,从而在使用多个节点时节省资源。请注意,类型设置必须与模型匹配。
修改后的节点选项: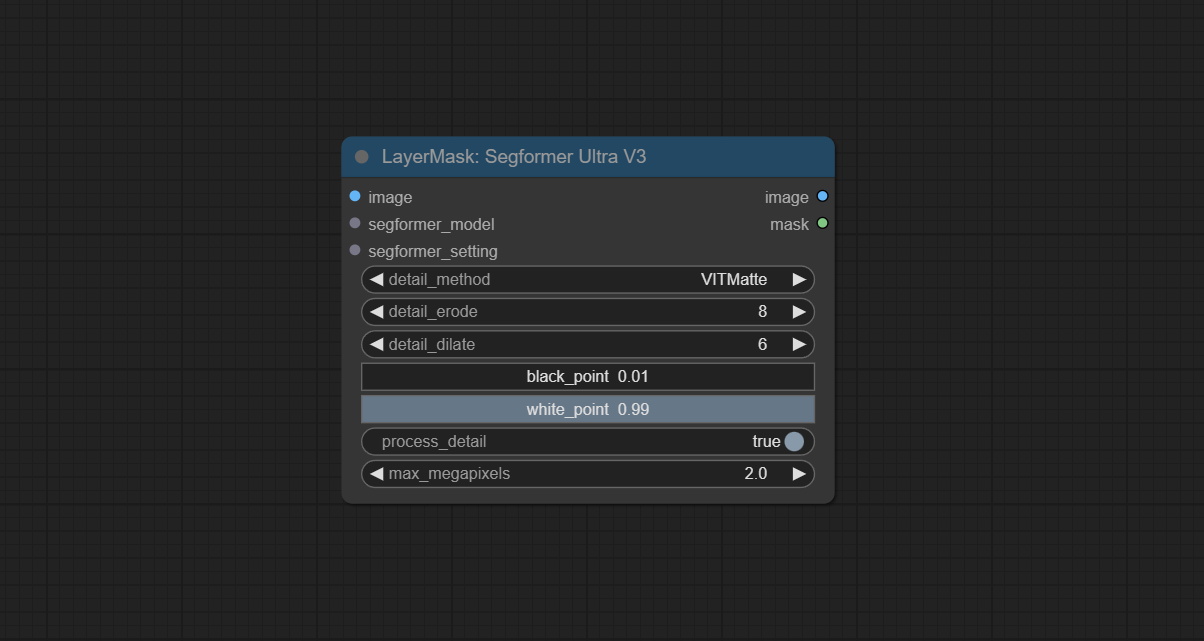
- segformer_model: Segformer 模型输入,该模型由
LoadSegformerModel节点加载。 - segformer_setting: Segformer 标签设置输入。
SegformerClothesSetting
 结合
结合 Segformer Ultra V3 设置 Segformer 服装节点。已从 SegformerClottesPipiline 节点中移除了模型选项。
SegformerFashionSetting
结合 Segformer Ultra V3 设置 Segformer 时尚节点。已从 SegformerFashionPipiline 节点中移除了模型选项。
LoadSegformerModel
与 Segformer Ultra V3 兼容的模型加载节点。
节点选项: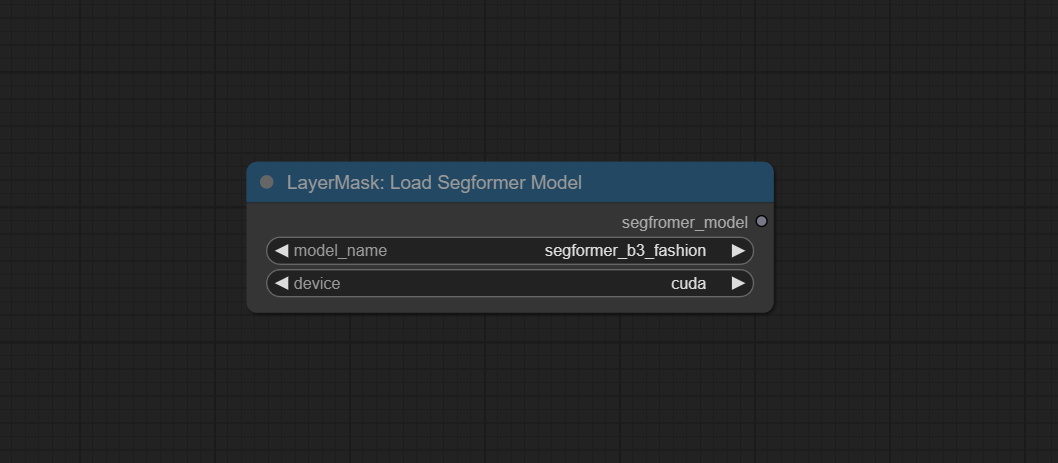
- model_name: 模型选择。
- devicee: 加载设备选择。
MaskEdgeUltraDetail
将粗糙的掩码处理为超精细的边缘。
该节点结合了 Spacepxl 的 ComfyUI-Image-Filters 中的 Alpha Matte 和 Guided Filter Alpha 节点功能,感谢原作者。
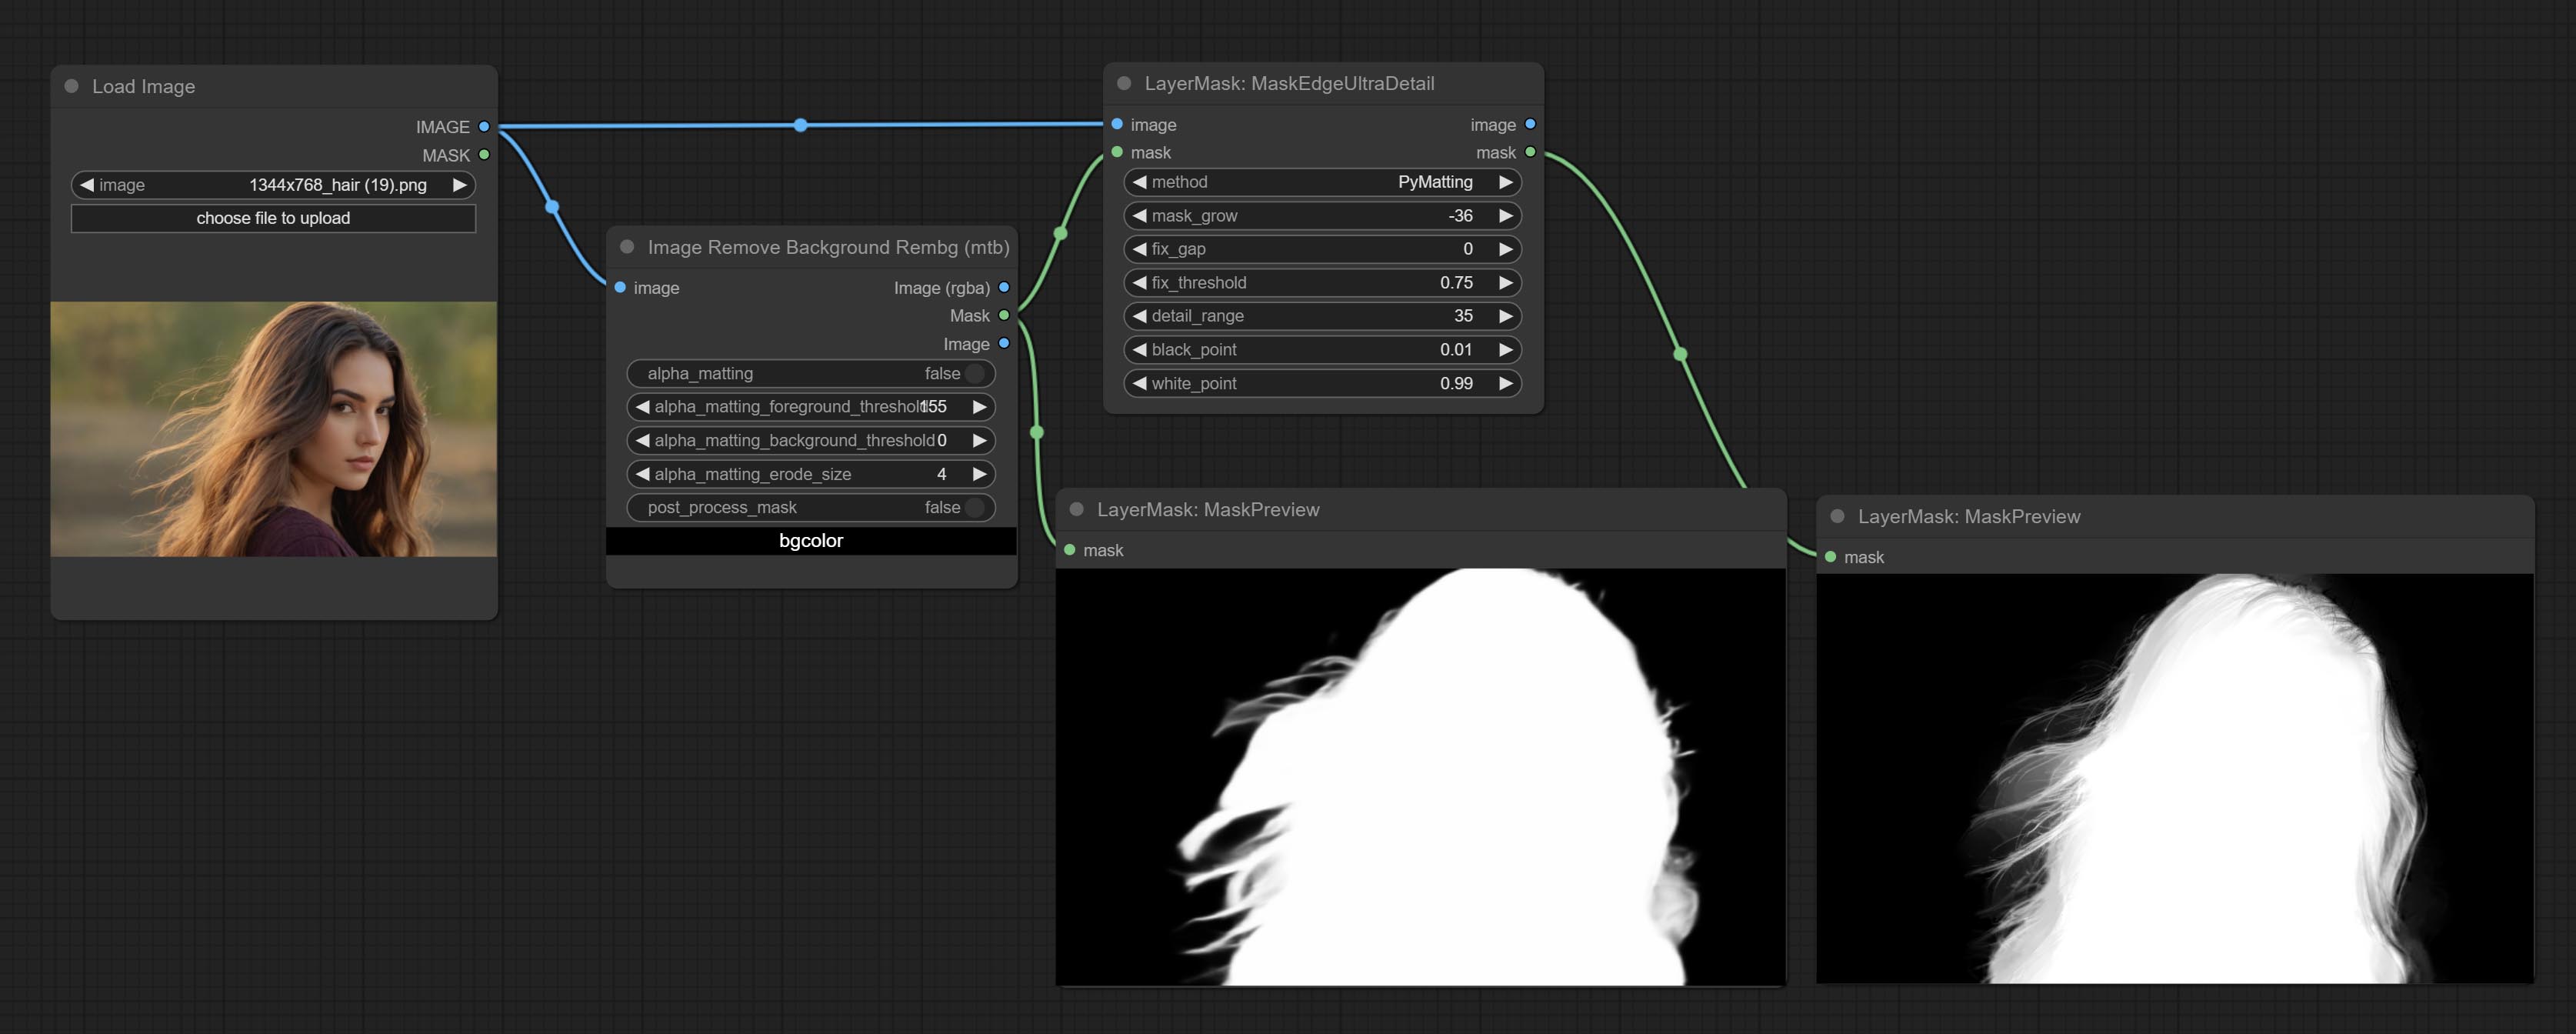
节点选项: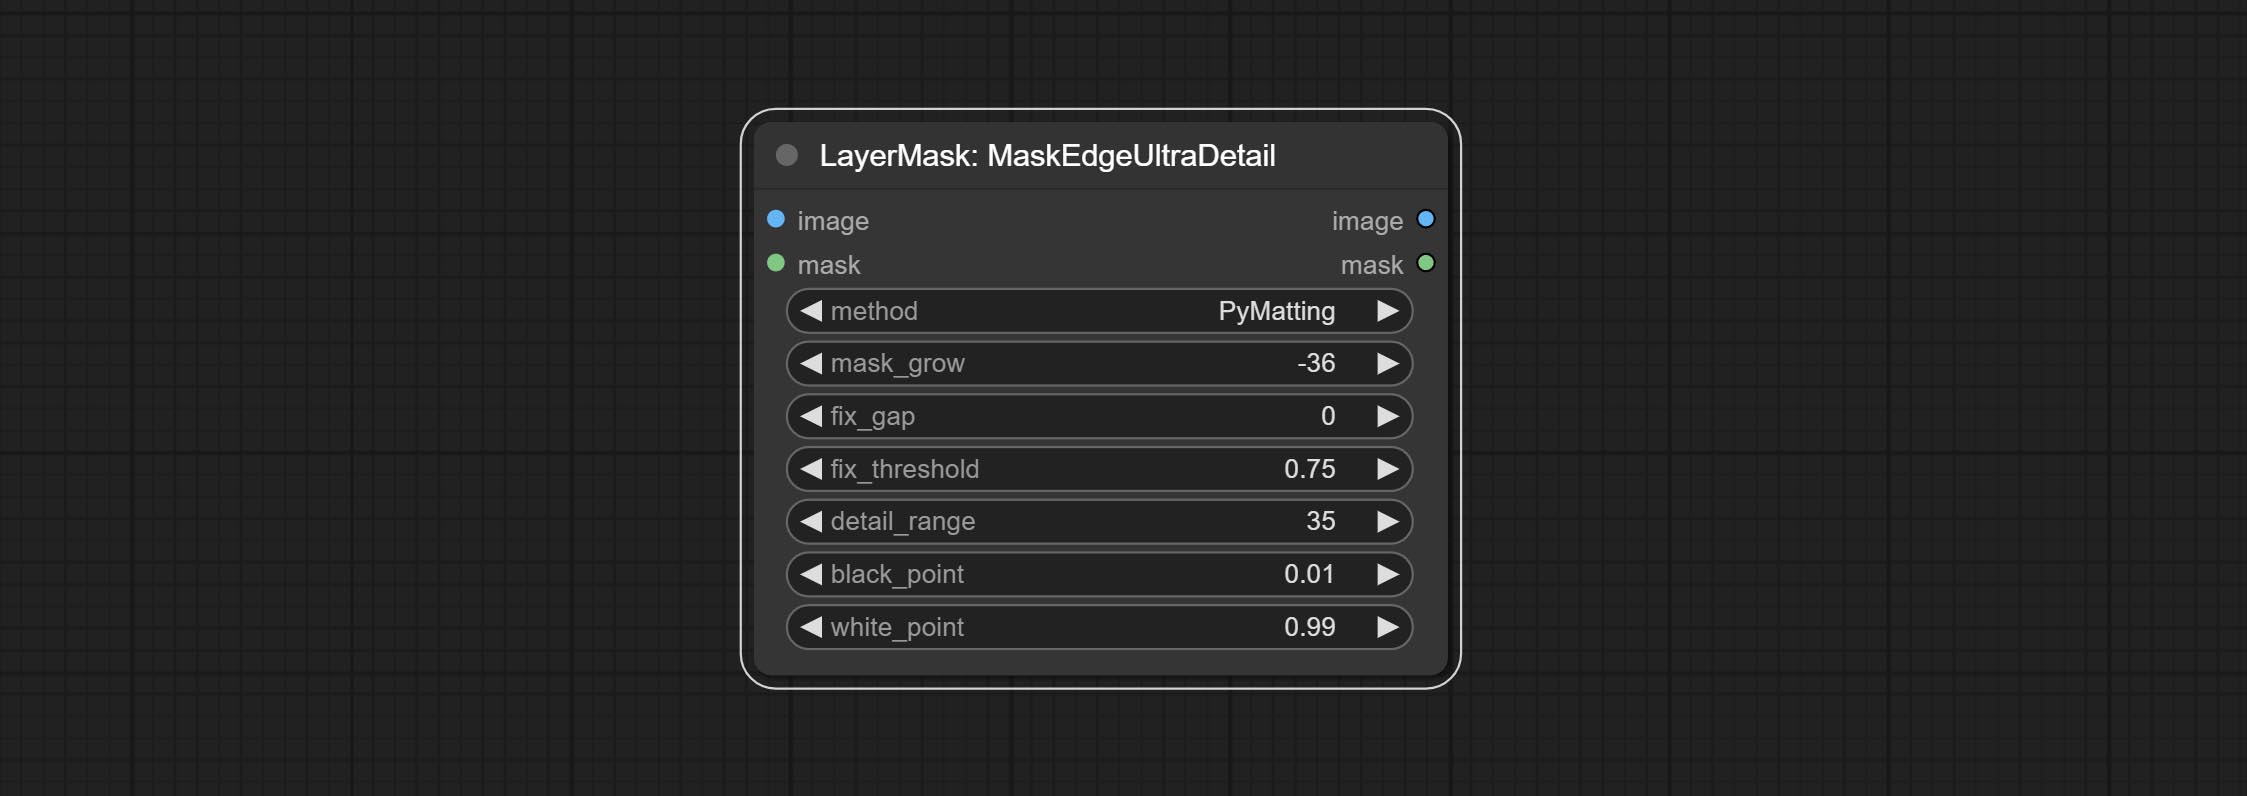
- method: 提供两种边缘处理方法:PyMatting 和 OpenCV-GuidedFilter。PyMatching 的处理速度较慢,但对于视频来说,建议使用此方法以获得更平滑的掩码序列。
- mask_grow: 掩码扩展幅度。正值向外扩展,负值向内收缩。对于较为粗糙的掩码,通常使用负值来缩小其边缘,以获得更好的效果。
- fix_gap: 修复掩码中的缺口。如果掩码中有明显的缺口,请适当增加此值。
- fix_threshold: 修复缺口的阈值。
- detail_range: 边缘细节范围。
- black_point: 边缘黑色采样阈值。
- white_point: 边缘白色采样阈值。
MaskEdgeUltraDetailV2
MaskEdgeUltraDetail 的 V2 升级版本新增了 VITMatte 边缘处理方法。(注:使用此方法处理超过 2K 分辨率的图像会消耗大量内存)
这种方法适用于处理半透明区域。
在 MaskEdgeUltraDetail 的基础上,进行了以下更改: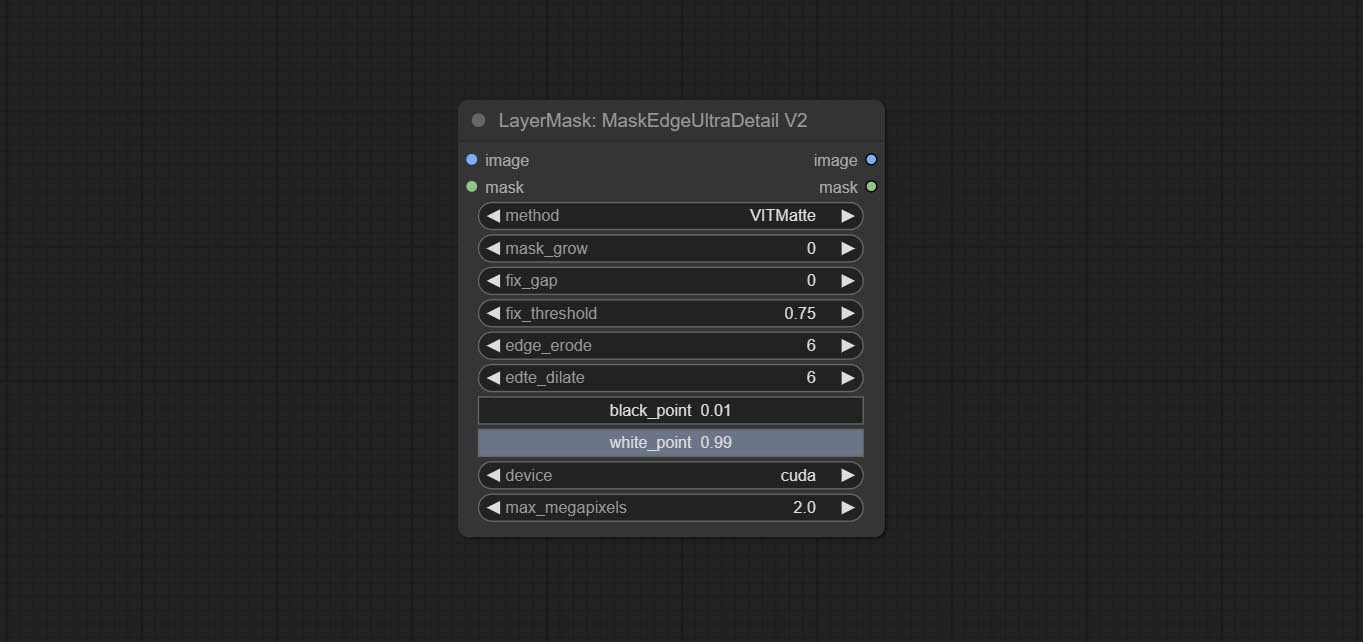
- method: 边缘处理方法。提供 VITMatte、VITMatte(本地)、PyMatting、GuidedFilter。如果首次使用 VITMatte 后已下载模型,则后续可使用 VITMatte(本地)。
- edge_erode: 从边缘向内侵蚀掩码范围。数值越大,向内修复的范围越大。
- edge_dilate: 掩码边缘向外扩张。数值越大,向外修复的范围越广。
- device: 设置是否使用 CUDA 的 VitMatte。
- max_megapixels: 设置 VitMate 操作的最大尺寸。
MaskEdgeUltraDetailV3
MaskEdgeUltraDetailV3 是 MaskEdgeUltraDetailV2 的升级版本,通过输入三元图蒙版来处理不同的分区,生成包含更精细和半透明部分的完整蒙版。
在 MaskEdgeUltraDetailV2 的基础上,进行了以下改进: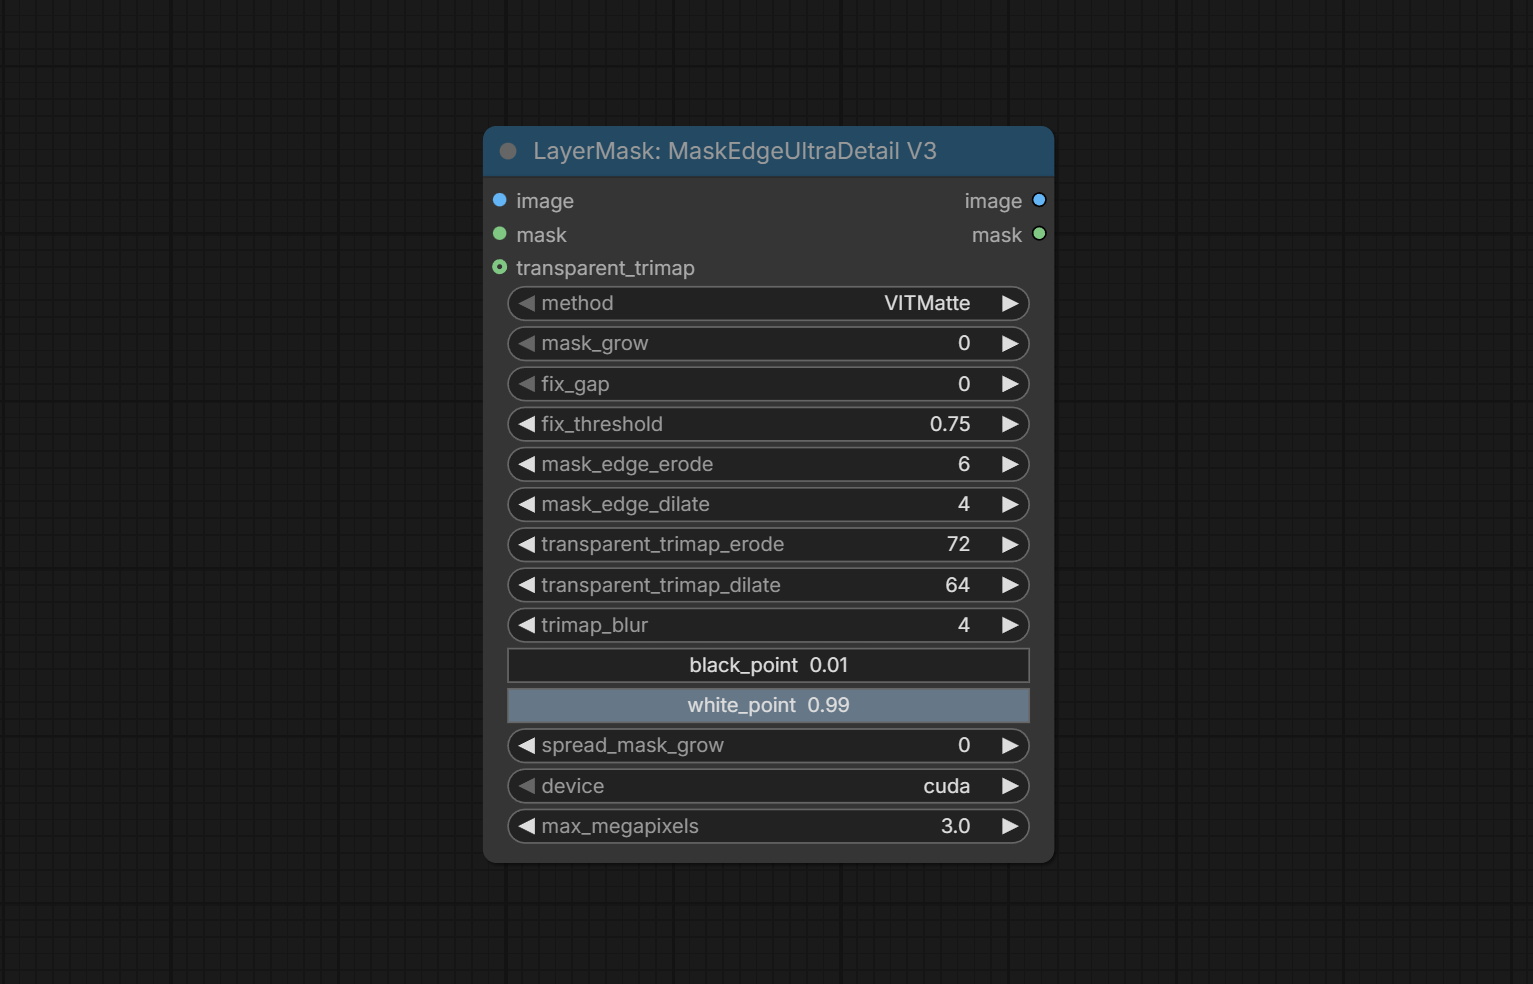
- transparent_trimap:在此区域内使用不同的虚化参数可以生成更精细的抠像蒙版。通常用于处理半透明物体或发丝等区域。
- mask_edge_erode:蒙版边缘向内侵蚀。数值越大,向内修复的范围越大。
- mask_edge_dilate:蒙版边缘向外扩张。数值越大,向外修复的范围越大。
- transparent_trimap_edge_erode:透明三元图蒙版的边缘向内侵蚀。数值越大,向内修正的范围越大。
- transparent_trimap_edge_dilate:透明三元图蒙版的边缘向外扩张。数值越大,向外修复的范围越大。
- trimap_blur:三元图蒙版与主蒙版融合处边缘的模糊程度。
MaskByColor
根据选定的颜色生成蒙版。
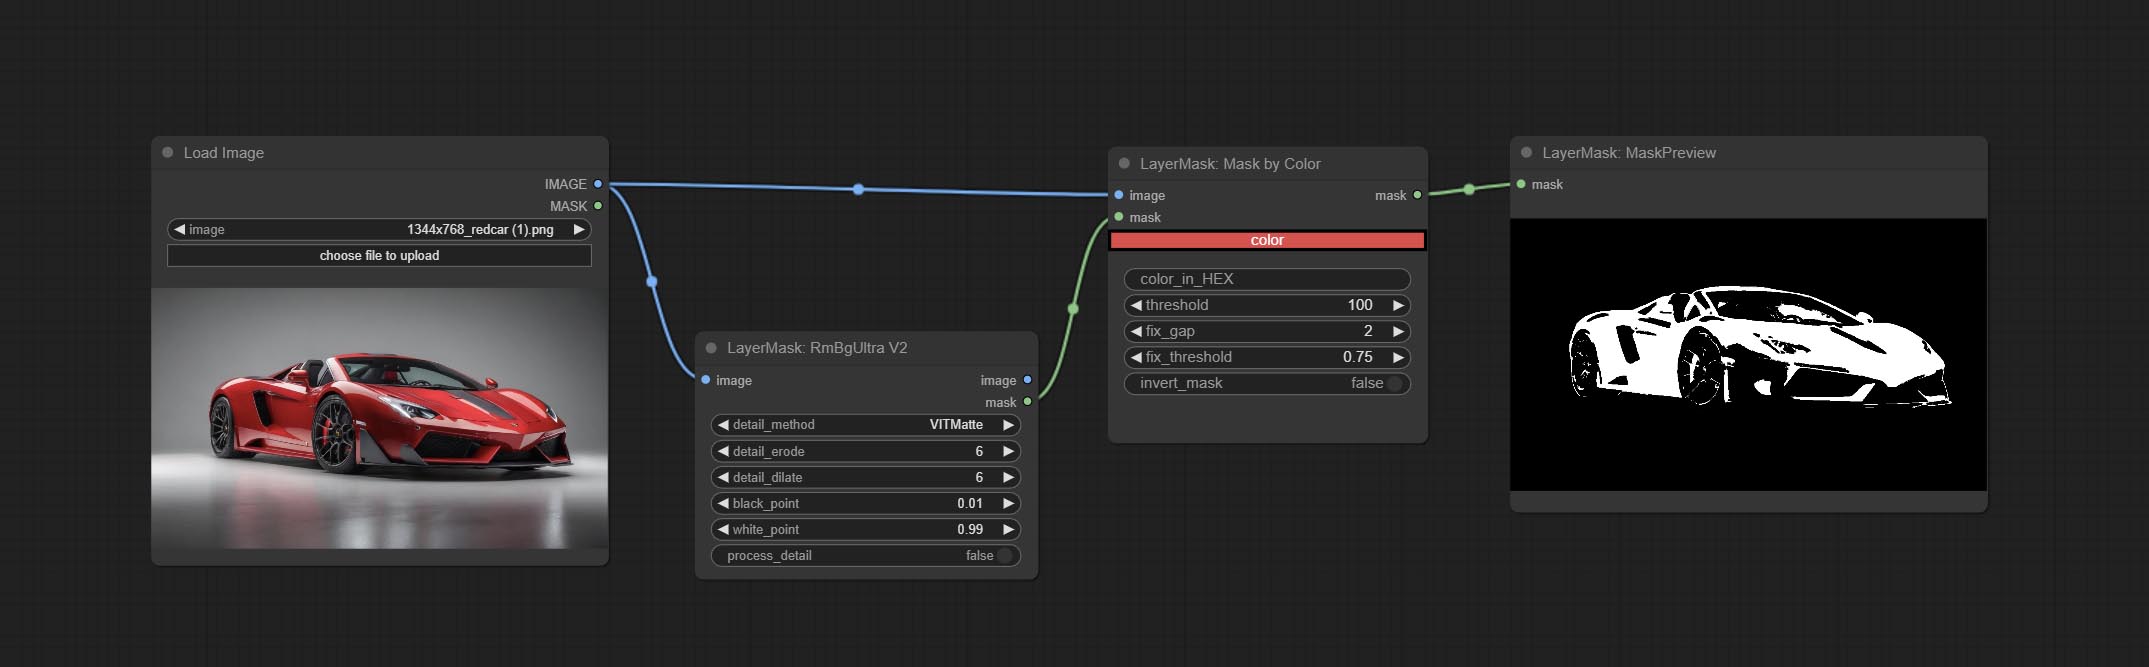
节点选项: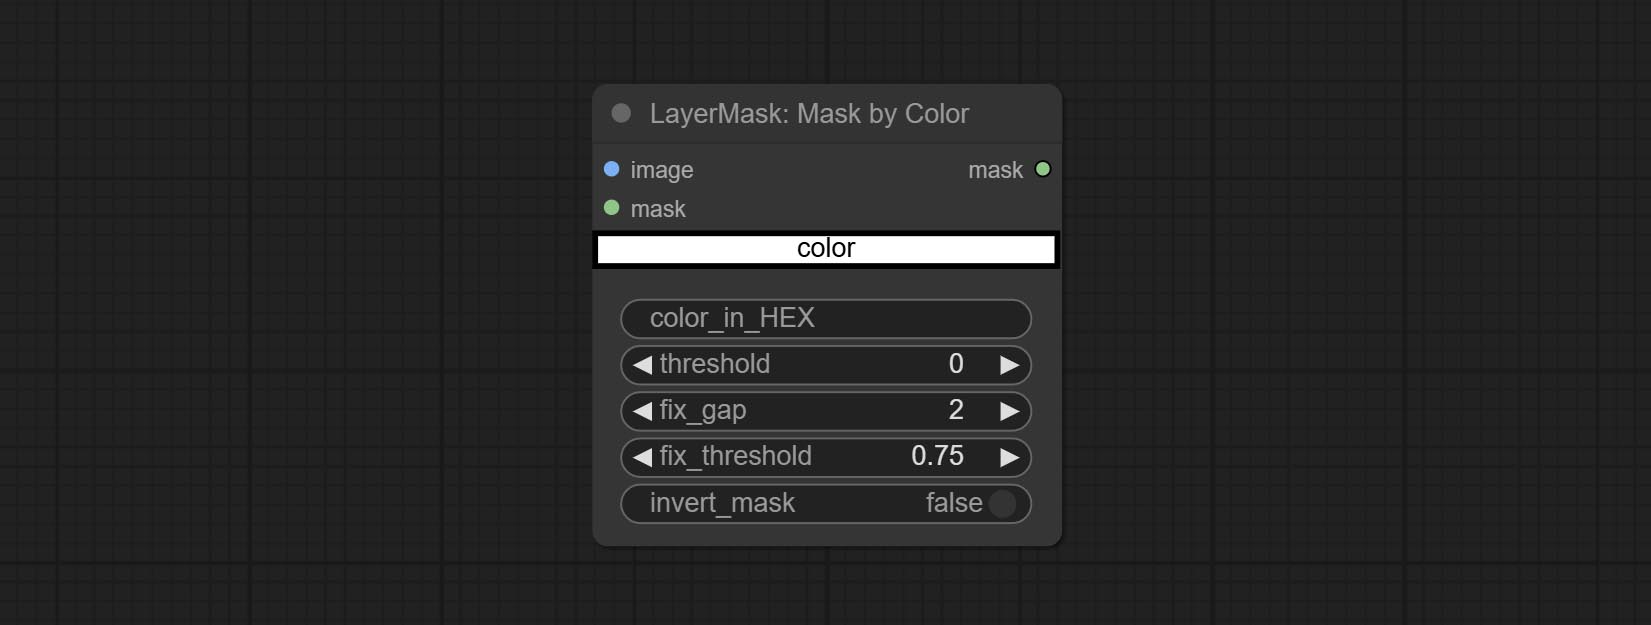
- image:输入图像。
- mask:此输入为可选,若有蒙版,则仅包含蒙版内的颜色范围。
- color:颜色选择器。点击色块选择颜色,也可使用拾色器面板上的吸管工具吸取屏幕颜色。注意:使用吸管时,请将浏览器窗口最大化。
- color_in_HEX4:输入颜色值。若填写此项,则优先使用该值,忽略通过
color选择的颜色。 - threshold:蒙版范围阈值,数值越大,蒙版范围越大。
- fix_gap:修复蒙版中的空隙。若蒙版存在明显空隙,可适当增大此值。
- fix_threshold:修复蒙版的阈值。
- invert_mask:是否反转蒙版。
ImageToMask
将图像转换为蒙版。支持将 LAB、RGBA、YUV 和 HSV 模式下的任意通道转换为蒙版,并提供色彩尺度调整功能。同时支持可选的蒙版输入,以获得仅包含有效部分的蒙版。
节点选项: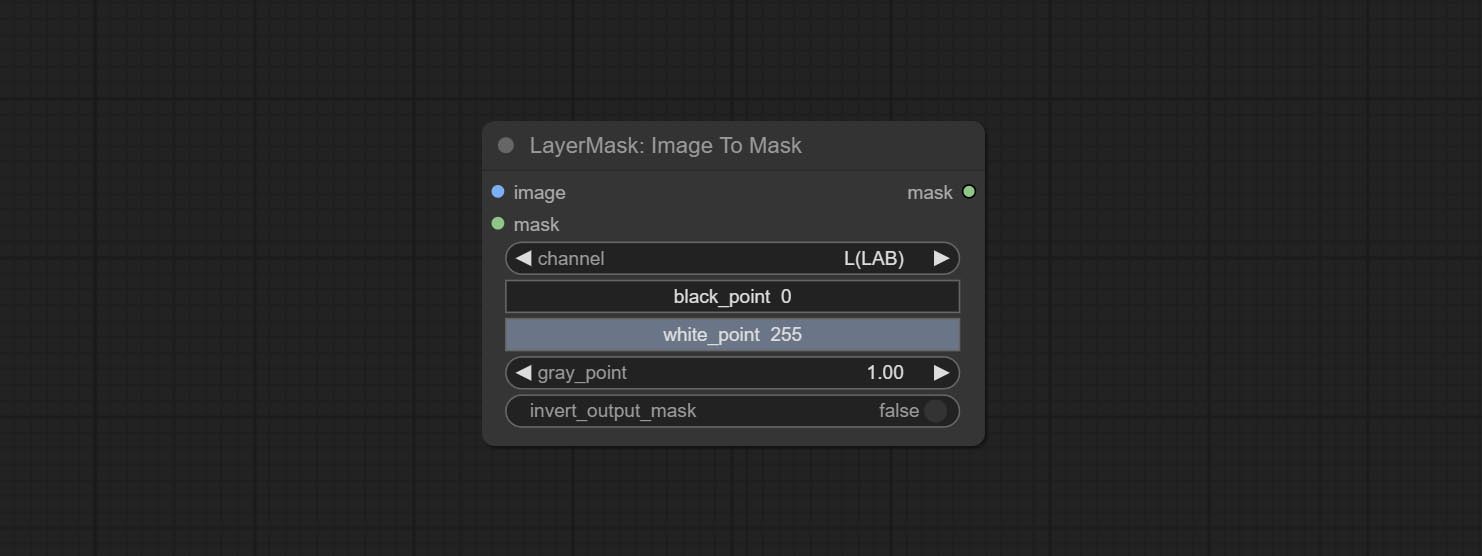
- image:输入图像。
- mask:此输入为可选,若有蒙版,则仅包含蒙版内的颜色范围。
- channel:通道选择。可选择 LAB、RGBA、YUV 或 HSV 模式的任意通道。
- black_point*:蒙版的黑点值。取值范围为 0–255,默认值为 0。
- white_point*:蒙版的白点值。取值范围为 0–255,默认值为 255。
- gray_point:蒙版的灰点值。取值范围为 0.01–9.99,默认值为 1。
- invert_output_mask:是否反转输出的蒙版。
*若 black_point 或 output_black_point 值大于 white_point 或 output_white_point,则两值会互换,较大的值作为 white_point,较小的值作为 black_point。
Shadow & Highlight Mask
生成图像中暗部和亮部的蒙版。
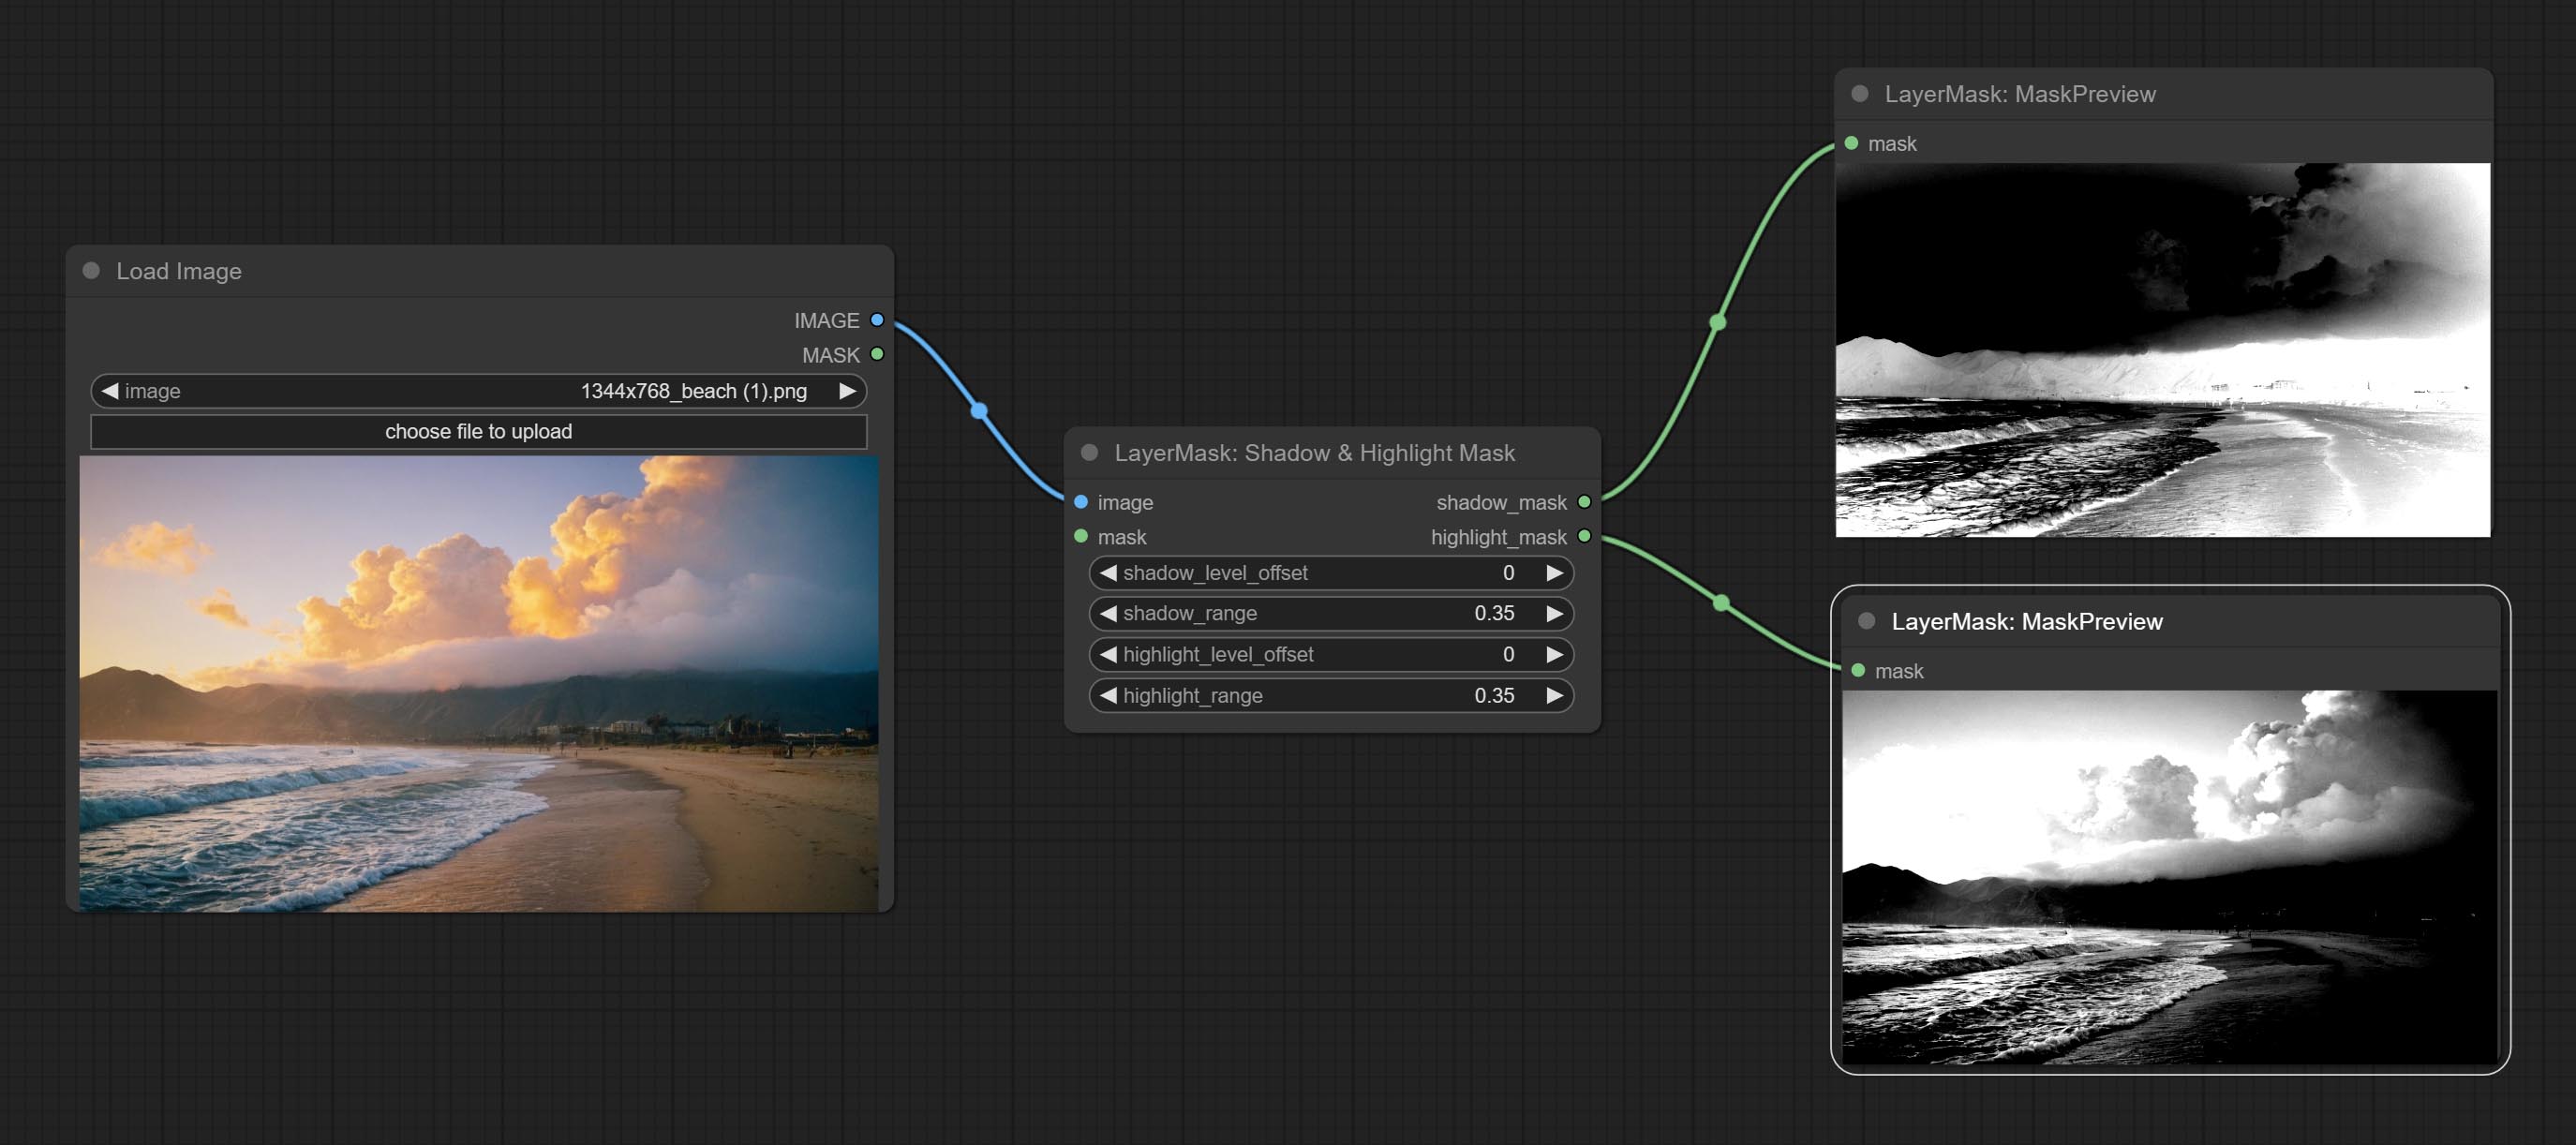
节点选项: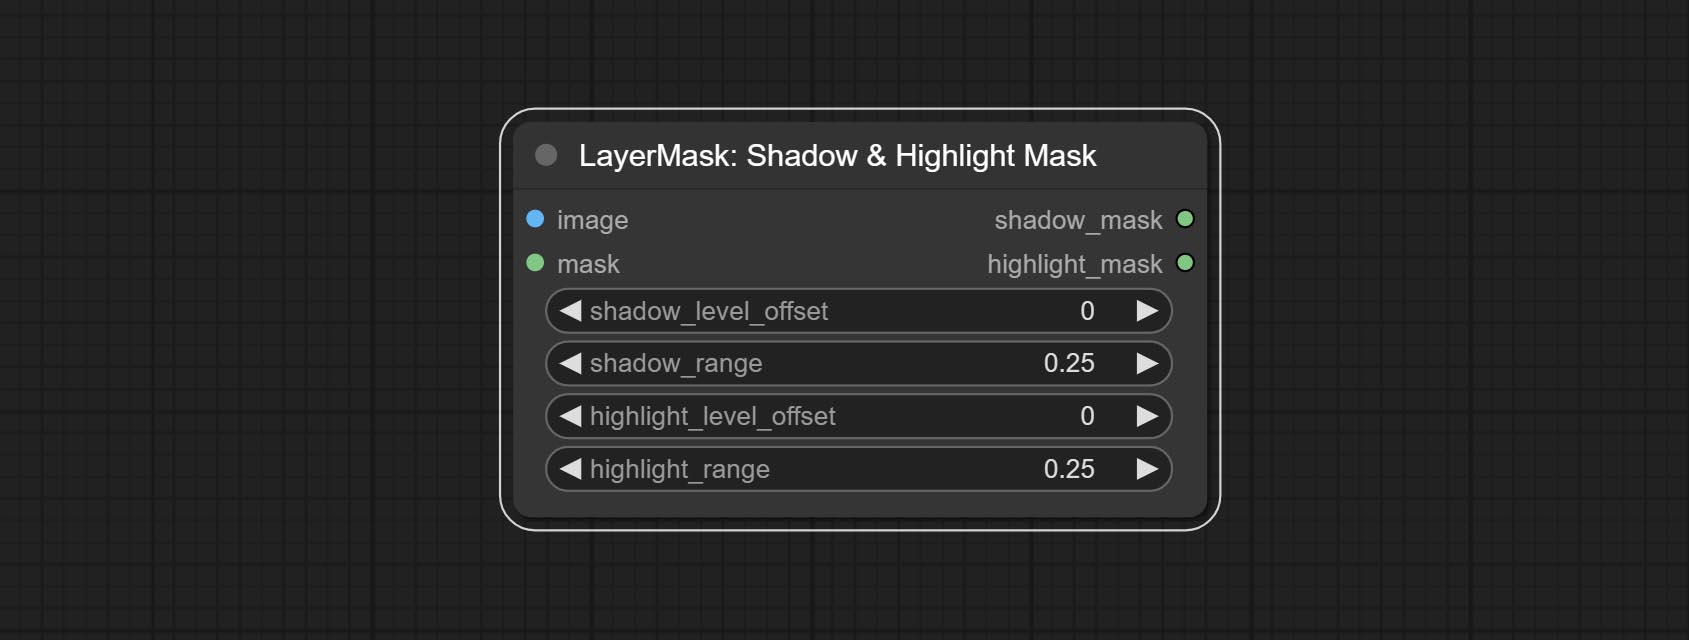
- image:输入图像。
- mask:可选输入。若有输入,则仅调整蒙版范围内的颜色。
- shadow_level_offset:暗部数值的偏移量,数值越大,越多靠近亮部的区域会被归入暗部。
- shadow_range:暗部的过渡范围。
- highlight_level_offset:亮部数值的偏移量,数值越大,越多靠近暗部的区域会被归入亮部。
- highlight_range:亮部的过渡范围。
Shadow Highlight Mask V2
这是 Shadow & Highlight Mask 节点的复制品,去掉了节点名称中的“&”字符,以避免 ComfyUI 工作流解析错误。
PixelSpread
对图像的蒙版边缘进行像素扩展预处理,可有效改善图像合成的边缘效果。
节点选项: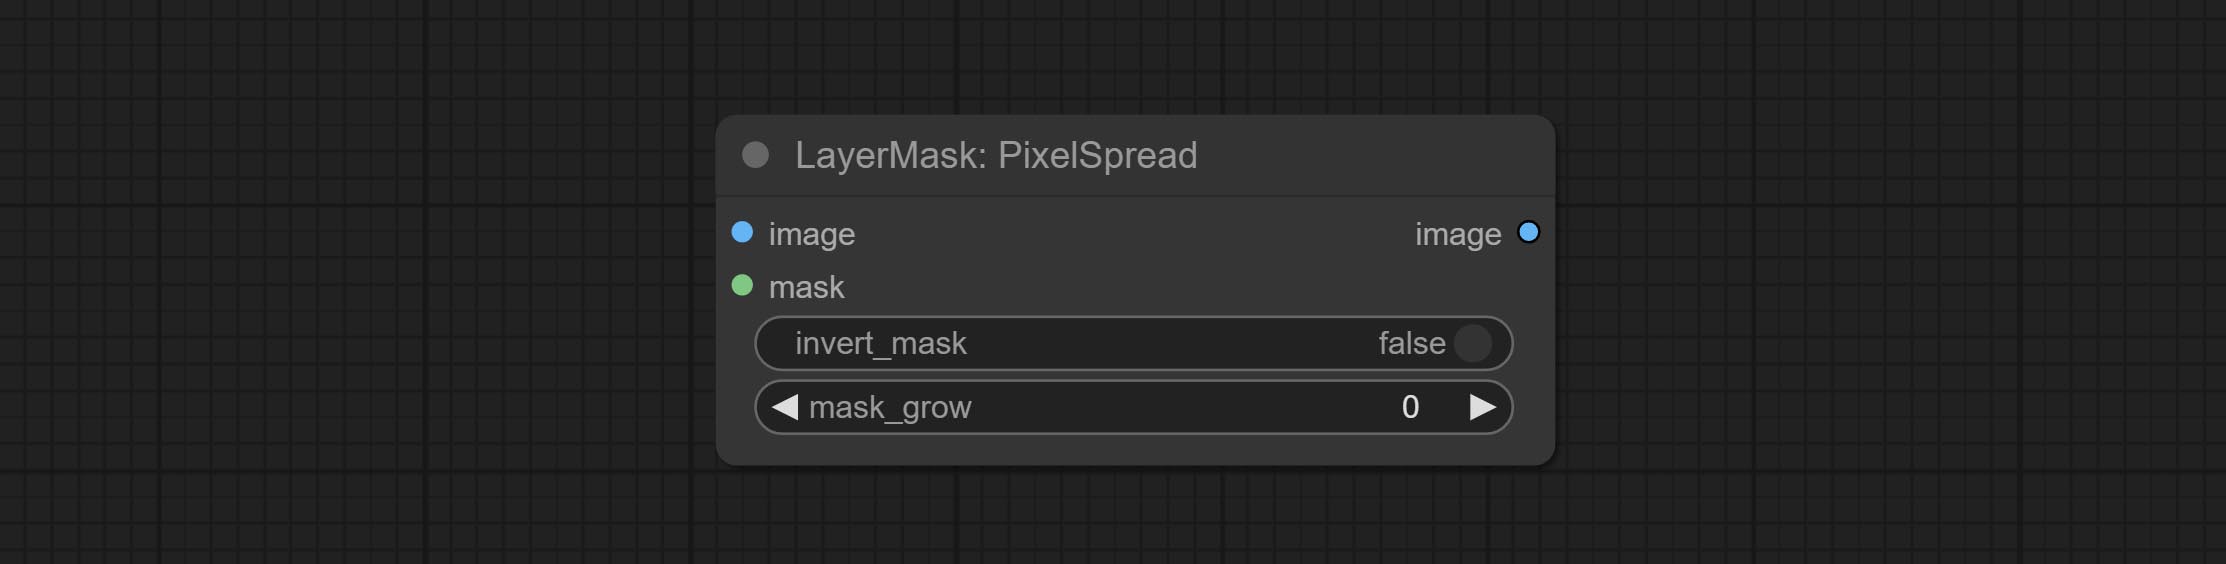
- invert_mask:是否反转蒙版。
- mask_grow:蒙版扩展幅度。
MaskGrow
扩展、收缩蒙版边缘并对其进行模糊处理。
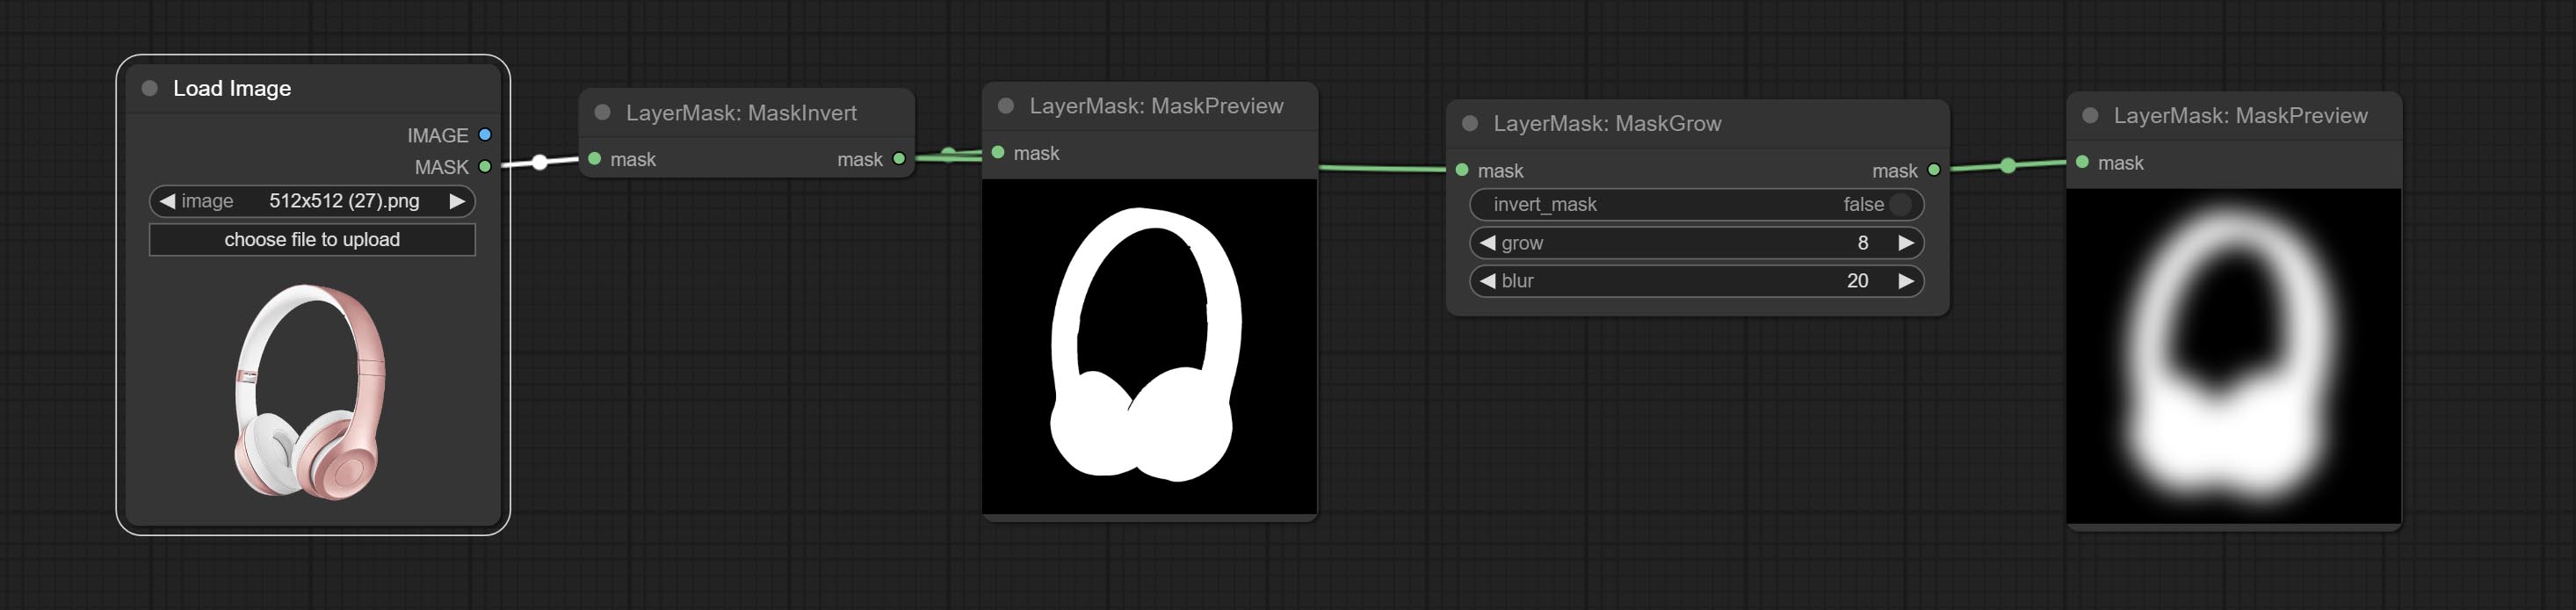
节点选项: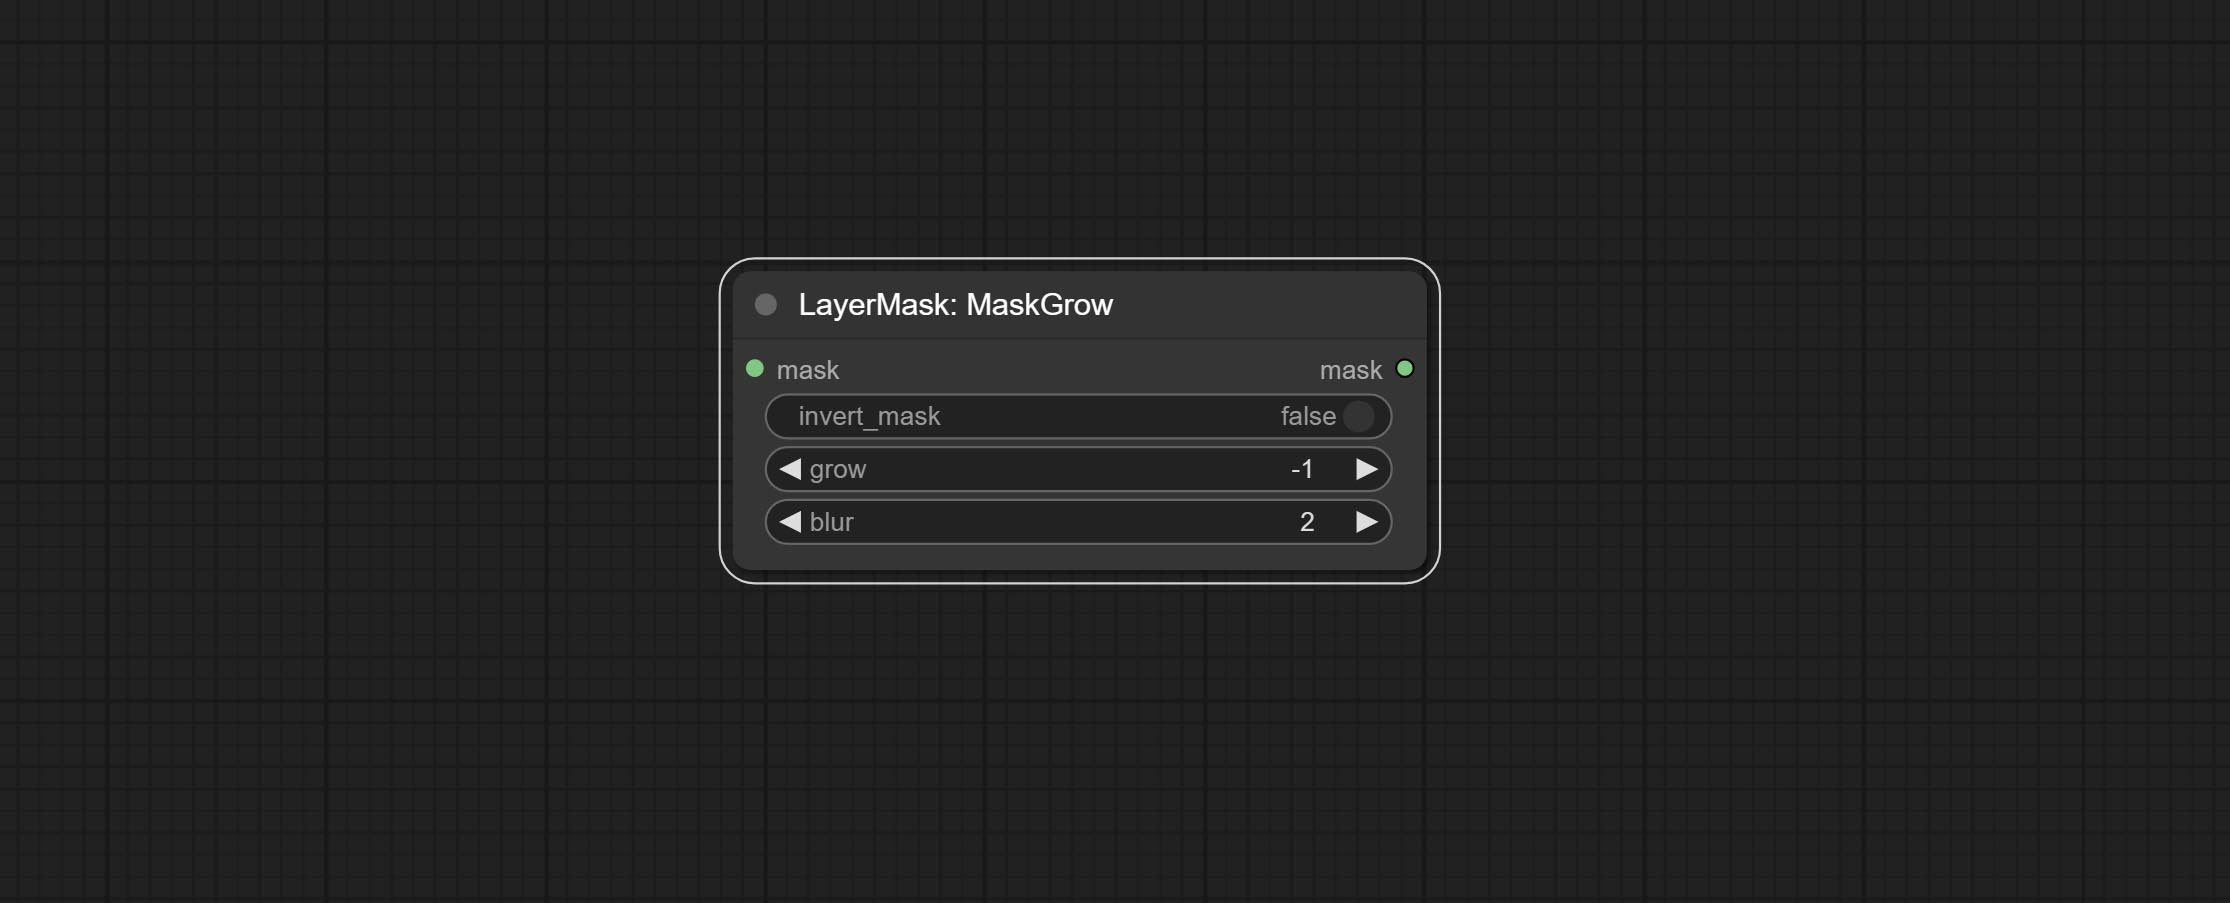
- invert_mask:是否反转蒙版。
- grow:正值表示向外扩展,负值表示向内收缩。
- blur:对边缘进行模糊处理。
MaskEdgeShrink
在保留边缘细节的同时,平滑并缩小蒙版边缘。
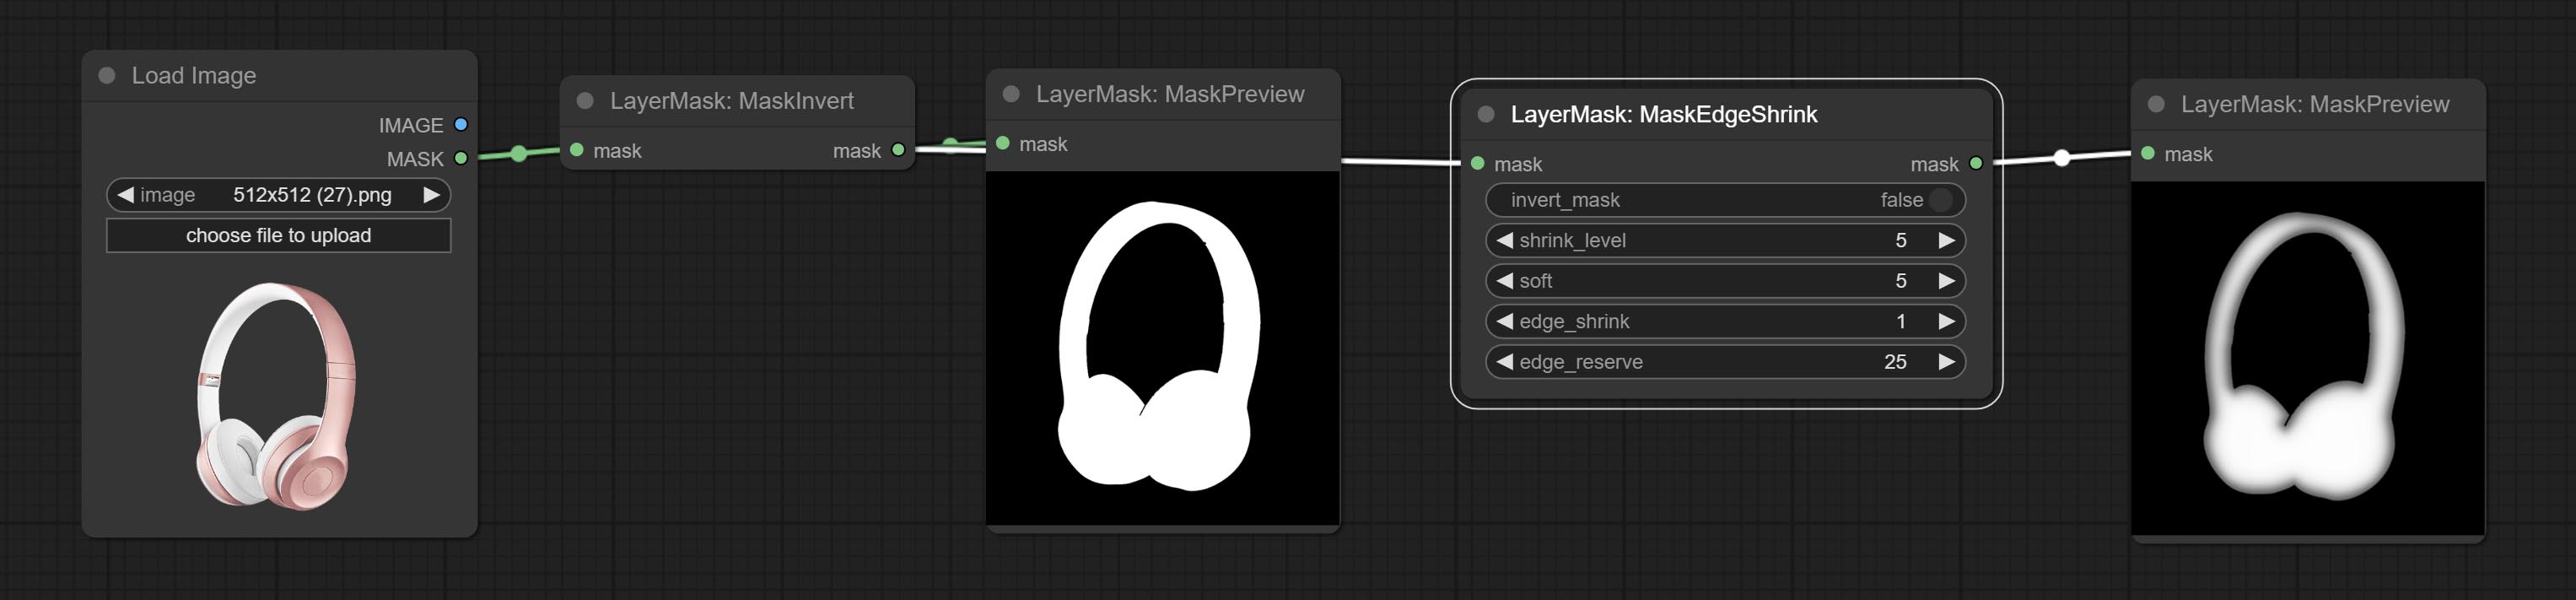
节点选项: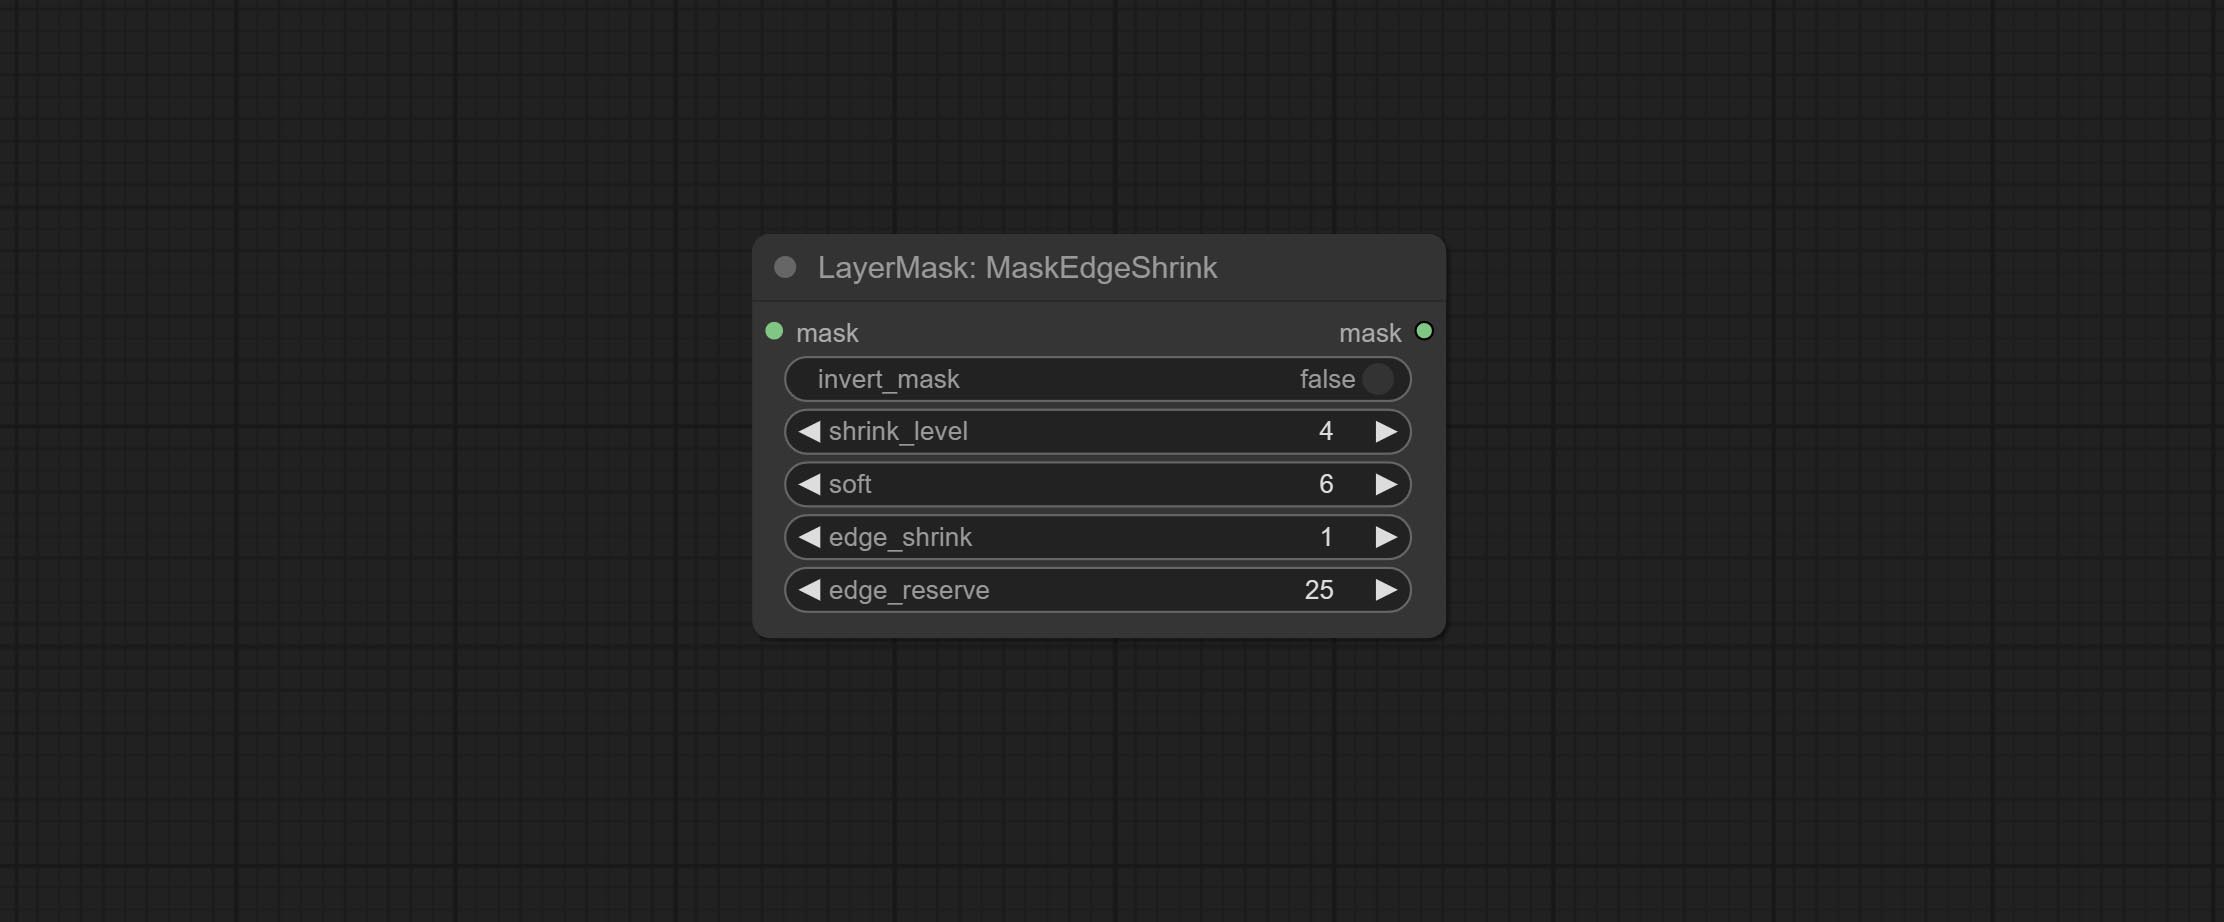
- invert_mask:是否反转蒙版。
- shrink_level:收缩的平滑度级别。
- soft:平滑幅度。
- edge_shrink:边缘收缩幅度。
- edge_reserve:保留边缘细节的幅度,100 表示完全保留,0 表示完全不保留。
MaskGrow 与 MaskEdgeShrink 的对比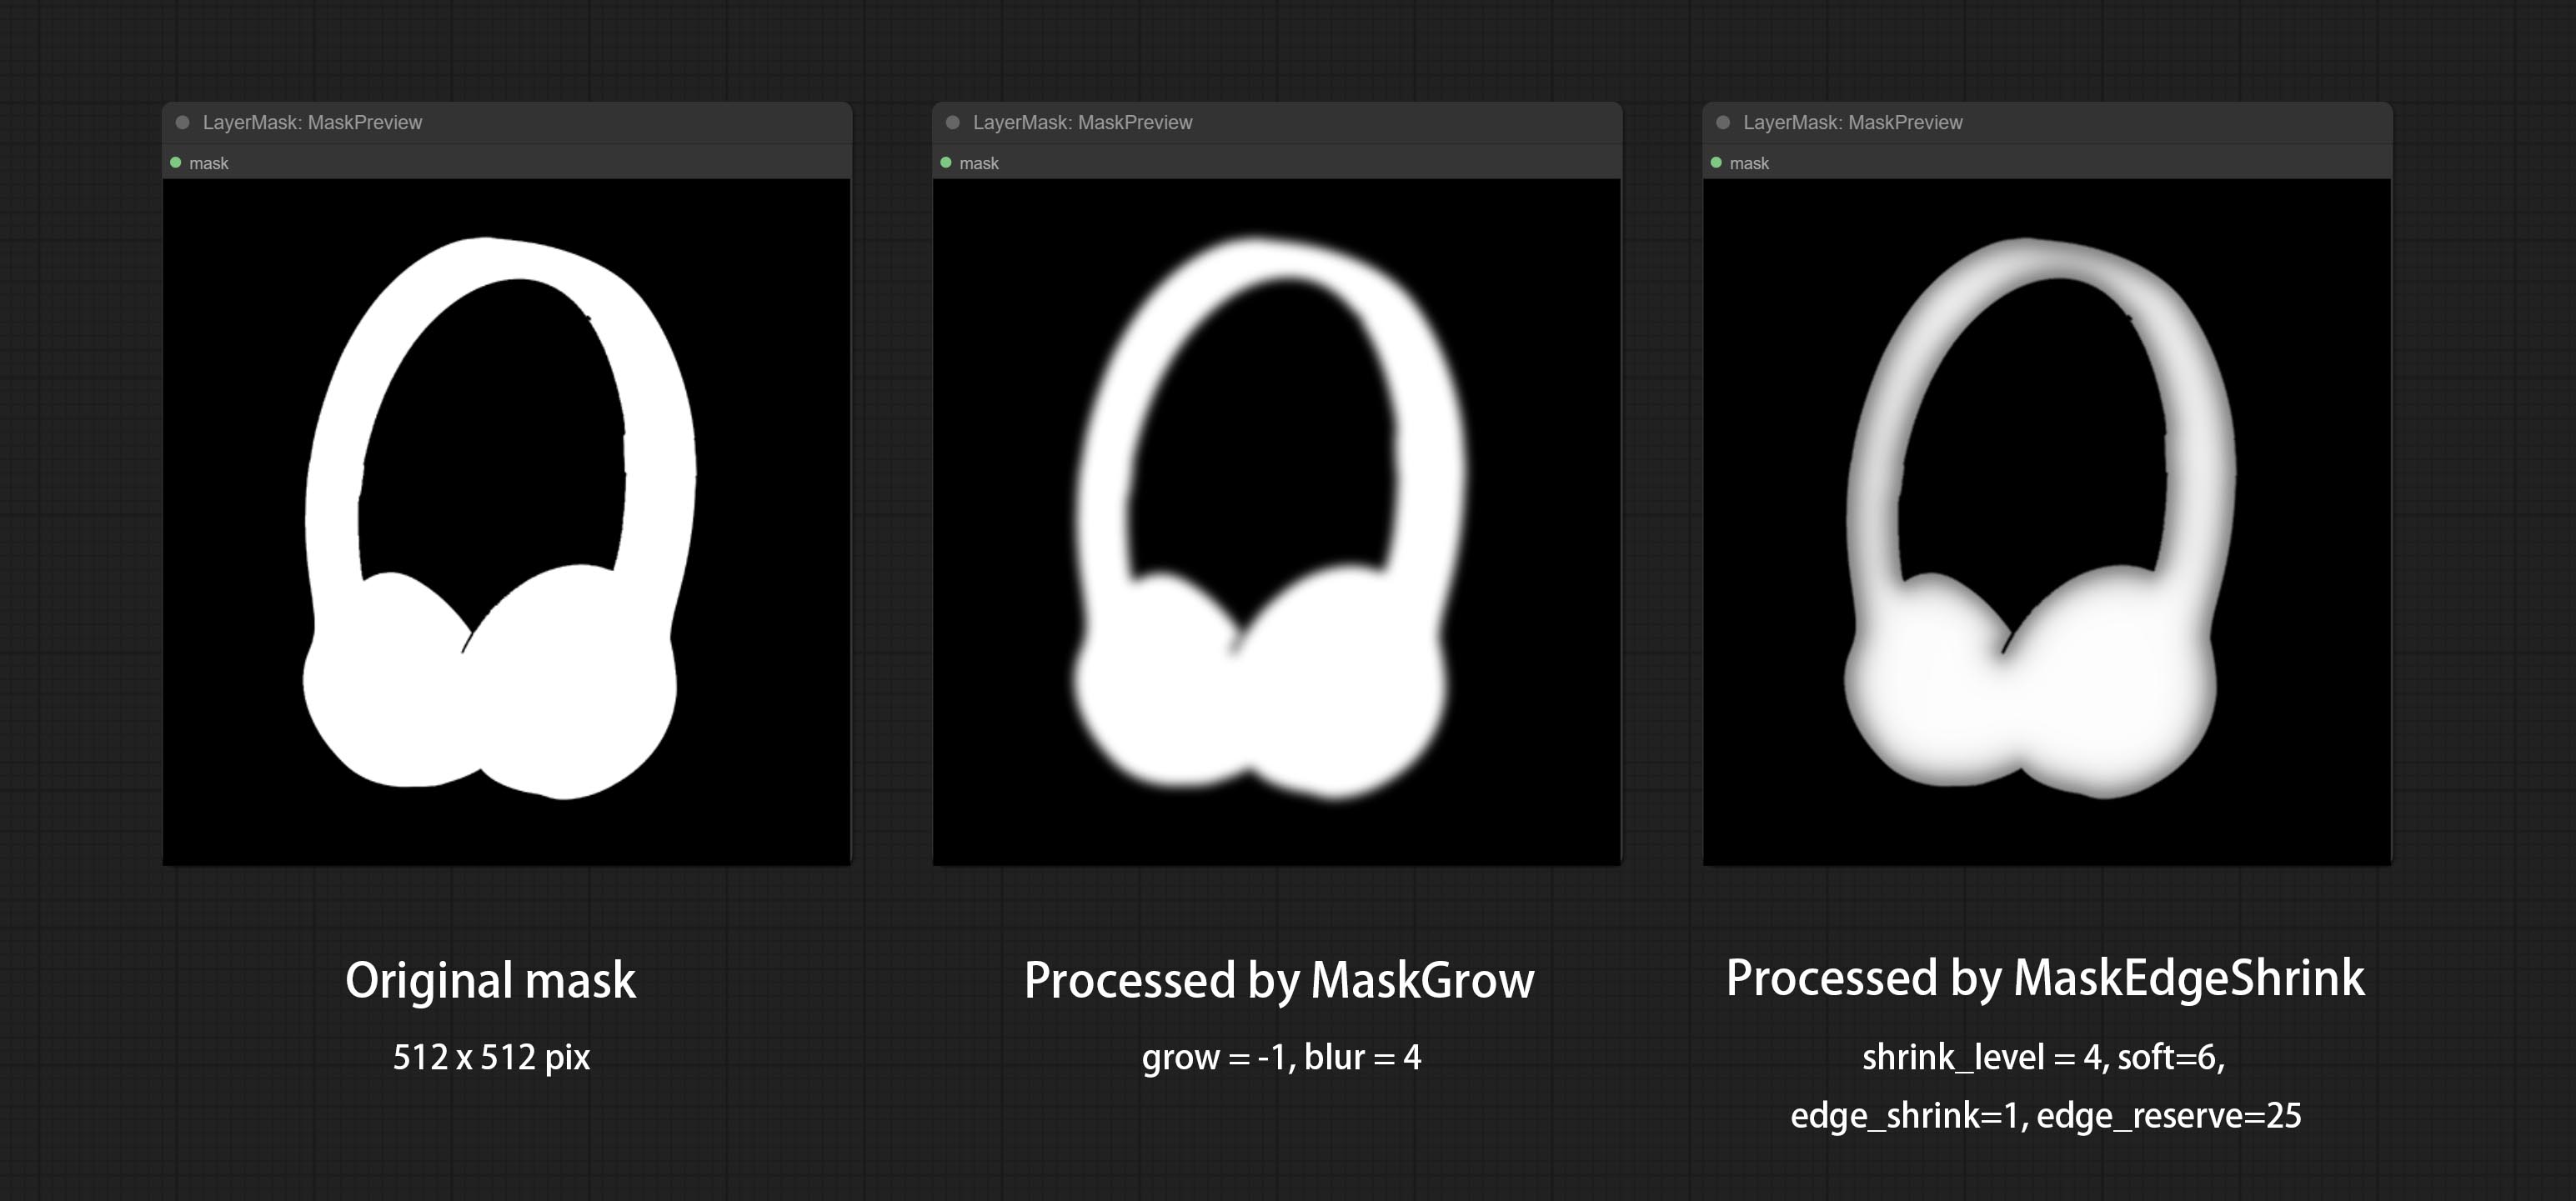
MaskMotionBlur
在蒙版上创建运动模糊效果。
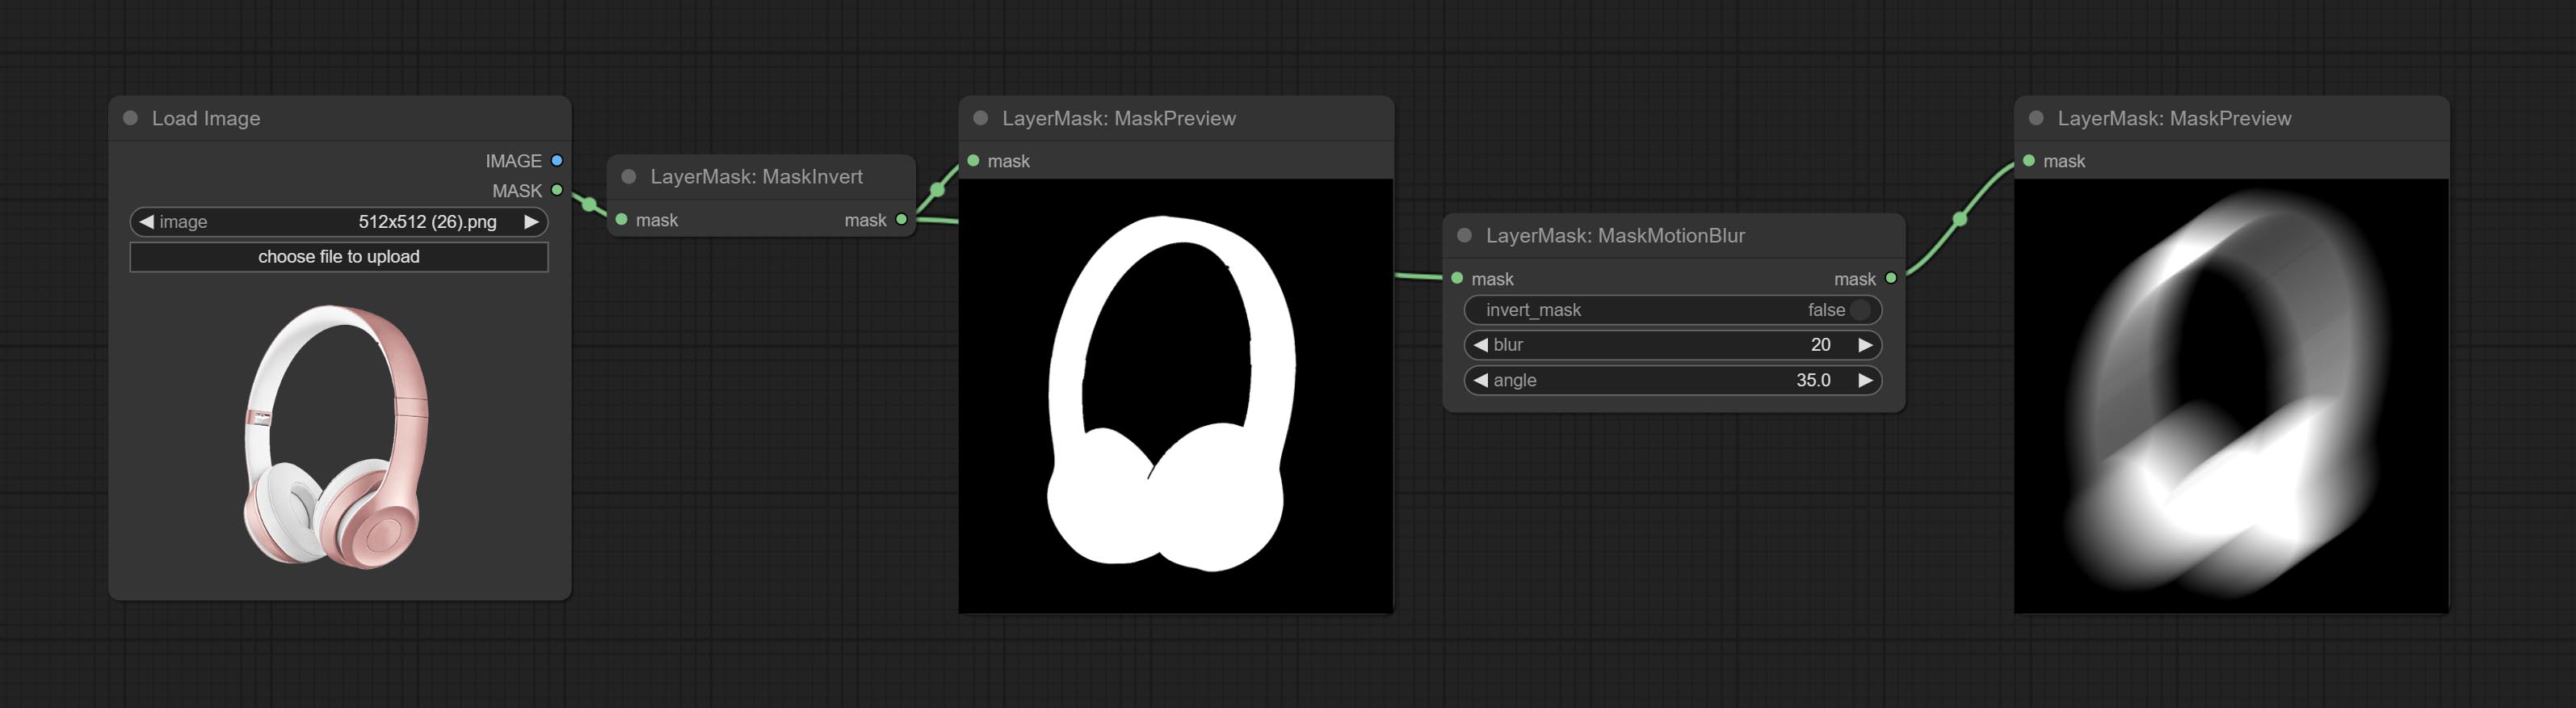
节点选项:
- invert_mask:是否反转蒙版。
- blur:模糊的大小。
- angle:模糊的角度。
MaskGradient
从蒙版的一侧创建渐变效果。请注意,此节点与 CreateGradientMask 节点有所不同。
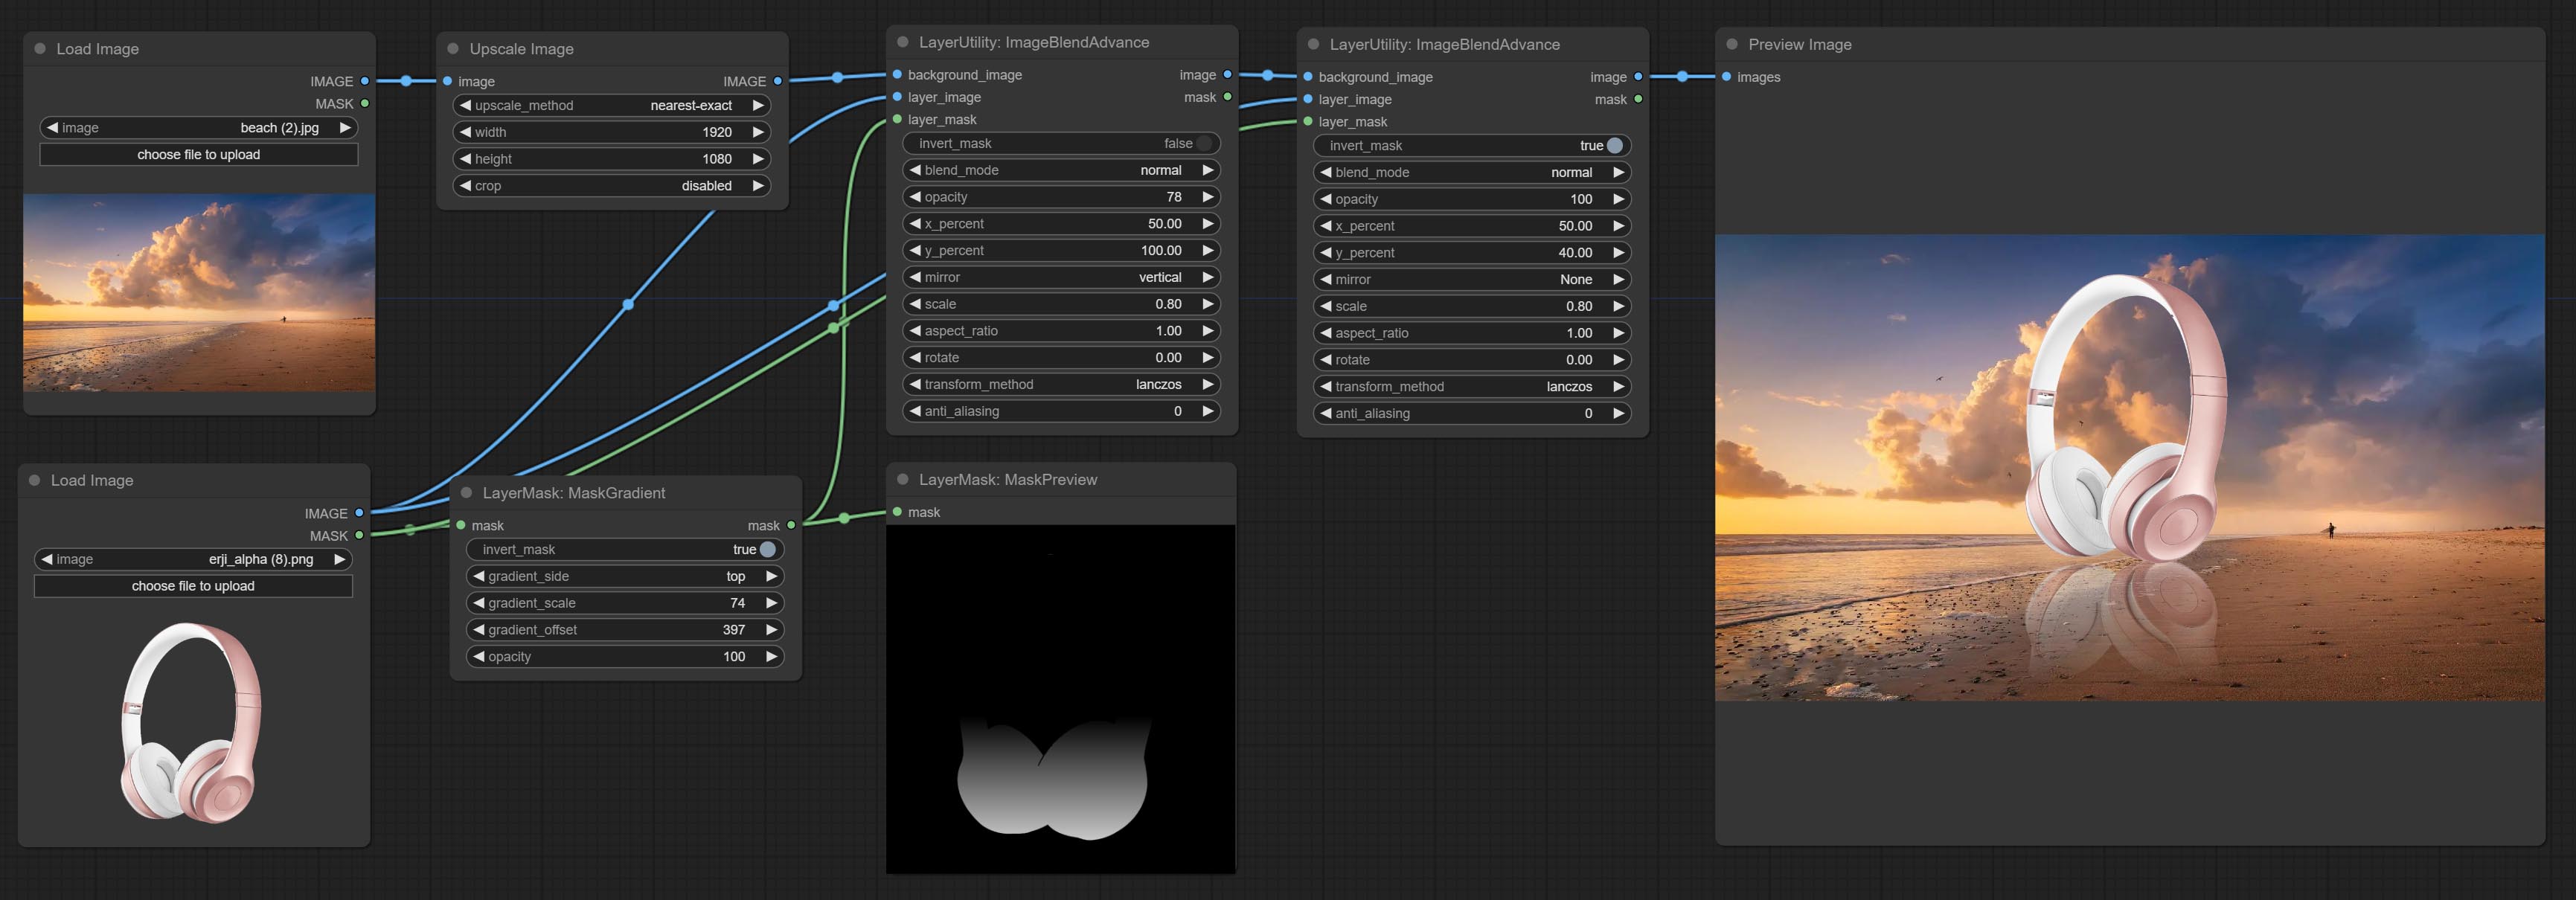
节点选项:
- invert_mask:是否反转蒙版。
- gradient_side:从哪一侧生成渐变。方向包括顶部、底部、左侧和右侧。
- gradient_scale:渐变距离。默认值为 100,表示渐变的一侧完全透明,另一侧完全不透明。数值越小,透明到不透明的距离越短。
- gradient_offset:渐变位置的偏移量。
- opacity:渐变的不透明度。
创建渐变蒙版
创建渐变蒙版。请注意此节点与“MaskGradient”节点的区别。
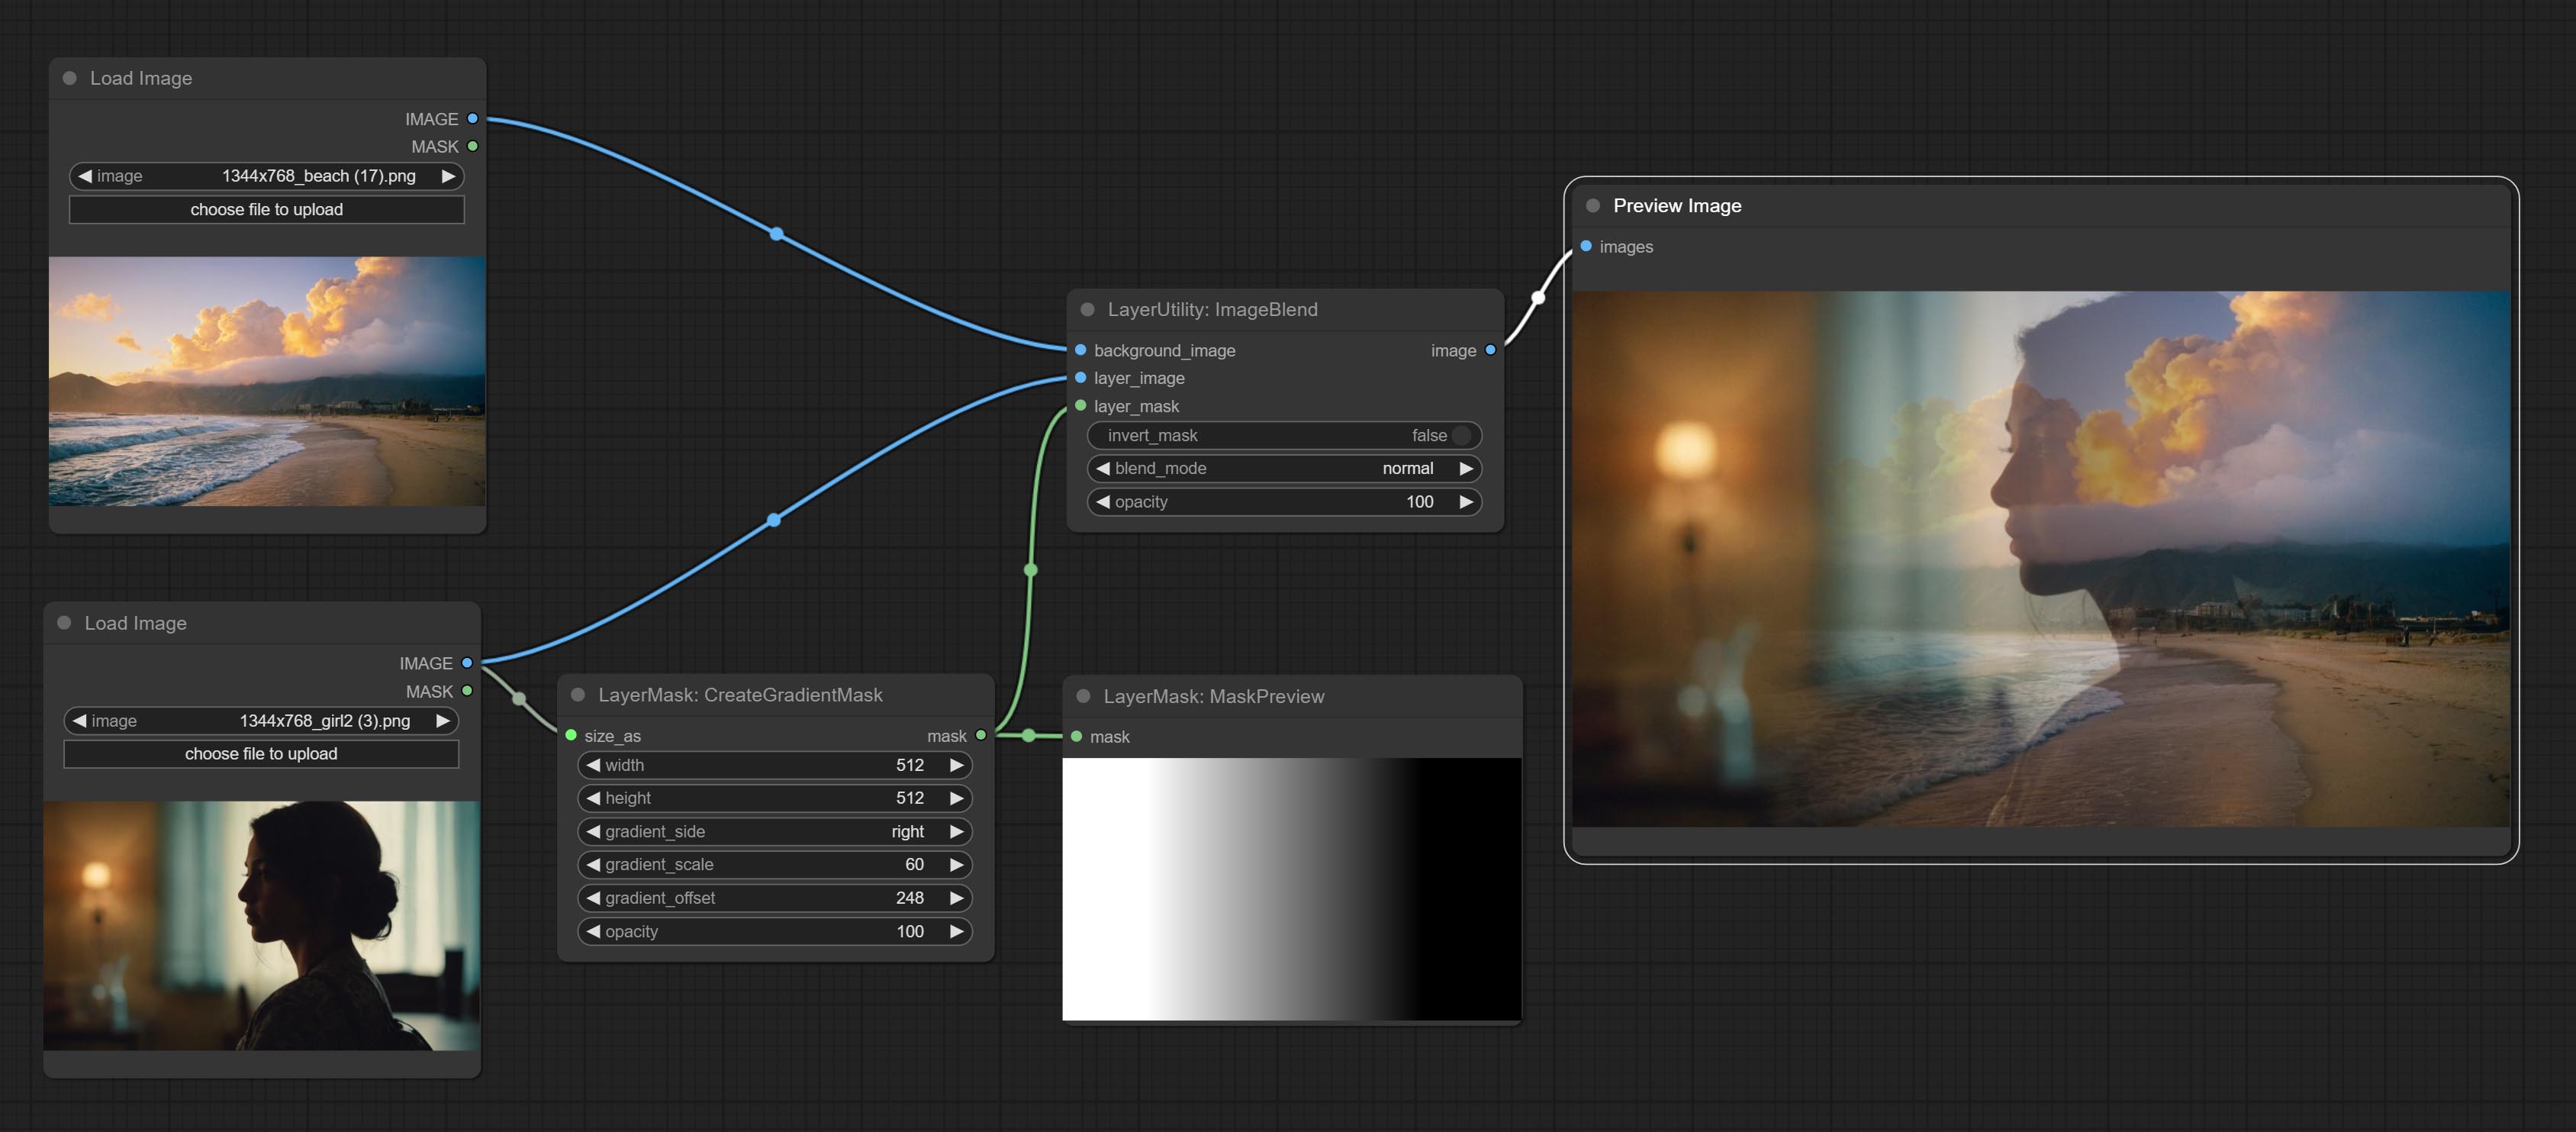
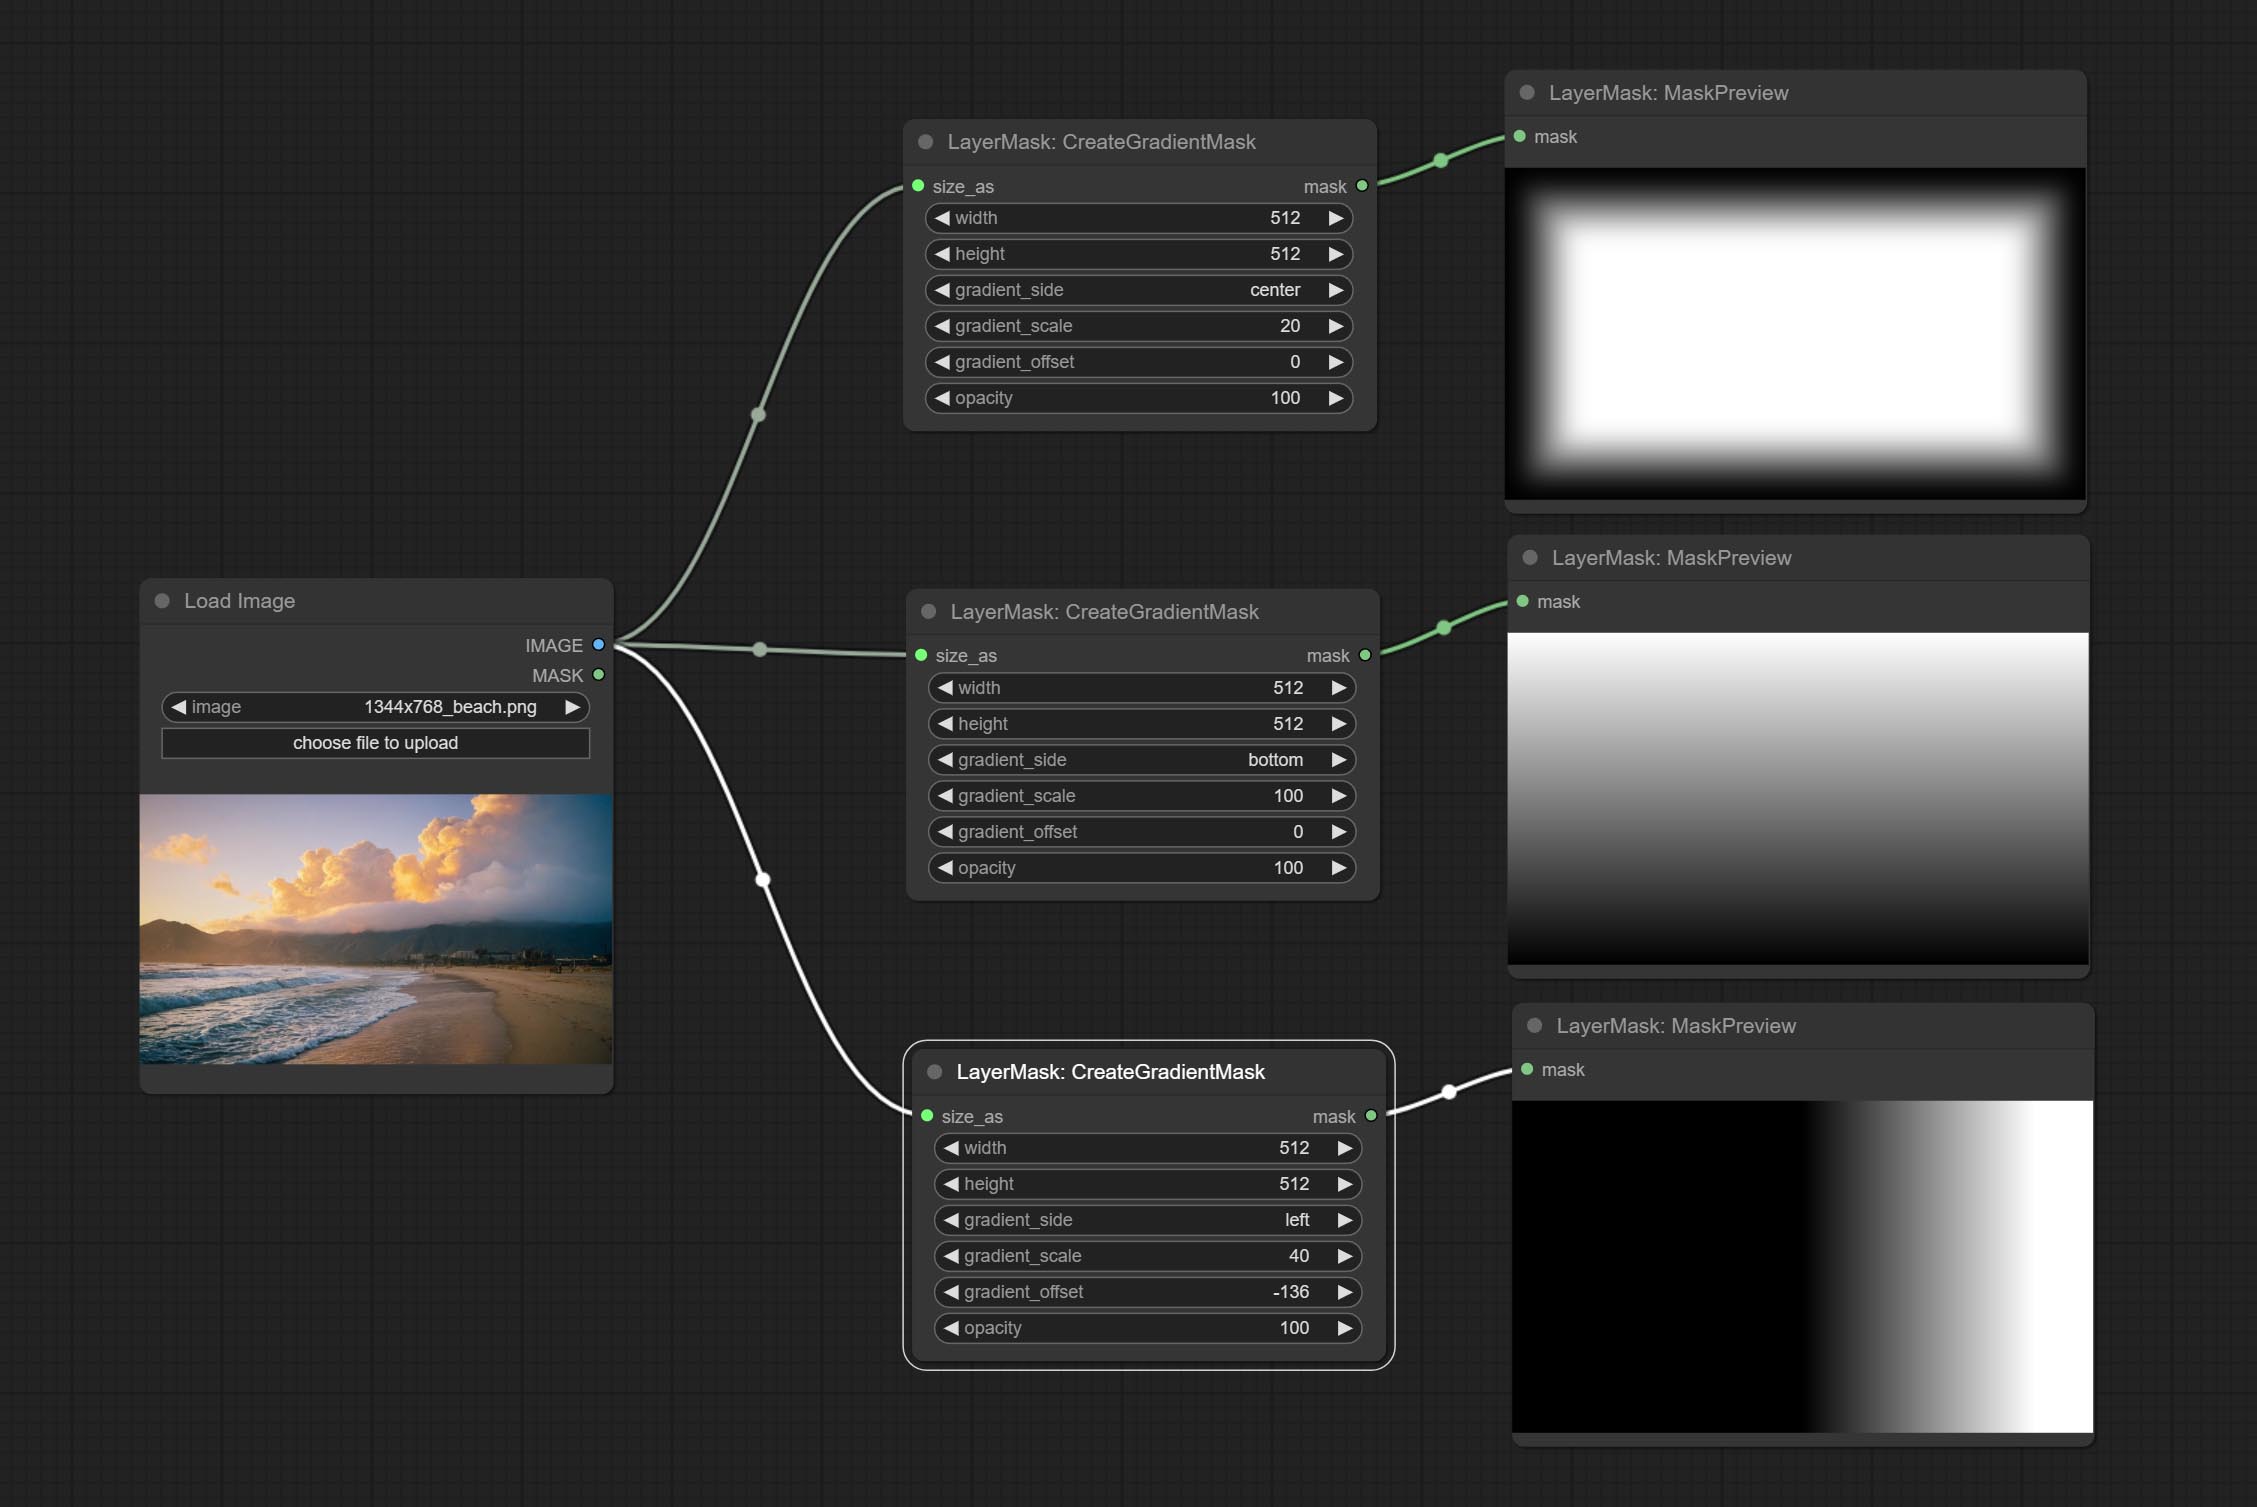
节点选项: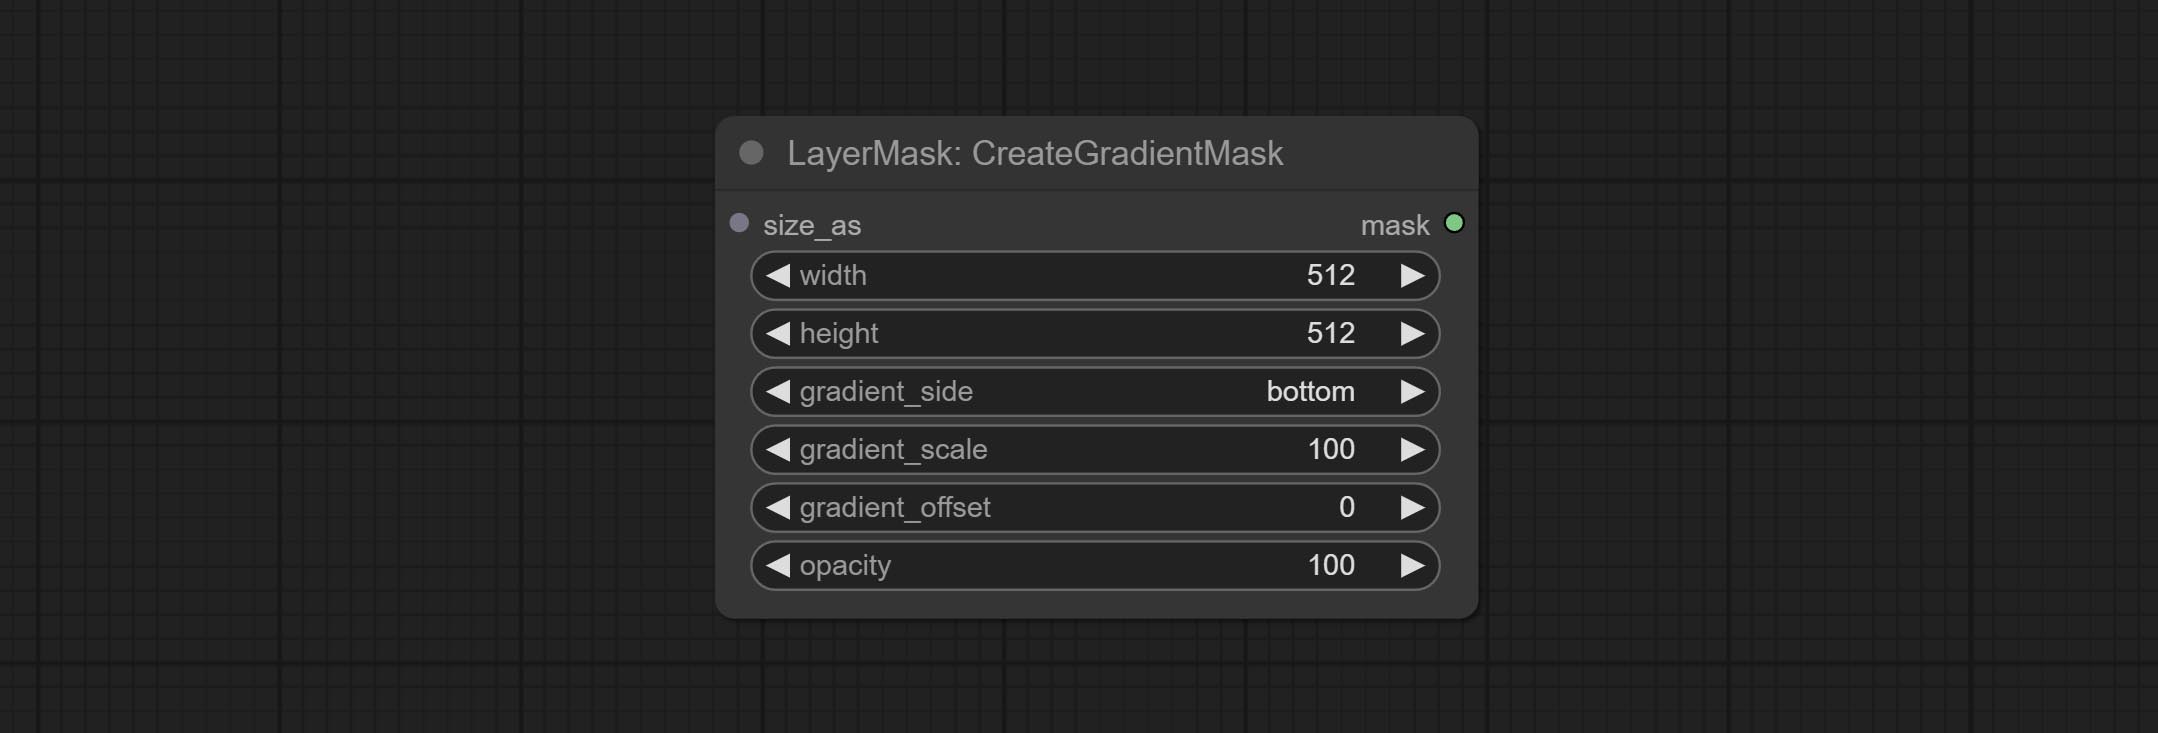
- size_as*:此处的输入图像或蒙版将根据其尺寸生成输出图像和蒙版。该输入优先于下方的宽度和高度设置。
- width:图像的宽度。如果有 size_as 输入,则此设置将被忽略。
- height:图像的高度。如果有 size_as 输入,则此设置将被忽略。
- gradient_side:从哪个边缘生成渐变。共有五个方向:顶部、底部、左侧、右侧和中心。
- gradient_scale:渐变距离。默认值为100,表示渐变的一侧完全透明,另一侧完全不透明。数值越小,从透明到不透明的距离越短。
- gradient_offset:渐变位置偏移。当
gradient_side设置为“中心”时,此处用于调整渐变区域的大小,正值会使区域缩小,负值则会放大。 - opacity:渐变的不透明度。
*仅限于输入图像和蒙版。强制集成其他类型的输入会导致节点报错。
蒙版描边
生成蒙版轮廓描边。
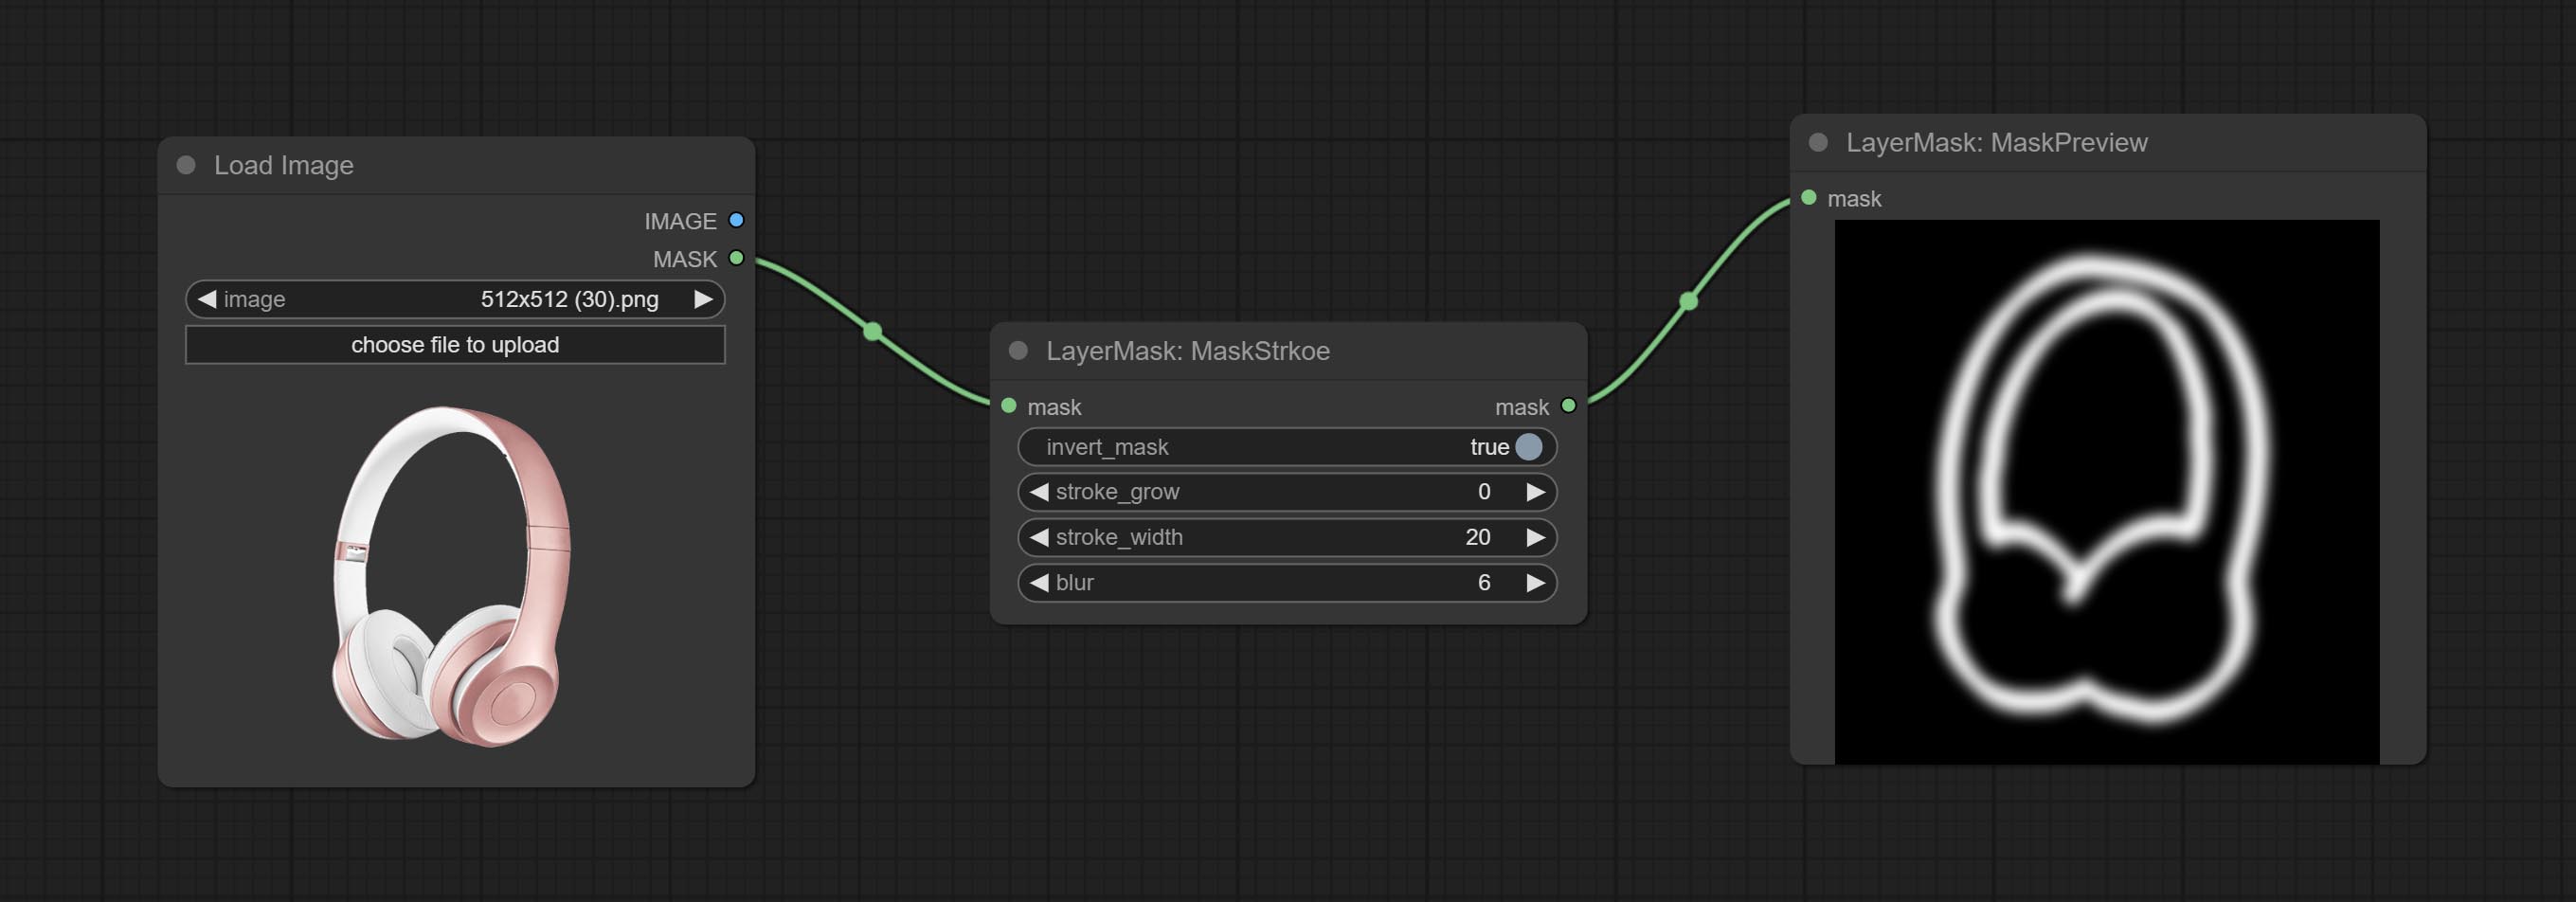
节点选项: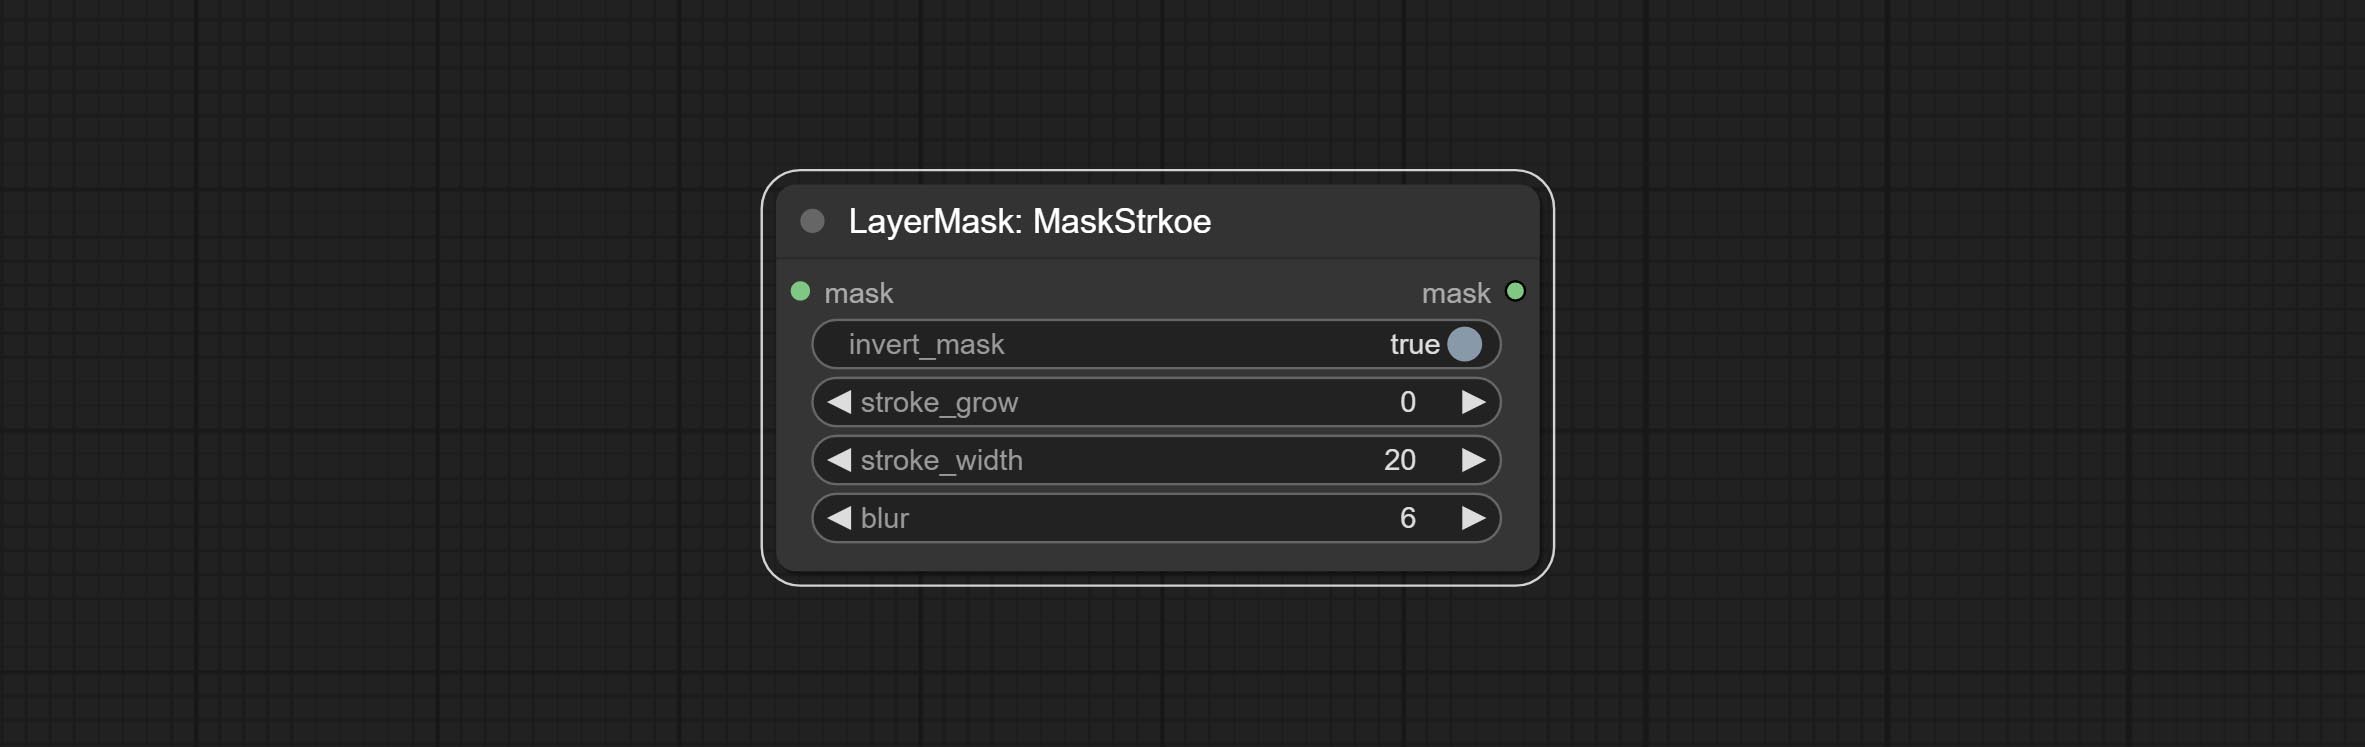
- invert_mask:是否反转蒙版。
- stroke_grow:描边的扩展/收缩幅度,正值表示扩展,负值表示收缩。
- stroke_width:描边的宽度。
- blur:描边的模糊程度。
蒙版噪点
为蒙版生成噪点。
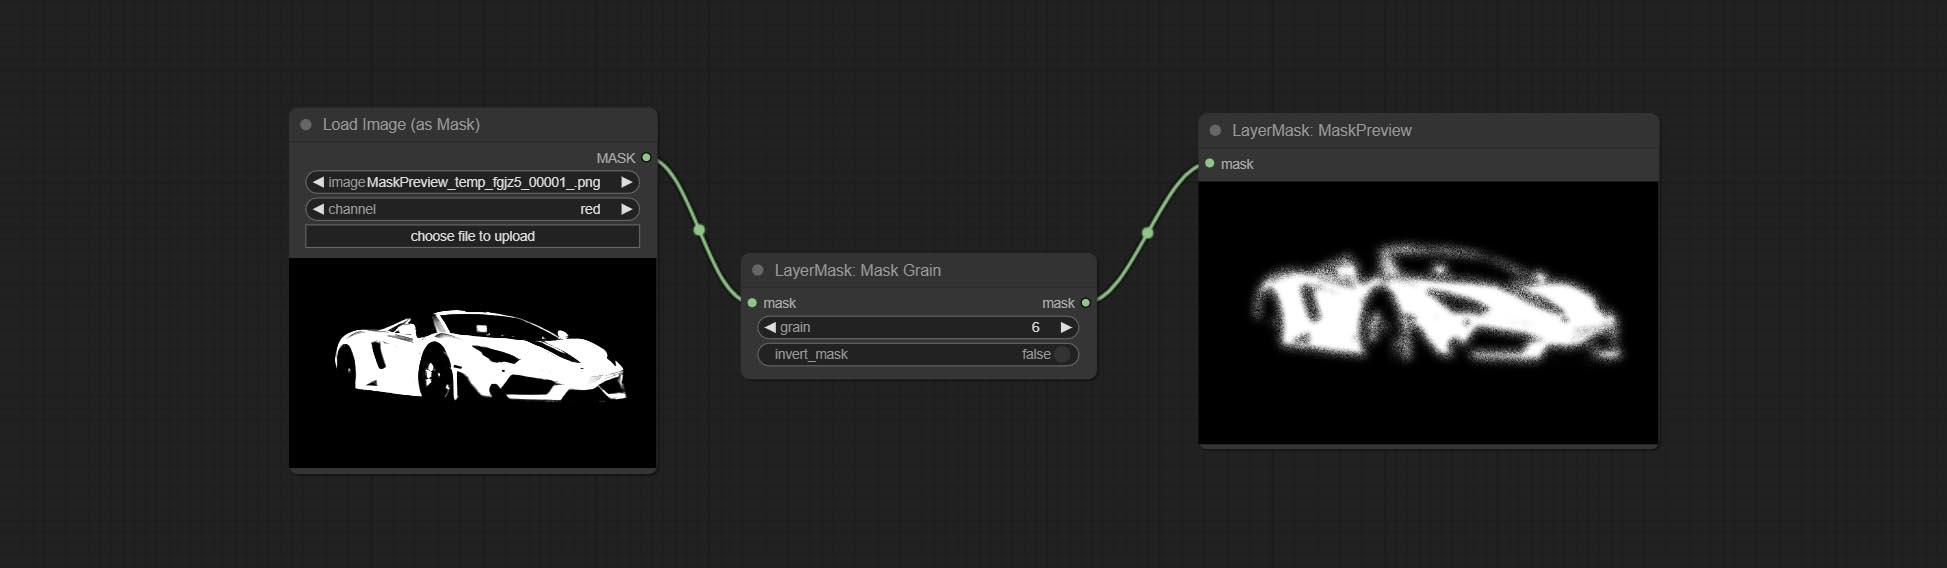
节点选项: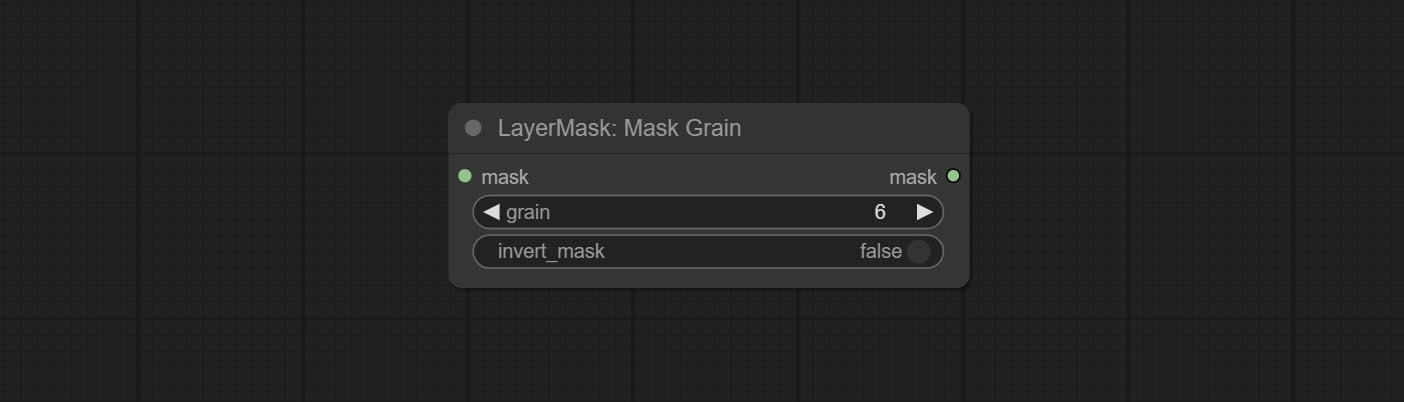
- grain:噪点强度。
- invert_mask:是否反转蒙版。
绘制圆角矩形
为蒙版生成圆角矩形边框。
节点选项: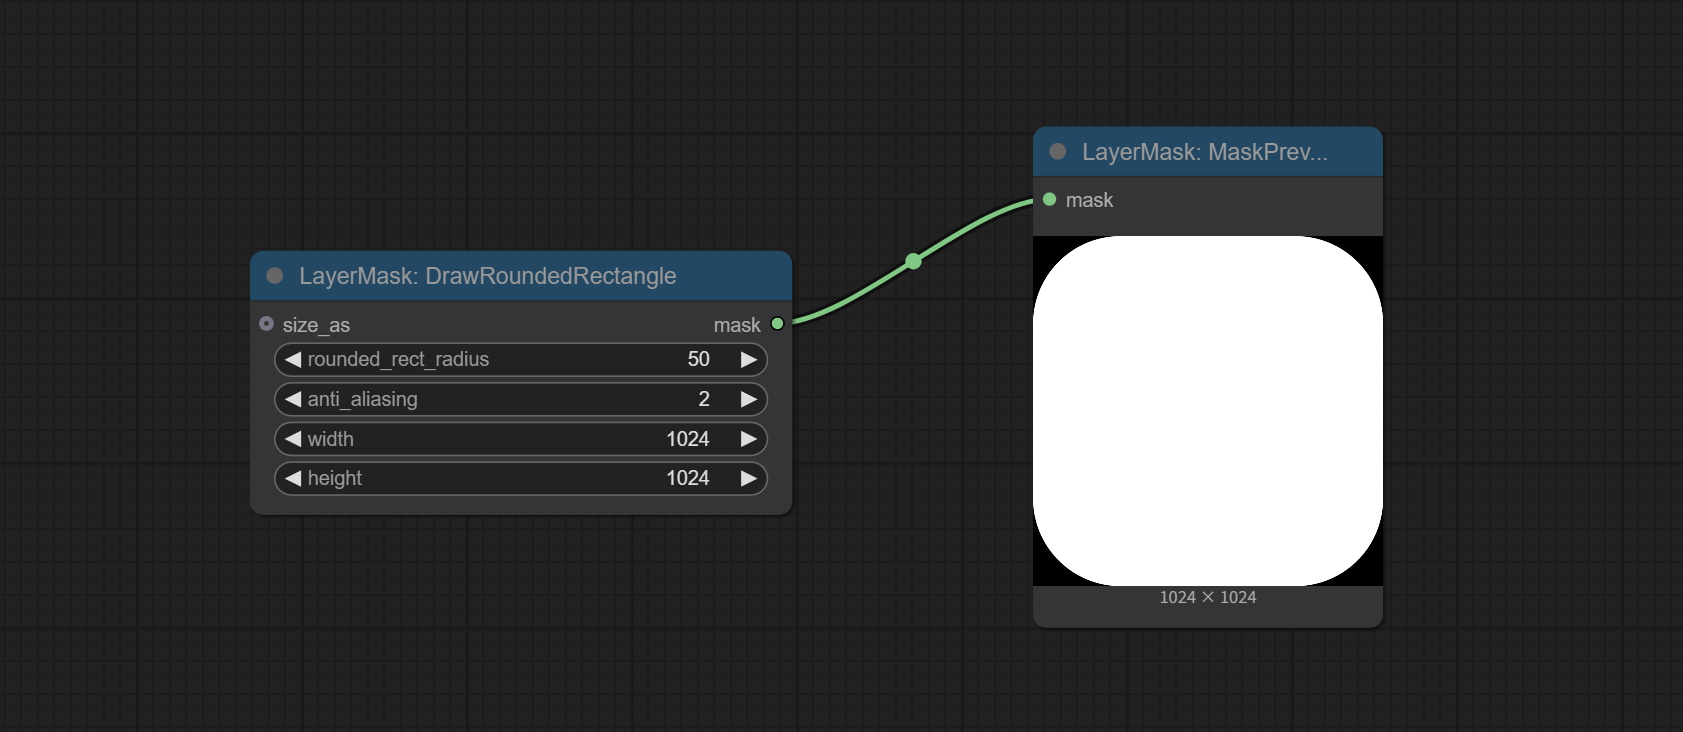
- size_as*:参考尺寸。可以是图像或蒙版。
- rounded_rect_radius:圆角矩形的半径。
- anti_aliasing:抗锯齿采样倍数。
- width:蒙版的宽度。如果输入了 size_as,则此设置将被忽略。
- height:蒙版的高度。如果输入了 size_as,则此设置将被忽略。
*仅限于输入图像和蒙版。强制集成其他类型的输入会导致节点报错。
蒙版预览
预览输入的蒙版
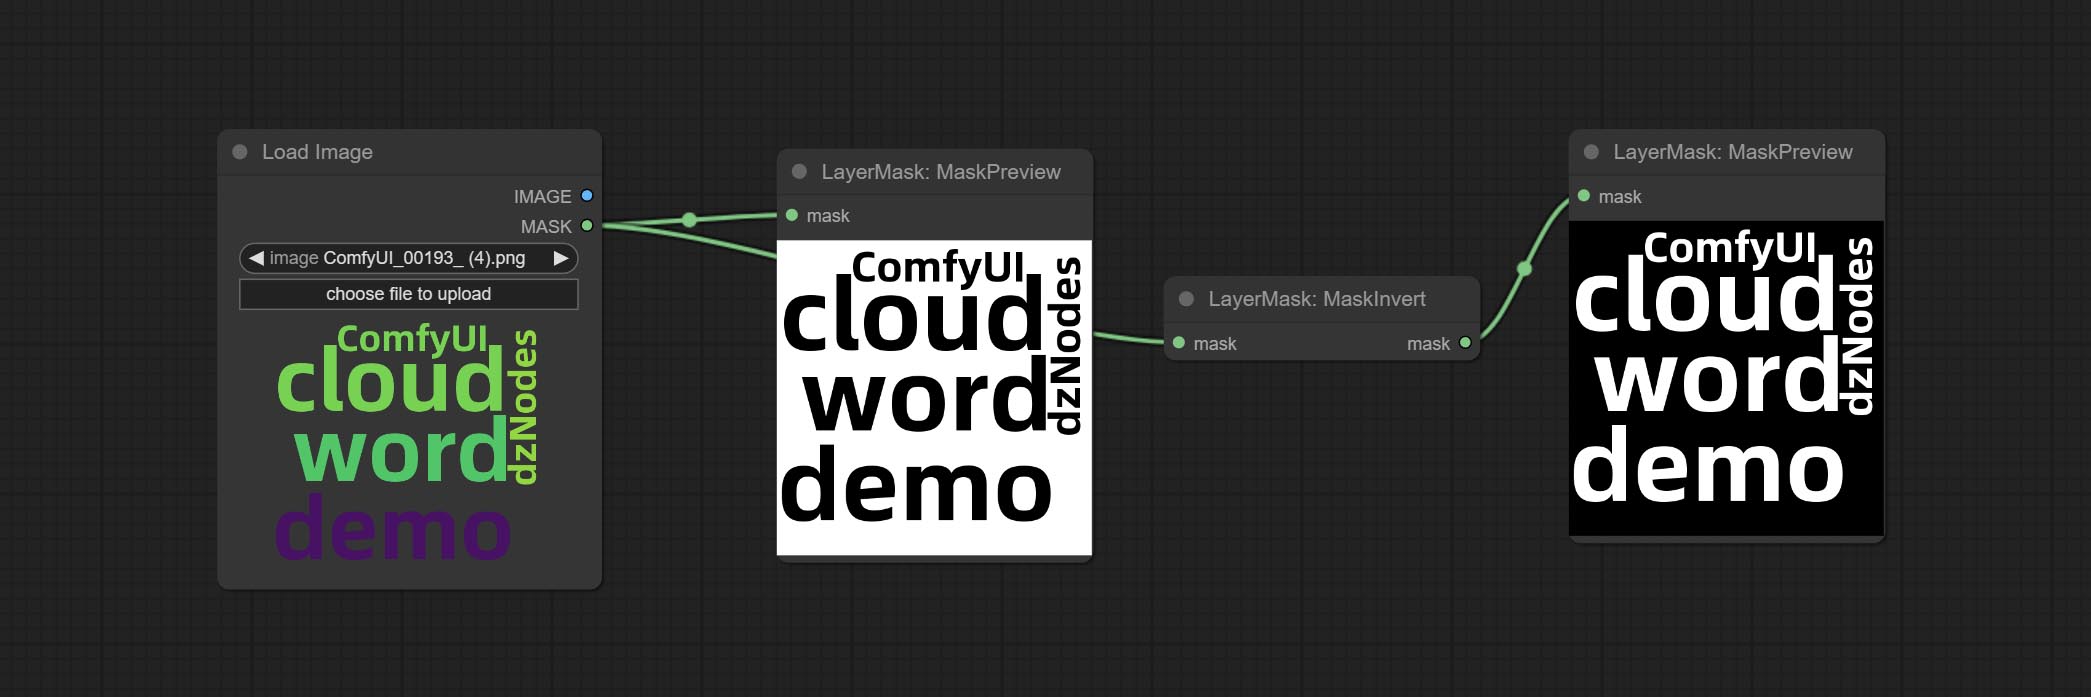
蒙版反转
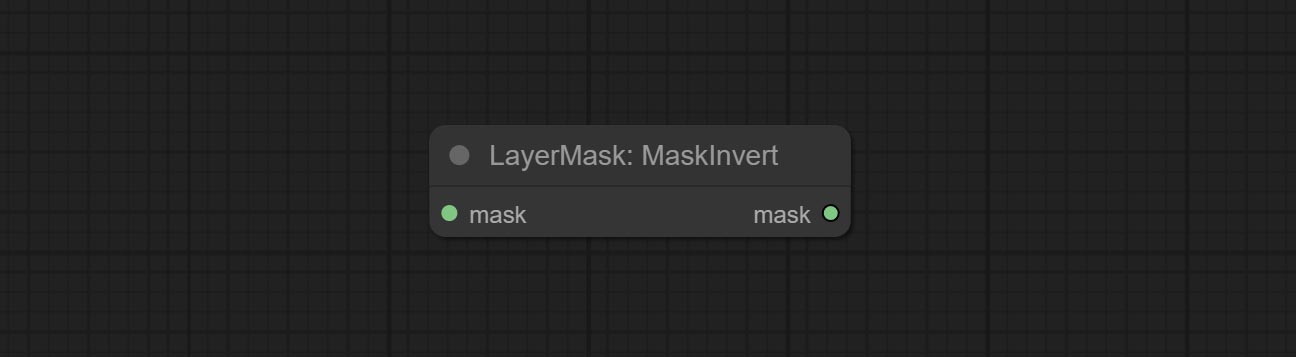
反转蒙版
图层滤镜
锐化与柔化
增强或柔化图像细节。
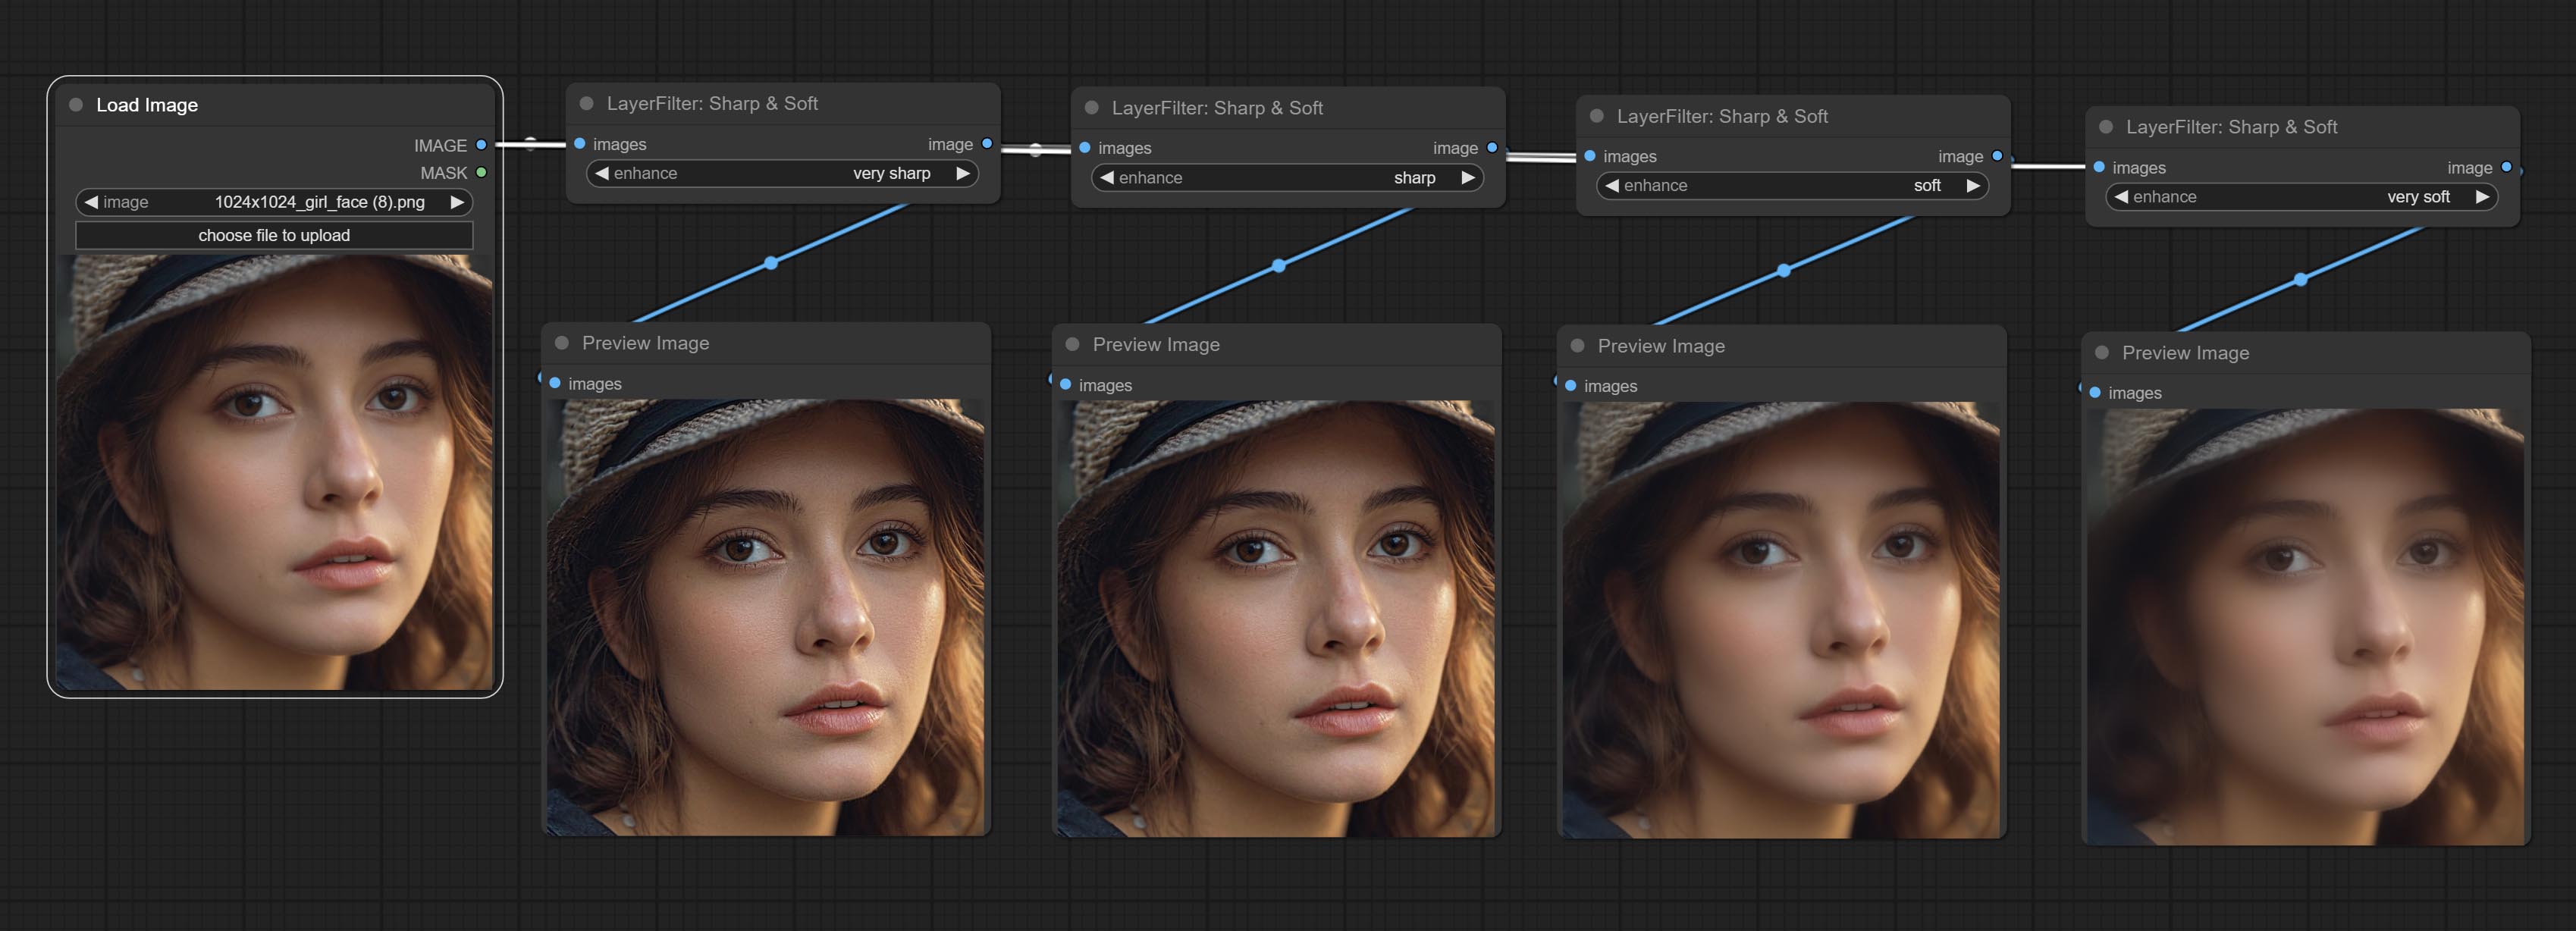
节点选项:
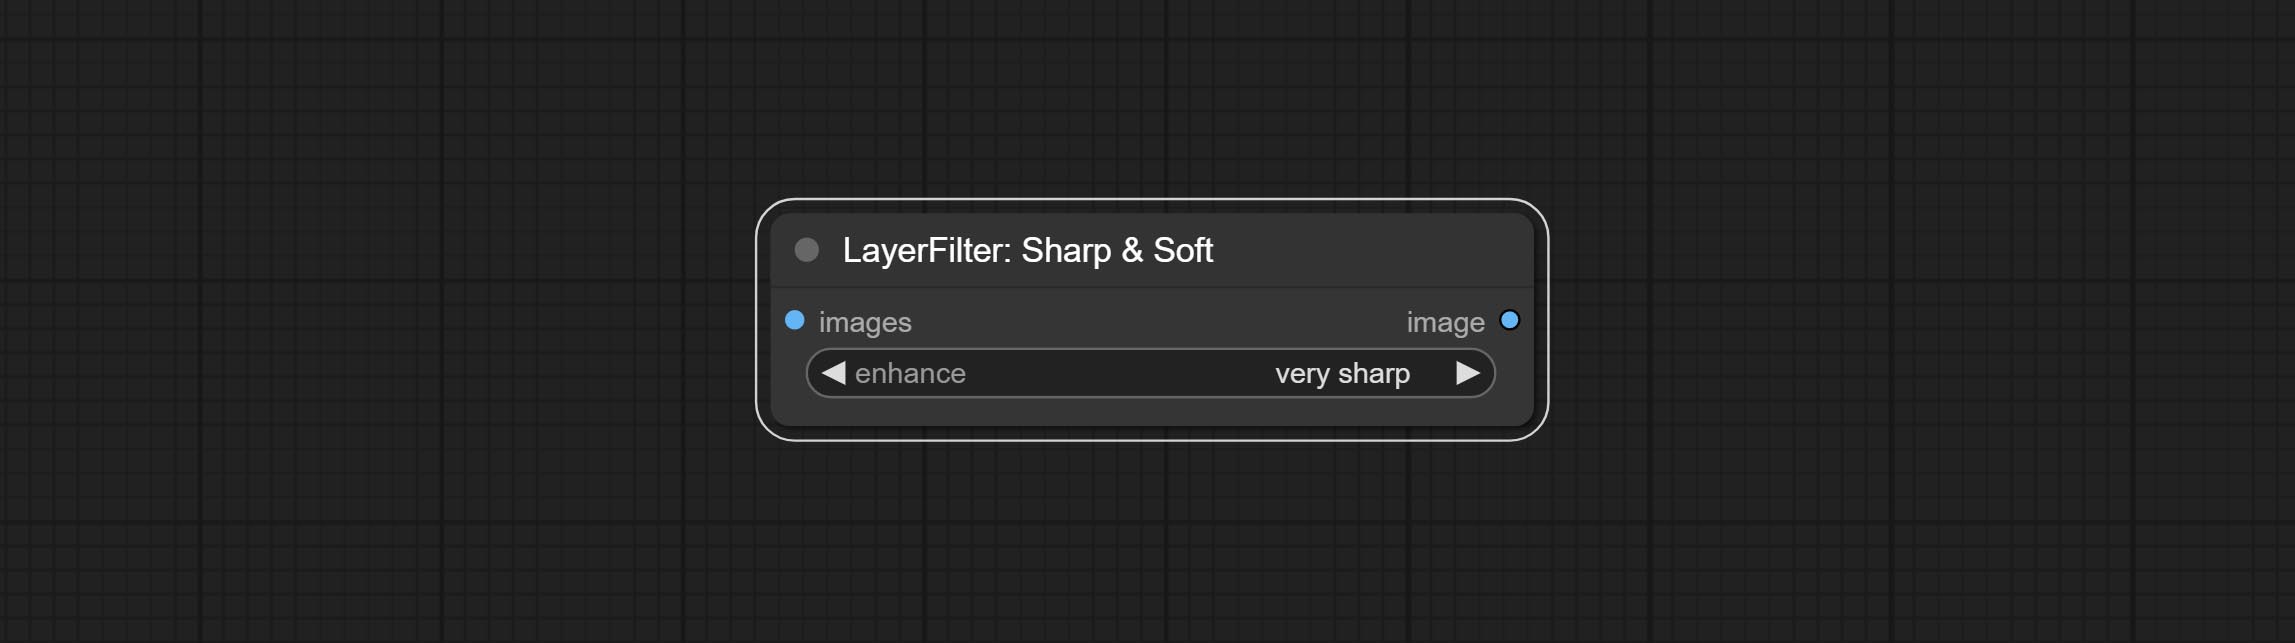
- enhance:提供4种预设,分别为极锐、锐、柔和极柔。若选择“无”,则不进行任何处理。
美肤
使皮肤看起来更光滑。
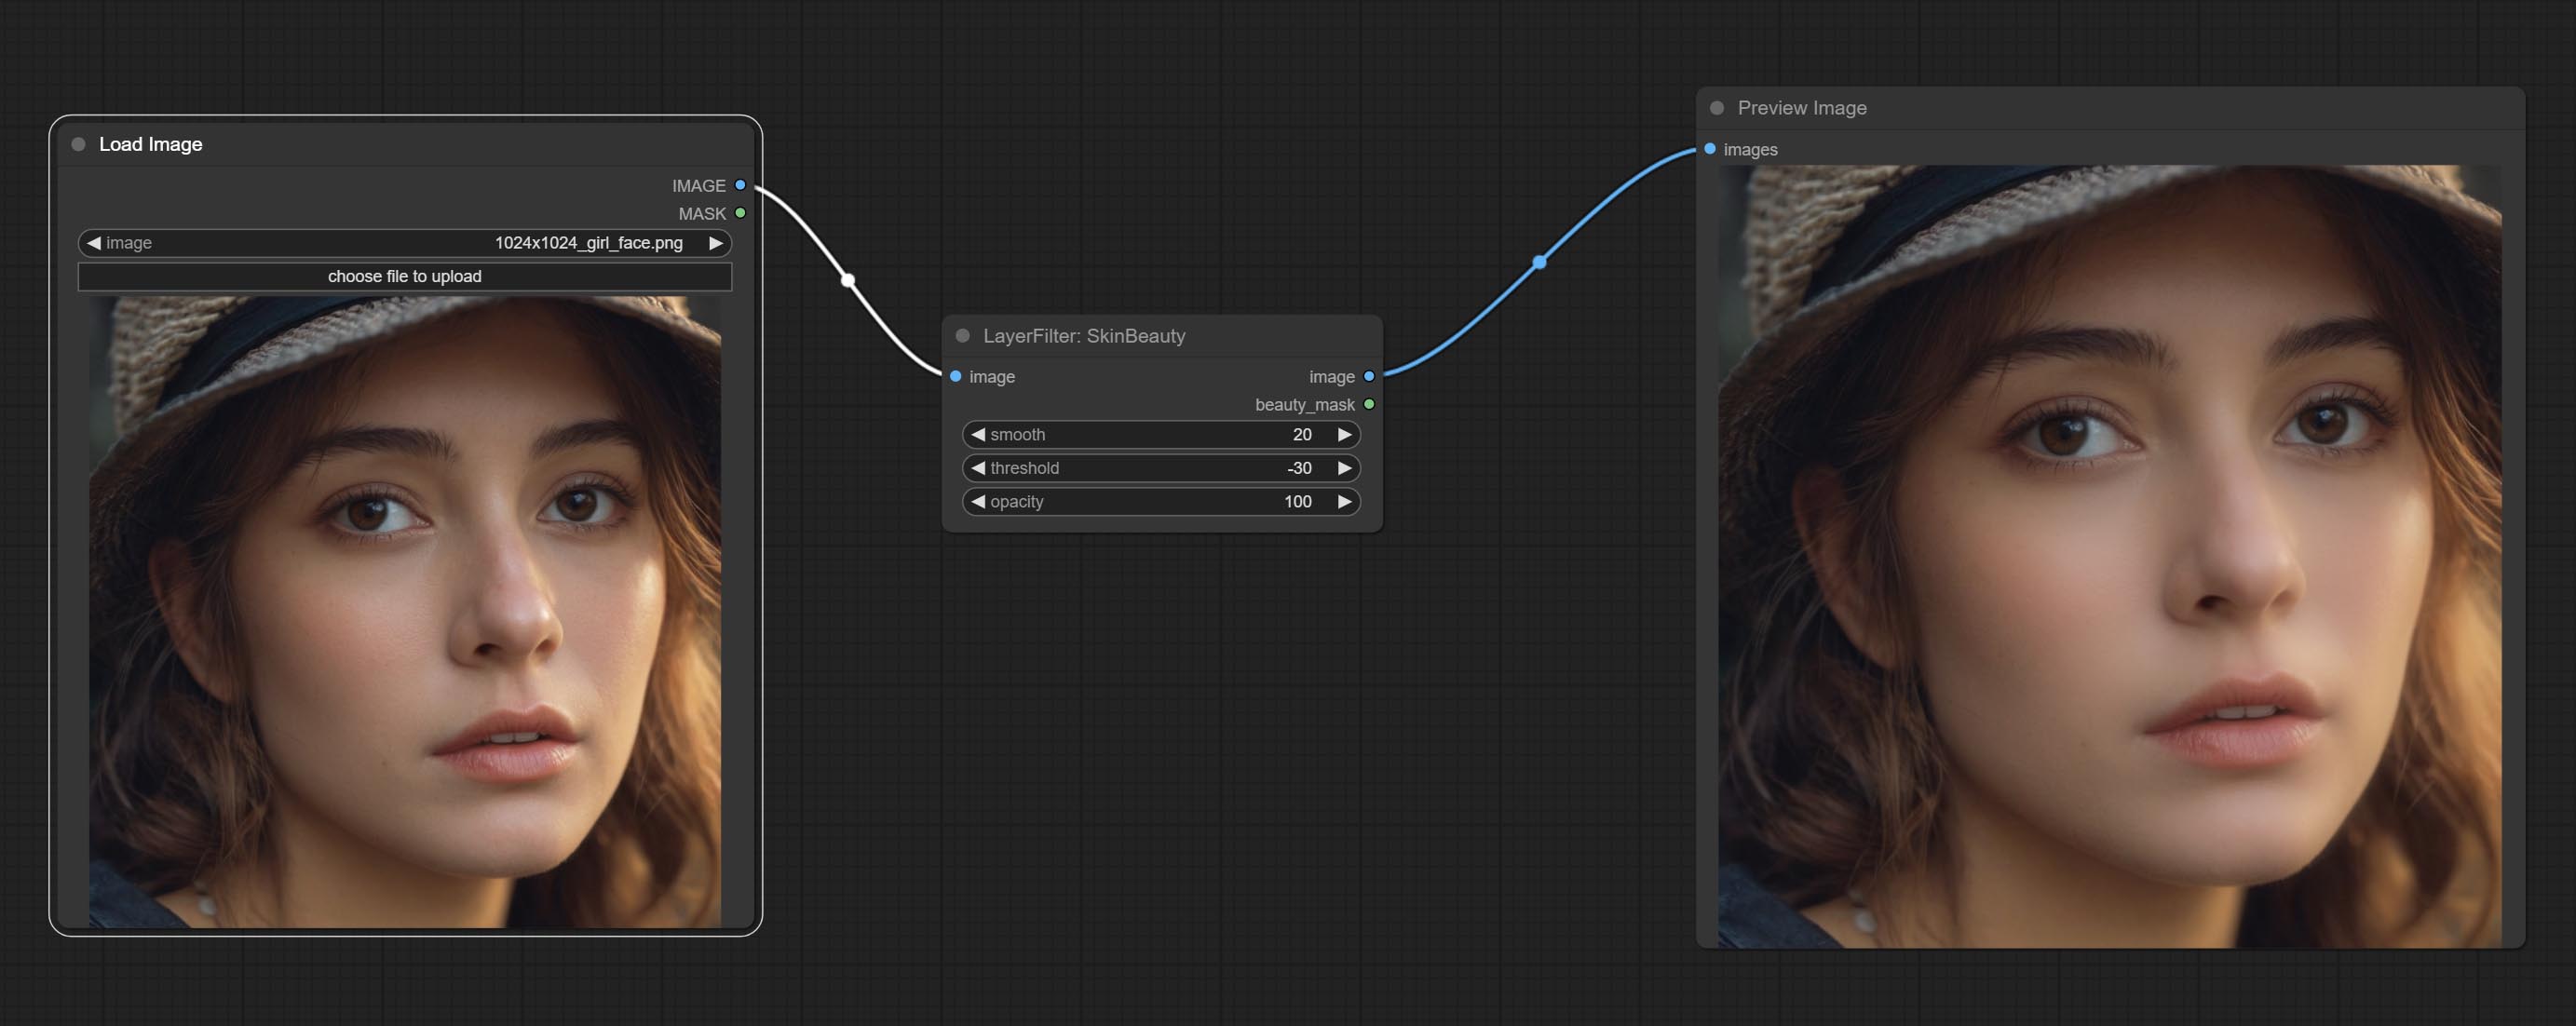
节点选项:
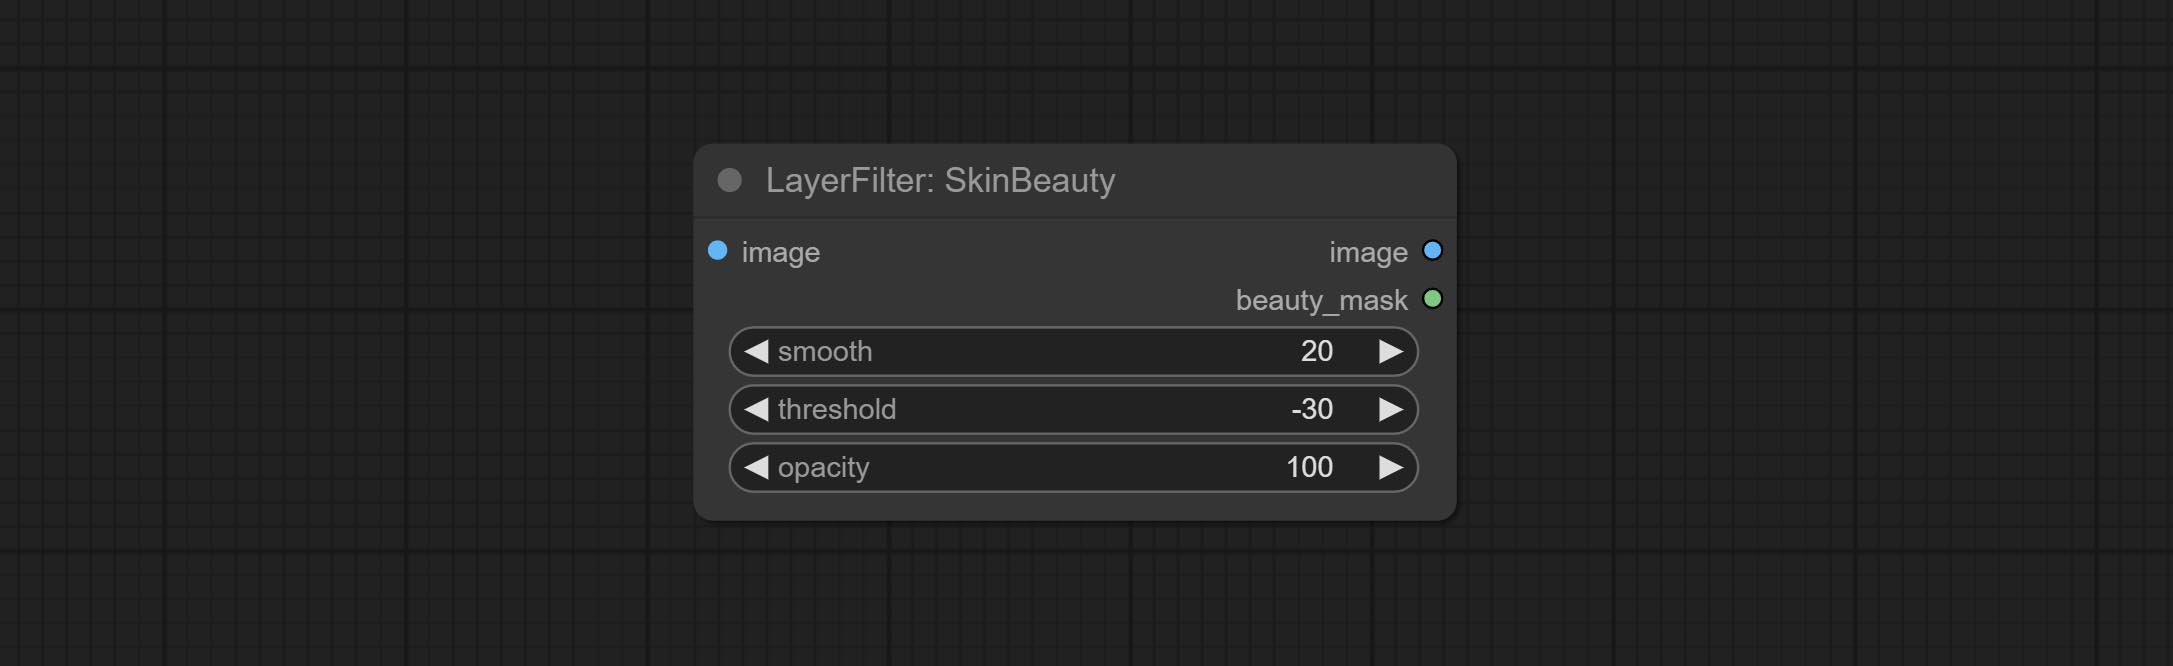
- smooth:皮肤平滑度。
- threshold:平滑范围。数值越大,平滑范围越小。
- opacity:平滑效果的不透明度。
水彩
水彩画效果
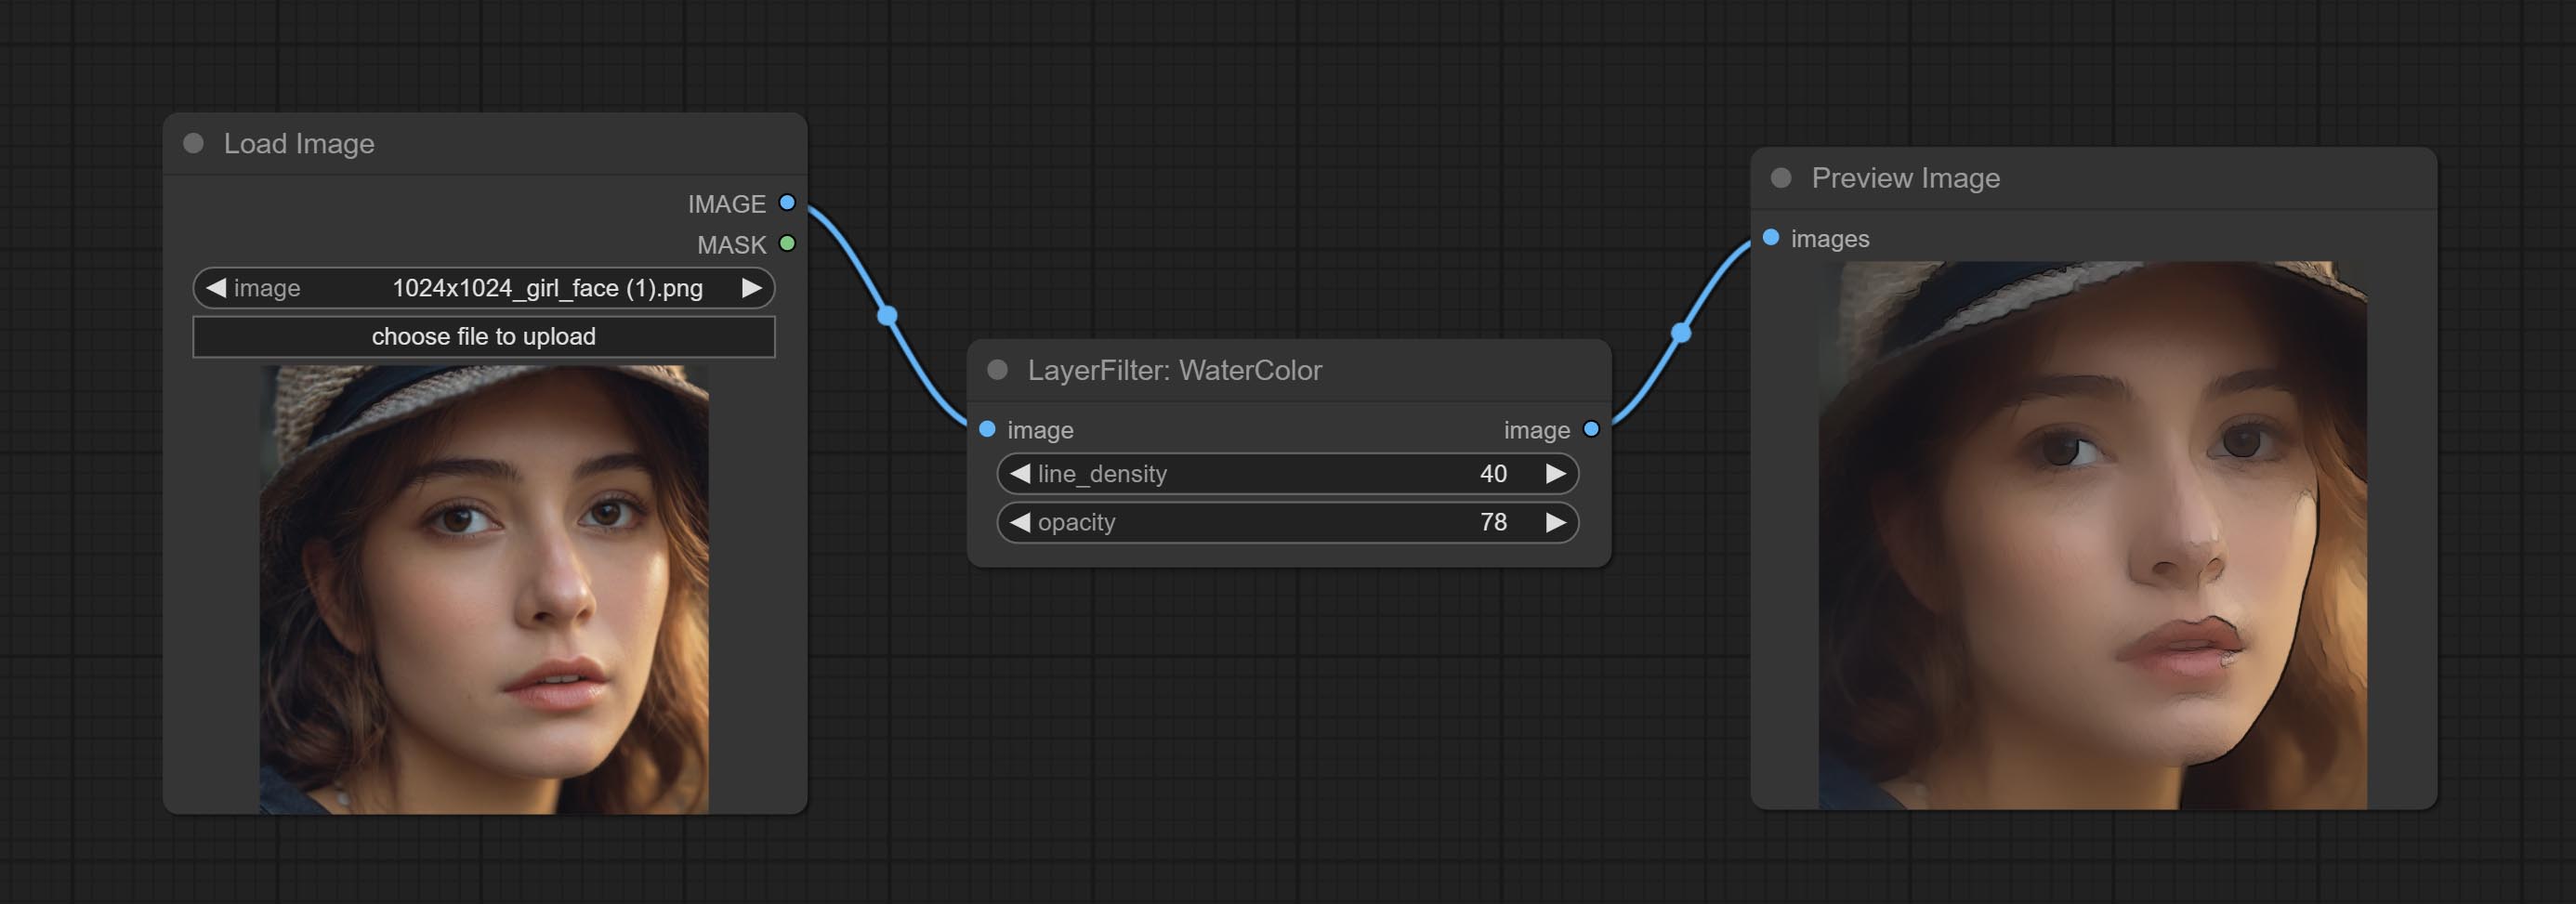
节点选项:
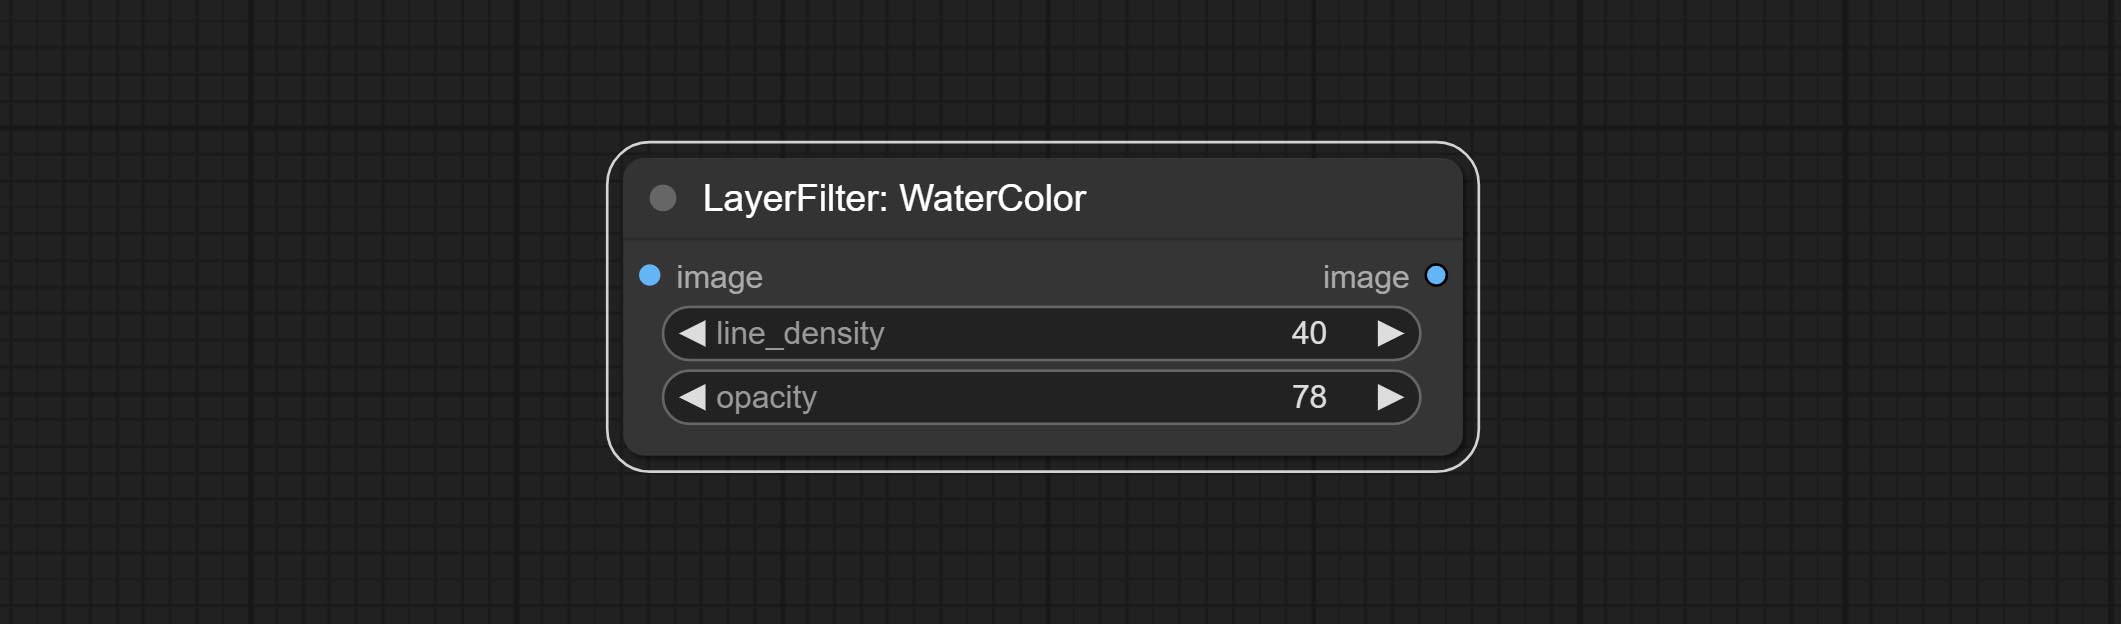
- line_density:黑色线条密度。
- opacity:水彩效果的不透明度。
半色调
将图像转换为半色调效果。
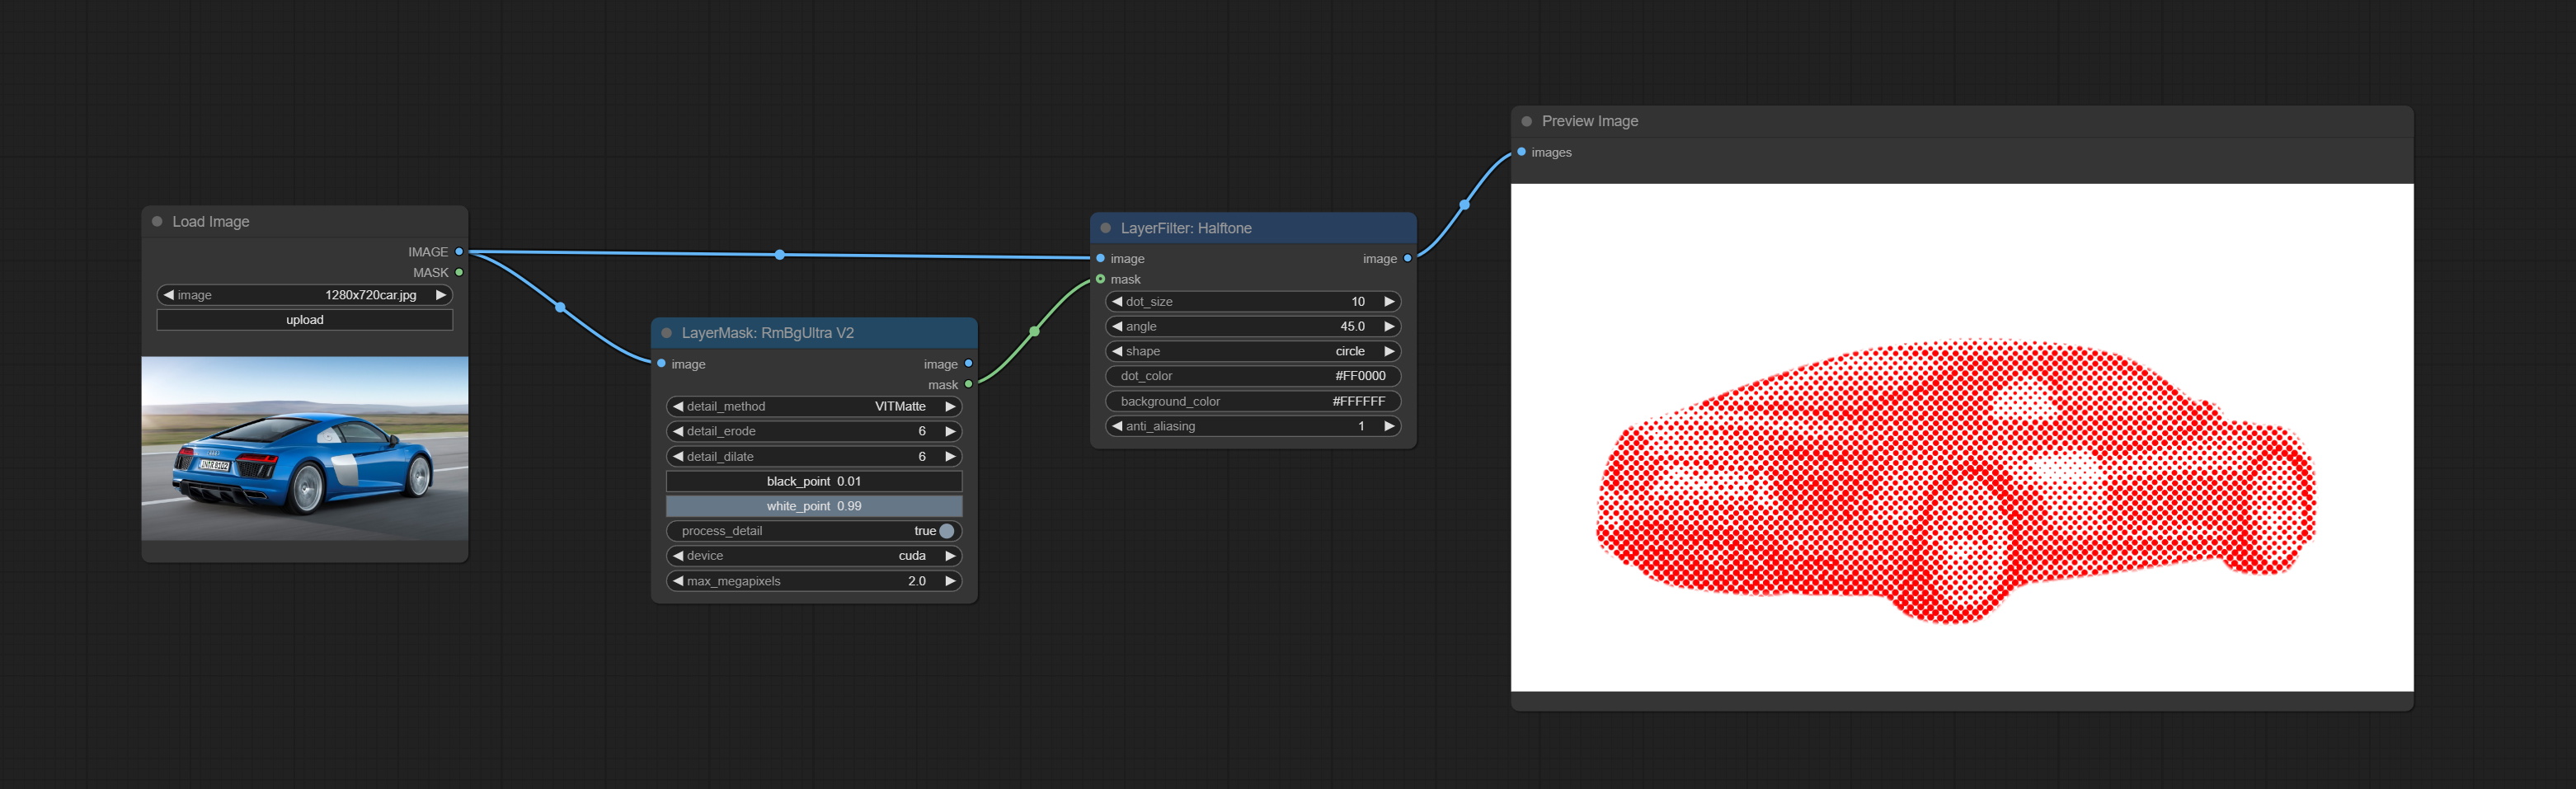
节点选项:

- image:输入图像。
- mask:可选的蒙版输入。
- dot_size:网点的大小。
- angle:网点排列的角度。
- shape:网点的形状。有三种选项:圆形、菱形和方形。
- dot_color:网点的颜色。
- background_color:背景颜色。
- anti_alias:抗锯齿强度。数值越高,网点边缘越平滑,但处理时间也会增加。
柔光
柔光效果,画面中的高光显得模糊。
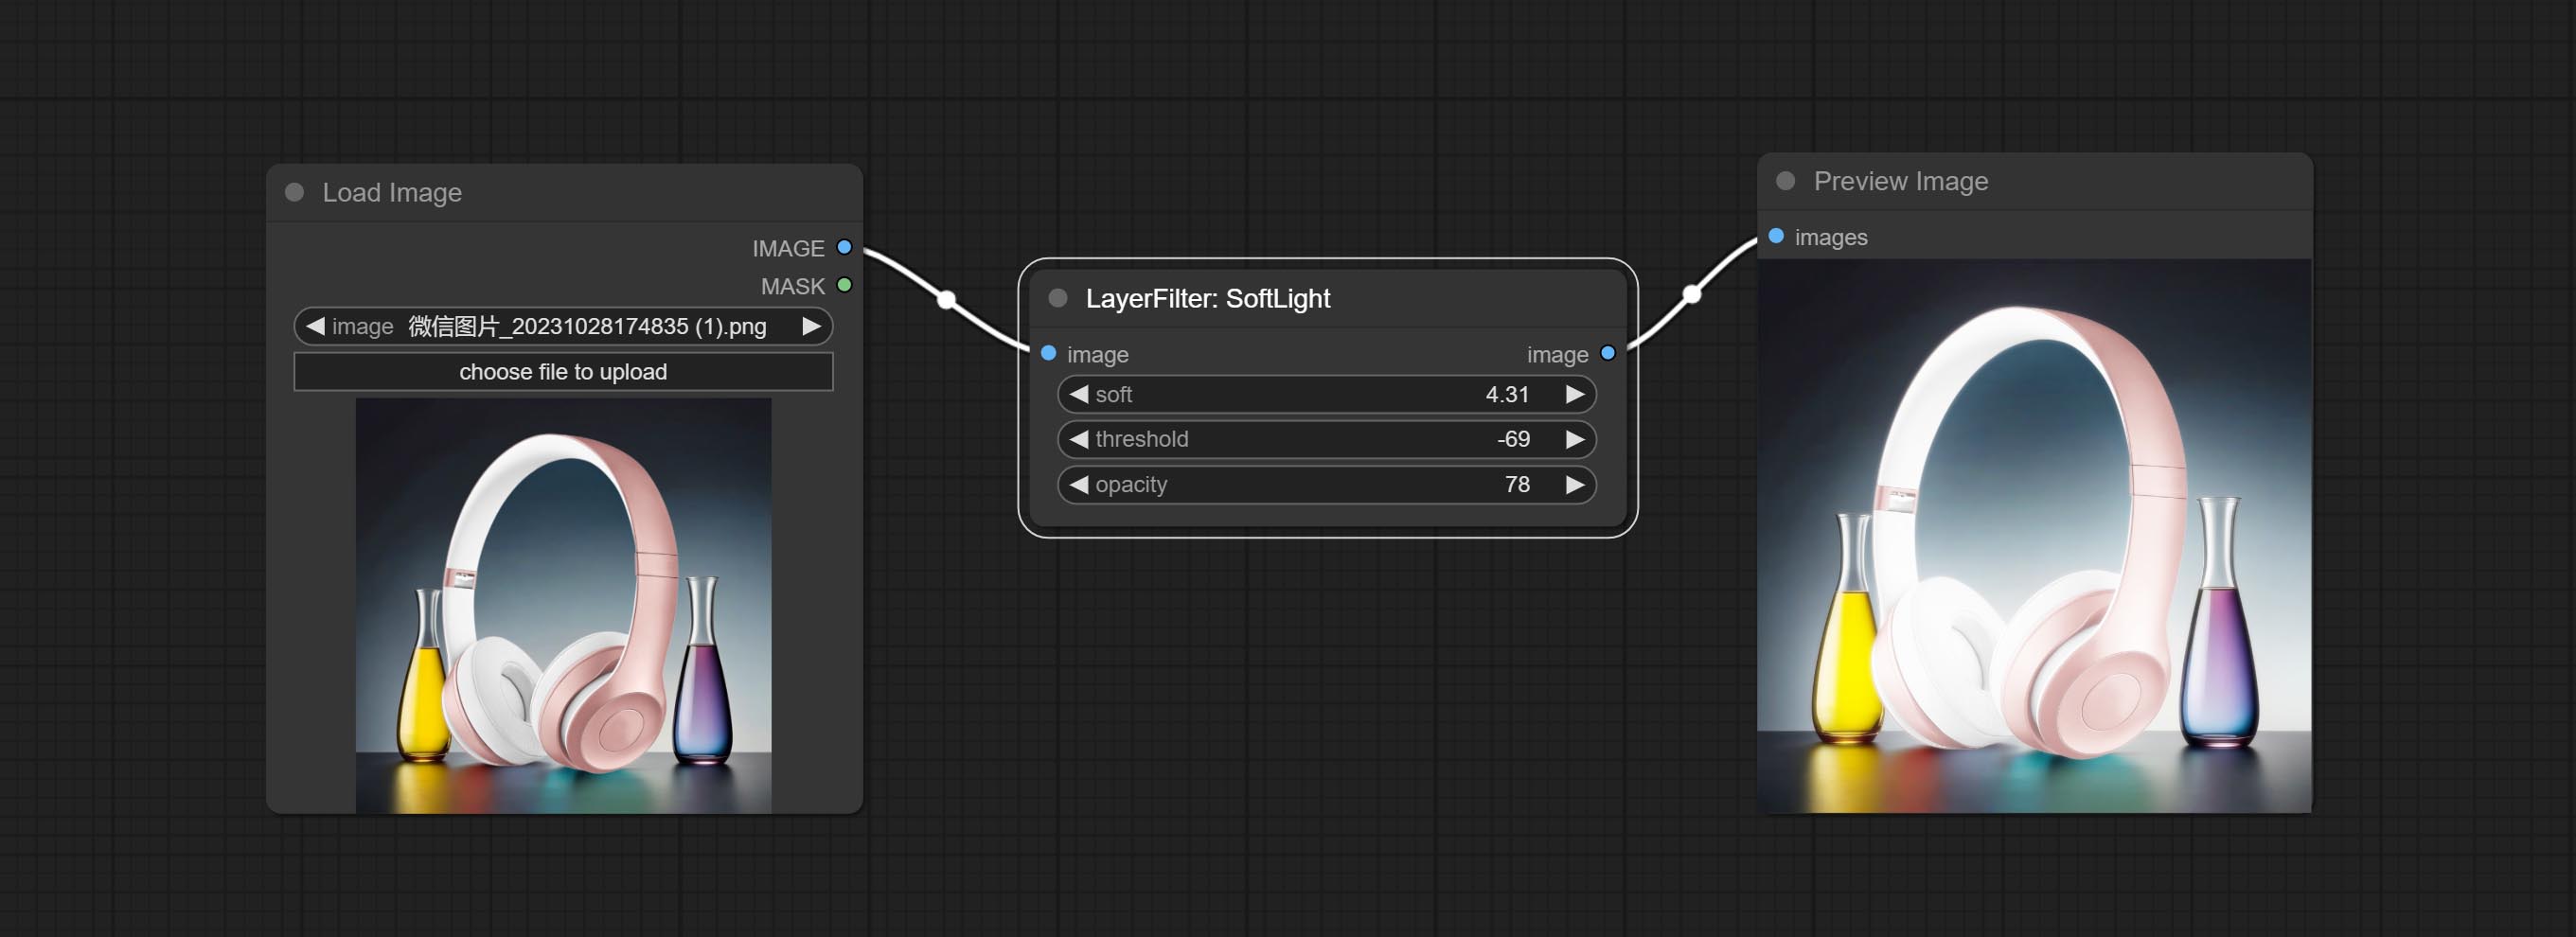
节点选项:
- soft:柔光的大小。
- threshold:柔光范围。光线从画面中最亮的部分开始显现。数值越低,范围越大;数值越高,范围越小。
- opacity:柔光的不透明度。
通道抖动
通道错位效果,类似于 TikTok 标志的效果。
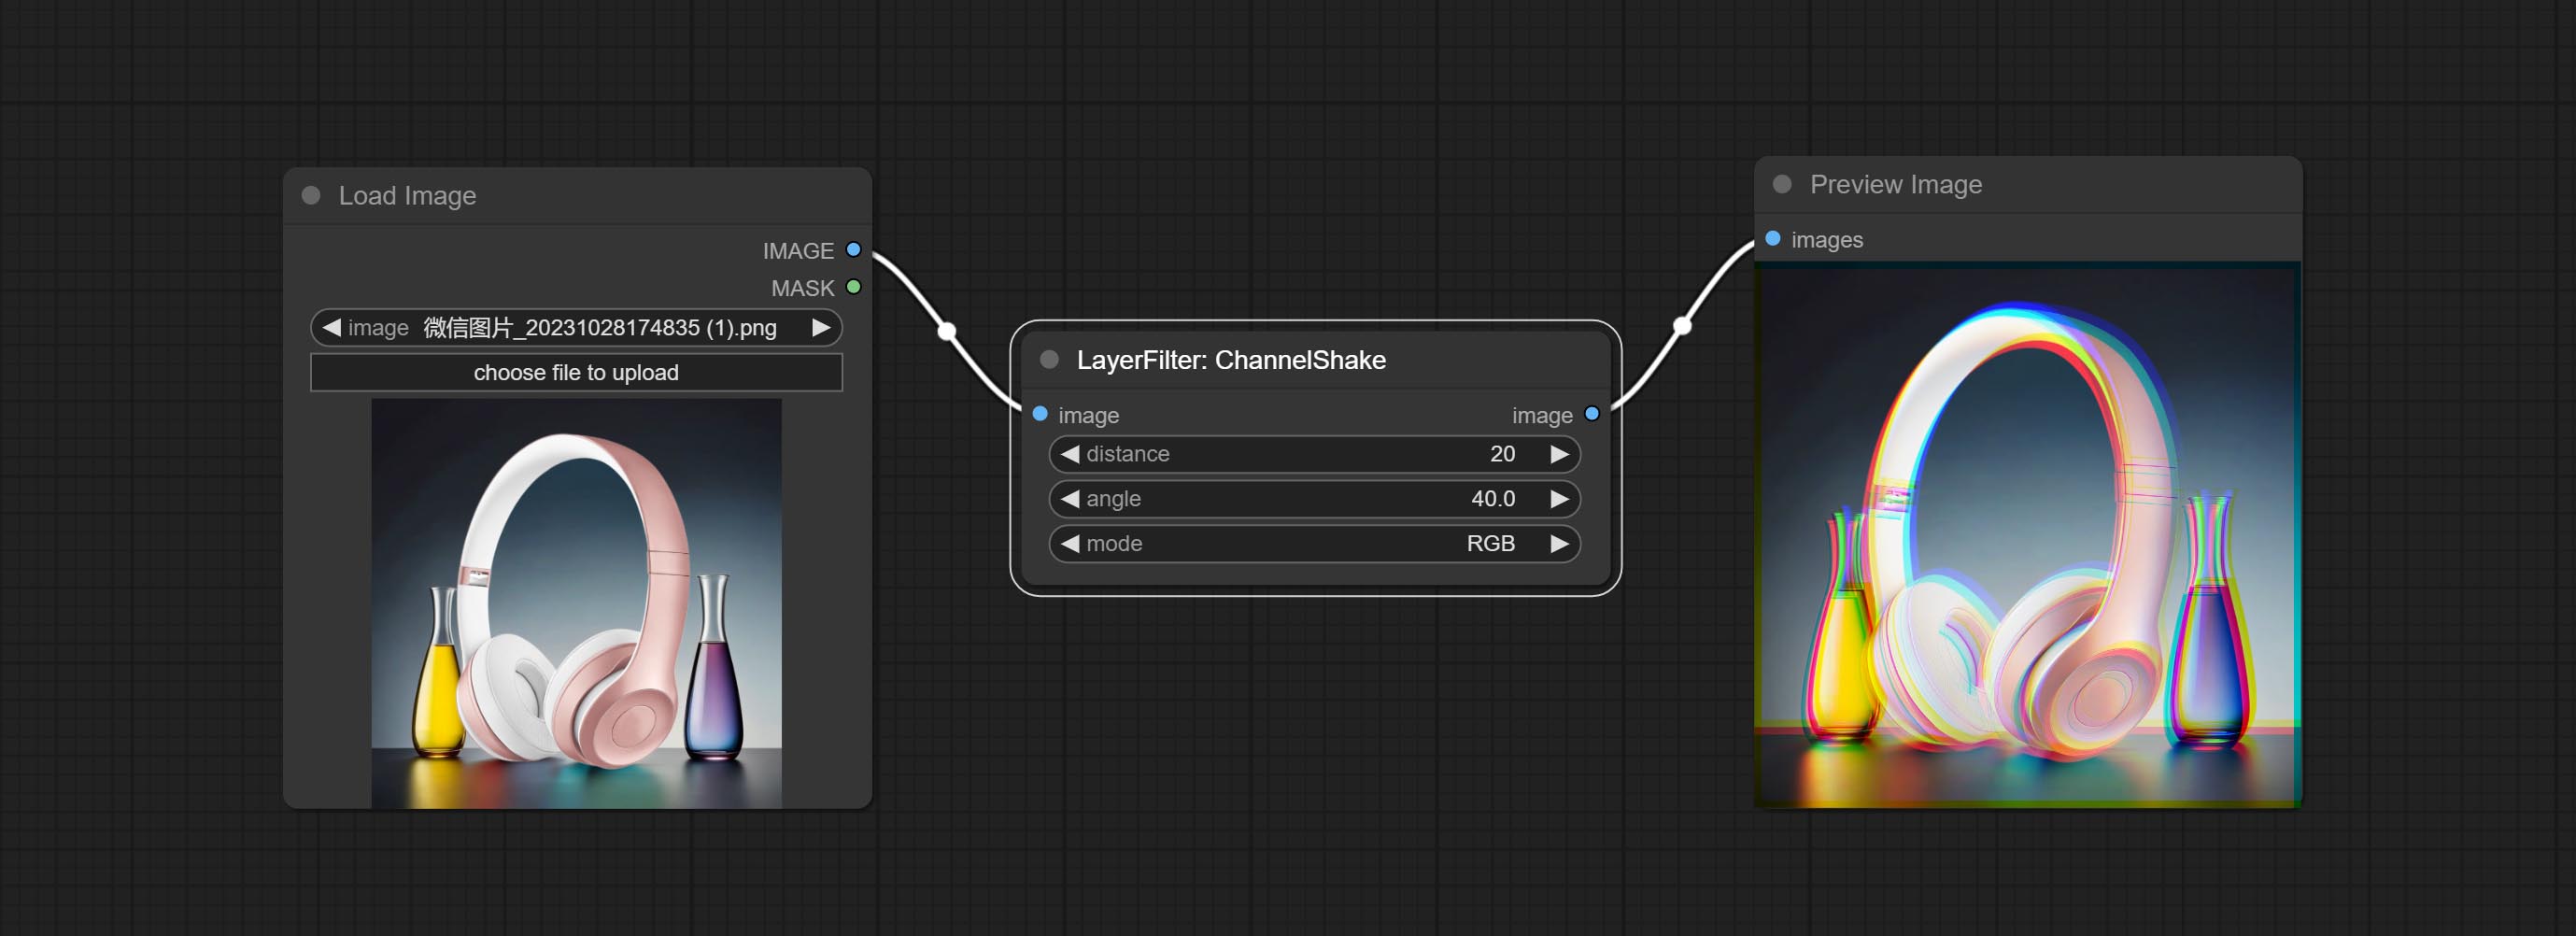
节点选项:
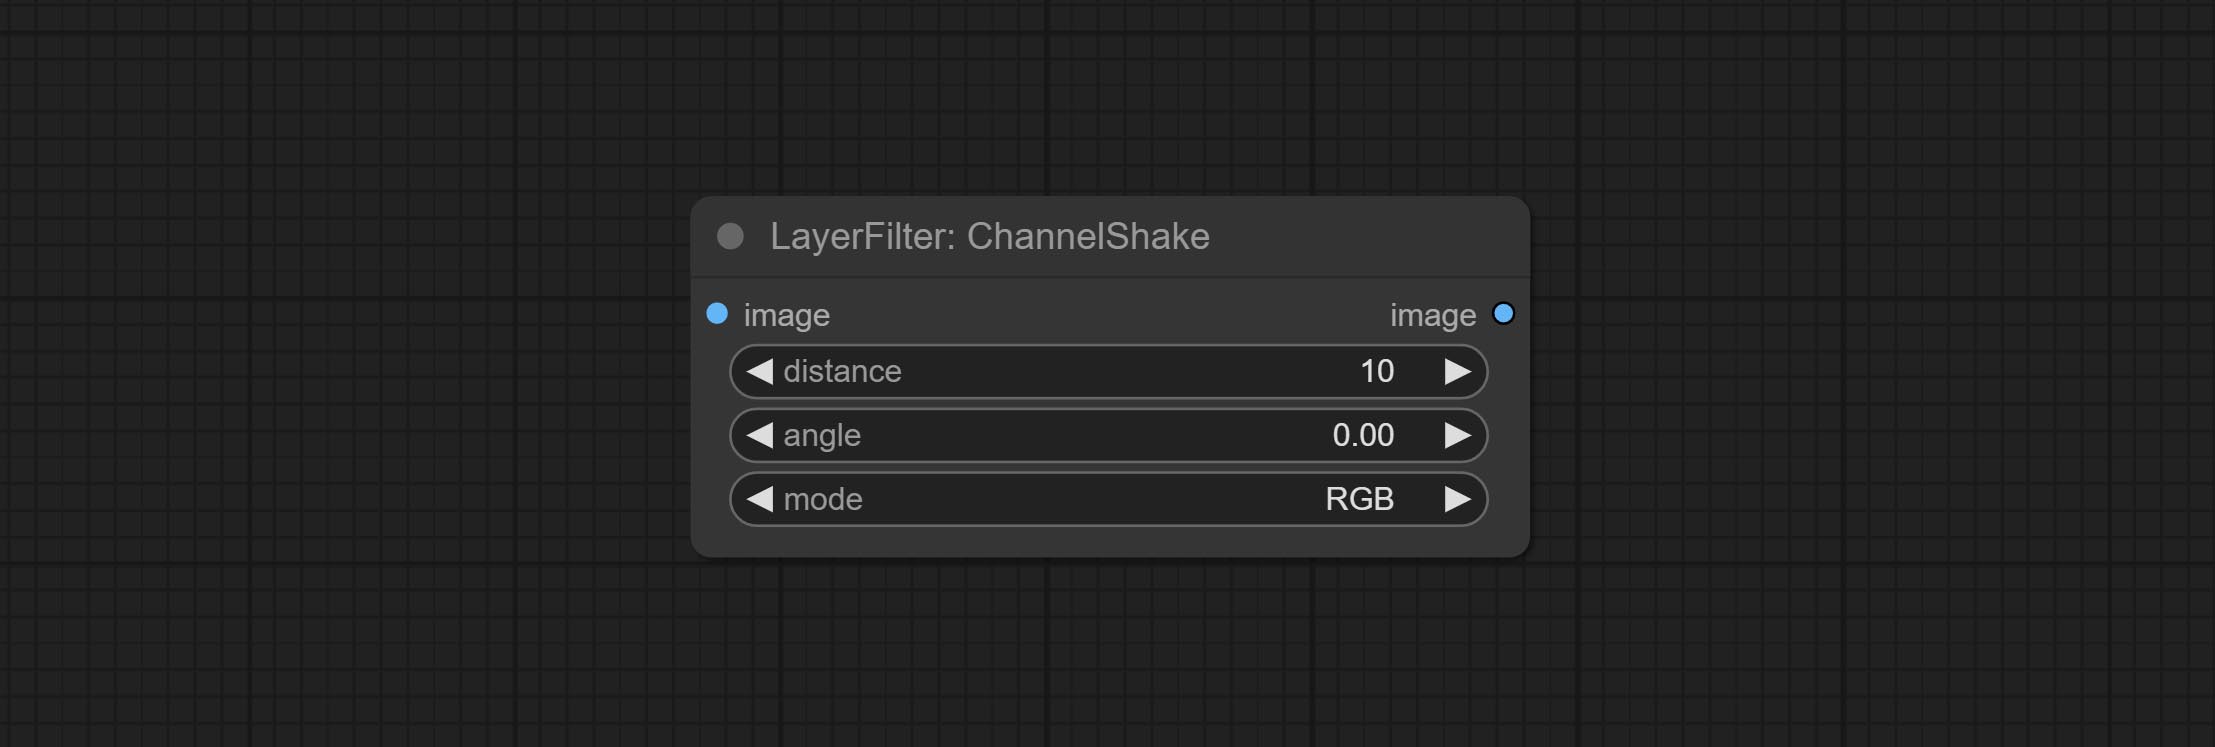
- distance:通道分离的距离。
- angle:通道分离的角度。
- mode:通道偏移的排列顺序。
HDR效果
提升输入图像的动态范围和视觉吸引力。
本节点是对 HDR Effects (SuperBeasts.AI) 的重新组织和封装,感谢原作者。
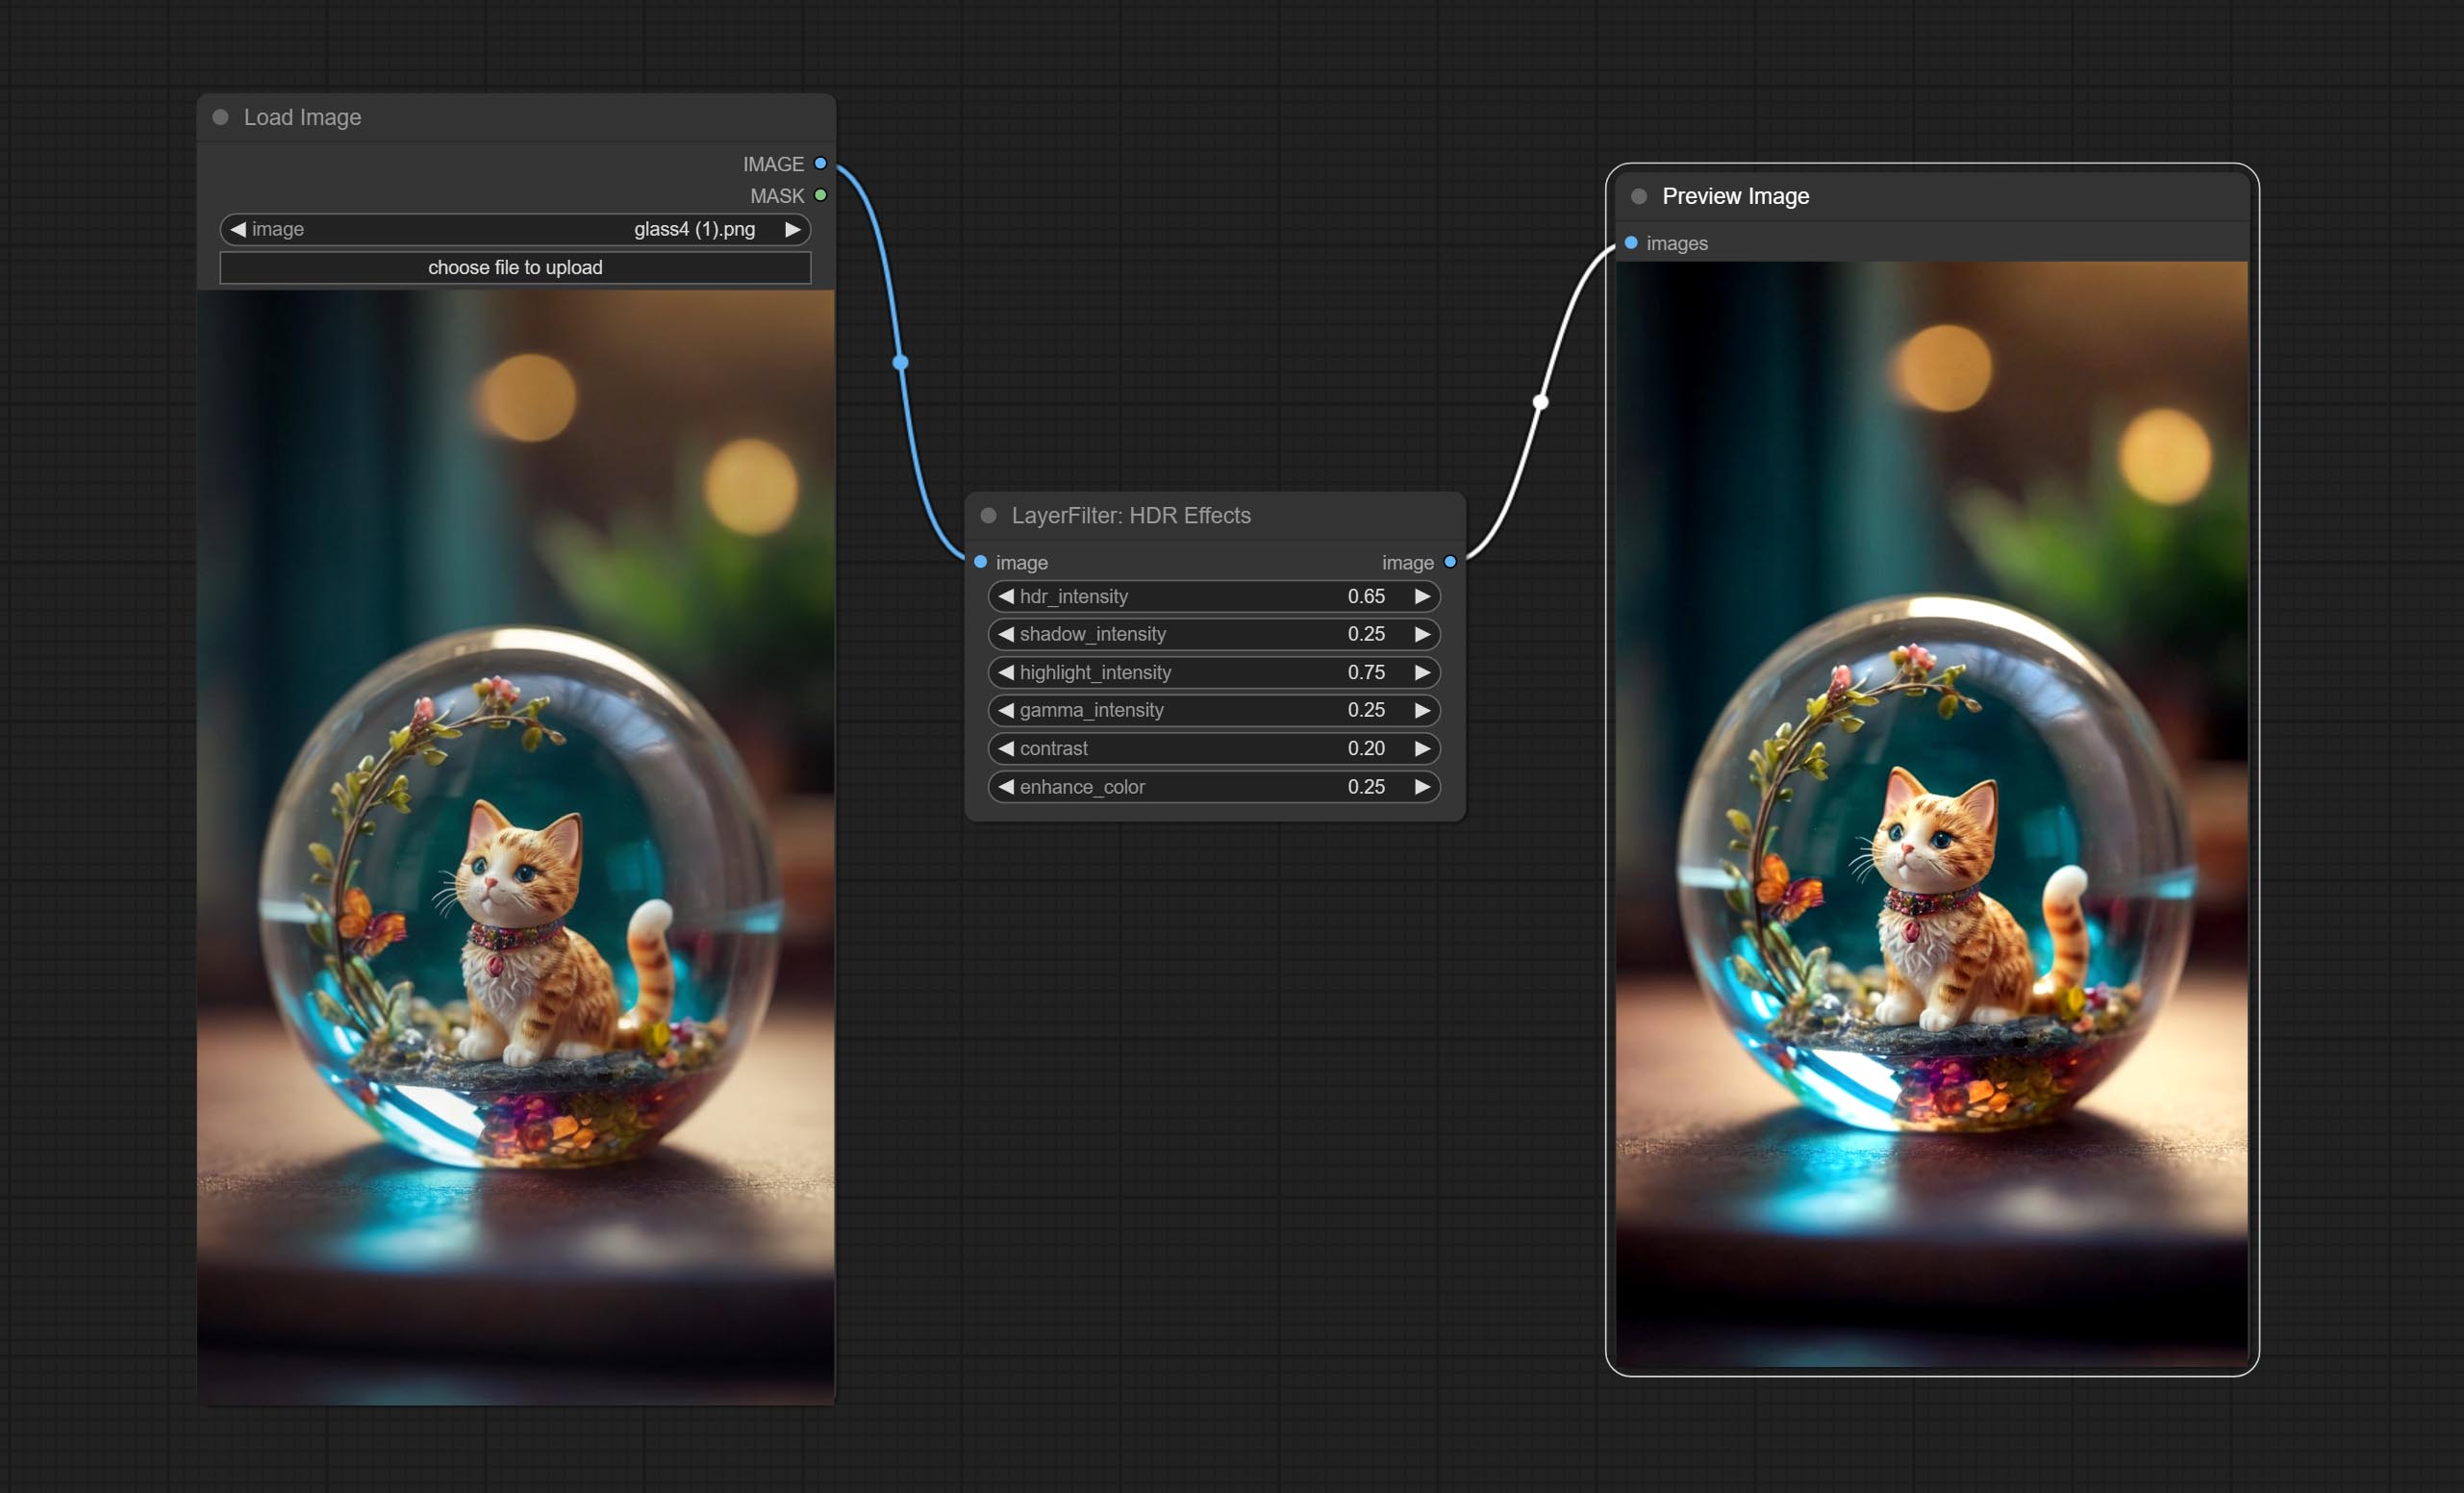
节点选项:
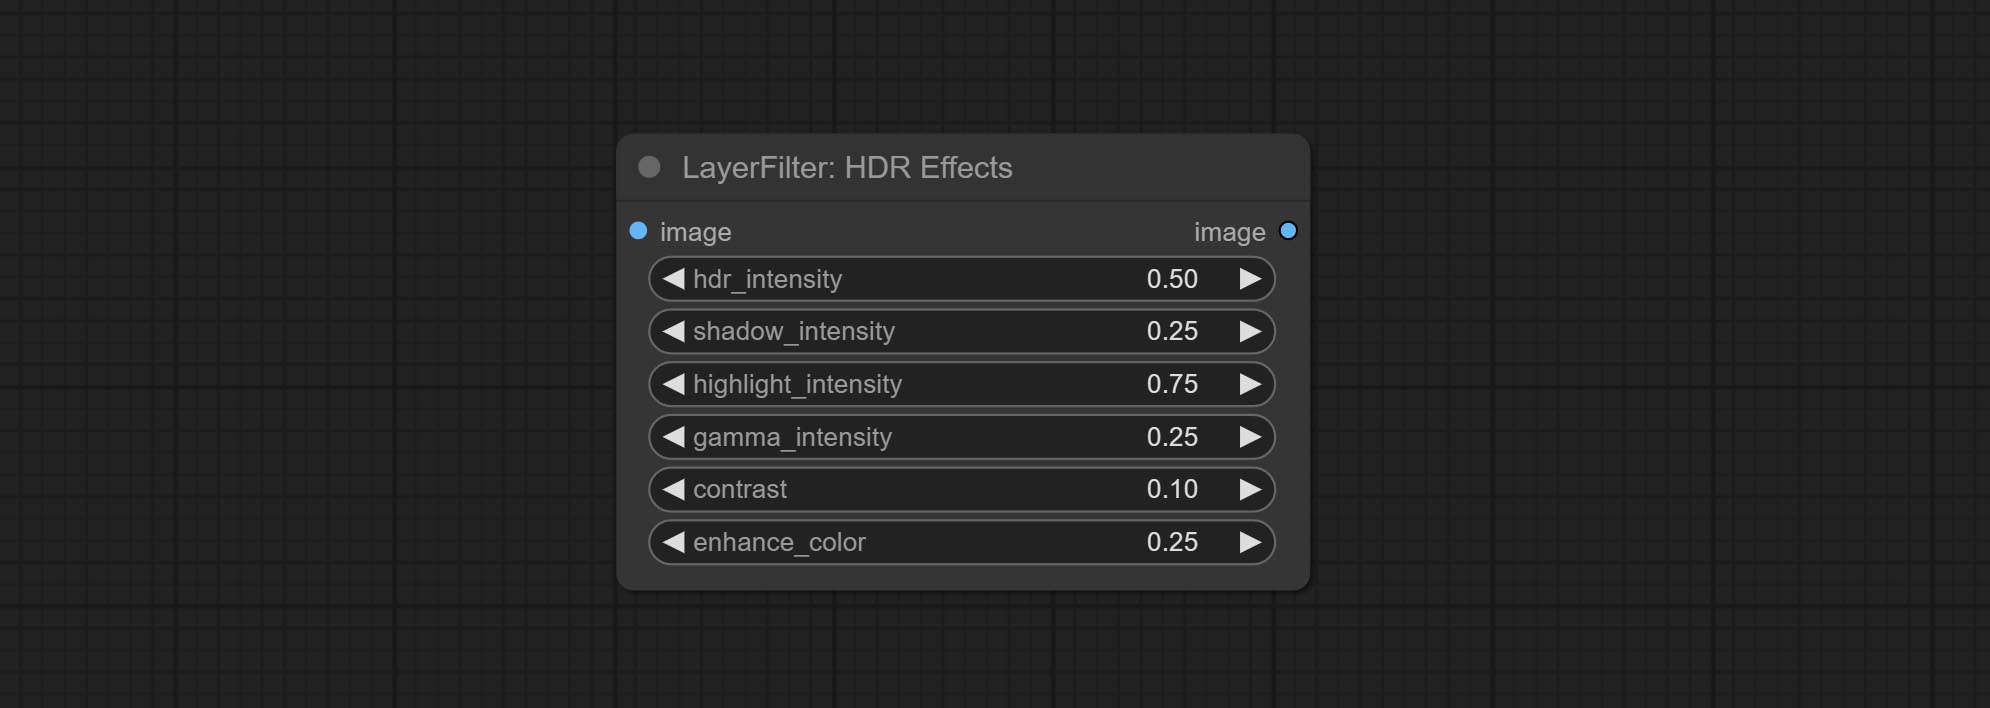
- hdr_intensity:范围为0.0至5.0,控制HDR效果的整体强度。数值越高,HDR效果越明显。
- shadow_intensity:范围为0.0至1.0,调整图像中阴影的强度。数值越高,阴影越深,对比度也越高。
- highlight_intensity:范围为0.0至1.0,调整图像中高光的强度。数值越高,高光越明亮,对比度也越高。
- gamma_intensity:范围为0.0至1.0,控制应用于图像的伽马校正。数值越高,整体亮度和对比度越高。
- contrast:范围为0.0至1.0,增强图像的对比度。数值越高,对比度越明显。
- enhance_color:范围为0.0至1.0,增强图像的色彩饱和度。数值越高,色彩越鲜艳。
胶片
模拟胶片的颗粒感、暗角和边缘模糊效果,支持输入深度图以模拟散焦效果。
该节点是对 digitaljohn/comfyui-propost 的重新组织和封装,感谢原作者。
节点选项: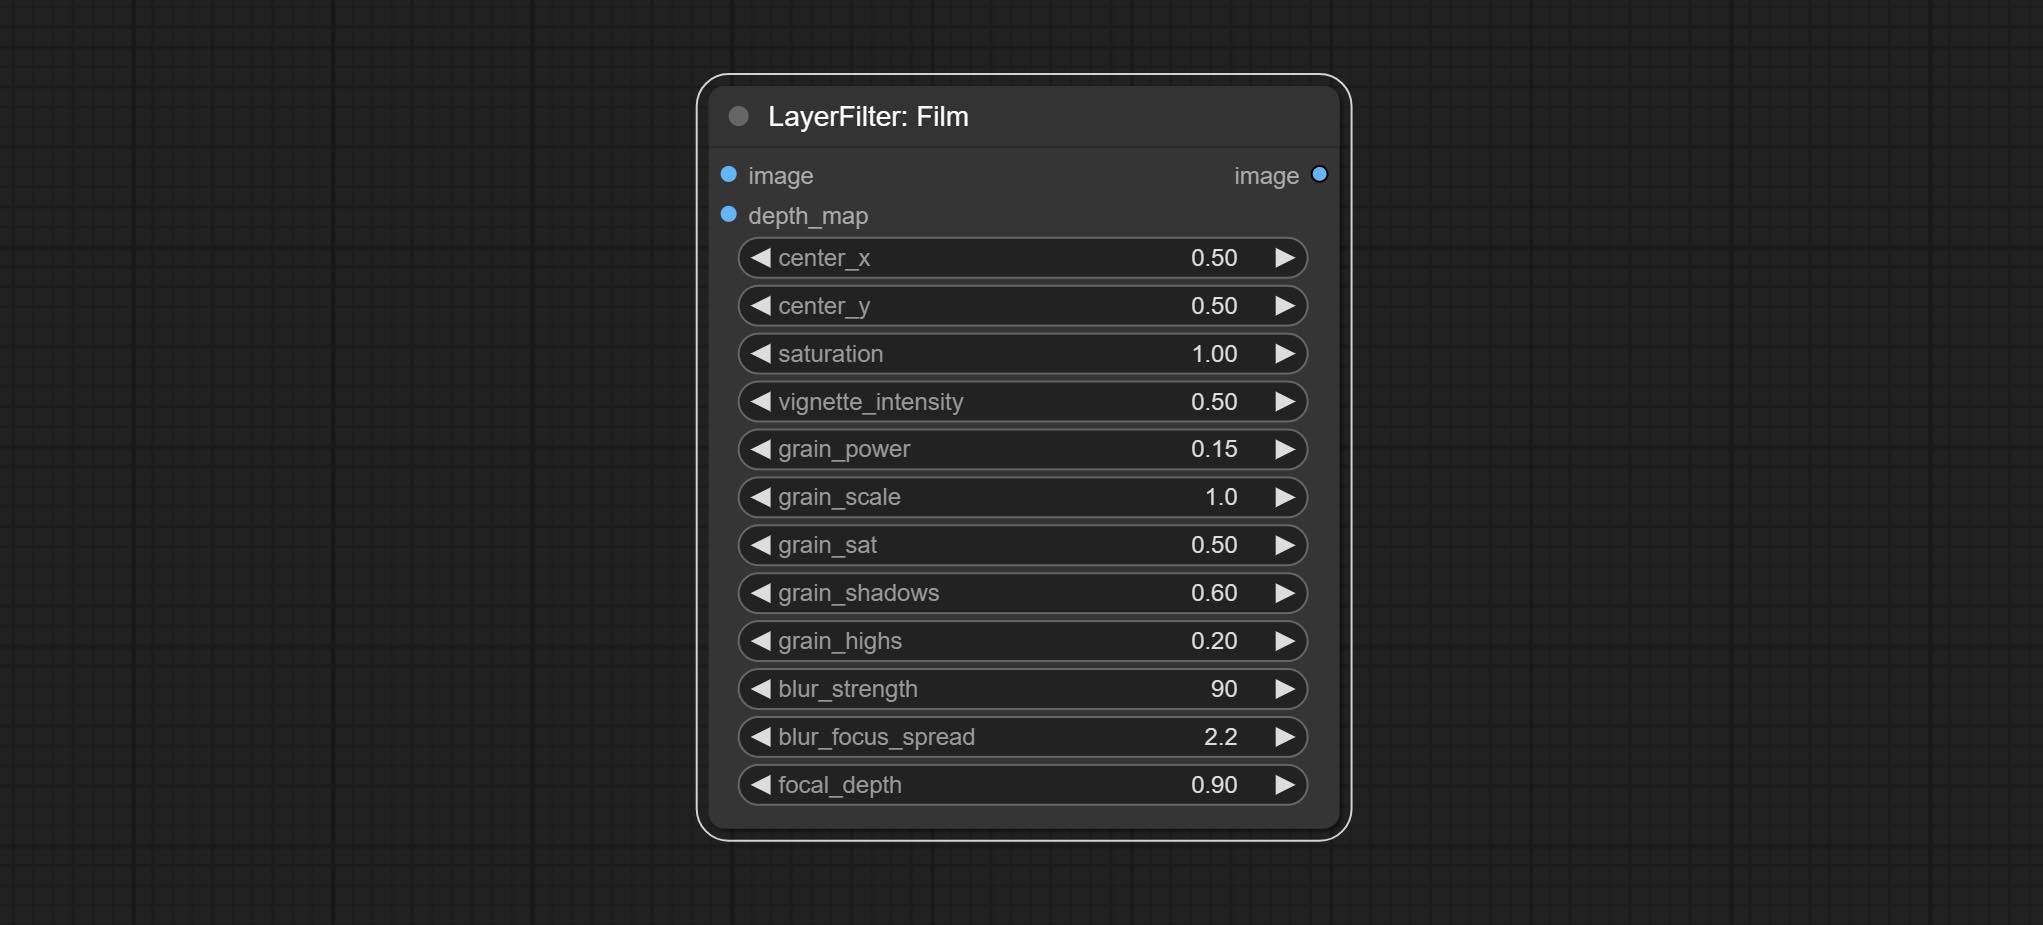
- image: 输入图像。
- depth_map: 输入深度图以模拟散焦效果。这是一个可选输入。如果没有输入,则会在图像边缘模拟径向模糊。
- center_x: 暗角和径向模糊中心点位置的水平坐标,其中 0 表示最左侧,1 表示最右侧,0.5 表示正中间。
- center_y: 暗角和径向模糊中心点位置的垂直坐标,定义同上。
- saturation: 色彩饱和度,1 为原始值。
- grain_power: 颗粒强度。数值越大,噪点越明显。
- grain_scale: 颗粒大小。
- grain_sat: 颗粒的色彩饱和度。0 表示单色噪点,数值越大,色彩越突出。
- grain_shadows: 暗部噪点强度。
- grain_highs: 亮部噪点强度。
- blur_strength: 模糊强度。数值越大,模糊效果越明显。
- blur_focus_spread: 焦点扩散范围。数值越大,清晰区域越大。
- focal_depth: 模拟散焦的焦距。0 表示焦点最远,1 表示焦点最近。此设置仅在输入深度图时有效。
胶片V2
胶片节点的升级版,在原有基础上增加了 fastgrain 方法,生成噪点的速度提升了 10 倍。fastgrain 的代码来自 github.com/spacepxl/ComfyUI-Image-Filters 中的 BetterFilmGrain 节点,感谢原作者。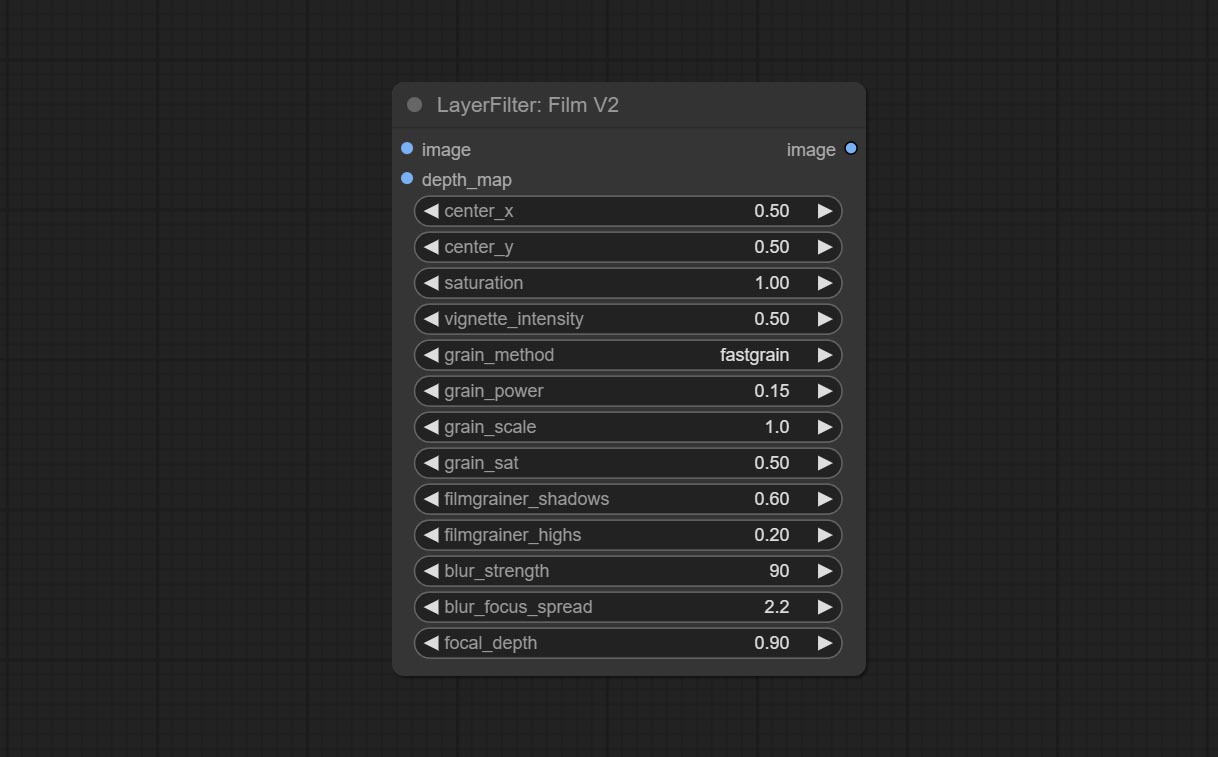
光晕
模拟胶片的漏光效果。请从 百度网盘 或 Google Drive 下载模型文件,并将其复制到 ComfyUI/models/layerstyle 文件夹中。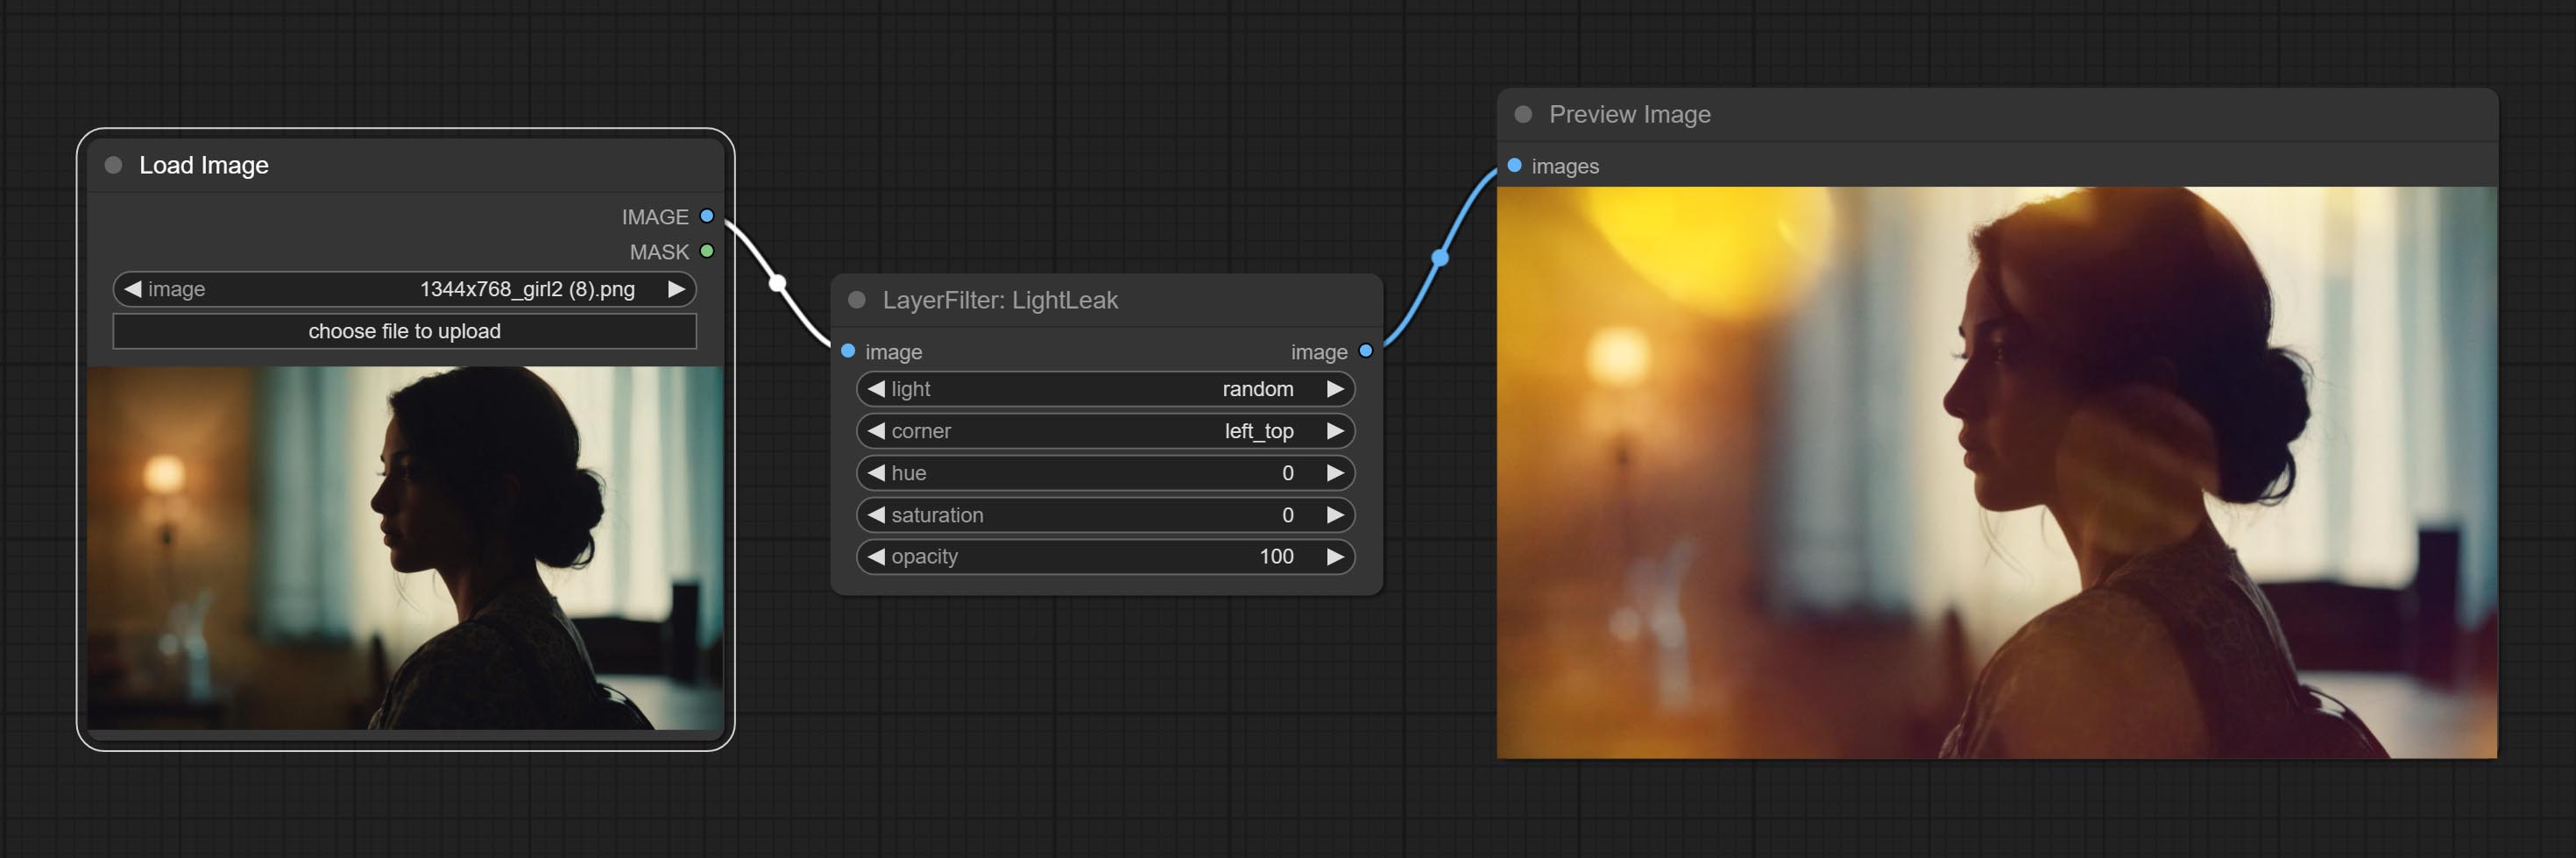
节点选项: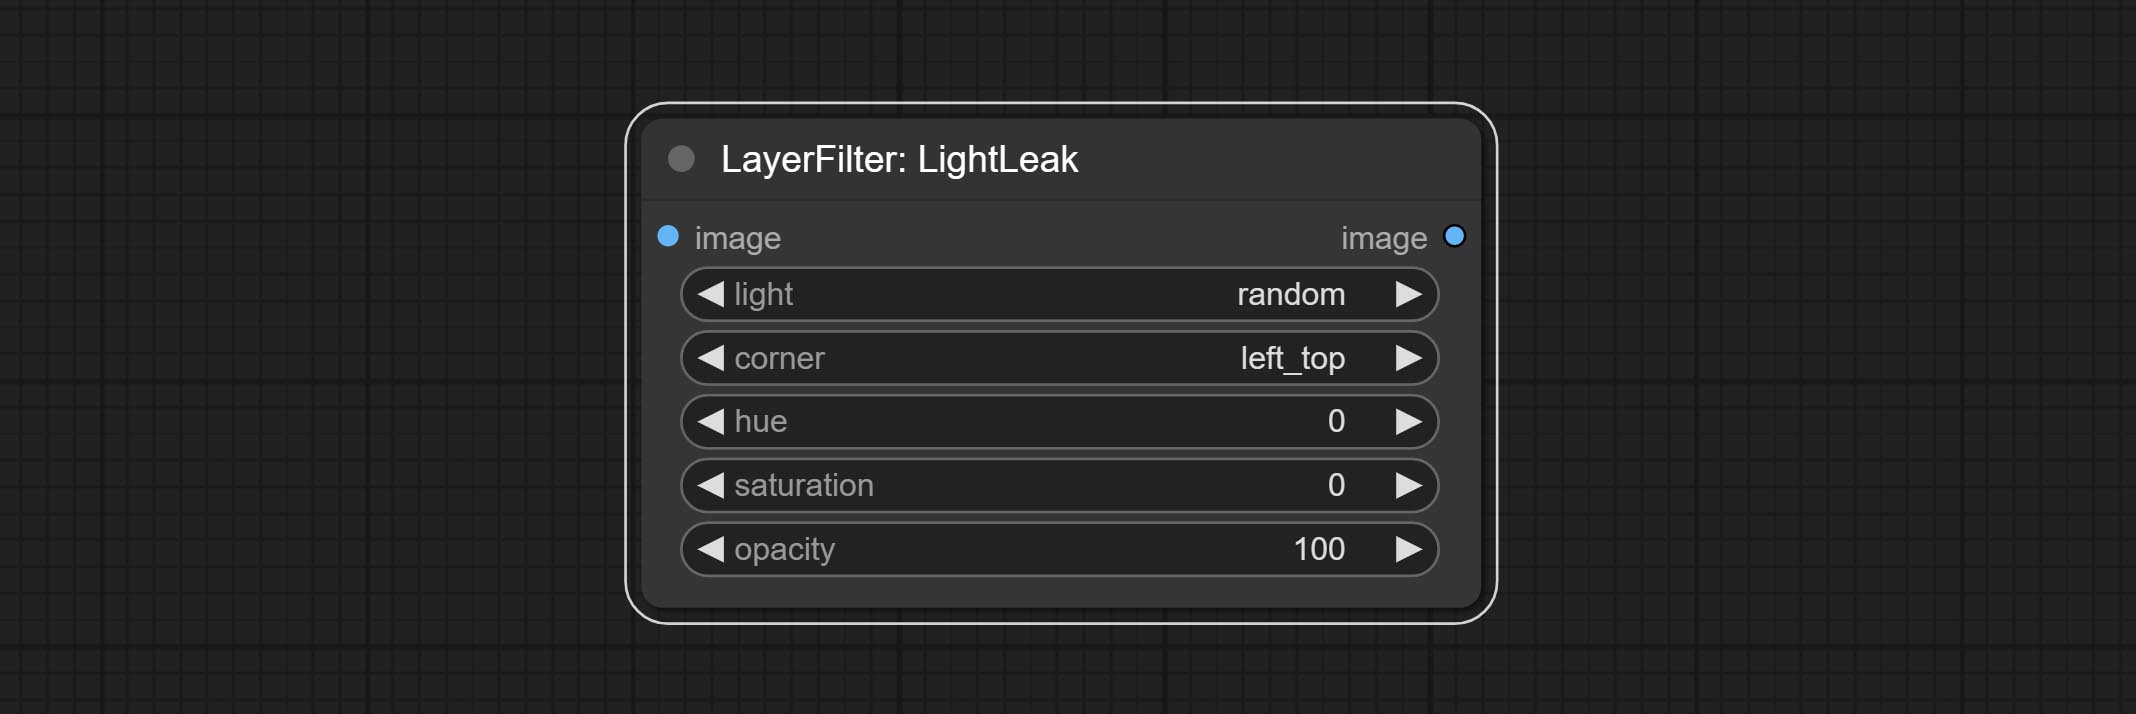
- light: 提供 32 种光斑类型。random 表示随机选择。
- corner: 光出现的位置有四个选项:左上角、右上角、左下角和右下角。
- hue: 光的颜色色调。
- saturation: 光的色彩饱和度。
- opacity: 光的透明度。
颜色映射
伪彩色热图效果。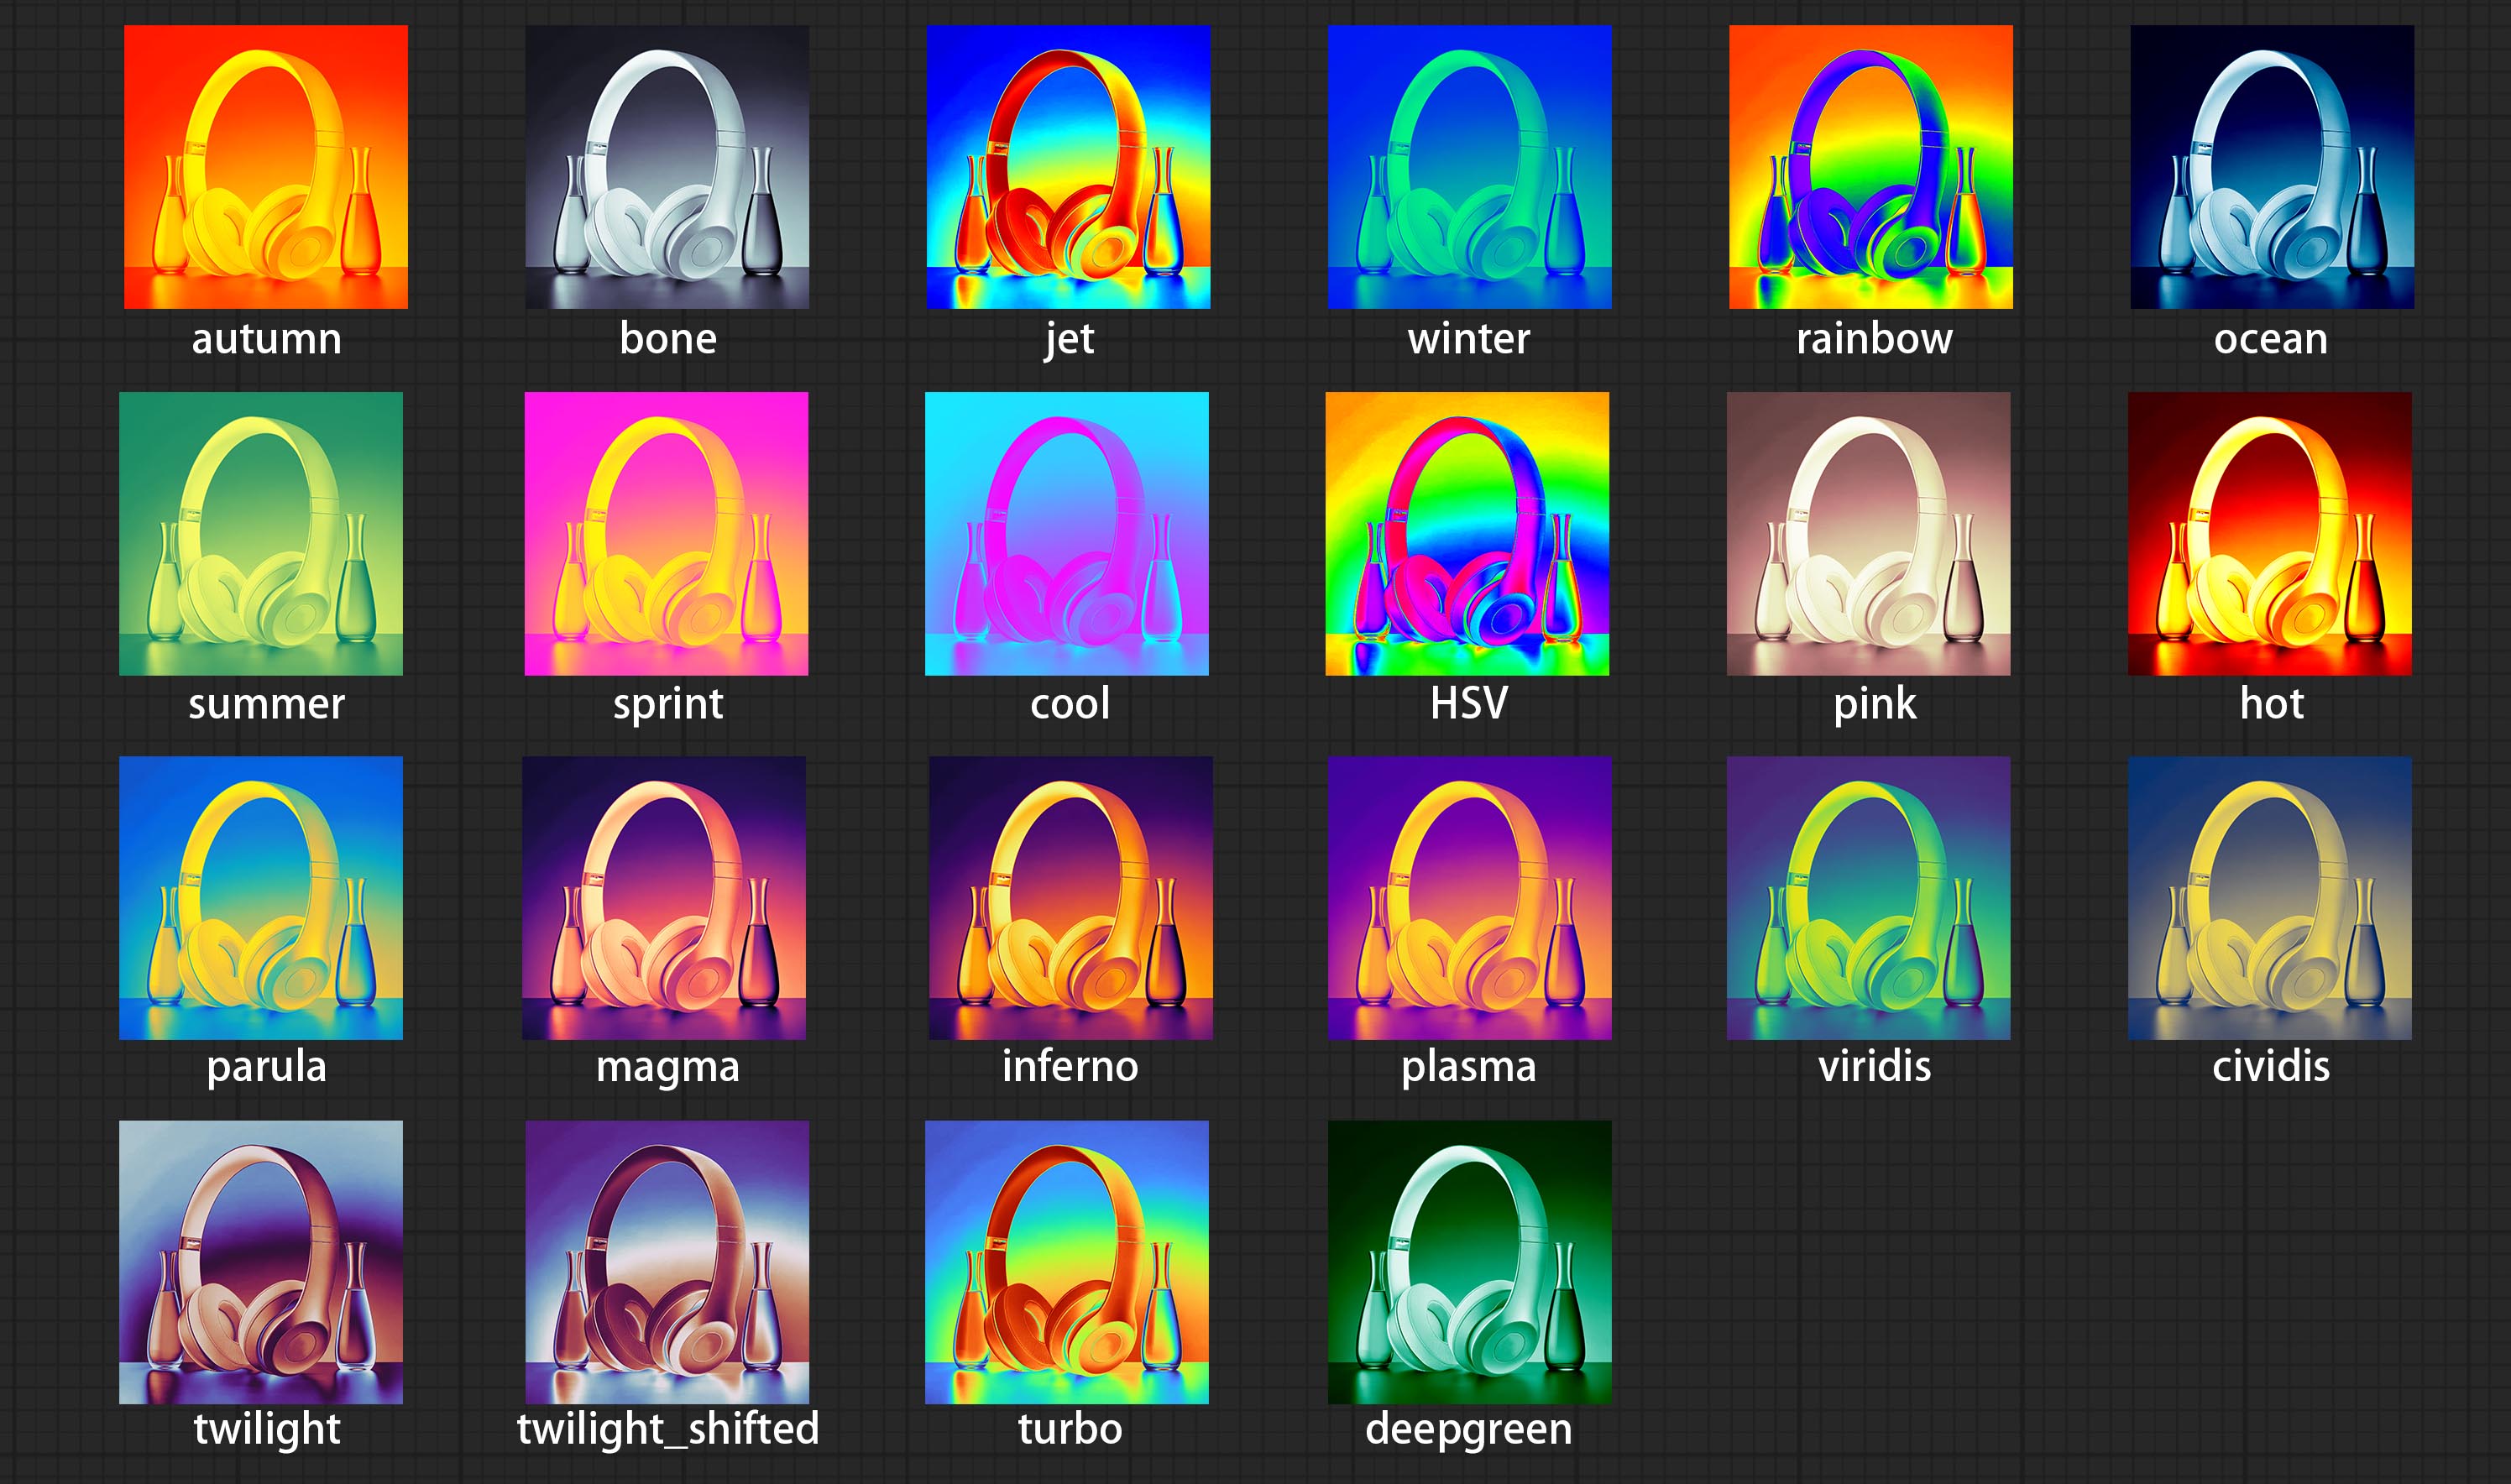
节点选项: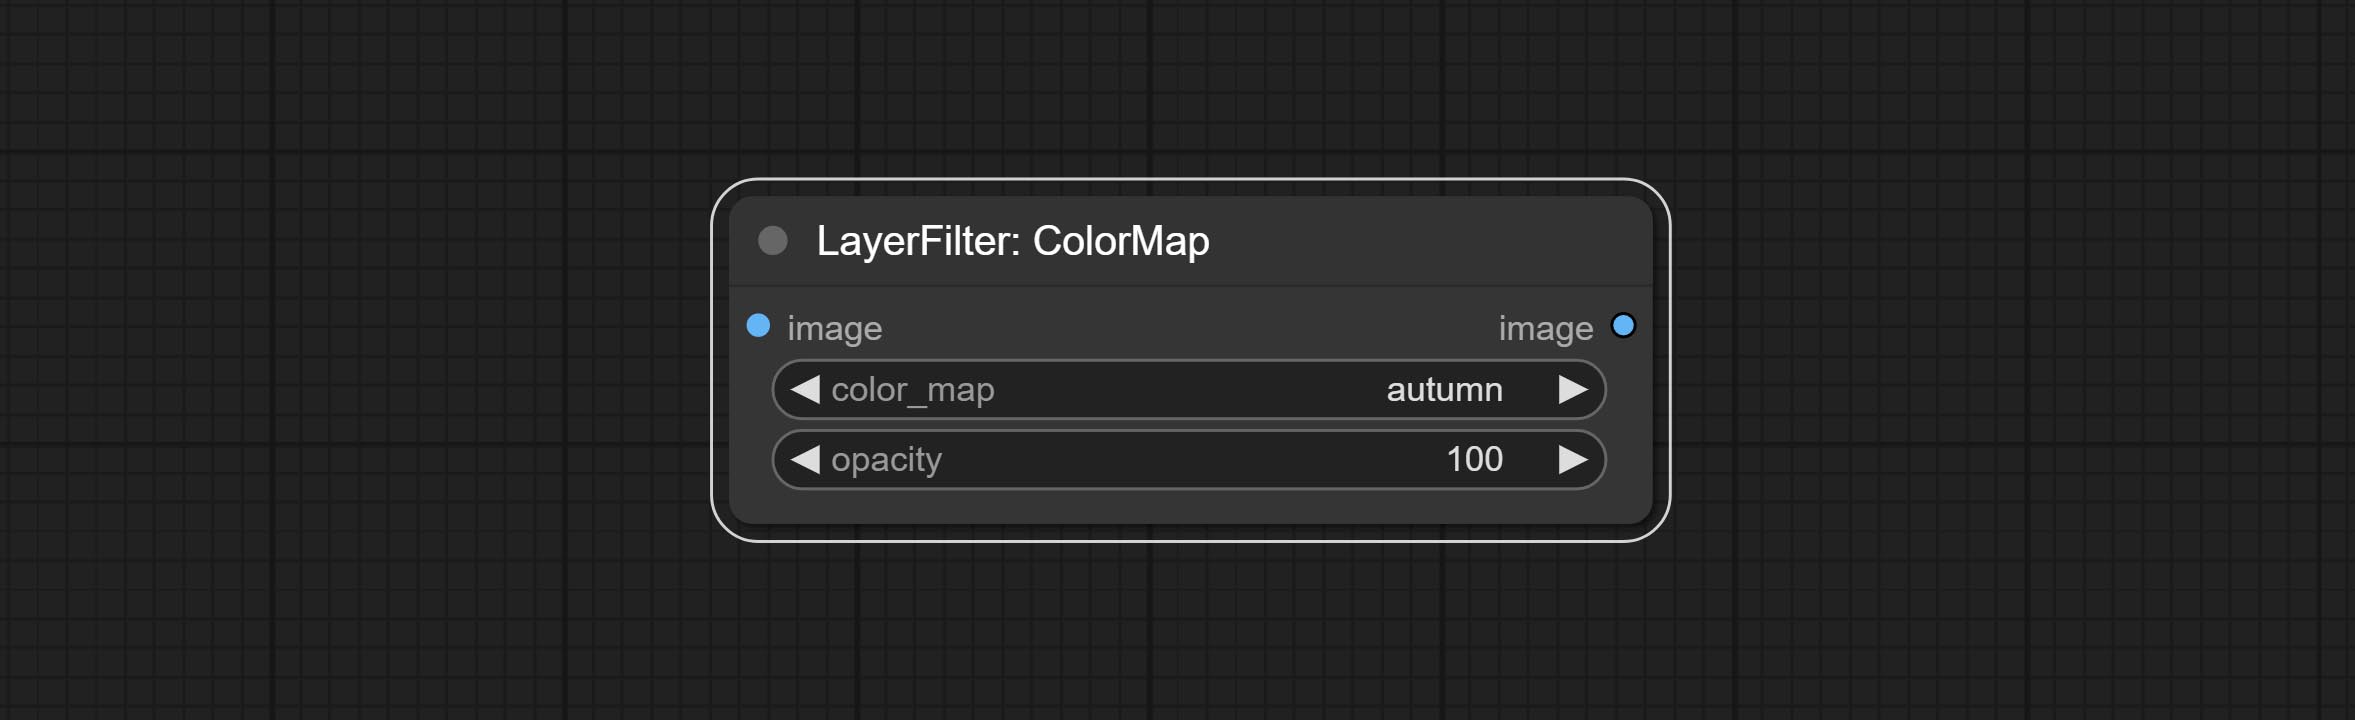
- color_map: 效果类型。共有 22 种效果,如上图所示。
- opacity: 颜色映射效果的透明度。
运动模糊
使图像产生运动模糊效果。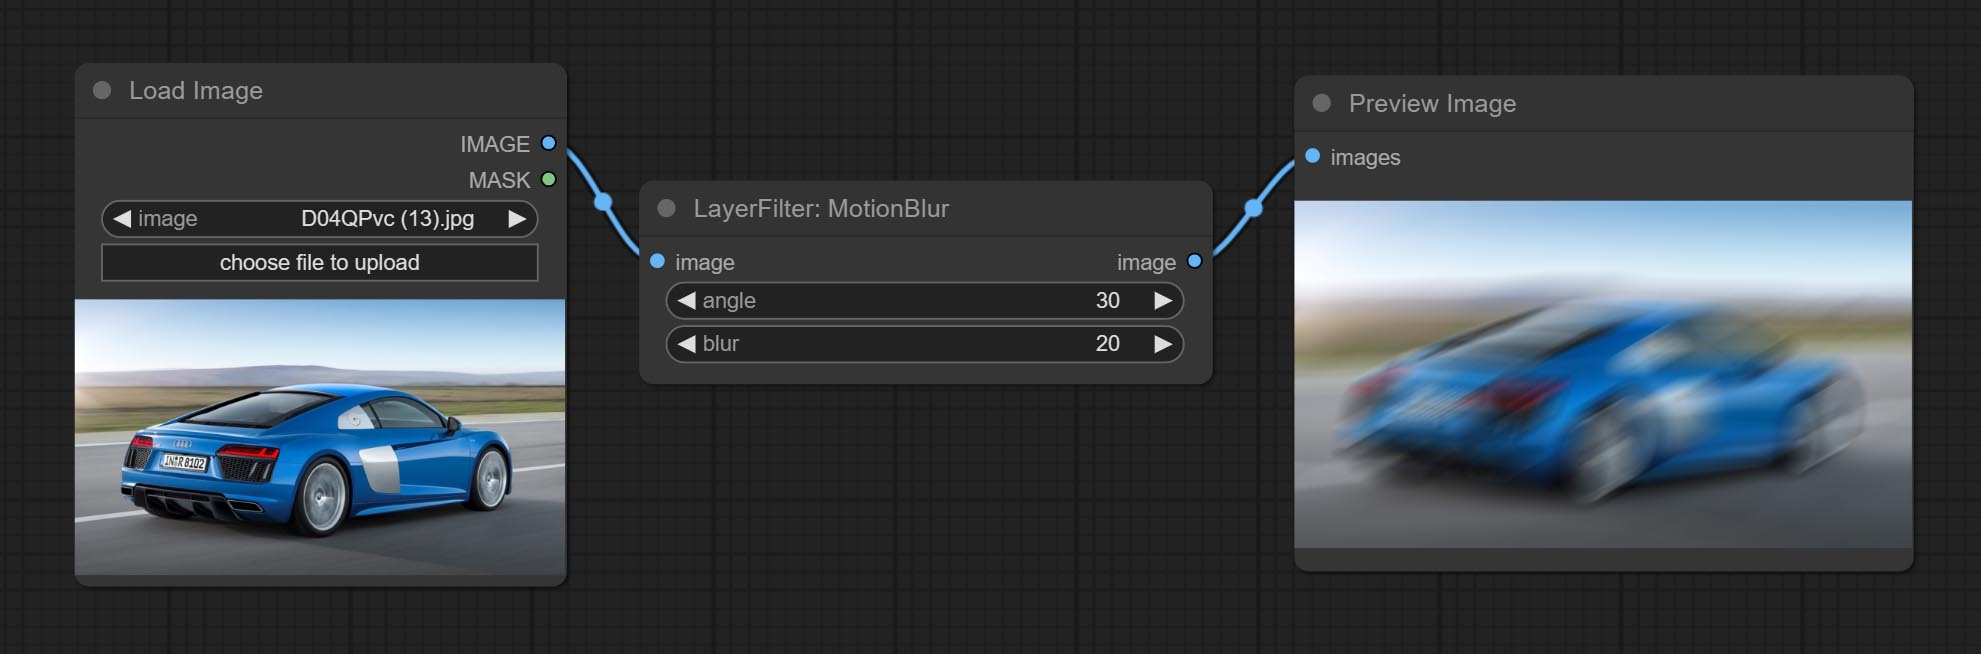
节点选项:
- angle: 模糊的角度。
- blur: 模糊的大小。
高斯模糊
对图像进行高斯模糊处理。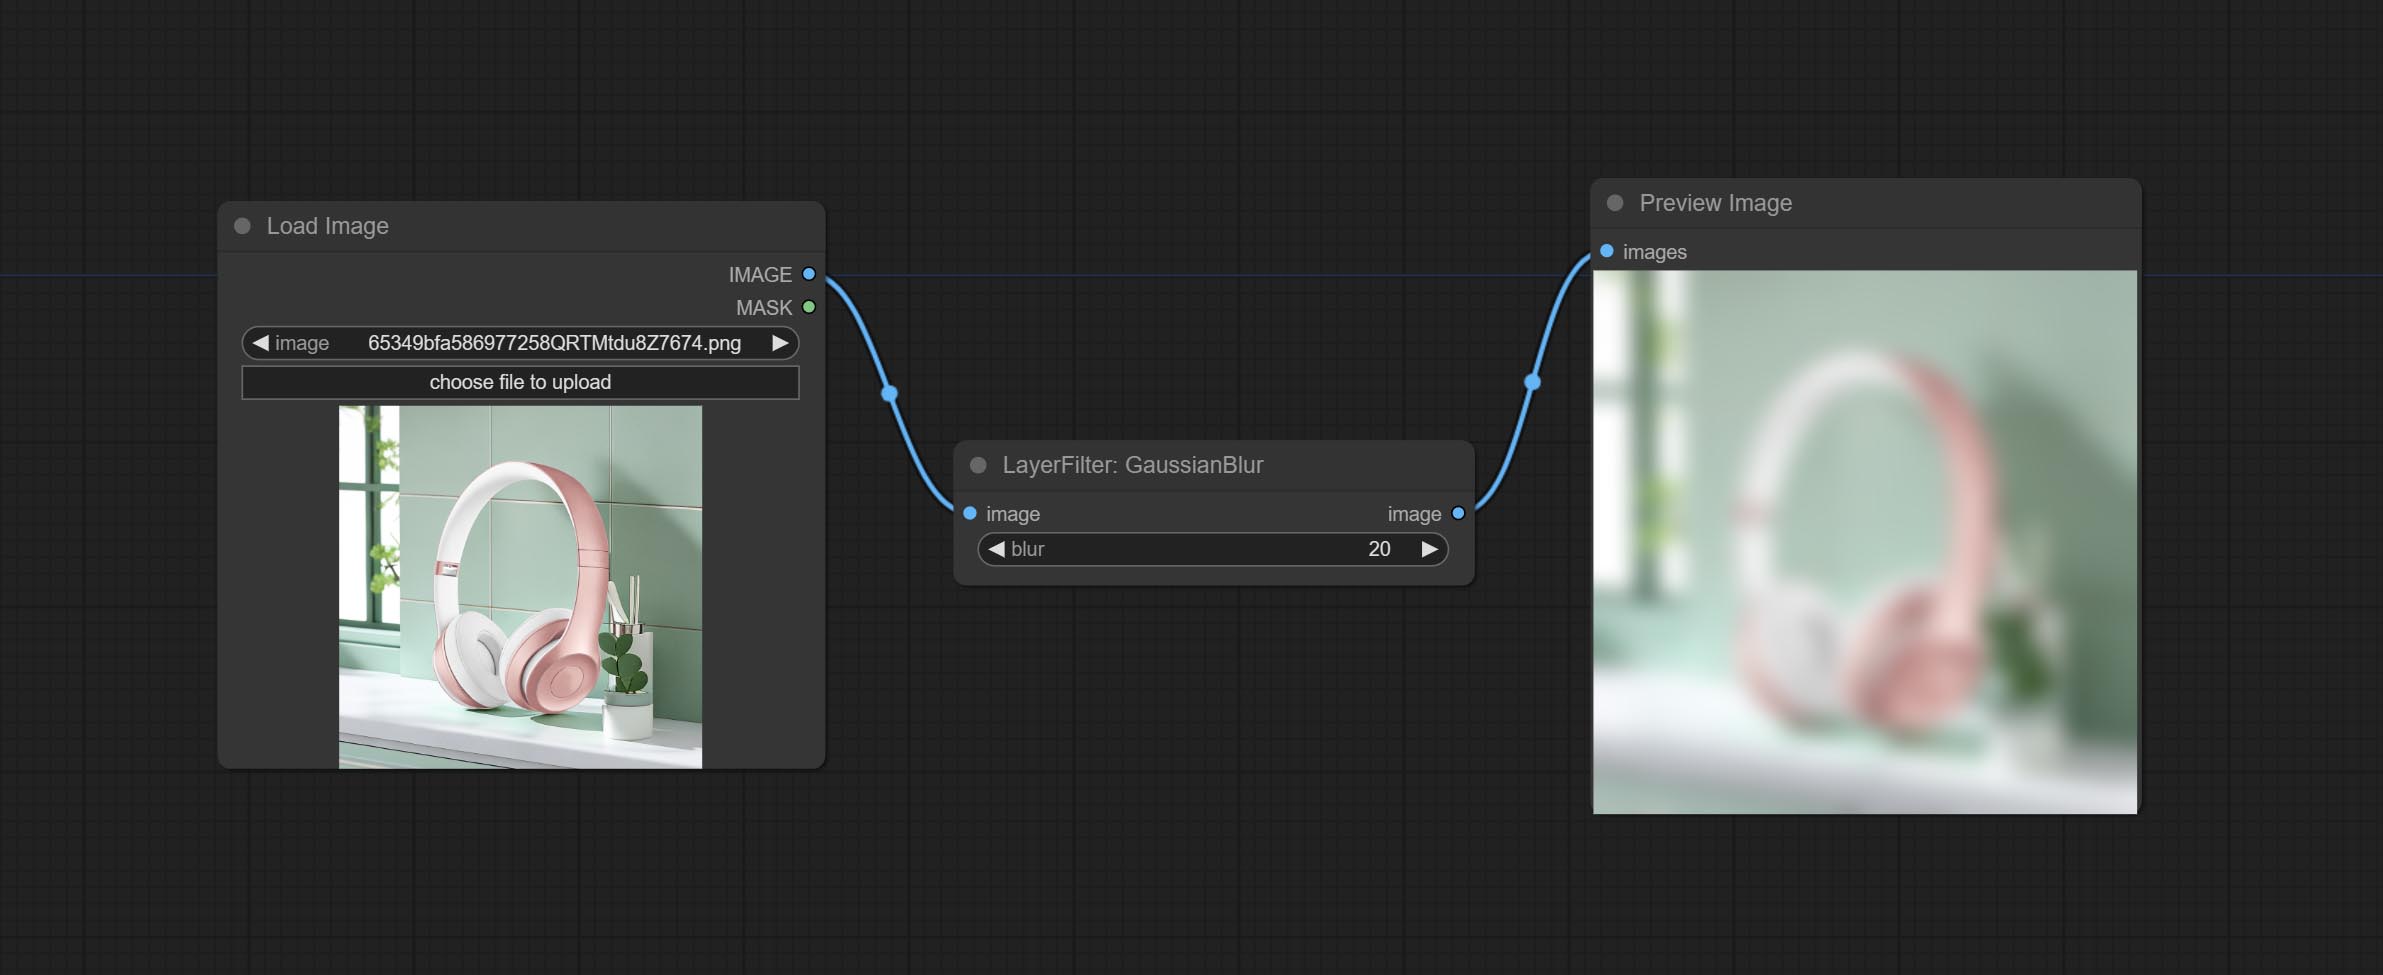
节点选项:
- blur: 模糊的大小,整数,范围 1–999。
高斯模糊V2
高斯模糊。将参数精度改为浮点数,精确到 0.01。
节点选项: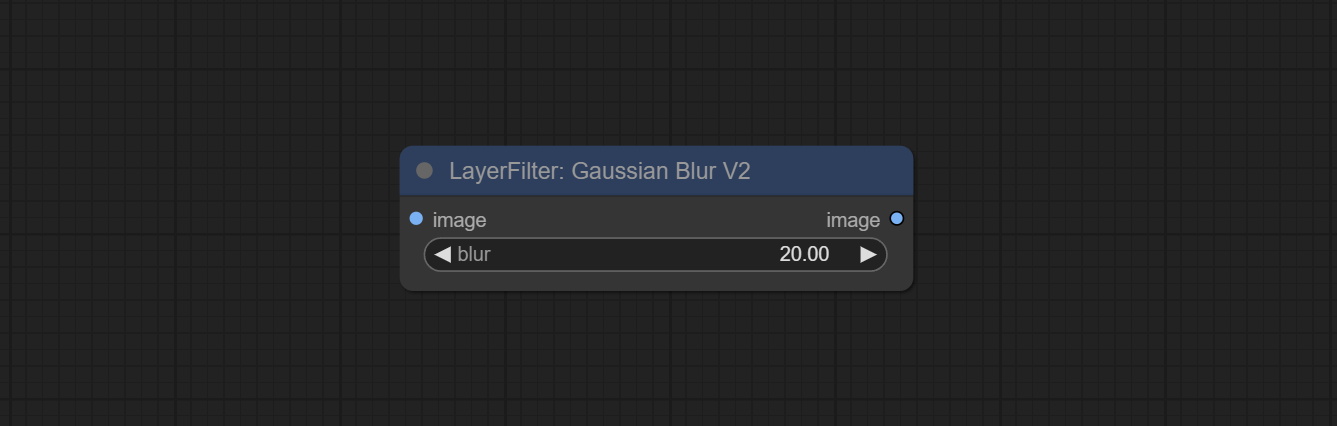
- blur: 模糊的大小,浮点数,范围 0–1000。
添加噪点
为图片添加噪点。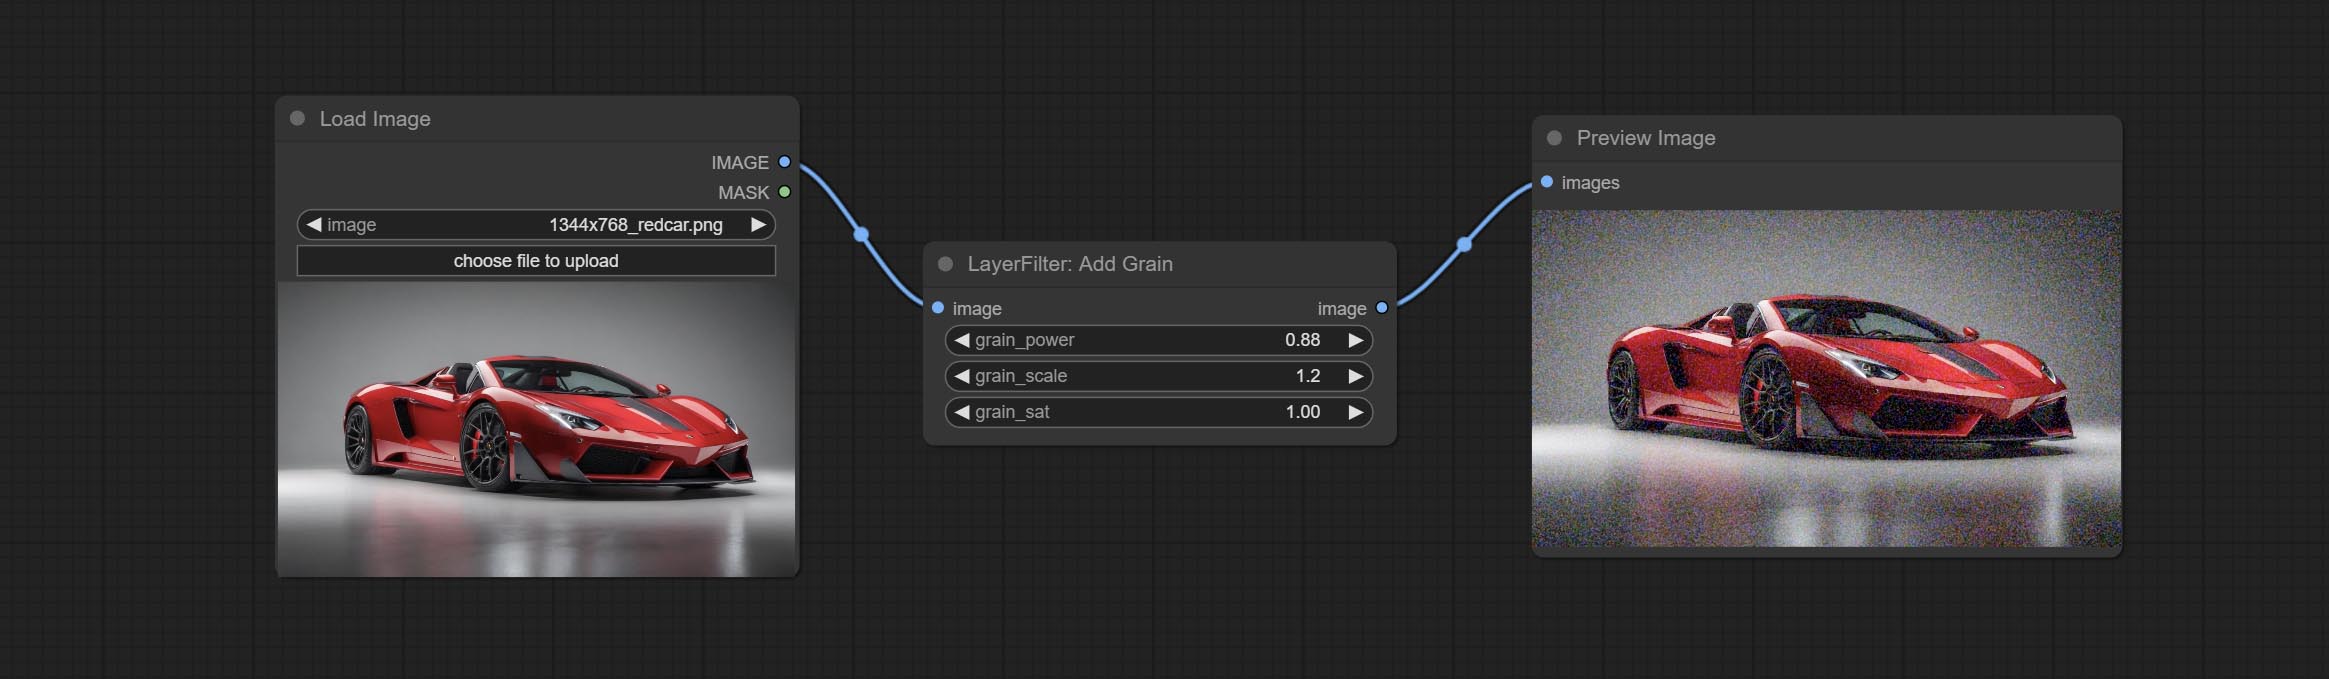
节点选项: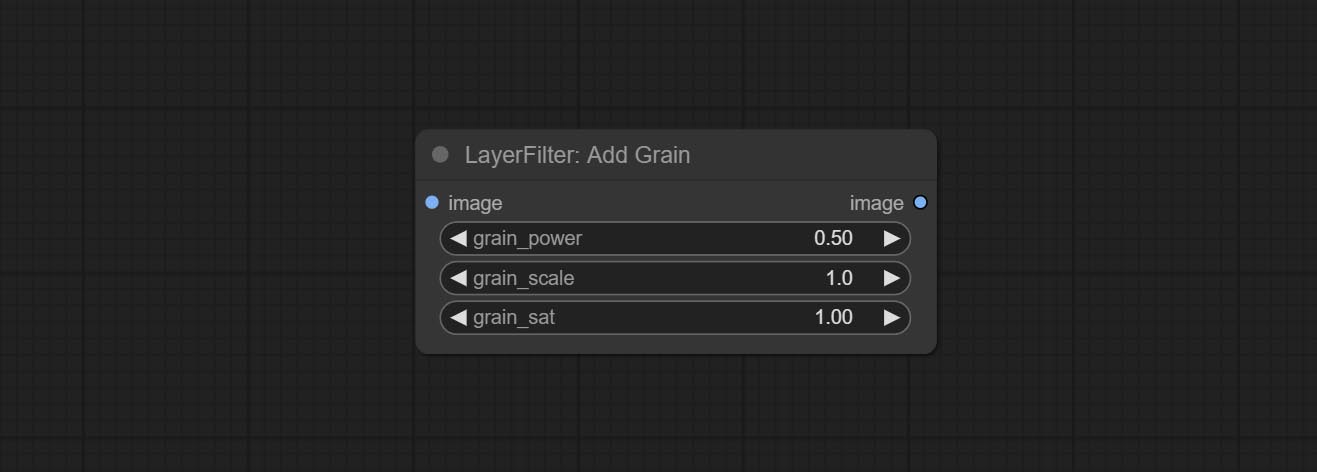
- grain_power: 噪点强度。
- grain_scale: 噪点大小。
- grain_sat: 噪点的色彩饱和度。
扭曲置换
为材质图像生成位移变形效果。
节点选项: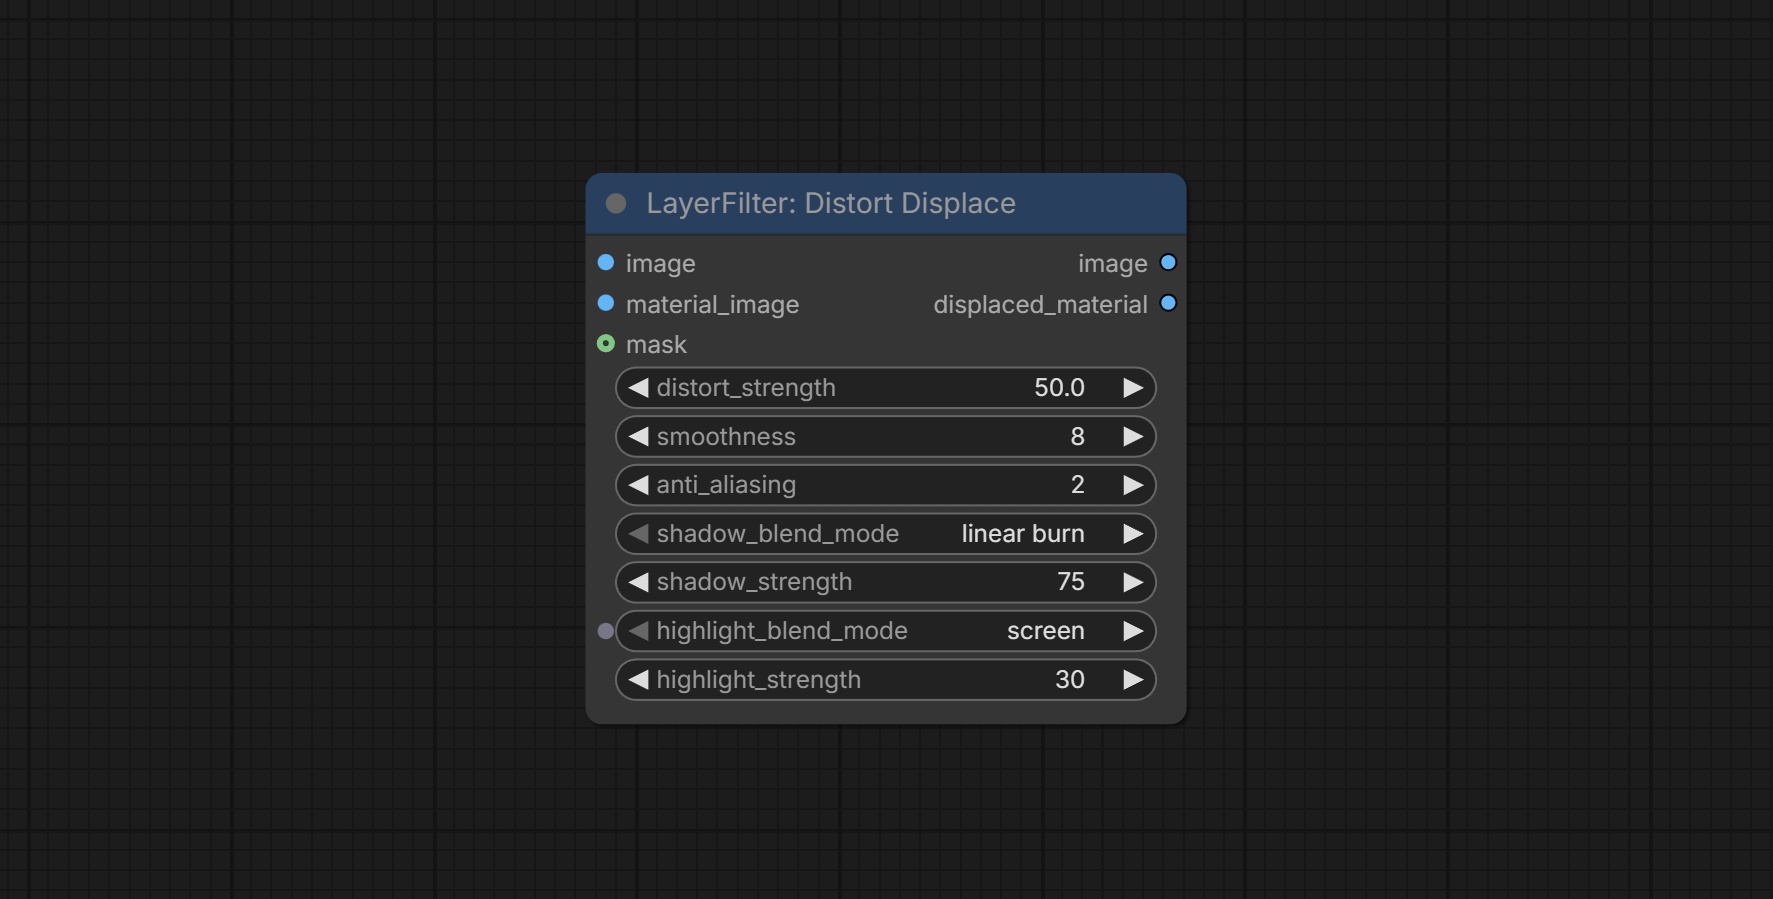
- image: 原始图像,基于该图像的灰度信息进行材质扭曲。
- material_image: 材质图像。该图像的尺寸应与原图像一致,否则会被强制调整大小。
- mask: 可选的遮罩输入。输出将仅包含遮罩区域内变形后的结果。
- distort_strength: 扭曲强度。
- smoothness: 扭曲的平滑度。
- anit_aliasing: 抗锯齿值。数值越高,生成速度会显著降低。
- shadow_blend_mode: 阴影部分的混合模式。
- shadow_strength: 阴影部分的混合透明度。
- highlight_blend_mode: 亮部部分的混合模式。
- highlight_strength: 亮部部分的混合透明度。
输出:
- image: 输出图像。
- displaced_material: 材质图像的变形结果。
注释用于 notes
1 layer_image、layer_mask 以及 background_image(如果已输入),这三项必须具有相同的尺寸。
2 mask 并非必填项。默认情况下会使用图像的 Alpha 通道。如果输入的图像不包含 Alpha 通道,则会自动创建整个图像的 Alpha 通道。若同时输入了 mask,则 Alpha 通道将被 mask 覆盖。
3 混合模式 包括 正常、正片叠底、屏幕、添加、减去、差值、变暗、颜色加深、颜色减淡、线性加深、线性减淡、叠加、柔光、强光、亮光、点光、线性光和硬混,共计 19 种混合模式。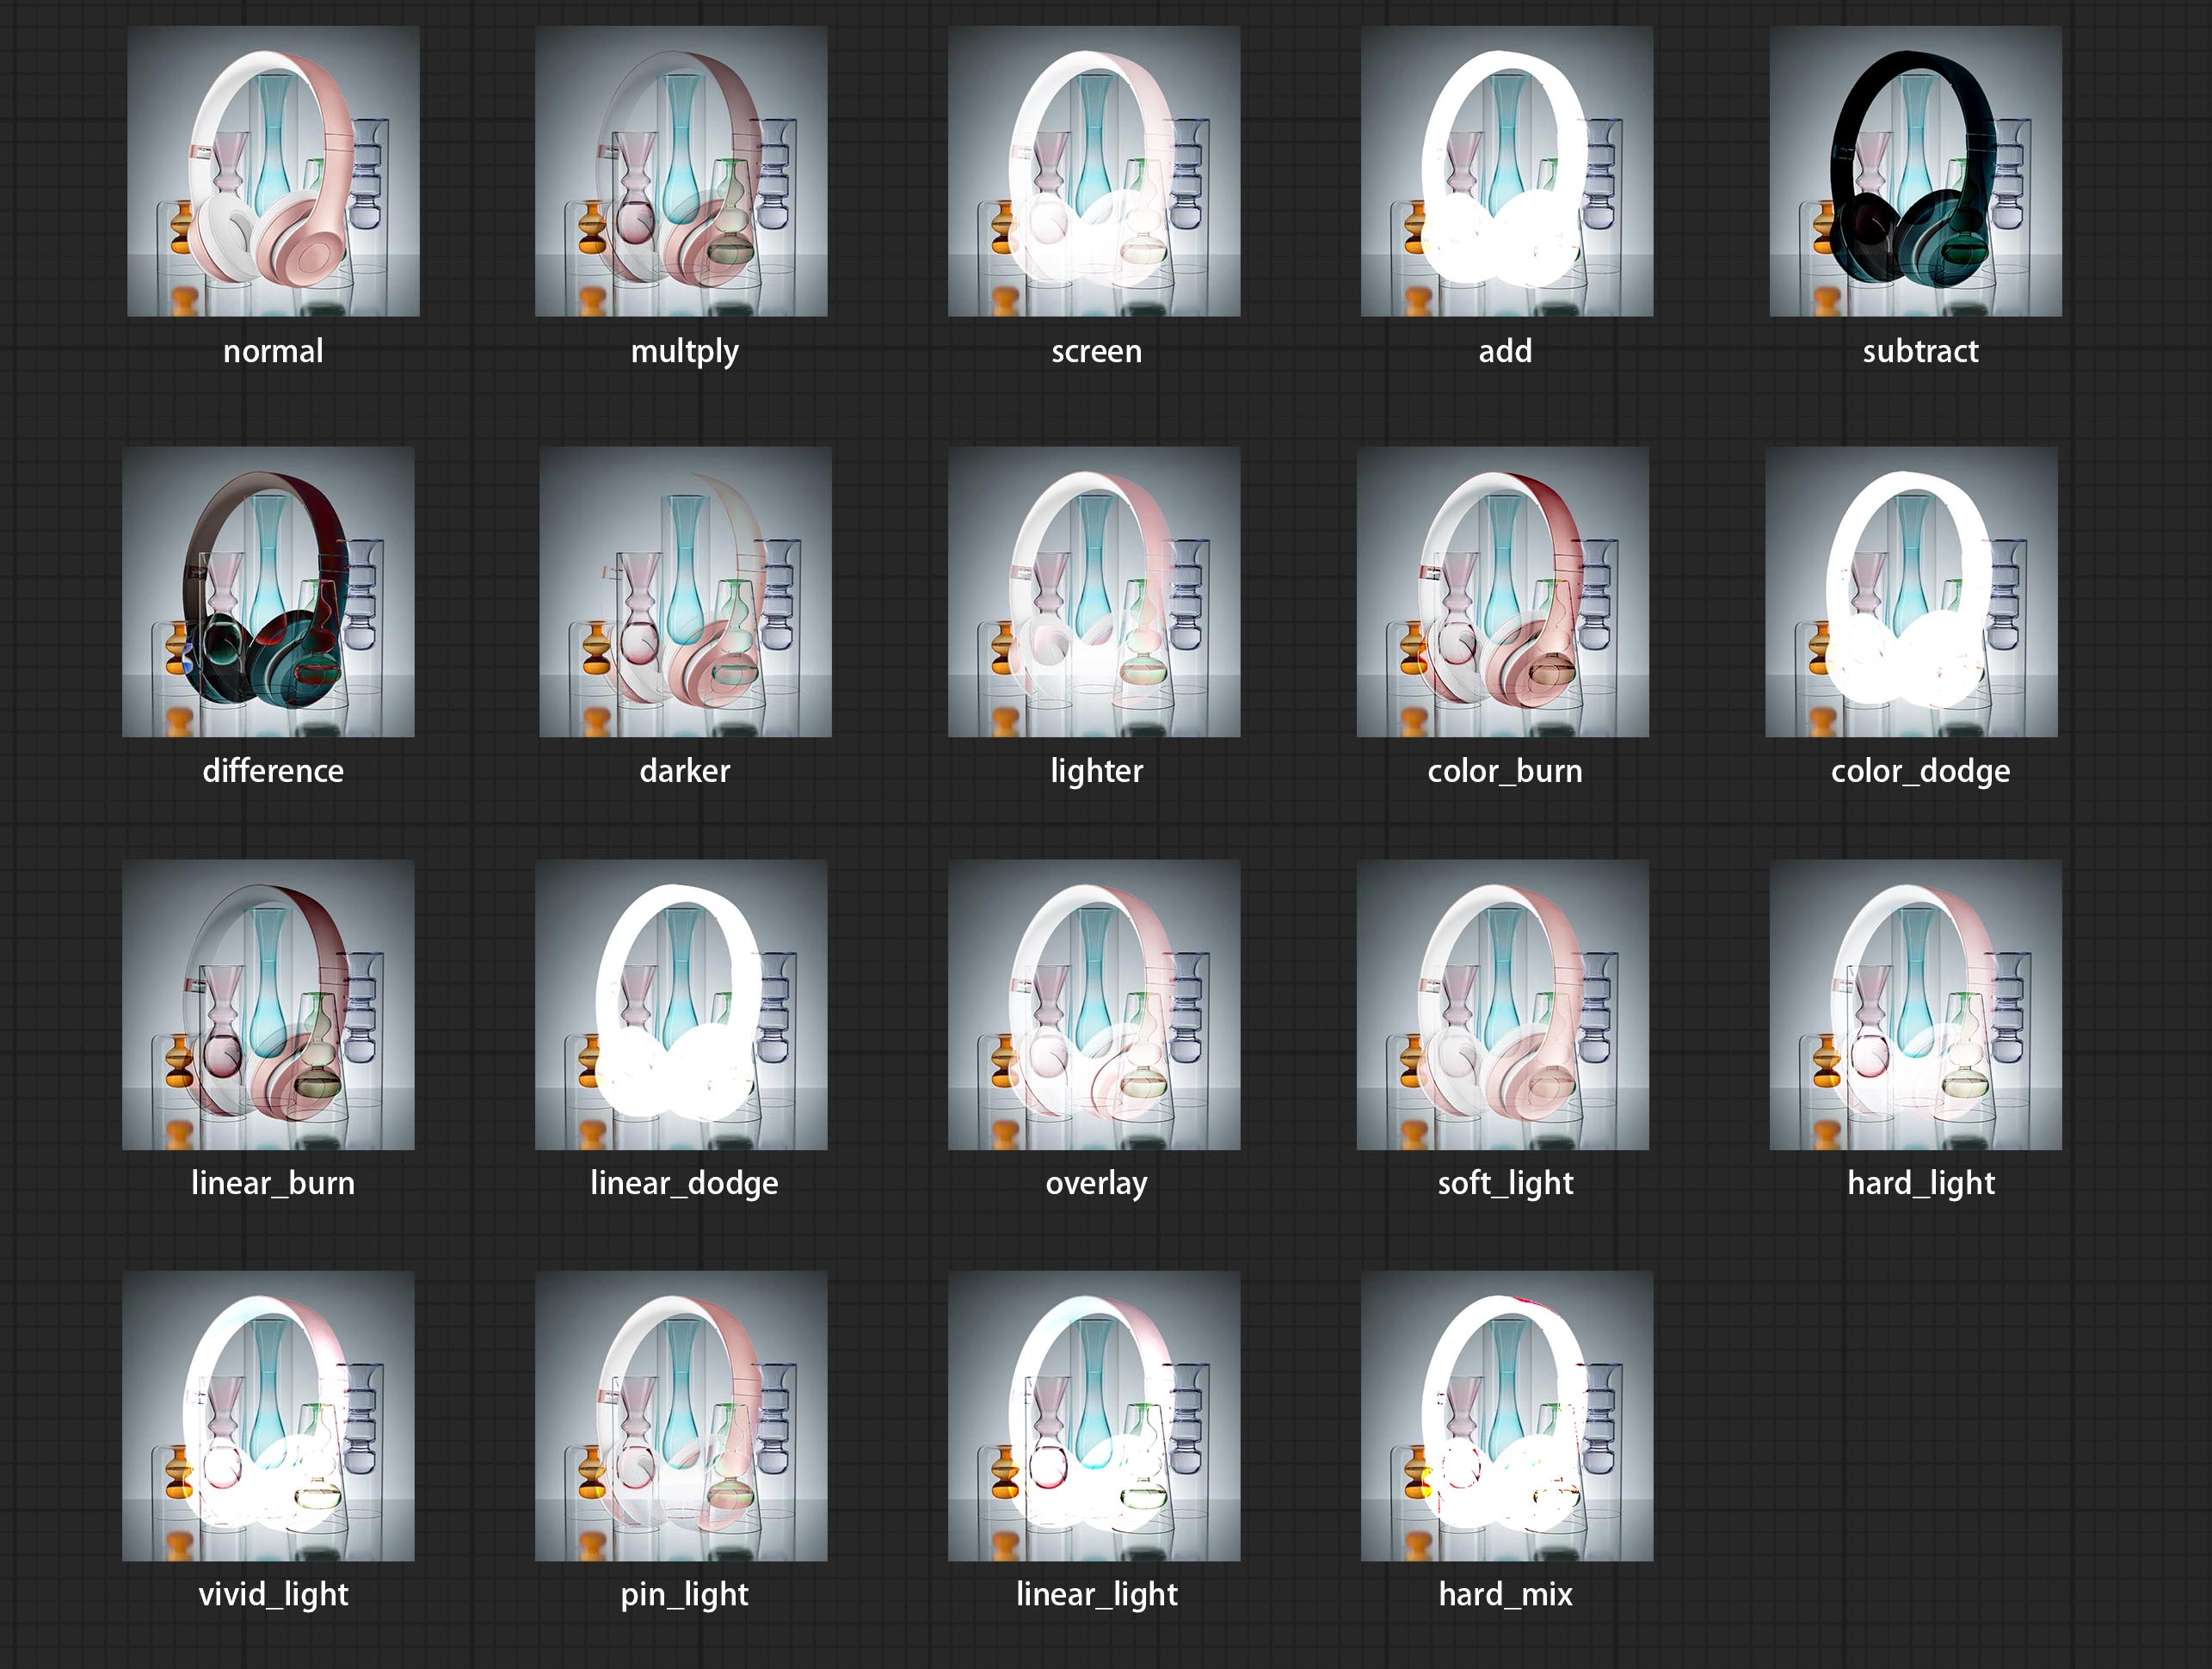
*混合模式预览
3 BlendModeV2 包括 正常、溶解、变暗、正片叠底、颜色加深、线性加深、深色、变亮、屏幕、颜色减淡、线性减淡(加法)、浅色、滤色、叠加、柔光、强光、亮光、线性光、点光、硬混、差值、排除、减去、除法、色相、饱和度、颜色、明度、颗粒提取、颗粒合并,共计 30 种混合模式。
BlendMode V2 的部分代码来源于 Virtuoso Nodes for ComfyUI。感谢原作者。
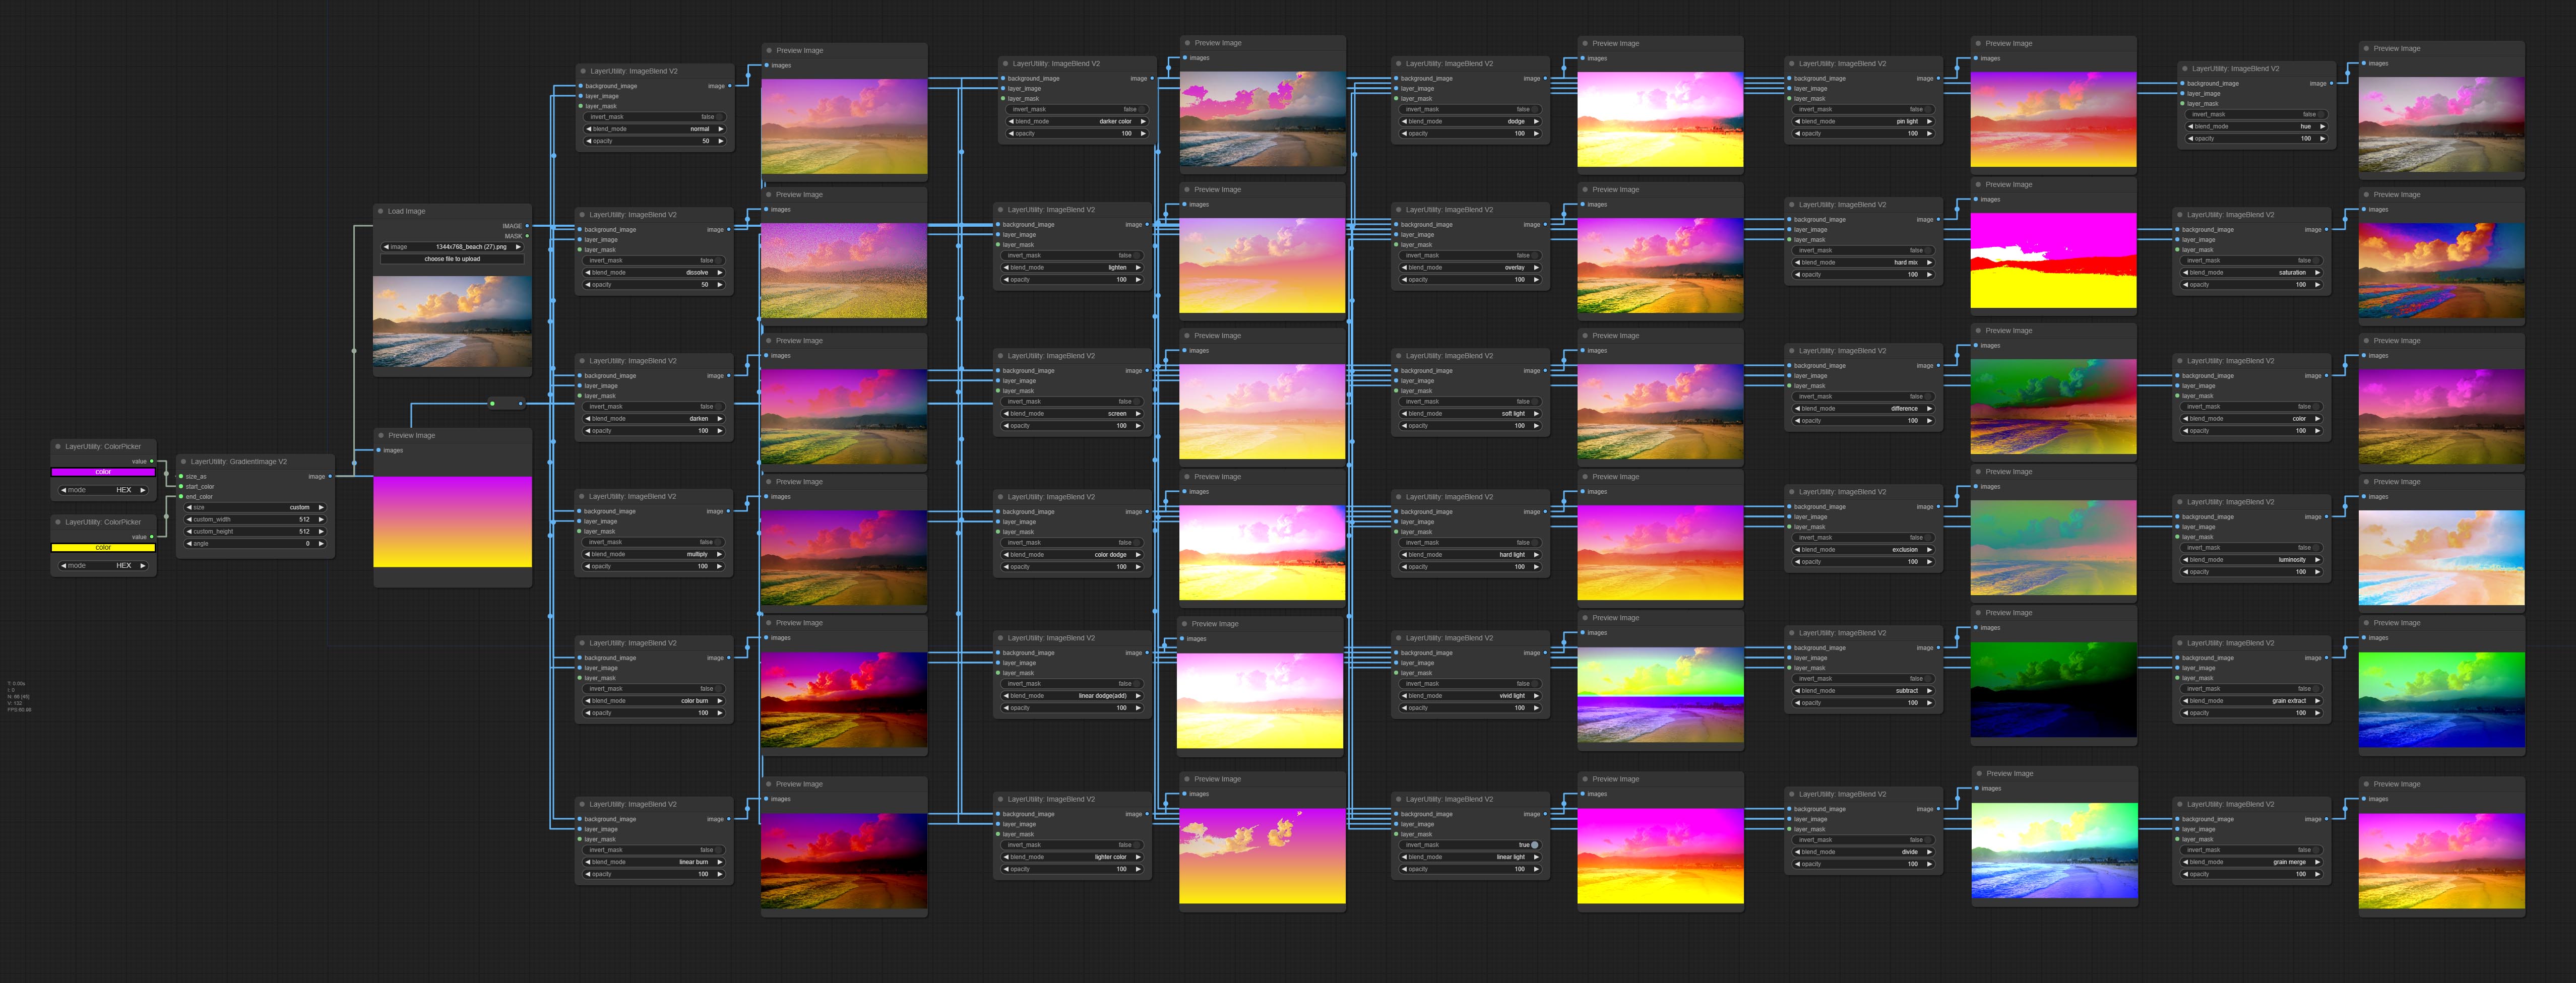
*Blend Mode V2 预览
4 RGB 颜色采用十六进制 RGB 格式表示,例如 '#FA3D86'。
5 layer_image 和 layer_mask 必须具有相同的尺寸。
星标

声明
LayerStyle 节点遵循 MIT 许可证,其部分功能代码来自其他开源项目。感谢原作者。如用于商业用途,请参考原项目的许可证以获取授权协议。
常见问题
相似工具推荐
openclaw
OpenClaw 是一款专为个人打造的本地化 AI 助手,旨在让你在自己的设备上拥有完全可控的智能伙伴。它打破了传统 AI 助手局限于特定网页或应用的束缚,能够直接接入你日常使用的各类通讯渠道,包括微信、WhatsApp、Telegram、Discord、iMessage 等数十种平台。无论你在哪个聊天软件中发送消息,OpenClaw 都能即时响应,甚至支持在 macOS、iOS 和 Android 设备上进行语音交互,并提供实时的画布渲染功能供你操控。 这款工具主要解决了用户对数据隐私、响应速度以及“始终在线”体验的需求。通过将 AI 部署在本地,用户无需依赖云端服务即可享受快速、私密的智能辅助,真正实现了“你的数据,你做主”。其独特的技术亮点在于强大的网关架构,将控制平面与核心助手分离,确保跨平台通信的流畅性与扩展性。 OpenClaw 非常适合希望构建个性化工作流的技术爱好者、开发者,以及注重隐私保护且不愿被单一生态绑定的普通用户。只要具备基础的终端操作能力(支持 macOS、Linux 及 Windows WSL2),即可通过简单的命令行引导完成部署。如果你渴望拥有一个懂你
stable-diffusion-webui
stable-diffusion-webui 是一个基于 Gradio 构建的网页版操作界面,旨在让用户能够轻松地在本地运行和使用强大的 Stable Diffusion 图像生成模型。它解决了原始模型依赖命令行、操作门槛高且功能分散的痛点,将复杂的 AI 绘图流程整合进一个直观易用的图形化平台。 无论是希望快速上手的普通创作者、需要精细控制画面细节的设计师,还是想要深入探索模型潜力的开发者与研究人员,都能从中获益。其核心亮点在于极高的功能丰富度:不仅支持文生图、图生图、局部重绘(Inpainting)和外绘(Outpainting)等基础模式,还独创了注意力机制调整、提示词矩阵、负向提示词以及“高清修复”等高级功能。此外,它内置了 GFPGAN 和 CodeFormer 等人脸修复工具,支持多种神经网络放大算法,并允许用户通过插件系统无限扩展能力。即使是显存有限的设备,stable-diffusion-webui 也提供了相应的优化选项,让高质量的 AI 艺术创作变得触手可及。
opencode
OpenCode 是一款开源的 AI 编程助手(Coding Agent),旨在像一位智能搭档一样融入您的开发流程。它不仅仅是一个代码补全插件,而是一个能够理解项目上下文、自主规划任务并执行复杂编码操作的智能体。无论是生成全新功能、重构现有代码,还是排查难以定位的 Bug,OpenCode 都能通过自然语言交互高效完成,显著减少开发者在重复性劳动和上下文切换上的时间消耗。 这款工具专为软件开发者、工程师及技术研究人员设计,特别适合希望利用大模型能力来提升编码效率、加速原型开发或处理遗留代码维护的专业人群。其核心亮点在于完全开源的架构,这意味着用户可以审查代码逻辑、自定义行为策略,甚至私有化部署以保障数据安全,彻底打破了传统闭源 AI 助手的“黑盒”限制。 在技术体验上,OpenCode 提供了灵活的终端界面(Terminal UI)和正在测试中的桌面应用程序,支持 macOS、Windows 及 Linux 全平台。它兼容多种包管理工具,安装便捷,并能无缝集成到现有的开发环境中。无论您是追求极致控制权的资深极客,还是渴望提升产出的独立开发者,OpenCode 都提供了一个透明、可信
ComfyUI
ComfyUI 是一款功能强大且高度模块化的视觉 AI 引擎,专为设计和执行复杂的 Stable Diffusion 图像生成流程而打造。它摒弃了传统的代码编写模式,采用直观的节点式流程图界面,让用户通过连接不同的功能模块即可构建个性化的生成管线。 这一设计巧妙解决了高级 AI 绘图工作流配置复杂、灵活性不足的痛点。用户无需具备编程背景,也能自由组合模型、调整参数并实时预览效果,轻松实现从基础文生图到多步骤高清修复等各类复杂任务。ComfyUI 拥有极佳的兼容性,不仅支持 Windows、macOS 和 Linux 全平台,还广泛适配 NVIDIA、AMD、Intel 及苹果 Silicon 等多种硬件架构,并率先支持 SDXL、Flux、SD3 等前沿模型。 无论是希望深入探索算法潜力的研究人员和开发者,还是追求极致创作自由度的设计师与资深 AI 绘画爱好者,ComfyUI 都能提供强大的支持。其独特的模块化架构允许社区不断扩展新功能,使其成为当前最灵活、生态最丰富的开源扩散模型工具之一,帮助用户将创意高效转化为现实。
gemini-cli
gemini-cli 是一款由谷歌推出的开源 AI 命令行工具,它将强大的 Gemini 大模型能力直接集成到用户的终端环境中。对于习惯在命令行工作的开发者而言,它提供了一条从输入提示词到获取模型响应的最短路径,无需切换窗口即可享受智能辅助。 这款工具主要解决了开发过程中频繁上下文切换的痛点,让用户能在熟悉的终端界面内直接完成代码理解、生成、调试以及自动化运维任务。无论是查询大型代码库、根据草图生成应用,还是执行复杂的 Git 操作,gemini-cli 都能通过自然语言指令高效处理。 它特别适合广大软件工程师、DevOps 人员及技术研究人员使用。其核心亮点包括支持高达 100 万 token 的超长上下文窗口,具备出色的逻辑推理能力;内置 Google 搜索、文件操作及 Shell 命令执行等实用工具;更独特的是,它支持 MCP(模型上下文协议),允许用户灵活扩展自定义集成,连接如图像生成等外部能力。此外,个人谷歌账号即可享受免费的额度支持,且项目基于 Apache 2.0 协议完全开源,是提升终端工作效率的理想助手。
markitdown
MarkItDown 是一款由微软 AutoGen 团队打造的轻量级 Python 工具,专为将各类文件高效转换为 Markdown 格式而设计。它支持 PDF、Word、Excel、PPT、图片(含 OCR)、音频(含语音转录)、HTML 乃至 YouTube 链接等多种格式的解析,能够精准提取文档中的标题、列表、表格和链接等关键结构信息。 在人工智能应用日益普及的今天,大语言模型(LLM)虽擅长处理文本,却难以直接读取复杂的二进制办公文档。MarkItDown 恰好解决了这一痛点,它将非结构化或半结构化的文件转化为模型“原生理解”且 Token 效率极高的 Markdown 格式,成为连接本地文件与 AI 分析 pipeline 的理想桥梁。此外,它还提供了 MCP(模型上下文协议)服务器,可无缝集成到 Claude Desktop 等 LLM 应用中。 这款工具特别适合开发者、数据科学家及 AI 研究人员使用,尤其是那些需要构建文档检索增强生成(RAG)系统、进行批量文本分析或希望让 AI 助手直接“阅读”本地文件的用户。虽然生成的内容也具备一定可读性,但其核心优势在于为机器