auto-tinder
auto-tinder 是一个旨在训练人工智能自动为你玩 Tinder 的趣味开源项目。它通过分析 Tinder 网页的内部 API 调用,结合 Python 和 TensorFlow 构建了一套自动化系统。这套系统不仅能下载附近用户的照片,还能利用预训练的 Inceptionv3 深度卷积神经网络来识别图片中的人物,并学习你的个人偏好,从而自动执行点赞或划走的决策。
auto-tinder 主要解决了手动浏览交友软件耗时费力的痛点,但其核心定位是教育与实验。它非常适合对计算机视觉、API 逆向工程以及强化学习感兴趣的开发者或研究人员参考。通过 auto-tinder,你可以深入了解如何从前端抓包分析接口,再到后端模型训练的全流程。
值得注意的是,auto-tinder 明确声明仅供娱乐和学习用途,严禁用于实际账号操作,因为这违反了 Tinder 的服务条款。如果你是技术爱好者,想探索 AI 在交互决策上的潜力,或者需要学习图像分类与 API 封装的技术实践,auto-tinder 的代码库将提供非常有价值的思路。但请务必遵守平台规则,切勿滥用。
使用场景
某位生活在一线城市的资深程序员,工作繁忙且对技术充满好奇。他希望能找到能理解自己偏好的伴侣,但苦于没有时间精力。
没有 auto-tinder 时
- 每天通勤路上需手动滑动数百次,消耗大量宝贵休息时间且易产生视觉疲劳
- 纯凭直觉判断颜值与兴趣,缺乏客观标准导致匹配质量参差不齐,浪费情感投入
- 难以从海量图片中快速定位目标人物,容易错过合适人选或陷入无效信息过载
- 反复查看相同类型的资料,无法建立稳定的筛选逻辑,导致决策效率低下
使用 auto-tinder 后
- 利用 Python 构建 API 包装类,自动模拟登录并执行点赞或跳过指令,解放双手
- 通过 TensorFlow 重训 Inceptionv3 网络,让 AI 精准学习个人审美偏好,越用越懂你
- 结合物体检测 API 预处理图像,只截取人物主体进行高效分类,减少背景干扰
- 系统全天候自动运行,将原本需要数小时的筛选工作压缩至几分钟完成,专注生活
核心价值在于将主观的择偶决策转化为可量化的自动化流程,极大提升了筛选效率与准确性。
运行环境要求
- 未说明
未说明
未说明

快速开始
Auto-Tinder - 训练 AI 帮你刷 Tinder(约会应用)
Auto-tinder 旨在利用 TensorFlow(一种机器学习框架)和 Python3 训练一个 API(应用程序编程接口),该 API 能够学习你的兴趣,并自动为你完成 Tinder(约会应用)的滑动匹配游戏。

在这份文档中,我将介绍创建 Auto-tinder 所需的以下步骤:
- 分析 Tinder 网页以找出 Tinder 进行的内部 API(应用程序编程接口)调用,在 Postman(API 测试工具)中重建这些 API 调用并分析其内容
- 用 Python 构建一个 API(应用程序编程接口)包装类,该类使用 Tinder API(应用程序编程接口)来执行喜欢/不喜欢/匹配等操作
- 下载一批附近人物的图片
- 编写一个简单的鼠标点击分类器来为我们的图片打标签
- 开发一个预处理器,利用 TensorFlow 目标检测 API(应用程序编程接口)仅裁剪出图片中的人物
- 重新训练 InceptionV3(一种深度卷积神经网络),使其在我们的分类数据上进行学习
- 结合分类器和 Tinder API(应用程序编程接口)包装类来为我们玩 Tinder
第 0 步:动机与免责声明
Auto-tinder 是一个纯粹为了娱乐和教育目的而创建的概念项目。它绝不应被滥用去伤害任何人或骚扰平台。Auto-tinder 脚本不应与您的 Tinder 个人资料配合使用,因为它们肯定违反了 Tinder 的服务条款(Terms of Service)。
我编写这段软件主要有两个主要原因:
- 因为我能做到,而且创造它很有趣 :)
- 我想弄清楚 AI 是否真的能够学习我对异性的偏好,并成为我可靠的左右滑动伴侣。
- (纯属虚构的理由:我是个懒人,为什么不投入 15 小时编写 Auto-tinder + 5 小时标注所有图片,从而节省我自己实际刷 Tinder 的几个小时呢?对我来说这听起来是一笔划算的交易!)
第一步:分析 Tinder API (应用程序接口)
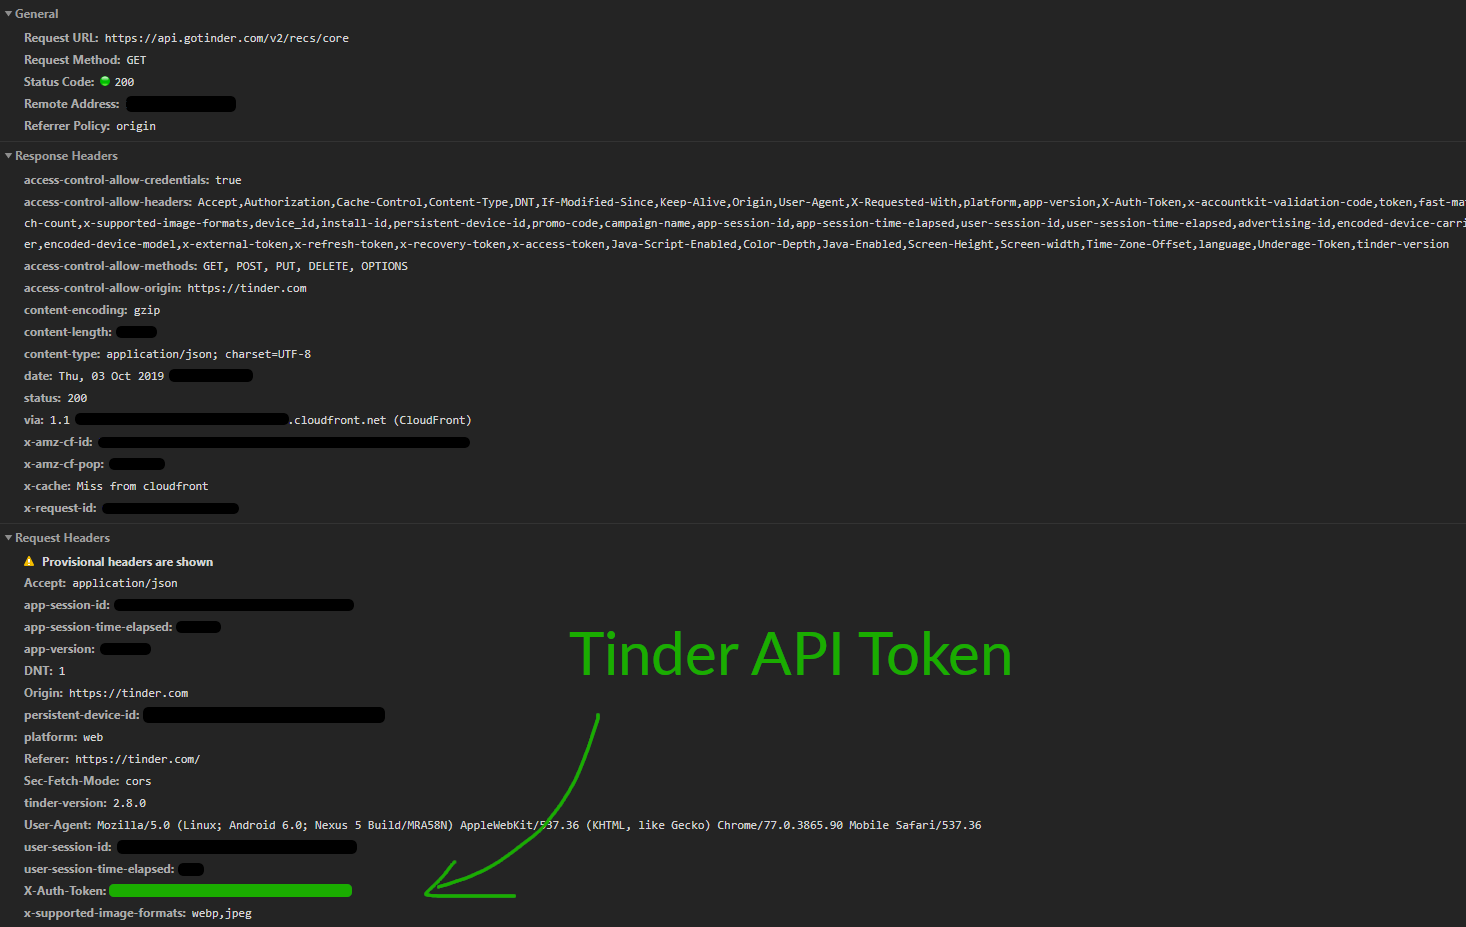
第一步是找出 Tinder 应用程序如何与其后端服务器通信。由于 Tinder 提供了其门户的网页版本,这很简单,只需访问 tinder.com,打开 Chrome DevTools 并快速查看网络协议即可。

上图显示的内容来自当 tinder.com 主页加载时发出的对 https://api.gotinder.com/v2/recs/core 的请求。显然,Tinder 拥有某种内部 API (应用程序接口),用于在前端和后端之间进行通信。
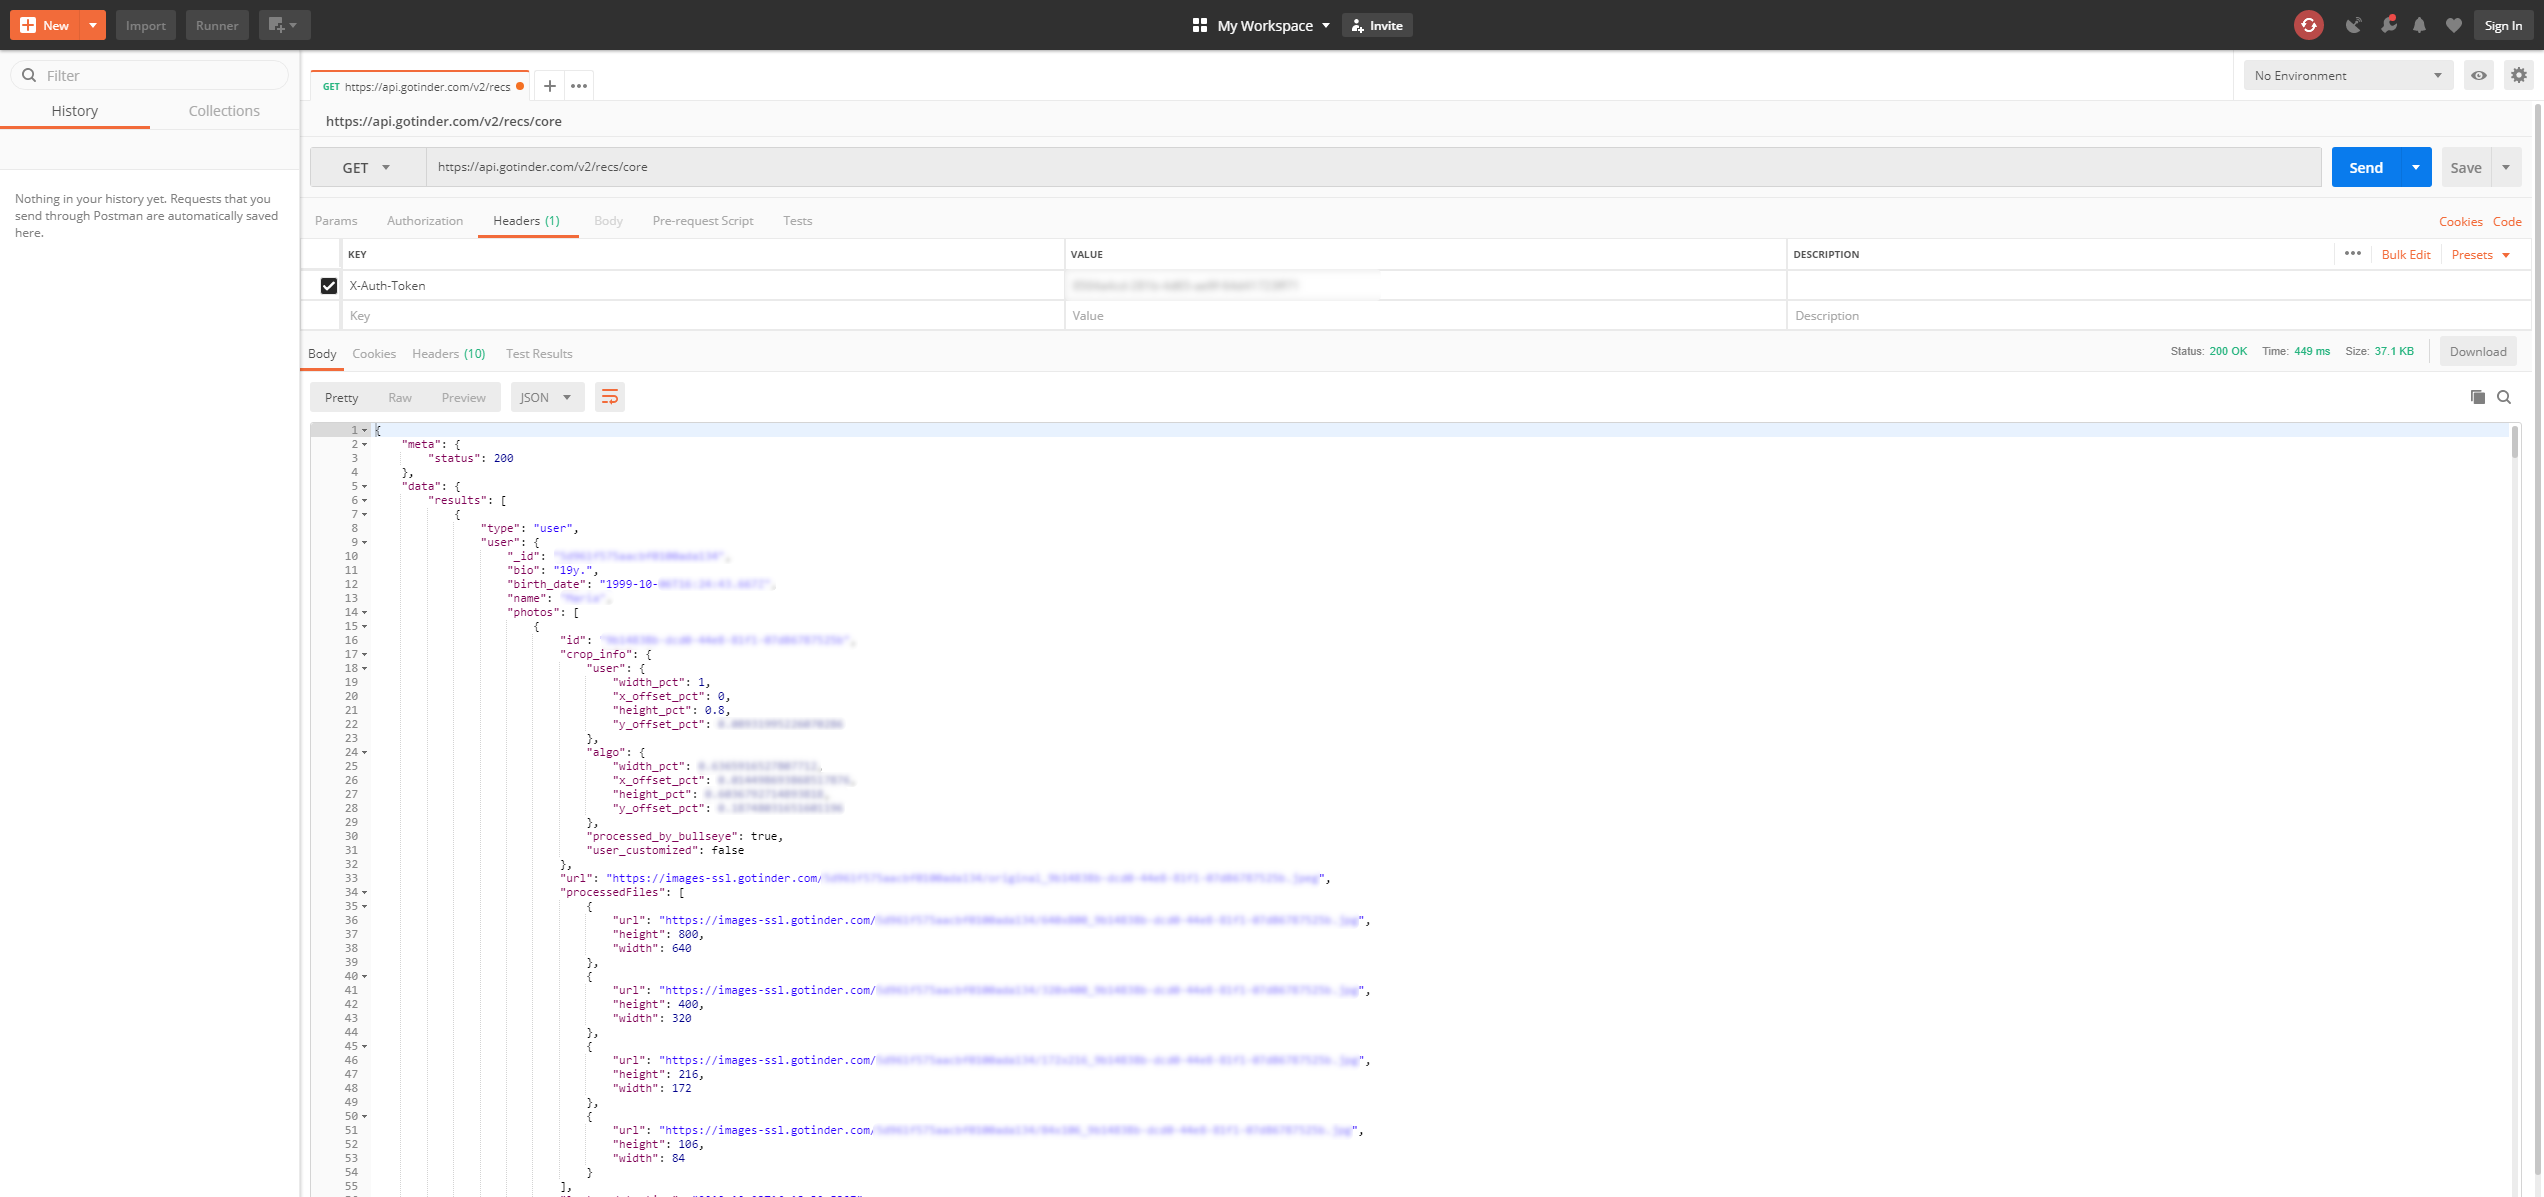
通过分析 /recs/core 的内容,可以清楚地看到这个 API 端点返回了附近用户个人资料列表。
数据包含(除许多其他字段外)以下数据:
{
    "meta": {
        "status": 200
    },
    "data": {
        "results": [
            {
                "type": "user",
                "user": {
                 "_id": "4adfwe547s8df64df",
                    "bio": "19y.",
                    "birth_date": "1997-17-06T18:21:44.654Z",
                    "name": "Anna",
                    "photos": [
                        {
                            "id": "879sdfert-lskdföj-8asdf879-987sdflkj",
                            "crop_info": {
                                "user": {
                                    "width_pct": 1,
                                    "x_offset_pct": 0,
                                    "height_pct": 0.8,
                                    "y_offset_pct": 0.08975463
                                },
                                "algo": {
                                    "width_pct": 0.45674357,
                                    "x_offset_pct": 0.984341657,
                                    "height_pct": 0.234165403,
                                    "y_offset_pct": 0.78902343
                                },
                                "processed_by_bullseye": true,
                                "user_customized": false
                            },
                            "url": "https://images-ssl.gotinder.com/4adfwe547s8df64df/original_879sdfert-lskdföj-8asdf879-987sdflkj.jpeg",
                            "processedFiles": [
                                {
                                    "url": "https://images-ssl.gotinder.com/4adfwe547s8df64df/640x800_879sdfert-lskdföj-8asdf879-987sdflkj.jpg",
                                    "height": 800,
                                    "width": 640
                                },
                                {
                                    "url": "https://images-ssl.gotinder.com/4adfwe547s8df64df/320x400_879sdfert-lskdföj-8asdf879-987sdflkj.jpg",
                                    "height": 400,
                                    "width": 320
                                },
                                {
                                    "url": "https://images-ssl.gotinder.com/4adfwe547s8df64df/172x216_879sdfert-lskdföj-8asdf879-987sdflkj.jpg",
                                    "height": 216,
                                    "width": 172
                                },
                                {
                                    "url": "https://images-ssl.gotinder.com/4adfwe547s8df64df/84x106_879sdfert-lskdföj-8asdf879-987sdflkj.jpg",
                                    "height": 106,
                                    "width": 84
                                }
                            ],
                            "last_update_time": "2019-10-03T16:18:30.532Z",
                            "fileName": "879sdfert-lskdföj-8asdf879-987sdflkj.webp",
                            "extension": "jpg,webp",
                            "webp_qf": [
                                75
                            ]
                        }
                    ],
                    "gender": 1,
                    "jobs": [],
                    "schools": [],
                    "show_gender_on_profile": false
                },
                "facebook": {
                    "common_connections": [],
                    "connection_count": 0,
                    "common_interests": []
                },
                "spotify": {
                    "spotify_connected": false
                },
                "distance_mi": 1,
                "content_hash": "slkadjfiuwejsdfuzkejhrsdbfskdzufiuerwer",
                "s_number": 9876540657341,
                "teaser": {
                    "string": ""
                },
                "teasers": [],
                "snap": {
                    "snaps": []
                }
            }
        ]
    }
}
这里有几点非常有趣 (注意我已更改所有数据以不侵犯此人的隐私):
- 所有图片均可公开访问。如果你复制图片 URL 并在无痕窗口中打开它,它仍然会立即加载——这意味着 Tinder 将所有用户图片公开上传到互联网,任何人都可以看到。
- 通过 API (应用程序接口) 可访问的原始照片分辨率极高。如果你向 Tinder 上传照片,他们会对应用内使用进行缩放,但他们会将原始版本公开存储在服务器上,任何人都可以访问。
- 即使你选择“在个人资料中显示性别”,其他人仍可以通过 API (应用程序接口) 看到你的性别 ("gender": 1,其中 1=女性,0=男性)
- 如果你连续向 Tinder API (应用程序接口) 发送多个请求,你总是会得到不同的结果(例如不同的个人资料)。因此,我们可以简单地重复调用此端点来“采集”一批图片,稍后用于训练我们的神经网络。
通过分析请求头信息,我们很快找到了私有的 API 密钥:X-Auth-Token。
复制此令牌并转到 Postman,我们可以验证仅凭正确的 URL 和认证令牌,我们确实可以自由地与 Tinder API (应用程序接口) 通信。
通过点击 Tinder Web 应用的一些部分,我很快发现了所有相关的 API 端点:
| 类型 | URL | 描述 |
|---|---|---|
| GET | /v2/recs/core | 返回附近人员列表 |
| GET | /v2/profile?include=account%2Cuser | 返回关于您自己个人资料的所有信息 |
| GET | /v2/matches | 返回与您匹配的所有人员列表 |
| GET | /like/{user_id} | 喜欢给定 user_id 的人员 |
| GET | /pass/{user_id} | 跳过给定 user_id 的人员 |
第二步:在 Python 中构建 API(应用程序编程接口)封装
让我们开始进入代码部分。我们将使用 Python Requests 库与 API(应用程序编程接口)进行通信,并围绕它编写一个 API 封装类以便于使用。
同样,我们编写了一个小型的 Person 类,它接收来自 Tinder 的 API 响应以表示一个人员(Person),并为 tinder API 提供了一些基本接口。
让我们从 Person 类开始。它将接收 API 数据、一个 tinder-api 对象,并将所有相关数据保存到实例变量中。它还将提供一些基本功能,如“喜欢”或“不喜欢”,这些功能会向 tinder-api 发起请求,这使我们能够方便地使用 "some_person.like()" 来对我们感兴趣的个人资料点赞。
import datetime
from geopy.geocoders import Nominatim

TINDER_URL = "https://api.gotinder.com"
geolocator = Nominatim(user_agent="auto-tinder")
PROF_FILE = "./images/unclassified/profiles.txt"

class Person(object):

    def __init__(self, data, api):
        self._api = api

        self.id = data["_id"]
        self.name = data.get("name", "Unknown")

        self.bio = data.get("bio", "")
        self.distance = data.get("distance_mi", 0) / 1.60934

        self.birth_date = datetime.datetime.strptime(data["birth_date"], '%Y-%m-%dT%H:%M:%S.%fZ') if data.get(
            "birth_date", False) else None
        self.gender = ["Male", "Female", "Unknown"][data.get("gender", 2)]

        self.images = list(map(lambda photo: photo["url"], data.get("photos", [])))

        self.jobs = list(
            map(lambda job: {"title": job.get("title", {}).get("name"), "company": job.get("company", {}).get("name")}, data.get("jobs", [])))
        self.schools = list(map(lambda school: school["name"], data.get("schools", [])))

        if data.get("pos", False):
            self.location = geolocator.reverse(f'{data["pos"]["lat"]}, {data["pos"]["lon"]}')


    def __repr__(self):
        return f"{self.id}  -  {self.name} ({self.birth_date.strftime('%d.%m.%Y')})"


    def like(self):
        return self._api.like(self.id)

    def dislike(self):
        return self._api.dislike(self.id)
我们的 API 封装类不过是使用类 (Class) 来调用 tinder API 的一种更优雅的方式:
import requests

TINDER_URL = "https://api.gotinder.com"

class tinderAPI():

    def __init__(self, token):
        self._token = token

    def profile(self):
        data = requests.get(TINDER_URL + "/v2/profile?include=account%2Cuser", headers={"X-Auth-Token": self._token}).json()
        return Profile(data["data"], self)

    def matches(self, limit=10):
        data = requests.get(TINDER_URL + f"/v2/matches?count={limit}", headers={"X-Auth-Token": self._token}).json()
        return list(map(lambda match: Person(match["person"], self), data["data"]["matches"]))

    def like(self, user_id):
        data = requests.get(TINDER_URL + f"/like/{user_id}", headers={"X-Auth-Token": self._token}).json()
        return {
            "is_match": data["match"],
            "liked_remaining": data["likes_remaining"]
        }

    def dislike(self, user_id):
        requests.get(TINDER_URL + f"/pass/{user_id}", headers={"X-Auth-Token": self._token}).json()
        return True

    def nearby_persons(self):
        data = requests.get(TINDER_URL + "/v2/recs/core", headers={"X-Auth-Token": self._token}).json()
        return list(map(lambda user: Person(user["user"], self), data["data"]["results"]))
我们现在可以使用 API 查找附近的人并查看他们的个人资料,甚至可以给他们全部点赞。将 YOUR-API-TOKEN 替换为你之前在 chrome 开发者控制台中找到的 X-Auth-Token(令牌)。
if __name__ == "__main__":
    token = "YOUR-API-TOKEN"
    api = tinderAPI(token)

    while True:
        persons = api.nearby_persons()
        for person in persons:
            print(person)
            # person.like()
第三步:下载附近人员的图片
接下来,我们希望自动下载一些附近人员的图片,我们可以用它们来训练我们的 AI(人工智能)。这里的“一些”,我指的是大约 1500-2500 张图片。
首先,让我们在 Person 类中添加一个允许我们下载图片的函数。
# At the top of auto_tinder.py
PROF_FILE = "./images/unclassified/profiles.txt"

# inside the Person-class
    def download_images(self, folder=".", sleep_max_for=0):
        with open(PROF_FILE, "r") as f:
            lines = f.readlines()
            if self.id in lines:
                return
        with open(PROF_FILE, "a") as f:
            f.write(self.id+"\r\n")
        index = -1
        for image_url in self.images:
            index += 1
            req = requests.get(image_url, stream=True)
            if req.status_code == 200:
                with open(f"{folder}/{self.id}_{self.name}_{index}.jpeg", "wb") as f:
                    f.write(req.content)
            sleep(random()*sleep_max_for)
请注意,我在这里和那里添加了一些随机的休眠时间,因为如果我们向 tinder CDN(内容分发网络)发送过多请求并在几秒钟内下载大量图片,很可能会被封锁。
我们将所有人的个人资料 ID 写入名为 "profiles.txt" 的文件中。通过首先扫描文档以确定特定人员是否已经存在其中,我们可以跳过我们已经遇到过的人,并确保我们不会对同一个人进行分类多次(你稍后会明白为什么这是一个风险)。
我们现在只需遍历附近的人员并将他们的图片下载到 "unclassified" 文件夹中。
if __name__ == "__main__":
    token = "YOUR-API-TOKEN"
    api = tinderAPI(token)

    while True:
        persons = api.nearby_persons()
        for person in persons:
            person.download_images(folder="./images/unclassified", sleep_max_for=random()*3)
            sleep(random()*10)
        sleep(random()*10)
我们现在可以简单地启动此脚本并让其运行几个小时,以获取几百张附近人员的个人资料图片。如果你是 tinder PRO 用户,请时不时更新你的位置以获取新的人员。
步骤 4:手动分类图像
既然我们已经有了大量可供处理的图像,让我们构建一个非常简单且简陋的分类器。
它只需遍历我们 "未分类" 文件夹中的所有图像,并在 GUI(图形用户界面)窗口中打开图像。通过右键点击人物,我们可以将该人物标记为“不喜欢”,而左键点击则标记为“喜欢”。这将在文件名中体现:如果我们标记图像为“喜欢”,4tz3kjldfj3482.jpg 将被重命名为 1_4tz3kjldfj3482.jpg,否则为 0_4tz3kjldfj3482.jpg。标签“喜欢/不喜欢”在文件名的开头被编码为 1/0。
让我们使用 tkinter(Python 标准 GUI 库)快速编写这个 GUI:
from os import listdir, rename
from os.path import isfile, join
import tkinter as tk
from PIL import ImageTk, Image

IMAGE_FOLDER = "./images/unclassified"

images = [f for f in listdir(IMAGE_FOLDER) if isfile(join(IMAGE_FOLDER, f))]
unclassified_images = filter(lambda image: not (image.startswith("0_") or image.startswith("1_")), images)
current = None

def next_img():
    global current, unclassified_images
    try:
        current = next(unclassified_images)
    except StopIteration:
        root.quit()
    print(current)
    pil_img = Image.open(IMAGE_FOLDER+"/"+current)
    width, height = pil_img.size
    max_height = 1000
    if height > max_height:
        resize_factor = max_height / height
        pil_img = pil_img.resize((int(width*resize_factor), int(height*resize_factor)), resample=Image.LANCZOS)
    img_tk = ImageTk.PhotoImage(pil_img)
    img_label.img = img_tk
    img_label.config(image=img_label.img)

def positive(arg):
    global current
    rename(IMAGE_FOLDER+"/"+current, IMAGE_FOLDER+"/1_"+current)
    next_img()

def negative(arg):
    global current
    rename(IMAGE_FOLDER + "/" + current, IMAGE_FOLDER + "/0_" + current)
    next_img()


if __name__ == "__main__":

    root = tk.Tk()

    img_label = tk.Label(root)
    img_label.pack()
    img_label.bind("<Button-1>", positive)
    img_label.bind("<Button-3>", negative)

    btn = tk.Button(root, text='Next image', command=next_img)

    next_img() # load first image

    root.mainloop()
我们将所有未分类的图像加载到 "unclassified_images" 列表中,打开一个 tkinter 窗口,调用 next_img() 将第一张图像放入其中,并调整图像大小以适应屏幕。然后,我们注册两个点击事件,左键和右键鼠标按钮,并调用 positive/negative 函数,根据标签重命名图像并显示下一张图像。
虽然简陋但有效。
步骤 5:开发预处理器以仅裁剪出图像中的人物
对于下一步,我们需要将图像数据转换为允许我们进行分类的格式。鉴于我们的数据集,有一些困难需要考虑。
- 数据集大小: 我们的数据集相对较小。我们有大约 2000 张图像,考虑到它们的复杂性(高分辨率 RGB(红、绿、蓝颜色模式)图像),这被认为是非常少的数据量。
- 数据差异: 图片有时包含背面的人,有时只有脸,有时根本没有。
- 数据噪声: 大多数图片不仅包含人物本身,还经常包含周围环境,这可能干扰我们的 AI(人工智能)。
我们通过以下方式应对这些挑战:
- 将图像转换为灰度图 (greyscale),以减少我们的 AI 需要学习的信息量(从 RGB 到 G,减少因子为 3)。
- 仅裁剪出图像中包含人物的部分,其他什么都不保留。
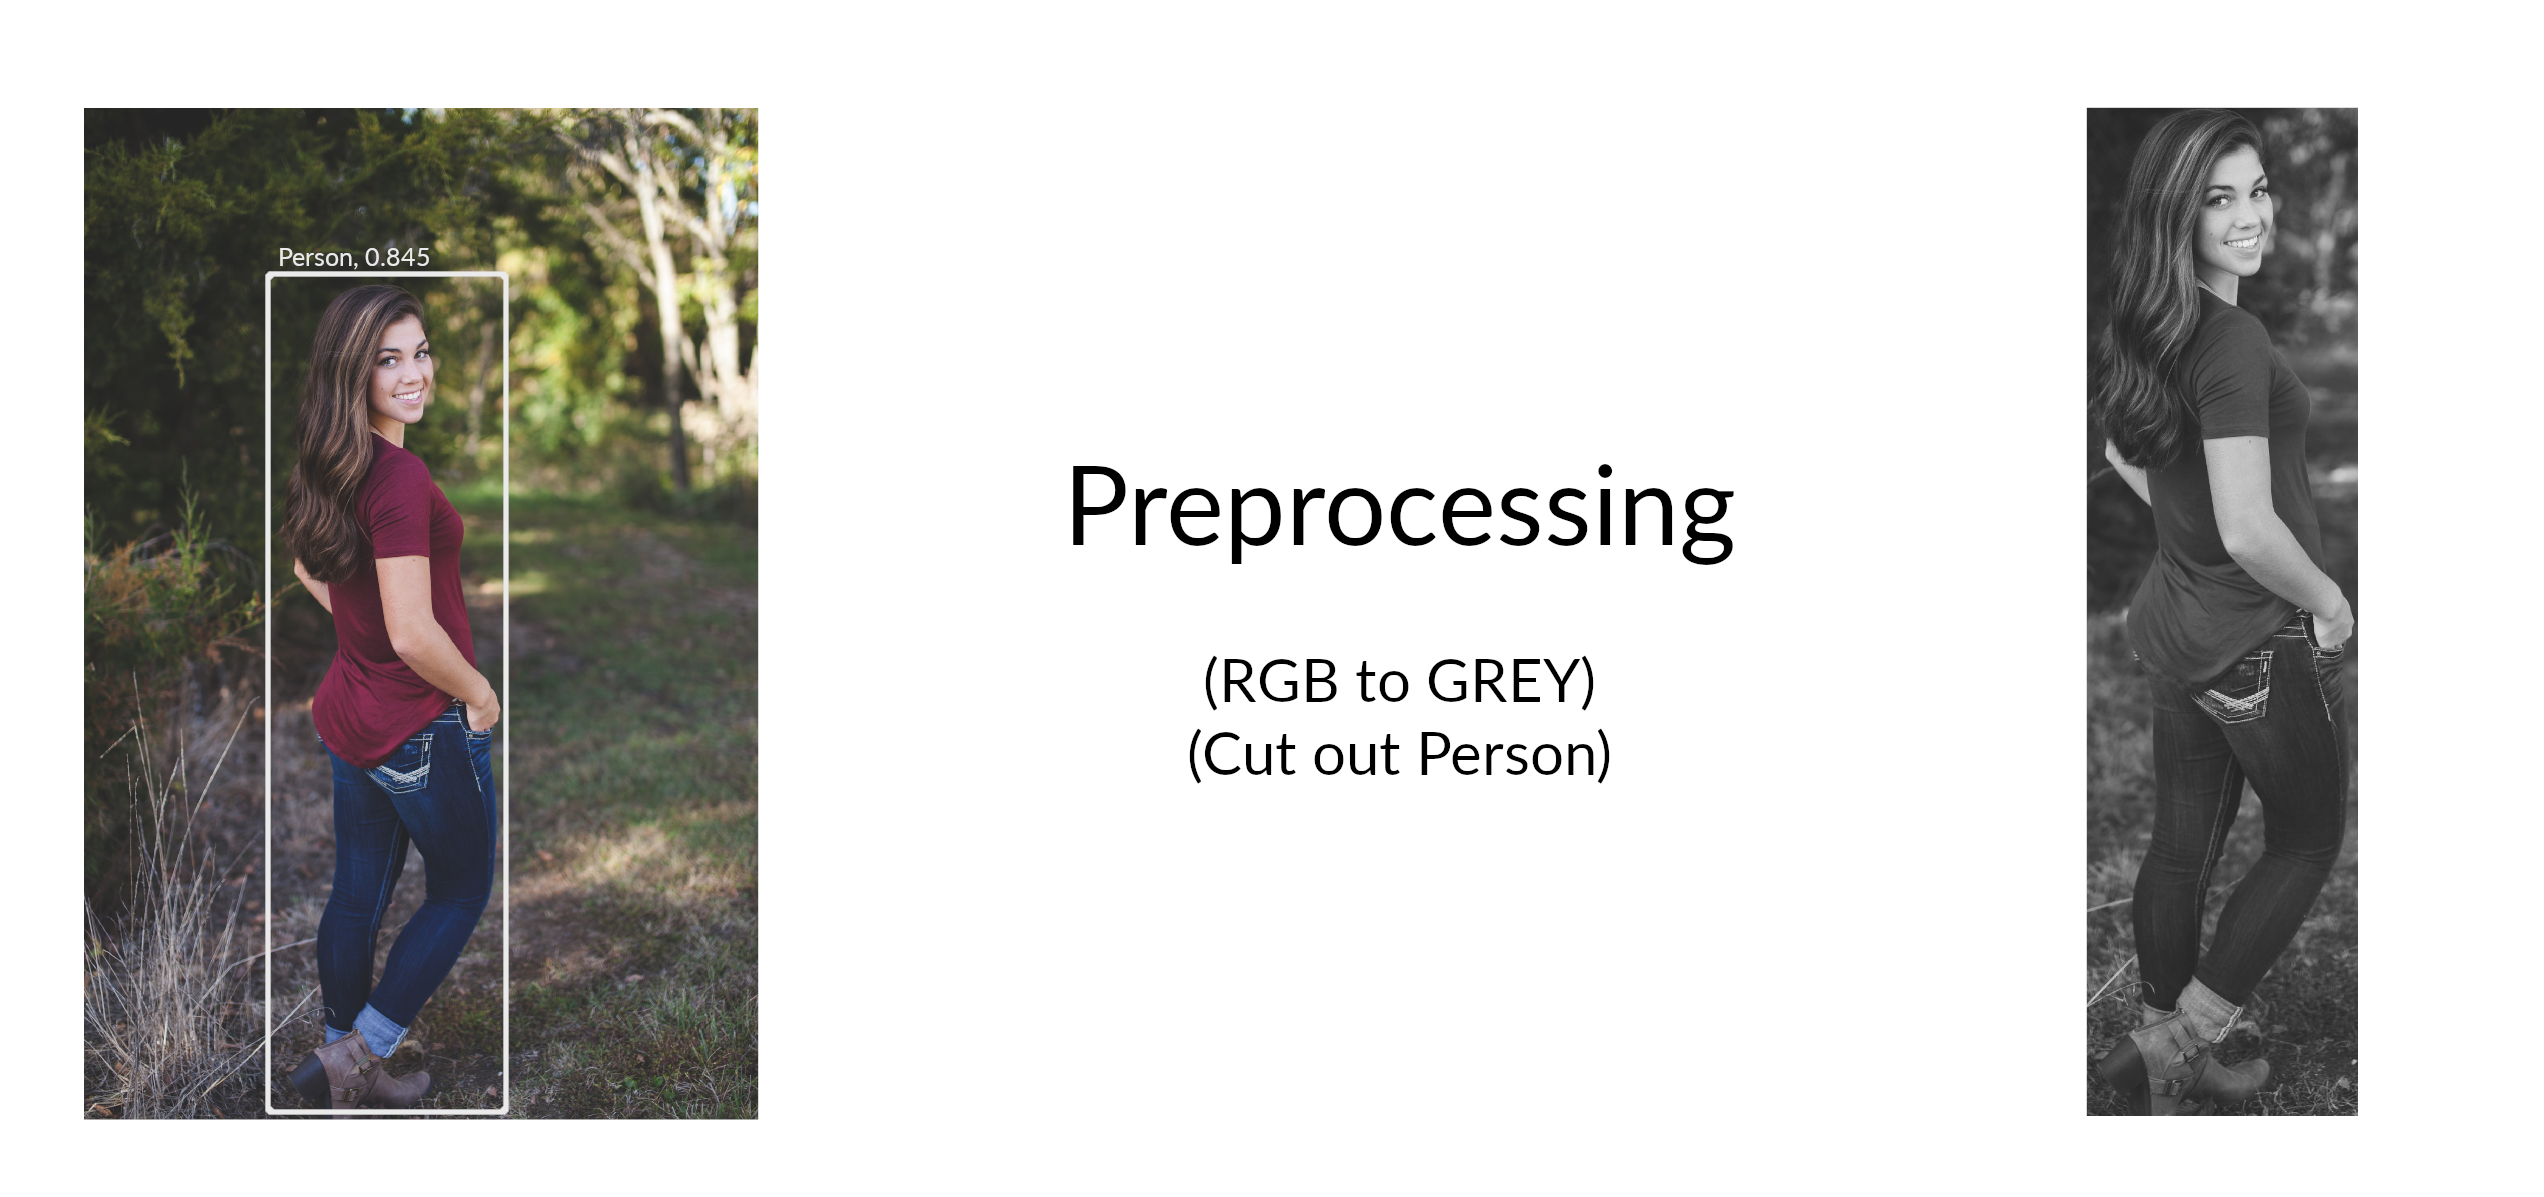
第一部分就像使用 Pillow(Python 图像处理库)打开图像并将其转换为灰度图一样简单。第二部分,我们使用 Tensorflow Object Detection API(TensorFlow 目标检测 API),采用 mobilenet(一种轻量级神经网络架构)网络架构,该架构在 coco 数据集(COCO 通用物体识别数据集)上进行了预训练,其中也包含“人物”标签。
我们的人脸检测脚本分为四个部分:
第一部分:将预训练的 mobilenet coco 数据集作为 Tensorflow 图打开
你可以在我的 Github 仓库中找到 tensorflow mobilenet coco 图的 .pb 文件。让我们将其作为 Tensorflow 图打开:
import tensorflow as tf

def open_graph():
    detection_graph = tf.Graph()
    with detection_graph.as_default():
        od_graph_def = tf.GraphDef()
        with tf.gfile.GFile('ssd_mobilenet_v1_coco_2017_11_17/frozen_inference_graph.pb', 'rb') as fid:
            serialized_graph = fid.read()
            od_graph_def.ParseFromString(serialized_graph)
            tf.import_graph_def(od_graph_def, name='')
    return detection_graph
第二部分:将图像加载为 numpy 数组
我们使用 Pillow 进行图像处理。由于 tensorflow(深度学习框架)需要原始 numpy(Python 数值计算库)数组来处理数据,让我们编写一个小函数将 Pillow 图像转换为 numpy 数组:
import numpy as np

def load_image_into_numpy_array(image):
    (im_width, im_height) = image.size
    return np.array(image.getdata()).reshape(
        (im_height, im_width, 3)).astype(np.uint8)
第 3 部分:调用目标检测 API(应用程序接口)
下一个函数接收一张图像和一个 TensorFlow 计算图(graph),使用它运行一个 TensorFlow 会话(session),并返回所有关于检测到的类别(对象类型)、边界框(bounding boxes)和得分(scores)的信息(即物体被正确检测的置信度)。
import numpy as np
from object_detection.utils import ops as utils_ops
import tensorflow as tf

def run_inference_for_single_image(image, sess):
    ops = tf.get_default_graph().get_operations()
    all_tensor_names = {output.name for op in ops for output in op.outputs}
    tensor_dict = {}
    for key in [
        'num_detections', 'detection_boxes', 'detection_scores',
        'detection_classes', 'detection_masks'
    ]:
        tensor_name = key + ':0'
        if tensor_name in all_tensor_names:
            tensor_dict[key] = tf.get_default_graph().get_tensor_by_name(
                tensor_name)
    if 'detection_masks' in tensor_dict:
        # The following processing is only for single image
        detection_boxes = tf.squeeze(tensor_dict['detection_boxes'], [0])
        detection_masks = tf.squeeze(tensor_dict['detection_masks'], [0])
        # Reframe is required to translate mask from box coordinates to image coordinates and fit the image size.
        real_num_detection = tf.cast(tensor_dict['num_detections'][0], tf.int32)
        detection_boxes = tf.slice(detection_boxes, [0, 0], [real_num_detection, -1])
        detection_masks = tf.slice(detection_masks, [0, 0, 0], [real_num_detection, -1, -1])
        detection_masks_reframed = utils_ops.reframe_box_masks_to_image_masks(
            detection_masks, detection_boxes, image.shape[1], image.shape[2])
        detection_masks_reframed = tf.cast(
            tf.greater(detection_masks_reframed, 0.5), tf.uint8)
        # Follow the convention by adding back the batch dimension
        tensor_dict['detection_masks'] = tf.expand_dims(
            detection_masks_reframed, 0)
    image_tensor = tf.get_default_graph().get_tensor_by_name('image_tensor:0')

    # Run inference
    output_dict = sess.run(tensor_dict,
                           feed_dict={image_tensor: image})

    # all outputs are float32 numpy arrays, so convert types as appropriate
    output_dict['num_detections'] = int(output_dict['num_detections'][0])
    output_dict['detection_classes'] = output_dict[
        'detection_classes'][0].astype(np.int64)
    output_dict['detection_boxes'] = output_dict['detection_boxes'][0]
    output_dict['detection_scores'] = output_dict['detection_scores'][0]
    if 'detection_masks' in output_dict:
        output_dict['detection_masks'] = output_dict['detection_masks'][0]
    return output_dict
第 4 部分:整合所有内容以查找人物
最后一步是编写一个函数,该函数接收图像路径,使用 Pillow(图像处理库)打开图像,调用目标检测 API(应用程序接口)接口,并根据检测到的人物的边界框对图像进行裁剪。
import numpy as np
from PIL import Image

PERSON_CLASS = 1
SCORE_THRESHOLD = 0.5

def get_person(image_path, sess):
    img = Image.open(image_path)
    image_np = load_image_into_numpy_array(img)
    image_np_expanded = np.expand_dims(image_np, axis=0)
    output_dict = run_inference_for_single_image(image_np_expanded, sess)

    persons_coordinates = []
    for i in range(len(output_dict["detection_boxes"])):
        score = output_dict["detection_scores"][i]
        classtype = output_dict["detection_classes"][i]
        if score > SCORE_THRESHOLD and classtype == PERSON_CLASS:
            persons_coordinates.append(output_dict["detection_boxes"][i])

    w, h = img.size
    for person_coordinate in persons_coordinates:
        cropped_img = img.crop((
            int(w * person_coordinate[1]),
            int(h * person_coordinate[0]),
            int(w * person_coordinate[3]),
            int(h * person_coordinate[2]),
        ))
        return cropped_img
    return None
第 5 部分:将所有图像移动到相应的分类文件夹中
作为最后一步,我们编写了一个脚本,该脚本遍历“未分类”文件夹中的所有图像,检查其文件名中是否包含编码标签,并在应用之前开发的预处理步骤后,将图像复制到相应的“已分类”文件夹中:
import os
import person_detector
import tensorflow as tf

IMAGE_FOLDER = "./images/unclassified"
POS_FOLDER = "./images/classified/positive"
NEG_FOLDER = "./images/classified/negative"


if __name__ == "__main__":
    detection_graph = person_detector.open_graph()

    images = [f for f in os.listdir(IMAGE_FOLDER) if os.path.isfile(os.path.join(IMAGE_FOLDER, f))]
    positive_images = filter(lambda image: (image.startswith("1_")), images)
    negative_images = filter(lambda image: (image.startswith("0_")), images)

    with detection_graph.as_default():
        with tf.Session() as sess:

            for pos in positive_images:
                old_filename = IMAGE_FOLDER + "/" + pos
                new_filename = POS_FOLDER + "/" + pos[:-5] + ".jpg"
                if not os.path.isfile(new_filename):
                    img = person_detector.get_person(old_filename, sess)
                    if not img:
                        continue
                    img = img.convert('L')
                    img.save(new_filename, "jpeg")

            for neg in negative_images:
                old_filename = IMAGE_FOLDER + "/" + neg
                new_filename = NEG_FOLDER + "/" + neg[:-5] + ".jpg"
                if not os.path.isfile(new_filename):
                    img = person_detector.get_person(old_filename, sess)
                    if not img:
                        continue
                    img = img.convert('L')
                    img.save(new_filename, "jpeg")
每当运行此脚本时,所有带标签的图像都会被处理并移动到“已分类”目录中的相应子文件夹中。
步骤 6:重新训练 inceptionv3 并编写 Classifier(分类器)
对于重新训练部分,我们将直接使用 TensorFlow(TensorFlow 深度学习框架)的 retrain.py 脚本配合 inceptionv3 模型。
在您的项目根目录下调用该脚本,参数如下:
python retrain.py --bottleneck_dir=tf/training_data/bottlenecks --model_dir=tf/training_data/inception --summaries_dir=tf/training_data/summaries/basic --output_graph=tf/training_output/retrained_graph.pb --output_labels=tf/training_output/retrained_labels.txt --image_dir=./images/classified --how_many_training_steps=50000 --testing_percentage=20 --learning_rate=0.001
在 GTX 1080 Ti 上,学习过程大约需要 15 分钟,对于我的标记数据集,最终准确率约为 80%,但这很大程度上取决于您输入数据的质量和标注情况。
训练过程的结果是在 "tf/training_output/retrained_graph.pb" 文件中的重新训练的 inceptionV3 模型。我们现在必须编写一个 Classifier(分类器)类,该类能高效地利用 TensorFlow 图中的新 weights(权重)来进行分类预测。
让我们编写一个 Classifier(分类器)类,它将 graph(计算图)作为 session(会话)打开,并提供一个 "classify" 方法,该方法接收图像文件,返回一个包含与我们 labels(标签)"positive"(正例)和 "negative"(负例)匹配的置信度值的 dict(字典)。
该类接收图的 path(路径)以及标签文件的 path(路径)作为输入,两者都位于我们的 "tf/training_output/" 文件夹中。我们开发了辅助函数,用于将图像文件转换为可以馈送到我们 graph(计算图)中的 tensor(张量),一个用于加载 graph(计算图)和 labels(标签)的辅助函数,以及一个在我们使用完毕后关闭 graph(计算图)的重要小函数。
import numpy as np
import tensorflow as tf

class Classifier():
    def __init__(self, graph, labels):

        self._graph = self.load_graph(graph)
        self._labels = self.load_labels(labels)

        self._input_operation = self._graph.get_operation_by_name("import/Placeholder")
        self._output_operation = self._graph.get_operation_by_name("import/final_result")

        self._session = tf.Session(graph=self._graph)

    def classify(self, file_name):
        t = self.read_tensor_from_image_file(file_name)

        # Open up a new tensorflow session and run it on the input
        results = self._session.run(self._output_operation.outputs[0], {self._input_operation.outputs[0]: t})
        results = np.squeeze(results)

        # Sort the output predictions by prediction accuracy
        top_k = results.argsort()[-5:][::-1]

        result = {}
        for i in top_k:
            result[self._labels[i]] = results[i]

        # Return sorted result tuples
        return result

    def close(self):
        self._session.close()


    @staticmethod
    def load_graph(model_file):
        graph = tf.Graph()
        graph_def = tf.GraphDef()
        with open(model_file, "rb") as f:
            graph_def.ParseFromString(f.read())
        with graph.as_default():
            tf.import_graph_def(graph_def)
        return graph

    @staticmethod
    def load_labels(label_file):
        label = []
        proto_as_ascii_lines = tf.gfile.GFile(label_file).readlines()
        for l in proto_as_ascii_lines:
            label.append(l.rstrip())
        return label

    @staticmethod
    def read_tensor_from_image_file(file_name,
                                    input_height=299,
                                    input_width=299,
                                    input_mean=0,
                                    input_std=255):
        input_name = "file_reader"
        file_reader = tf.read_file(file_name, input_name)
        image_reader = tf.image.decode_jpeg(
            file_reader, channels=3, name="jpeg_reader")
        float_caster = tf.cast(image_reader, tf.float32)
        dims_expander = tf.expand_dims(float_caster, 0)
        resized = tf.image.resize_bilinear(dims_expander, [input_height, input_width])
        normalized = tf.divide(tf.subtract(resized, [input_mean]), [input_std])
        sess = tf.Session()
        result = sess.run(normalized)
        return result
步骤 7:利用这些内容实际自动玩 Tinder
既然我们已经有了 Classifier(分类器),让我们扩展之前提到的 "Person"(人物)类,并为其添加一个 "predict_likeliness"(预测喜好可能性)函数,该函数使用 Classifier(分类器)实例来验证是否应该喜欢给定的人。
# 在 Person 类中

```python
    def predict_likeliness(self, classifier, sess):
        ratings = []
        for image in self.images:
            req = requests.get(image, stream=True)
            tmp_filename = f"./images/tmp/run.jpg"
            if req.status_code == 200:
                with open(tmp_filename, "wb") as f:
                    f.write(req.content)
            img = person_detector.get_person(tmp_filename, sess)
            if img:
                img = img.convert('L')
                img.save(tmp_filename, "jpeg")
                certainty = classifier.classify(tmp_filename)
                pos = certainty["positive"]
                ratings.append(pos)
        ratings.sort(reverse=True)
        ratings = ratings[:5]
        if len(ratings) == 0:
            return 0.001
        return ratings[0]*0.6 + sum(ratings[1:])/len(ratings[1:])*0.4
现在我们需要将所有拼图碎片组合在一起。
首先,让我们使用我们的 API 令牌初始化 Tinder API(应用程序编程接口)。然后,我们使用重新训练的图和标签,将分类 TensorFlow(一种开源机器学习框架)图打开为 TensorFlow 会话。接着,我们获取附近的人并进行 Likelihood(可能性)预测。
作为额外奖励,如果 Tinder 上的人在和我相同的大学就读,我添加了一个 1.2 的 Likelihood(可能性)乘数,这样我更有可能与本地学生匹配。
对于所有预测 Likelihood(可能性)分数为 0.8 的人,我执行“喜欢”操作,对于其他人则执行“不喜欢”操作。
我开发了这个脚本,使其在启动后自动运行接下来的 2 小时。
from likeliness_classifier import Classifier
import person_detector
import tensorflow as tf
from time import time

if __name__ == "__main__":
    token = "YOUR-API-TOKEN"
    api = tinderAPI(token)

    detection_graph = person_detector.open_graph()
    with detection_graph.as_default():
        with tf.Session() as sess:

            classifier = Classifier(graph="./tf/training_output/retrained_graph.pb",
                                    labels="./tf/training_output/retrained_labels.txt")

            end_time = time() + 60*60*2
            while time() < end_time:
                try:
                    persons = api.nearby_persons()
                    pos_schools = ["Universität Zürich", "University of Zurich", "UZH"]

                    for person in persons:
                        score = person.predict_likeliness(classifier, sess)

                        for school in pos_schools:
                            if school in person.schools:
                                print()
                                score *= 1.2

                        print("-------------------------")
                        print("ID: ", person.id)
                        print("Name: ", person.name)
                        print("Schools: ", person.schools)
                        print("Images: ", person.images)
                        print(score)

                        if score > 0.8:
                            res = person.like()
                            print("LIKE")
                        else:
                            res = person.dislike()
                            print("DISLIKE")
                except Exception:
                    pass

    classifier.close()
就是这样!我们现在可以让脚本运行任意长时间,并且在不滥用拇指的情况下玩 Tinder!
如果您有问题或发现了错误,欢迎贡献到我的 Github 仓库。
许可证
MIT 许可证
Copyright (c) 2018 Joel Barmettler
Permission is hereby granted, free of charge, to any person obtaining a copy of this software and associated documentation files (the "Software"), to deal in the Software without restriction, including without limitation the rights to use, copy, modify, merge, publish, distribute, sublicense, and/or sell copies of the Software, and to permit persons to whom the Software is furnished to do so, subject to the following conditions:
The above copyright notice and this permission notice shall be included in all copies or substantial portions of the Software.
THE SOFTWARE IS PROVIDED "AS IS", WITHOUT WARRANTY OF ANY KIND, EXPRESS OR IMPLIED, INCLUDING BUT NOT LIMITED TO THE WARRANTIES OF MERCHANTABILITY, FITNESS FOR A PARTICULAR PURPOSE AND NONINFRINGEMENT. IN NO EVENT SHALL THE AUTHORS OR COPYRIGHT HOLDERS BE LIABLE FOR ANY CLAIM, DAMAGES OR OTHER LIABILITY, WHETHER IN AN ACTION OF CONTRACT, TORT OR OTHERWISE, ARISING FROM, OUT OF OR IN CONNECTION WITH THE SOFTWARE OR THE USE OR OTHER DEALINGS IN THE SOFTWARE.
顺便提一下,我是来自苏黎世的 AI(人工智能)工程师,从事 AI 研究,并在瑞士苏黎世担任 AI 主题演讲嘉宾 和举办 AI 网络研讨会!
常见问题
相似工具推荐
stable-diffusion-webui
stable-diffusion-webui 是一个基于 Gradio 构建的网页版操作界面,旨在让用户能够轻松地在本地运行和使用强大的 Stable Diffusion 图像生成模型。它解决了原始模型依赖命令行、操作门槛高且功能分散的痛点,将复杂的 AI 绘图流程整合进一个直观易用的图形化平台。 无论是希望快速上手的普通创作者、需要精细控制画面细节的设计师,还是想要深入探索模型潜力的开发者与研究人员,都能从中获益。其核心亮点在于极高的功能丰富度:不仅支持文生图、图生图、局部重绘(Inpainting)和外绘(Outpainting)等基础模式,还独创了注意力机制调整、提示词矩阵、负向提示词以及“高清修复”等高级功能。此外,它内置了 GFPGAN 和 CodeFormer 等人脸修复工具,支持多种神经网络放大算法,并允许用户通过插件系统无限扩展能力。即使是显存有限的设备,stable-diffusion-webui 也提供了相应的优化选项,让高质量的 AI 艺术创作变得触手可及。
everything-claude-code
everything-claude-code 是一套专为 AI 编程助手(如 Claude Code、Codex、Cursor 等)打造的高性能优化系统。它不仅仅是一组配置文件,而是一个经过长期实战打磨的完整框架,旨在解决 AI 代理在实际开发中面临的效率低下、记忆丢失、安全隐患及缺乏持续学习能力等核心痛点。 通过引入技能模块化、直觉增强、记忆持久化机制以及内置的安全扫描功能,everything-claude-code 能显著提升 AI 在复杂任务中的表现,帮助开发者构建更稳定、更智能的生产级 AI 代理。其独特的“研究优先”开发理念和针对 Token 消耗的优化策略,使得模型响应更快、成本更低,同时有效防御潜在的攻击向量。 这套工具特别适合软件开发者、AI 研究人员以及希望深度定制 AI 工作流的技术团队使用。无论您是在构建大型代码库,还是需要 AI 协助进行安全审计与自动化测试,everything-claude-code 都能提供强大的底层支持。作为一个曾荣获 Anthropic 黑客大奖的开源项目,它融合了多语言支持与丰富的实战钩子(hooks),让 AI 真正成长为懂上
ComfyUI
ComfyUI 是一款功能强大且高度模块化的视觉 AI 引擎,专为设计和执行复杂的 Stable Diffusion 图像生成流程而打造。它摒弃了传统的代码编写模式,采用直观的节点式流程图界面,让用户通过连接不同的功能模块即可构建个性化的生成管线。 这一设计巧妙解决了高级 AI 绘图工作流配置复杂、灵活性不足的痛点。用户无需具备编程背景,也能自由组合模型、调整参数并实时预览效果,轻松实现从基础文生图到多步骤高清修复等各类复杂任务。ComfyUI 拥有极佳的兼容性,不仅支持 Windows、macOS 和 Linux 全平台,还广泛适配 NVIDIA、AMD、Intel 及苹果 Silicon 等多种硬件架构,并率先支持 SDXL、Flux、SD3 等前沿模型。 无论是希望深入探索算法潜力的研究人员和开发者,还是追求极致创作自由度的设计师与资深 AI 绘画爱好者,ComfyUI 都能提供强大的支持。其独特的模块化架构允许社区不断扩展新功能,使其成为当前最灵活、生态最丰富的开源扩散模型工具之一,帮助用户将创意高效转化为现实。
NextChat
NextChat 是一款轻量且极速的 AI 助手,旨在为用户提供流畅、跨平台的大模型交互体验。它完美解决了用户在多设备间切换时难以保持对话连续性,以及面对众多 AI 模型不知如何统一管理的痛点。无论是日常办公、学习辅助还是创意激发,NextChat 都能让用户随时随地通过网页、iOS、Android、Windows、MacOS 或 Linux 端无缝接入智能服务。 这款工具非常适合普通用户、学生、职场人士以及需要私有化部署的企业团队使用。对于开发者而言,它也提供了便捷的自托管方案,支持一键部署到 Vercel 或 Zeabur 等平台。 NextChat 的核心亮点在于其广泛的模型兼容性,原生支持 Claude、DeepSeek、GPT-4 及 Gemini Pro 等主流大模型,让用户在一个界面即可自由切换不同 AI 能力。此外,它还率先支持 MCP(Model Context Protocol)协议,增强了上下文处理能力。针对企业用户,NextChat 提供专业版解决方案,具备品牌定制、细粒度权限控制、内部知识库整合及安全审计等功能,满足公司对数据隐私和个性化管理的高标准要求。
ML-For-Beginners
ML-For-Beginners 是由微软推出的一套系统化机器学习入门课程,旨在帮助零基础用户轻松掌握经典机器学习知识。这套课程将学习路径规划为 12 周,包含 26 节精炼课程和 52 道配套测验,内容涵盖从基础概念到实际应用的完整流程,有效解决了初学者面对庞大知识体系时无从下手、缺乏结构化指导的痛点。 无论是希望转型的开发者、需要补充算法背景的研究人员,还是对人工智能充满好奇的普通爱好者,都能从中受益。课程不仅提供了清晰的理论讲解,还强调动手实践,让用户在循序渐进中建立扎实的技能基础。其独特的亮点在于强大的多语言支持,通过自动化机制提供了包括简体中文在内的 50 多种语言版本,极大地降低了全球不同背景用户的学习门槛。此外,项目采用开源协作模式,社区活跃且内容持续更新,确保学习者能获取前沿且准确的技术资讯。如果你正寻找一条清晰、友好且专业的机器学习入门之路,ML-For-Beginners 将是理想的起点。
ragflow
RAGFlow 是一款领先的开源检索增强生成(RAG)引擎,旨在为大语言模型构建更精准、可靠的上下文层。它巧妙地将前沿的 RAG 技术与智能体(Agent)能力相结合,不仅支持从各类文档中高效提取知识,还能让模型基于这些知识进行逻辑推理和任务执行。 在大模型应用中,幻觉问题和知识滞后是常见痛点。RAGFlow 通过深度解析复杂文档结构(如表格、图表及混合排版),显著提升了信息检索的准确度,从而有效减少模型“胡编乱造”的现象,确保回答既有据可依又具备时效性。其内置的智能体机制更进一步,使系统不仅能回答问题,还能自主规划步骤解决复杂问题。 这款工具特别适合开发者、企业技术团队以及 AI 研究人员使用。无论是希望快速搭建私有知识库问答系统,还是致力于探索大模型在垂直领域落地的创新者,都能从中受益。RAGFlow 提供了可视化的工作流编排界面和灵活的 API 接口,既降低了非算法背景用户的上手门槛,也满足了专业开发者对系统深度定制的需求。作为基于 Apache 2.0 协议开源的项目,它正成为连接通用大模型与行业专有知识之间的重要桥梁。